IOS 仿時光網選票UI實例代碼
一、項目簡介
該項目利用UIScrollView的各種滾動事件的監聽,仿造時光網選擇電影票的UI而開發的一個自定義View。使用簡單,可擴展性很強。具備點擊每個Item進行選票功能,選票居中功能,滑動時自動選擇距離中間最近的View處於選中狀態,而且對於滑動時松開手的時候是否有初始速度進行了區分處理。案例演示如下:<br/>
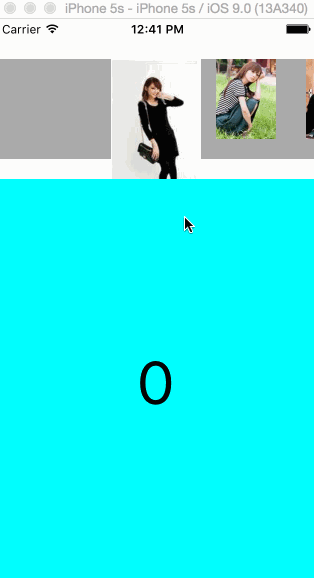
仿時光網選票UI
二、項目講解
1、初始化UIScrollView中每個Item的View,把每個View放到_viewArray數組中,方便接下來的定位和管理。每一個View中包含一個UIImageView,把每一個UIImageView放在_imageViewArray數組中,方便接下來的進行隨著滑動的放大和縮小操作。
-(instancetype)initViewWithImageArray:(NSArray *)imageArray{
if (!imageArray) {
return nil;
}
if (imageArray.count<1) {
return nil;
}

NSInteger totalNum = imageArray.count;
self = [super initWithFrame:CGRectMake(0, 40, SCREEN_WIDTH, 120)];
if (self) {
_scrollview = [[UIScrollView alloc] initWithFrame:self.bounds];
_scrollview.contentSize = CGSizeMake(LEFT_SPACE*2+SELECT_VIEW_WIDTH+(totalNum-1)*NORMAL_VIEW_WIDTH+(totalNum-1)*ITEM_SPACE, 120);
_scrollview.delegate = self;
_scrollview.showsHorizontalScrollIndicator = NO;
_scrollview.decelerationRate = UIScrollViewDecelerationRateFast;
[self addSubview:_scrollview];

UIView *backView = [[UIView alloc] initWithFrame:CGRectMake(-SCREEN_WIDTH, 0, _scrollview.contentSize.width+SCREEN_WIDTH*2, _scrollview.contentSize.height-20)];
backView.backgroundColor = [UIColor lightGrayColor];
[_scrollview addSubview:backView];

_imageViewArray = [NSMutableArray array];
_viewArray = [NSMutableArray array];

CGFloat offsetX = LEFT_SPACE;
for (int i=0; i<totalNum; i++) {

UIView *view = [[UIView alloc] initWithFrame:CGRectMake(offsetX, 0, NORMAL_VIEW_WIDTH, NORMAL_VIEW_HEIGHT)];
[_scrollview addSubview:view];
[_viewArray addObject:view];
offsetX += NORMAL_VIEW_WIDTH+ITEM_SPACE;


CGRect rect;
if (i==0) {
rect = CGRectMake(-(SELECT_VIEW_WIDTH-NORMAL_VIEW_WIDTH)/2, 0, SELECT_VIEW_WIDTH, SELECT_VIEW_HEIGHT);
}else{
rect = CGRectMake(0, 0, NORMAL_VIEW_WIDTH, NORMAL_VIEW_HEIGHT);
}
UIImageView *imageView = [[UIImageView alloc] initWithFrame:rect];
imageView.image = imageArray[i];
imageView.tag = i;
imageView.userInteractionEnabled = YES;
UITapGestureRecognizer *tap = [[UITapGestureRecognizer alloc] initWithTarget:self action:@selector(clickImage:)];
[imageView addGestureRecognizer:tap];
[view addSubview:imageView];
[_imageViewArray addObject:imageView];
}

}
return self;
}
2、在滑動的過程中,我們實時的需要改變計算哪一個Item距離中間最近,在過渡到最中間的過程中,選中的Item距離中間越近,選中Item的frame越大,反則越小。
-(void)scrollViewDidScroll:(UIScrollView *)scrollView{
int currentIndex = scrollView.contentOffset.x/(NORMAL_VIEW_WIDTH+ITEM_SPACE);
if (currentIndex>_imageViewArray.count-2||currentIndex<0) {
return;
}
int rightIndex = currentIndex+1;
UIImageView *currentImageView = _imageViewArray[currentIndex];
UIImageView *rightImageView = _imageViewArray[rightIndex];


CGFloat scale = (scrollView.contentOffset.x-currentIndex*(NORMAL_VIEW_WIDTH+ITEM_SPACE))/(NORMAL_VIEW_WIDTH+ITEM_SPACE);

//NSLog(@"%f",scale);

CGFloat width = SELECT_VIEW_WIDTH-scale*(SELECT_VIEW_WIDTH-NORMAL_VIEW_WIDTH);
CGFloat height = SELECT_VIEW_HEIGHT-scale*(SELECT_VIEW_HEIGHT-NORMAL_VIEW_HEIGHT);
if (width<NORMAL_VIEW_WIDTH) {
width = NORMAL_VIEW_WIDTH;
}
if (height<NORMAL_VIEW_HEIGHT) {
height = NORMAL_VIEW_HEIGHT;
}
if (width>SELECT_VIEW_WIDTH) {
width = SELECT_VIEW_WIDTH;
}
if (height>SELECT_VIEW_HEIGHT) {
height = SELECT_VIEW_HEIGHT;
}
CGRect rect = CGRectMake(-(width-NORMAL_VIEW_WIDTH)/2, 0, width, height);
currentImageView.frame = rect;

width = NORMAL_VIEW_WIDTH+scale*(SELECT_VIEW_WIDTH-NORMAL_VIEW_WIDTH);
height = NORMAL_VIEW_HEIGHT+scale*(SELECT_VIEW_HEIGHT-NORMAL_VIEW_HEIGHT);
if (width<NORMAL_VIEW_WIDTH) {
width = NORMAL_VIEW_WIDTH;
}
if (height<NORMAL_VIEW_HEIGHT) {
height = NORMAL_VIEW_HEIGHT;
}
if (width>SELECT_VIEW_WIDTH) {
width = SELECT_VIEW_WIDTH;
}
if (height>SELECT_VIEW_HEIGHT) {
height = SELECT_VIEW_HEIGHT;
}
rect = CGRectMake(-(width-NORMAL_VIEW_WIDTH)/2, 0, width, height);
NSLog(@"%@",NSStringFromCGRect(rect));
rightImageView.frame = rect;
}
3、點擊某一個Item,讓Item處於中間選中狀態。
-(void)clickImage:(UITapGestureRecognizer *)tap{
UIImageView *imageView = (UIImageView *)tap.view;
NSInteger tag = imageView.tag;

UIView *containerView = _viewArray[tag];

CGFloat offsetX = CGRectGetMidX(containerView.frame)-SCREEN_WIDTH/2;


[_scrollview scrollRectToVisible:CGRectMake(offsetX, 0, SCREEN_WIDTH, 120) animated:YES];

if (_delegate && [_delegate respondsToSelector:@selector(itemSelected:)]) {
[_delegate itemSelected:tag];
}

}
4、當用戶在滑動結束,並具有初始速度的時候,當滑動停止的時候,我們需要把距離中間最近Item定位到最中間。
-(void)scrollViewDidEndDecelerating:(UIScrollView *)scrollView{
int currentIndex = roundf(scrollView.contentOffset.x/(NORMAL_VIEW_WIDTH+ITEM_SPACE));
UIView *containerView = _viewArray[currentIndex];
CGFloat offsetX = CGRectGetMidX(containerView.frame)-SCREEN_WIDTH/2;
[_scrollview scrollRectToVisible:CGRectMake(offsetX, 0, SCREEN_WIDTH, 120) animated:YES];
if (_delegate && [_delegate respondsToSelector:@selector(itemSelected:)]) {
[_delegate itemSelected:currentIndex];
}
}
5、當用戶在滑動結束的時候,但是沒有初始速度的時候,此時不會觸發-(void)scrollViewDidEndDecelerating:(UIScrollView )scrollView方法,我們需要在-(void)scrollViewDidEndDragging:(UIScrollView )scrollView willDecelerate:(BOOL)decelerate方法中,進行處理。
-(void)scrollViewDidEndDragging:(UIScrollView *)scrollView willDecelerate:(BOOL)decelerate{
if (!decelerate) {
int currentIndex = roundf(scrollView.contentOffset.x/(NORMAL_VIEW_WIDTH+ITEM_SPACE));
UIView *containerView = _viewArray[currentIndex];
CGFloat offsetX = CGRectGetMidX(containerView.frame)-SCREEN_WIDTH/2;
[_scrollview scrollRectToVisible:CGRectMake(offsetX, 0, SCREEN_WIDTH, 120) animated:YES];
if (_delegate && [_delegate respondsToSelector:@selector(itemSelected:)]) {
[_delegate itemSelected:currentIndex];
}
}
}
6、注意點,設置_scrollview.decelerationRate = UIScrollViewDecelerationRateFast;減慢UIScrollView滑動速度。會使用戶體驗更好。
三、項目使用
1、本項目支持CocosPod,引用工程代碼如下:
pod 'YXFilmSelectView', '~> 0.0.1'
2、使用方法
YXFilmSelectView *filmSelectView = [[YXFilmSelectView alloc] initViewWithImageArray:imageArray];
filmSelectView.delegate = self;
[self.view addSubview:filmSelectView];
3、提供YXFilmSelectViewDelegate代理,用於每一個Item處於選中狀態的處理。
- (void)itemSelected:(NSInteger)index{
_containerView.backgroundColor = _colorArray[index%_colorArray.count];
_showLabel.text = [NSString stringWithFormat:@"%zi",index];
}
四、Demo下載地址
Demo下載地址
以上就是IOS 仿時光網選票UI實例,有需要的朋友可以參考下,謝謝大家對本站的支持!
- 上一頁:iOS如何保持程序在後台長時間運行
- 下一頁:iOS消息遠程推送通知