iOS簡單登錄LoginViewController、注冊RegisterViewController等功能實現方法
編輯:IOS開發綜合
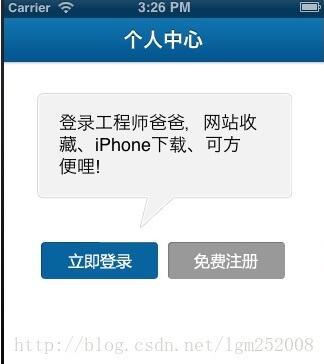
一、個人中心未登錄
方法:
加判斷登錄狀態直接打開個人中心頁面4,否則出現上面引導登錄或注冊入口顯示
代碼如下:
#pragma mark addView
- (void)addView
{
 //背景圖
 [self.view setBackgroundColor:[UIColor whiteColor]];
 UIImageView *loginImgTips = [[UIImageView alloc] initWithImage:[UIImage imageNamed:@"login_tips.png"]];
 loginImgTips.frame = CGRectMake(33, 31, 255, 135);
 [self.view addSubview:loginImgTips];
 [loginImgTips release];

 //登錄、注冊提示
 UILabel *loginLab = [[UILabel alloc] initWithFrame:CGRectMake(55, 43, 199, 80)];
 [loginLab setText:@"登錄工程師爸爸,網站收藏、iPhone下載、可方便哩!"];
 [loginLab setTextColor:[UIColor blackColor]];
 [loginLab setBackgroundColor:[UIColor clearColor]];
 [loginLab setNumberOfLines:3];
 [loginLab setFont:[UIFont systemFontOfSize:18]];
 [self.view addSubview:loginLab];
 [loginLab release];

 //登錄
 UIButton *loginBtn = [[UIButton alloc] initWithFrame:CGRectMake(37, 180, 117, 37)];
 [loginBtn setBackgroundImage:[UIImage imageNamed:@"Button_login.png"] forState:UIControlStateNormal];
 [loginBtn setBackgroundImage:[UIImage imageNamed:@"[email protected]"] forState:UIControlStateHighlighted];
 [loginBtn addTarget:self action:@selector(btnClick:) forControlEvents:UIControlEventTouchUpInside];
 [loginBtn setTag:101];
 [self.view addSubview:loginBtn];
 [loginBtn release];

 //注冊
 UIButton *registerBtn = [[UIButton alloc] initWithFrame:CGRectMake(164, 180, 117, 37)];
 [registerBtn setBackgroundImage:[UIImage imageNamed:@"Button_reg.png"] forState:UIControlStateNormal];
 [registerBtn setBackgroundImage:[UIImage imageNamed:@"[email protected]"] forState:UIControlStateHighlighted];
 [registerBtn addTarget:self action:@selector(btnClick:) forControlEvents:UIControlEventTouchUpInside];
 [registerBtn setTag:102];
 [self.view addSubview:registerBtn];
 [registerBtn release];
}
二、登錄
頂部導航代碼:
#pragma mark addNavBar
-(void) addNavBar
{
 //返回按鈕
 UIButton *btnLeft = [[UIButton alloc] initWithFrame:CGRectMake(0, 0, 24, 24)];
 [btnLeft setBackgroundImage:[UIImage imageNamed:@"item_back.png"] forState:UIControlStateNormal];
 [btnLeft setBackgroundImage:[UIImage imageNamed:@"[email protected]"] forState:UIControlStateHighlighted];
 [btnLeft setTag:101];
 [btnLeft.titleLabel setFont:[UIFont boldSystemFontOfSize:14]];
 [btnLeft addTarget:self action:@selector(btnClick:) forControlEvents:UIControlEventTouchUpInside];
 UIBarButtonItem *navBarBack = [[UIBarButtonItem alloc] initWithCustomView:btnLeft];
 [btnLeft release];

 [self.navigationItem setLeftBarButtonItem:navBarBack];
 [navBarBack release];

 //右側完成
 UIBarButtonItem *navBarFinish = [[UIBarButtonItem alloc] initWithTitle:@"注冊" style:UIBarButtonItemStyleDone target:self action:@selector(btnClick:)];
 navBarFinish.tag = 102;
 self.navigationItem.rightBarButtonItem = navBarFinish;
 [navBarFinish release];
}
登錄界面代碼實現如下:
#pragma mark addView
//創建輸入框
- (void)addInput
{
 //基本參數定義
 CGFloat padx = 80.0f;
 _vFrame = CGRectMake(10, 14, 300, 80);
 UIFont *lpFont = [UIFont boldSystemFontOfSize:16];

 //郵箱和密碼背景顏色設置
 _view = [[UIView alloc] initWithFrame:_vFrame];
 _view.layer.cornerRadius = 8.0;
 _view.layer.borderWidth = 1;
 _view.layer.borderColor = [UIColor colorWithRed:209.0f/255.0f green:209.0f/255.0f blue:209.0f/255.0f alpha:1.0f].CGColor;
 [_view setBackgroundColor:[UIColor colorWithRed:247.0f/255.0f green:247.0f/255.0f blue:247.0f/255.0f alpha:1.0f]];
 [self.view addSubview:_view];
 [_view release];

 //郵箱與密碼中間分割線
 UIView *line = [[UIView alloc] initWithFrame:CGRectMake(10, 55, 300, 1)];
 [line setBackgroundColor:[UIColor colorWithRed:209.0f/255.0f green:209.0f/255.0f blue:209.0f/255.0f alpha:1.0f]];
 [self.view addSubview:line];
 [line release];

 //用戶名或Email
 UIImageView * _eview = [[UIImageView alloc] initWithFrame:CGRectMake(0, 0, 250, 40)];
 [_eview setUserInteractionEnabled:YES];
 [_view addSubview:_eview];
 [_eview release];

 UILabel *_unameLab = [[UILabel alloc] initWithFrame:CGRectMake(20, 5, 55, 40)];
 [_unameLab setText:@"用戶名"];
 _unameLab.highlighted = YES;
 _unameLab.highlightedTextColor = [UIColor blackColor];
 [_unameLab setFont:lpFont];
 [_unameLab setBackgroundColor:[UIColor clearColor]];
 [_unameLab setTextColor:[UIColor blackColor]];
 [_view addSubview:_unameLab];
 [_unameLab release];

 //用戶郵箱
 _email = [[UITextField alloc] initWithFrame:CGRectMake(padx, 15, 200, 40)];
 [_email setBackgroundColor:[UIColor clearColor]];
 [_email setKeyboardType:UIKeyboardTypeEmailAddress];
 [_email setTextColor:[UIColor grayColor]];
 //[_email setClearButtonMode:UITextFieldViewModeWhileEditing]; //編輯時會出現個修改X
 [_email setTag:101];
 [_email setReturnKeyType:UIReturnKeyNext]; //鍵盤下一步Next
 [_email setAutocapitalizationType:UITextAutocapitalizationTypeNone]; //關閉首字母大寫
 [_email setAutocorrectionType:UITextAutocorrectionTypeNo];
 [_email becomeFirstResponder]; //默認打開鍵盤
 [_email setFont:[UIFont systemFontOfSize:17]];
 [_email setDelegate:self];
 [_email setPlaceholder:@"用戶名或電子郵箱"];
 [_email setText:@""];
 [_email setHighlighted:YES];
 [_eview addSubview:_email];

 //密碼
 UILabel *_passwdLab = [[UILabel alloc] initWithFrame:CGRectMake(20, 43, 45, 40)];
 [_passwdLab setText:@"密 碼"];
 [_passwdLab setFont:lpFont];
 _passwdLab.highlighted = YES;
 _passwdLab.highlightedTextColor = [UIColor blackColor];
 [_passwdLab setBackgroundColor:[UIColor clearColor]];
 [_passwdLab setTextColor:[UIColor blackColor]];
 [_view addSubview:_passwdLab];
 [_passwdLab release];

 _passwd = [[UITextField alloc] initWithFrame:CGRectMake(padx, 53, 200, 40)];
 [_passwd setBackgroundColor:[UIColor clearColor]];
 [_passwd setKeyboardType:UIKeyboardTypeDefault];
 [_passwd setBorderStyle:UITextBorderStyleNone];
 [_passwd setAutocapitalizationType:UITextAutocapitalizationTypeNone]; //關閉首字母大寫
 [_passwd setReturnKeyType:UIReturnKeyDone]; //完成
 [_passwd setSecureTextEntry:YES]; //驗證
 [_passwd setDelegate:self];
 [_passwd setTag:102];
 [_passwd setTextColor:[UIColor grayColor]];
 [_passwd setFont:lpFont];
 [_passwd setText:@""
 [_view addSubview:_passwd];
}
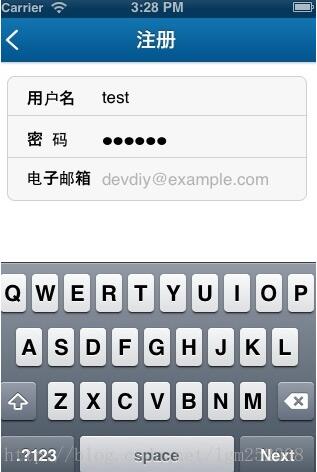
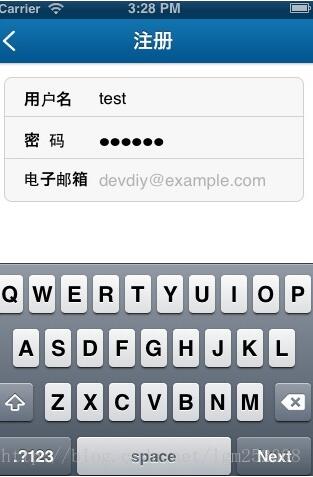
三、注冊

頂部導航控制,代碼實現如下:
- (void)addNavBar
{
 if (_step == 1) {
 [self setXDNav:YES];

 //返回按鈕
 UIButton *btnLeft = [[UIButton alloc] initWithFrame:CGRectMake(0, 0, 24, 24)];
 [btnLeft setBackgroundImage:[UIImage imageNamed:@"item_back.png"] forState:UIControlStateNormal];
 [btnLeft setBackgroundImage:[UIImage imageNamed:@"[email protected]"] forState:UIControlStateHighlighted];
 [btnLeft setTag:101];
 [btnLeft.titleLabel setFont:[UIFont boldSystemFontOfSize:14]];
 [btnLeft addTarget:self action:@selector(btnClick:) forControlEvents:UIControlEventTouchUpInside];
 UIBarButtonItem *navBarBack = [[UIBarButtonItem alloc] initWithCustomView:btnLeft];
 [btnLeft release];
 [self.navigationItem setLeftBarButtonItem:navBarBack];
 [navBarBack release];

 //設標題
 [self setXDTitle:@"注冊" pageName:@""];

 //添加返回按鈕

 [self addInputOne]; //注冊第一步
 }else{
 [self setXDTitle:@"寶貝信息設置" pageName:@""];

 //返回按鈕
 UIButton *btnLeft = [[UIButton alloc] initWithFrame:CGRectMake(0, 0, 24, 24)];
 [btnLeft setBackgroundImage:[UIImage imageNamed:@"item_back.png"] forState:UIControlStateNormal];
 [btnLeft setBackgroundImage:[UIImage imageNamed:@"[email protected]"] forState:UIControlStateHighlighted];
 [btnLeft setTag:101];
 [btnLeft.titleLabel setFont:[UIFont boldSystemFontOfSize:14]];
 [btnLeft addTarget:self action:@selector(btnClick:) forControlEvents:UIControlEventTouchUpInside];
 UIBarButtonItem *navBarBack = [[UIBarButtonItem alloc] initWithCustomView:btnLeft];
 [btnLeft release];

 [self.navigationItem setLeftBarButtonItem:navBarBack];
 [navBarBack release];

 //右側完成
 UIBarButtonItem *navBarFinish = [[UIBarButtonItem alloc] initWithTitle:@"完成" style:UIBarButtonItemStyleDone target:self action:@selector(btnClick:)];
 navBarFinish.tag = 102;
 //[_navBarFinish addTarget:self action:@selector(btnClick:) forControlEvents:UIControlEventTouchUpInside];
 self.navigationItem.rightBarButtonItem = navBarFinish;
 [navBarFinish release];
 [self addInputTow];
 }
}
注冊分兩步:
第一步基本信息注冊,代碼如下
//創建輸入框
- (void)addInputOne
{
 //基本參數定義
 CGFloat padx = 95.0f;
 _vFrame = CGRectMake(10, 14, 300, 125);
 UIFont *lpFont = [UIFont boldSystemFontOfSize:16];

 //郵箱和密碼背景顏色設置
 _view = [[UIView alloc] initWithFrame:_vFrame];
 _view.layer.cornerRadius = 8.0;
 _view.layer.borderWidth = 1;
 _view.layer.borderColor = [UIColor colorWithRed:209.0f/255.0f green:209.0f/255.0f blue:209.0f/255.0f alpha:1.0f].CGColor;
 [_view setBackgroundColor:[UIColor colorWithRed:247.0f/255.0f green:247.0f/255.0f blue:247.0f/255.0f alpha:1.0f]];
 [self.view addSubview:_view];
 [_view release];

 //用戶名與密碼中間分割線
 UIView *lineOne = [[UIView alloc] initWithFrame:CGRectMake(10, 53, 300, 1)];
 [lineOne setBackgroundColor:[UIColor colorWithRed:209.0f/255.0f green:209.0f/255.0f blue:209.0f/255.0f alpha:1.0f]];
 [self.view addSubview:lineOne];
 [lineOne release];

 //用戶名
 UILabel *_unameLab = [[UILabel alloc] initWithFrame:CGRectMake(20, 2, 55, 40)];
 [_unameLab setText:@"用戶名"];
 _unameLab.highlighted = YES;
 _unameLab.highlightedTextColor = [UIColor blackColor];
 [_unameLab setFont:lpFont];
 [_unameLab setBackgroundColor:[UIColor clearColor]];
 [_unameLab setTextColor:[UIColor blackColor]];
 [_view addSubview:_unameLab];
 [_unameLab release];

 _uname = [[UITextField alloc] initWithFrame:CGRectMake(padx, 10, 230, 40)];
 [_uname setBackgroundColor:[UIColor clearColor]];
 [_uname setTag:101];
 [_uname setUserInteractionEnabled:YES];
 [_uname setKeyboardType:UIKeyboardTypeDefault];
 [_uname setReturnKeyType:UIReturnKeyNext]; //鍵盤下一步Next
 [_uname setAutocapitalizationType:UITextAutocapitalizationTypeNone]; //關閉首字母大寫
 [_uname setAutocorrectionType:UITextAutocorrectionTypeNo];
 [_uname setReturnKeyType:UIReturnKeyNext]; //下一個Passwd
 [_uname becomeFirstResponder]; //默認打開鍵盤
 [_uname setFont:[UIFont systemFontOfSize:17]];
 [_uname setDelegate:self];
 [_uname setText:@""];
 [_uname setHighlighted:YES];
 [_view addSubview:_uname];

 //密碼
 UILabel *_passwdLab = [[UILabel alloc] initWithFrame:CGRectMake(20, 43, 45, 40)];
 [_passwdLab setText:@"密 碼"];
 [_passwdLab setFont:lpFont];
 _passwdLab.highlighted = YES;
 _passwdLab.highlightedTextColor = [UIColor blackColor];
 [_passwdLab setBackgroundColor:[UIColor clearColor]];
 [_passwdLab setTextColor:[UIColor blackColor]];
 [_view addSubview:_passwdLab];
 [_passwdLab release];

 _passwd = [[UITextField alloc] initWithFrame:CGRectMake(padx, 53, 200, 40)];
 [_passwd setBackgroundColor:[UIColor clearColor]];
 [_passwd setKeyboardType:UIKeyboardTypeDefault];
 [_passwd setBorderStyle:UITextBorderStyleNone];
 [_passwd setAutocapitalizationType:UITextAutocapitalizationTypeNone]; //關閉首字母大寫
 [_passwd setReturnKeyType:UIReturnKeyNext]; //下一個Email
 [_passwd setSecureTextEntry:YES]; //驗證
 [_passwd setDelegate:self];
 [_passwd setTag:102];
 [_passwd setTextColor:[UIColor grayColor]];
 [_passwd setFont:lpFont];
 [_passwd setText:@""];
 [_view addSubview:_passwd];

 //郵箱與密碼中間分割線
 UIView *lineTow = [[UIView alloc] initWithFrame:CGRectMake(10, 95, 300, 1)];
 [lineTow setBackgroundColor:[UIColor colorWithRed:209.0f/255.0f green:209.0f/255.0f blue:209.0f/255.0f alpha:1.0f]];
 [self.view addSubview:lineTow];
 [lineTow release];

 //用戶郵箱
 UILabel *_emailLab = [[UILabel alloc] initWithFrame:CGRectMake(20, 82, 280, 40)];
 [_emailLab setText:@"電子郵箱"];
 _emailLab.highlighted = YES;
 _emailLab.highlightedTextColor = [UIColor blackColor];
 [_emailLab setFont:lpFont];
 [_emailLab setBackgroundColor:[UIColor clearColor]];
 [_emailLab setTextColor:[UIColor blackColor]];
 [_view addSubview:_emailLab];
 [_emailLab release];

 _email = [[UITextField alloc] initWithFrame:CGRectMake(padx, 92, 200, 40)];
 [_email setBackgroundColor:[UIColor clearColor]];
 [_email setKeyboardType:UIKeyboardTypeEmailAddress];
 [_email setTextColor:[UIColor grayColor]];
 [_email setTag:103];
 [_email setReturnKeyType:UIReturnKeyDone]; //鍵盤下一步Next
 [_email setAutocapitalizationType:UITextAutocapitalizationTypeNone]; //關閉首字母大寫
 [_email setAutocorrectionType:UITextAutocorrectionTypeNo];
 [_email setFont:[UIFont systemFontOfSize:17]];
 [_email setDelegate:self];
 [_email setPlaceholder:@"[email protected]"];
 [_email setText:@""];
 [_email setHighlighted:YES];
 [_view addSubview:_email];
}
第二步完善資源輸入,代碼實現如下:
//創建輸入框
- (void)addInputTow
{
 //基本參數定義
 CGFloat padx = 100.0f;
 _vFrame = CGRectMake(10, 10, 300, 125);
 UIFont *lpFont = [UIFont boldSystemFontOfSize:16];

 //寶貝小名、寶貝性別、寶貝生日背景顏色設置
 _view = [[UIView alloc] initWithFrame:_vFrame];
 _view.layer.cornerRadius = 8.0;
 _view.layer.borderWidth = 1;
 _view.layer.borderColor = [UIColor colorWithRed:209.0f/255.0f green:209.0f/255.0f blue:209.0f/255.0f alpha:1.0f].CGColor;
 [_view setBackgroundColor:[UIColor colorWithRed:247.0f/255.0f green:247.0f/255.0f blue:247.0f/255.0f alpha:1.0f]];
 [self.view addSubview:_view];
 [_view release];

 //寶貝小名和寶貝性別分割線
 UIView *lineOne = [[UIView alloc] initWithFrame:CGRectMake(10, 10, 300, 1)];
 [lineOne setBackgroundColor:[UIColor colorWithRed:209.0f/255.0f green:209.0f/255.0f blue:209.0f/255.0f alpha:1.0f]];
 [self.view addSubview:lineOne];
 [lineOne release];

 //寶貝小名
 UILabel *_nicknameLab = [[UILabel alloc] initWithFrame:CGRectMake(20, 2, 75, 40)];
 [_nicknameLab setText:@"寶貝小名"];
 _nicknameLab.highlighted = YES;
 _nicknameLab.highlightedTextColor = [UIColor blackColor];
 [_nicknameLab setFont:lpFont];
 [_nicknameLab setBackgroundColor:[UIColor clearColor]];
 [_nicknameLab setTextColor:[UIColor blackColor]];
 [_view addSubview:_nicknameLab];
 [_nicknameLab release];

 _nickname = [[UITextField alloc] initWithFrame:CGRectMake(padx, 13, 180, 40)];
 [_nickname setBackgroundColor:[UIColor clearColor]];
 [_nickname setTag:101];
 [_nickname setUserInteractionEnabled:YES];
 [_nickname setKeyboardType:UIKeyboardTypeDefault];
 [_nickname setReturnKeyType:UIReturnKeyNext]; //鍵盤下一步Next
 [_nickname setAutocapitalizationType:UITextAutocapitalizationTypeNone]; //關閉首字母大寫
 [_nickname setAutocorrectionType:UITextAutocorrectionTypeNo];
 [_nickname setReturnKeyType:UIReturnKeyNext]; //下一個寶貝性別
 [_nickname becomeFirstResponder]; //默認打開鍵盤
 [_nickname setFont:[UIFont systemFontOfSize:17]];
 [_nickname setDelegate:self];
 [_nickname setText:@""];
 [_nickname setHighlighted:YES];
 [_view addSubview:_nickname];

 //寶貝性別
 UILabel *_sexLab = [[UILabel alloc] initWithFrame:CGRectMake(20, 35, 75, 50)];
 [_sexLab setText:@"寶貝性別"];
 [_sexLab setFont:lpFont];
 _sexLab.highlighted = YES;
 _sexLab.highlightedTextColor = [UIColor blackColor];
 [_sexLab setBackgroundColor:[UIColor clearColor]];
 [_sexLab setTextColor:[UIColor blackColor]];
 [_view addSubview:_sexLab];
 [_sexLab release];

 _segment = [[UISegmentedControl alloc] initWithItems:
     [NSArray arrayWithObjects:
     @"男",@"女",
     nil]];
 _segment.frame = CGRectMake(padx+10, 56, 130, 32);
 _segment.segmentedControlStyle = UISegmentedControlStylePlain;
 _segment.selectedSegmentIndex = 1;
 [self.view addSubview:_segment];
 [_segment release];

 //寶貝性別與寶貝生日中間分割線
 UIView *lineTow = [[UIView alloc] initWithFrame:CGRectMake(10, 93, 300, 1)];
 [lineTow setBackgroundColor:[UIColor colorWithRed:209.0f/255.0f green:209.0f/255.0f blue:209.0f/255.0f alpha:1.0f]];
 [self.view addSubview:lineTow];
 [lineTow release];

 //寶貝生日
 UILabel *_birthLab = [[UILabel alloc] initWithFrame:CGRectMake(30, 96, 75, 40)];
 [_birthLab setText:@"寶貝生日"];
 _birthLab.highlighted = YES;
 _birthLab.highlightedTextColor = [UIColor blackColor];
 [_birthLab setFont:lpFont];
 [_birthLab setBackgroundColor:[UIColor clearColor]];
 [_birthLab setTextColor:[UIColor blackColor]];
 [self.view addSubview:_birthLab];
 [_birthLab release];

 _birthDay = [[UIButton alloc] initWithFrame:CGRectMake(57, 96, 200, 40)];
 [_birthDay setBackgroundColor:[UIColor clearColor]];
 [_birthDay setTitleColor:[UIColor blackColor] forState:UIControlStateNormal];
 [_birthDay setTitle:@"2004-10-09" forState:UIControlStateNormal];
 [_birthDay setTag:104];
 [_birthDay addTarget:self action:@selector(openBirthday) forControlEvents:UIControlEventTouchUpInside];
 [_birthDay setHighlighted:YES];
 [self.view addSubview:_birthDay];

 //寶貝信息提示
 UILabel *_babyNote = [[UILabel alloc] initWithFrame:CGRectMake(45, 131, 300, 40)];
 [_babyNote setBackgroundColor:[UIColor clearColor]];
 [_babyNote setTextColor:[UIColor colorWithRed:83.0f/255.0f green:92.0f/255.0f blue:112.0f/255.0f alpha:1.0f]];
 [_babyNote setTag:104];
 [_babyNote setFont:[UIFont systemFontOfSize:14]];
 [_babyNote setText:@"推薦引擎會根據孩子信息進行個性推薦"];
 [_babyNote setHighlighted:YES];
 [self.view addSubview:_babyNote];
 [_babyNote release];

 //初始日期選擇控件
 _datePicker = [[UIDatePicker alloc] initWithFrame:CGRectMake(0.0, 200.0, 0.0, 0.0)];
 NSDateFormatter *dateFormatter = [[NSDateFormatter alloc] init];
 [dateFormatter setDateFormat:@"yyyy-MM-dd"];

 //將當前生日時間設置到日期輪軸上
 _datePicker.date = [dateFormatter dateFromString:_birthDay.titleLabel.text];

 //設置為中文顯示
 NSLocale *locale = [[NSLocale alloc] initWithLocaleIdentifier:@"zh_CN"];
 _datePicker.locale = locale;
 [locale release];
 [_datePicker setDatePickerMode:UIDatePickerModeDate];

 [_datePicker addTarget:self action:@selector(dataValueChanged) forControlEvents:UIControlEventValueChanged];
 [self.view addSubview:_datePicker];
}
四、注冊,登錄成功後直接進入個人中心頁
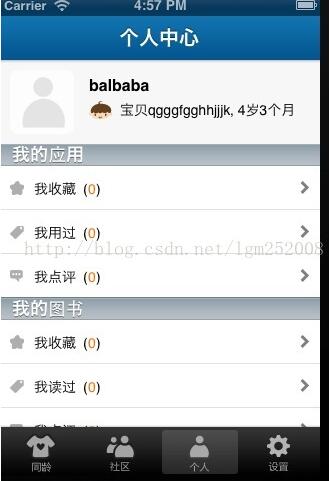
頂部界面代碼實現如下:
#pragma mark addHeadView
- (void)addHeadView
{
 //頭像背景設置
 UIView *headView = [[UIView alloc] initWithFrame:CGRectMake(0, 0, 320, 84)];
 [headView setBackgroundColor:[UIColor colorWithRed:247.0f/255.0f green:247.0f/255.0f blue:247.0f/255.0f alpha:1.0f]];

 //按鈕方式添加左側用頭像
 UIButton *headBtn = [[UIButton alloc] initWithFrame:CGRectMake(10, 10, 64, 64)];
 [headBtn setBackgroundImage:[UIImage imageNamed:@"Baby_head.png"] forState:UIControlStateNormal];
 headBtn.layer.cornerRadius = 8.0;
 headBtn.layer.masksToBounds = YES;
 [headView addSubview:headBtn];
 [headBtn release];
 [self.view addSubview:headView];

 //用戶名
 UILabel *unameLab = [[UILabel alloc] initWithFrame:CGRectMake(89, 15, 200, 20)];
 [unameLab setText:@"balbaba"];
 [unameLab setTextColor:[UIColor blackColor]];
 [unameLab setFont:[UIFont boldSystemFontOfSize:16]];
 [unameLab setBackgroundColor:[UIColor clearColor]];
 [headView addSubview:unameLab];

 //寶貝頭像小圖
 UIImageView *iconView = [[UIImageView alloc] initWithFrame:CGRectMake(89, 38, 24, 24)];
 [iconView setImage:[UIImage imageNamed:@"Baby_gender_boy.png"]];
 [headView addSubview:iconView];

 //寶貝昵稱
 UILabel *nicknameLab = [[UILabel alloc] initWithFrame:CGRectMake(120, 40, 120, 20)];
 [nicknameLab setText:@"寶貝qgggfgghhjjjk"];
 [nicknameLab setTextColor:[UIColor blackColor]];
 [nicknameLab setFont:[UIFont systemFontOfSize:14]];
 [nicknameLab setBackgroundColor:[UIColor clearColor]];
 [headView addSubview:nicknameLab];

 //寶貝生日
 UILabel *birthDayLab = [[UILabel alloc] initWithFrame:CGRectMake(230, 40, 80, 20)];
 [birthDayLab setText:@", 4歲3個月"];
 [birthDayLab setTextColor:[UIColor blackColor]];
 [birthDayLab setFont:[UIFont systemFontOfSize:14]];
 [birthDayLab setBackgroundColor:[UIColor clearColor]];
 [headView addSubview:birthDayLab];

 [headView release];
}
分段表格視圖實現代碼如下:
#pragma mark addTableView
- (void)addTableView
{
 _tableView = [[UITableView alloc] initWithFrame:CGRectMake(0, 84, 320, 416) style:UITableViewStylePlain];
 [_tableView setDelegate:self];
 [_tableView setDataSource:self];

 //清除分隔線
 //_tableView.separatorStyle = UITableViewCellSeparatorStyleNone;
 [self.view addSubview:_tableView];
}

//代理-每個行的Cell
- (UITableViewCell *)tableView:(UITableView *)tableView cellForRowAtIndexPath:(NSIndexPath *)indexPath
{

 NSString *iden = [NSString stringWithFormat:@"_ucenterCell_%d", 1];

 UcenterCell *cell = [tableView dequeueReusableCellWithIdentifier:iden];

 if (cell == nil) {
 cell = [[[UcenterCell alloc] initWithStyle:UITableViewCellStyleDefault reuseIdentifier:iden] autorelease];
 }

 //cell.selectionStyle = UITableViewCellSelectionStyleNone;
 cell.accessoryType = UITableViewCellAccessoryDisclosureIndicator;

 NSDictionary *dic = [[[_dataList objectAtIndex:indexPath.section] objectForKey:@"subs"] objectAtIndex:indexPath.row];
 [cell setValueForDictionary:dic];

 return cell;
}

//多少個段
- (NSInteger)numberOfSectionsInTableView:(UITableView *)tableView
{
 return [_dataList count];
}

//段的高度
-(CGFloat)tableView:(UITableView *)tableView heightForHeaderInSection:(NSInteger)section
{
 return 22;
}

//設置每段顯示Title
- (NSString *)tableView:(UITableView *)tableView titleForHeaderInSection:(NSInteger)section
{
 return [[[[_dataList objectAtIndex:section] objectForKey:@"subs"] objectAtIndex:0] objectForKey:@"section"];
}

//代理-每段有多少行
- (NSInteger)tableView:(UITableView *)tableView numberOfRowsInSection:(NSInteger)section
{
 return [[[_dataList objectAtIndex:section] objectForKey:@"subs"] count];
}

//代理-計算每個行的高度
- (CGFloat)tableView:(UITableView *)tableView heightForRowAtIndexPath:(NSIndexPath *)indexPath
{
 return 44.0f;
}

//代理-選擇行的觸發事件
- (void)tableView:(UITableView *)tableView didSelectRowAtIndexPath:(NSIndexPath *)indexPath
{
 [tableView deselectRowAtIndexPath:indexPath animated:YES];

 //點擊推出頁面
 DetailViewController *rvc = [[DetailViewController alloc] init];
 [self.navigationController pushViewController:rvc animated:YES];
 [rvc release];
}
注:
1、注冊、登錄功能主要是鍛練對鍵盤和輸入框UITextField、UISegment及UIPickerView的熟練使用
2、在注冊、登錄時頂部導航左、中、右相關的"返回" 、"注冊"、"完成"等按鈕盡量直接使用系統的的類似下面代碼
 [self.navigationItem setLeftBarButtonItem:navBarBack];
 self.navigationItem.rightBarButtonItem = navBarFinish;
 [self.navigationItem.titleView addSubview:segment];
在各個ViewController之間切換和控制。
至此完整的用戶注冊、登錄、進入中心頁界面實現就完成了,結合上面的代碼實現其它IOS項目App應用的功能和流程上大同小異,需要我們自己根據實際產品業務的要求
做出調整,希望對網友有幫助。
以上就是本文的全部內容,希望對大家的學習有所幫助,也希望大家多多支持本站。

相關文章
+