iOS開發系列--地圖與定位源代碼詳解
概覽
現在很多社交、電商、團購應用都引入了地圖和定位功能,似乎地圖功能不再是地圖應用和導航應用所特有的。的確,有了地圖和定位功能確實讓我們的生活更加豐富多彩,極大的改變了我們的生活方式。例如你到了一個陌生的地方想要查找附近的酒店、超市等就可以打開軟件搜索周邊;類似的,還有很多團購軟件可以根據你所在的位置自動為你推薦某些商品。總之,目前地圖和定位功能已經大量引入到應用開發中。今天就和大家一起看一下iOS如何進行地圖和定位開發。
- 定位
- 地圖
定位
要實現地圖、導航功能,往往需要先熟悉定位功能,在iOS中通過Core Location框架進行定位操作。Core Location自身可以單獨使用,和地圖開發框架MapKit完全是獨立的,但是往往地圖開發要配合定位框架使用。在Core Location中主要包含了定位、地理編碼(包括反編碼)功能。
定位功能
定位是一個很常用的功能,如一些地圖軟件打開之後如果用戶允許軟件定位的話,那麼打開軟件後就會自動鎖定到當前位置,如果用戶手機移動那麼當前位置也會跟隨著變化。要實現這個功能需要使用Core Loaction中CLLocationManager類,首先看一下這個類的一些主要方法和屬性:
類方法
說明
+ (BOOL)locationServicesEnabled;
是否啟用定位服務,通常如果用戶沒有啟用定位服務可以提示用戶打開定位服務
+ (CLAuthorizationStatus)authorizationStatus;
定位服務授權狀態,返回枚舉類型:
kCLAuthorizationStatusNotDetermined: 用戶尚未做出決定是否啟用定位服務
kCLAuthorizationStatusRestricted: 沒有獲得用戶授權使用定位服務,可能用戶沒有自己禁止訪問授權
kCLAuthorizationStatusDenied :用戶已經明確禁止應用使用定位服務或者當前系統定位服務處於關閉狀態
kCLAuthorizationStatusAuthorizedAlways: 應用獲得授權可以一直使用定位服務,即使應用不在使用狀態
kCLAuthorizationStatusAuthorizedWhenInUse: 使用此應用過程中允許訪問定位服務
屬性
說明
desiredAccuracy
定位精度,枚舉類型:
kCLLocationAccuracyBest:最精確定位
CLLocationAccuracy kCLLocationAccuracyNearestTenMeters:十米誤差范圍
kCLLocationAccuracyHundredMeters:百米誤差范圍
kCLLocationAccuracyKilometer:千米誤差范圍
kCLLocationAccuracyThreeKilometers:三千米誤差范圍
didEnterRegion:(CLRegion *)region和- (void)locationManager:(CLLocationManager *)manager
didExitRegion:(CLRegion *)region代理方法反饋相關信息 stopMonitoringForRegion: 停止對某個區域進行定位追蹤 requestWhenInUseAuthorization 請求獲得應用使用時的定位服務授權,注意使用此方法前在要在info.plist中配置NSLocationWhenInUseUsageDescription requestAlwaysAuthorization 請求獲得應用一直使用定位服務授權,注意使用此方法前要在info.plist中配置NSLocationAlwaysUsageDescription 代理方法 說明 -(void)locationManager:(CLLocationManager *)manager didUpdateLocations:(NSArray *)locations; 位置發生改變後執行(第一次定位到某個位置之後也會執行) - (void)locationManager:(CLLocationManager *)manager
didUpdateHeading:(CLHeading *)newHeading; 導航方向發生變化後執行 - (void)locationManager:(CLLocationManager *)manager
didEnterRegion:(CLRegion *)region 進入某個區域之後執行 - (void)locationManager:(CLLocationManager *)manager
didExitRegion:(CLRegion *)region 走出某個區域之後執行
iOS 8 還提供了更加人性化的定位服務選項。App 的定位服務不再僅僅是關閉或打開,現在,定位服務的啟用提供了三個選項,「永不」「使用應用程序期間」和「始終」。同時,考慮到能耗問題,如果一款 App 要求始終能在後台開啟定位服務,iOS 8 不僅會在首次打開 App 時主動向你詢問,還會在日常使用中彈窗提醒你該 App 一直在後台使用定位服務,並詢問你是否繼續允許。在iOS7及以前的版本,如果在應用程序中使用定位服務只要在程序中調用startUpdatingLocation方法應用就會詢問用戶是否允許此應用是否允許使用定位服務,同時在提示過程中可以通過在info.plist中配置通過配置Privacy - Location Usage Description告訴用戶使用的目的,同時這個配置是可選的。
但是在iOS8中配置配置項發生了變化,可以通過配置NSLocationAlwaysUsageDescription或者NSLocationWhenInUseUsageDescription來告訴用戶使用定位服務的目的,並且注意這個配置是必須的,如果不進行配置則默認情況下應用無法使用定位服務,打開應用不會給出打開定位服務的提示,除非安裝後自己設置此應用的定位服務。同時,在應用程序中需要根據配置對requestAlwaysAuthorization或locationServicesEnabled方法進行請求。由於本人機器已經更新到最新的iOS8.1下面的內容主要針對iOS8,使用iOS7的朋友需要稍作調整。
//
// KCMainViewController.m
// CoreLocation
//
// Created by Kenshin Cui on 14-03-27.
// Copyright (c) 2014年 Kenshin Cui. All rights reserved.
//

#import "KCMainViewController.h"
#import <CoreLocation/CoreLocation.h>

@interface KCMainViewController ()<CLLocationManagerDelegate>{

  CLLocationManager *_locationManager;
}

@end

@implementation KCMainViewController

- (void)viewDidLoad {
  [super viewDidLoad];

  //定位管理器
  _locationManager=[[CLLocationManager alloc]init];

  if (![CLLocationManager locationServicesEnabled]) {
    NSLog(@"定位服務當前可能尚未打開,請設置打開!");
    return;
  }

  //如果沒有授權則請求用戶授權
  if ([CLLocationManager authorizationStatus]==kCLAuthorizationStatusNotDetermined){
    [_locationManager requestWhenInUseAuthorization];
  }else if([CLLocationManager authorizationStatus]==kCLAuthorizationStatusAuthorizedWhenInUse){
    //設置代理
    _locationManager.delegate=self;
    //設置定位精度
    _locationManager.desiredAccuracy=kCLLocationAccuracyBest;
    //定位頻率,每隔多少米定位一次
    CLLocationDistance distance=10.0;//十米定位一次
    _locationManager.distanceFilter=distance;
    //啟動跟蹤定位
    [_locationManager startUpdatingLocation];
  }
}

#pragma mark - CoreLocation 代理
#pragma mark 跟蹤定位代理方法,每次位置發生變化即會執行(只要定位到相應位置)
//可以通過模擬器設置一個虛擬位置,否則在模擬器中無法調用此方法
-(void)locationManager:(CLLocationManager *)manager didUpdateLocations:(NSArray *)locations{
  CLLocation *location=[locations firstObject];//取出第一個位置
  CLLocationCoordinate2D coordinate=location.coordinate;//位置坐標
  NSLog(@"經度:%f,緯度:%f,海拔:%f,航向:%f,行走速度:%f",coordinate.longitude,coordinate.latitude,location.altitude,location.course,location.speed);
  //如果不需要實時定位,使用完即使關閉定位服務
  [_locationManager stopUpdatingLocation];
}

@end
注意:
1.定位頻率和定位精度並不應當越精確越好,需要視實際情況而定,因為越精確越耗性能,也就越費電。
2.定位成功後會根據設置情況頻繁調用-(void)locationManager:(CLLocationManager *)manager didUpdateLocations:(NSArray *)locations方法,這個方法返回一組地理位置對象數組,每個元素一個CLLocation代表地理位置信息(包含經度、緯度、海報、行走速度等信息),之所以返回數組是因為有些時候一個位置點可能包含多個位置。
3.使用完定位服務後如果不需要實時監控應該立即關閉定位服務以節省資源。
4.除了提供定位功能,CLLocationManager還可以調用startMonitoringForRegion:方法對指定區域進行監控。
地理編碼
除了提供位置跟蹤功能之外,在定位服務中還包含CLGeocoder類用於處理地理編碼和逆地理編碼(又叫反地理編碼)功能。
地理編碼:根據給定的位置(通常是地名)確定地理坐標(經、緯度)。
逆地理編碼:可以根據地理坐標(經、緯度)確定位置信息(街道、門牌等)。
CLGeocoder最主要的兩個方法就是- (void)geocodeAddressString:(NSString *)addressString completionHandler:(CLGeocodeCompletionHandler)completionHandler;和- (void)reverseGeocodeLocation:(CLLocation *)location completionHandler:(CLGeocodeCompletionHandler)completionHandler;,分別用於地理編碼和逆地理編碼。下面簡單演示一下:
//
// KCMainViewController.m
// CoreLocation
//
// Created by Kenshin Cui on 14-03-27.
// Copyright (c) 2014年 Kenshin Cui. All rights reserved.
//

#import "KCMainViewController.h"
#import <CoreLocation/CoreLocation.h>

@interface KCMainViewController ()<CLLocationManagerDelegate>{

  CLGeocoder *_geocoder;
}

@end

@implementation KCMainViewController

- (void)viewDidLoad {
  [super viewDidLoad];

  _geocoder=[[CLGeocoder alloc]init];
  [self getCoordinateByAddress:@"北京"];
  [self getAddressByLatitude:39.54 longitude:116.28];
}

#pragma mark 根據地名確定地理坐標
-(void)getCoordinateByAddress:(NSString *)address{
  //地理編碼
  [_geocoder geocodeAddressString:address completionHandler:^(NSArray *placemarks, NSError *error) {
    //取得第一個地標,地標中存儲了詳細的地址信息,注意:一個地名可能搜索出多個地址
    CLPlacemark *placemark=[placemarks firstObject];

    CLLocation *location=placemark.location;//位置
    CLRegion *region=placemark.region;//區域
    NSDictionary *addressDic= placemark.addressDictionary;//詳細地址信息字典,包含以下部分信息
//    NSString *name=placemark.name;//地名
//    NSString *thoroughfare=placemark.thoroughfare;//街道
//    NSString *subThoroughfare=placemark.subThoroughfare; //街道相關信息,例如門牌等
//    NSString *locality=placemark.locality; // 城市
//    NSString *subLocality=placemark.subLocality; // 城市相關信息,例如標志性建築
//    NSString *administrativeArea=placemark.administrativeArea; // 州
//    NSString *subAdministrativeArea=placemark.subAdministrativeArea; //其他行政區域信息
//    NSString *postalCode=placemark.postalCode; //郵編
//    NSString *ISOcountryCode=placemark.ISOcountryCode; //國家編碼
//    NSString *country=placemark.country; //國家
//    NSString *inlandWater=placemark.inlandWater; //水源、湖泊
//    NSString *ocean=placemark.ocean; // 海洋
//    NSArray *areasOfInterest=placemark.areasOfInterest; //關聯的或利益相關的地標
    NSLog(@"位置:%@,區域:%@,詳細信息:%@",location,region,addressDic);
  }];
}

#pragma mark 根據坐標取得地名
-(void)getAddressByLatitude:(CLLocationDegrees)latitude longitude:(CLLocationDegrees)longitude{
  //反地理編碼
  CLLocation *location=[[CLLocation alloc]initWithLatitude:latitude longitude:longitude];
  [_geocoder reverseGeocodeLocation:location completionHandler:^(NSArray *placemarks, NSError *error) {
    CLPlacemark *placemark=[placemarks firstObject];
    NSLog(@"詳細信息:%@",placemark.addressDictionary);
  }];
}

@end
地圖
iOS從6.0開始地圖數據不再由谷歌驅動,而是改用自家地圖,當然在國內它的數據是由高德地圖提供的。這樣一來,如果在iOS6.0之前進行地圖開發的話使用方法會有所不同,基於目前的情況其實使用iOS6.0之前版本的系統基本已經寥寥無幾了,所有在接下來的內容中不會再針對iOS5及之前版本的地圖開發進行介紹。
在iOS中進行地圖開發主要有兩種方式,一種是直接利用MapKit框架進行地圖開發,利用這種方式可以對地圖進行精准的控制;另一種方式是直接調用蘋果官方自帶的地圖應用,主要用於一些簡單的地圖應用(例如:進行導航覆蓋物填充等),無法進行精確的控制。當然,本節重點內容還是前者,後面的內容也會稍加提示。
用MapKit之前需要簡單了解一下MapKit中地圖展示控件MKMapView的的一些常用屬性和方法,具體如下表:
屬性
說明
userTrackingMode
跟蹤類型,是一個枚舉:
MKUserTrackingModeNone :不進行用戶位置跟蹤;
MKUserTrackingModeFollow :跟蹤用戶位置;
MKUserTrackingModeFollowWithHeading :跟蹤用戶位置並且跟蹤用戶前進方向;
mapType
地圖類型,是一個枚舉:
MKMapTypeStandard :標准地圖,一般情況下使用此地圖即可滿足;
MKMapTypeSatellite :衛星地圖;
MKMapTypeHybrid :混合地圖,加載最慢比較消耗資源;
userLocation
用戶位置,只讀屬性
annotations
當前地圖中的所有大頭針,只讀屬性
對象方法
說明
- (void)addAnnotation:(id <MKAnnotation>)annotation;
添加大頭針,對應的有添加大頭針數組
- (void)removeAnnotation:(id <MKAnnotation>)annotation;
刪除大頭針,對應的有刪除大頭針數組
- (void)setRegion:(MKCoordinateRegion)region animated:(BOOL)animated;
設置地圖顯示區域,用於控制當前屏幕顯示地圖范圍 - (void)setCenterCoordinate:(CLLocationCoordinate2D)coordinate animated:(BOOL)animated; 設置地圖中心點位置 - (CGPoint)convertCoordinate:(CLLocationCoordinate2D)coordinate toPointToView:(UIView *)view; 將地理坐標(經緯度)轉化為數學坐標(UIKit坐標) - (CLLocationCoordinate2D)convertPoint:(CGPoint)point toCoordinateFromView:(UIView *)view; 將數學坐標轉換為地理坐標 - (MKAnnotationView *)dequeueReusableAnnotationViewWithIdentifier:(NSString *)identifier; 從緩存池中取出大頭針,類似於UITableView中取出UITableViewCell,為了進行性能優化而設計 - (void)selectAnnotation:(id <MKAnnotation>)annotation animated:(BOOL)animated; 選中指定的大頭針 - (void)deselectAnnotation:(id <MKAnnotation>)annotation animated:(BOOL)animated; 取消選中指定的大頭針 代理方法 說明 - (void)mapView:(MKMapView *)mapView didUpdateUserLocation:(MKUserLocation *)userLocation ; 用戶位置發生改變時觸發(第一次定位到用戶位置也會觸發該方法) - (void)mapView:(MKMapView *)mapView didUpdateUserLocation:(MKUserLocation *)userLocation ; 顯示區域發生改變後觸發 - (void)mapViewDidFinishLoadingMap:(MKMapView *)mapView; 地圖加載完成後觸發 - (MKAnnotationView *)mapView:(MKMapView *)mapView viewForAnnotation:(id <MKAnnotation>)annotation; 顯示大頭針時觸發,返回大頭針視圖,通常自定義大頭針可以通過此方法進行 - (void)mapView:(MKMapView *)mapView didSelectAnnotationView:(MKAnnotationView *)view 點擊選中某個大頭針時觸發 - (void)mapView:(MKMapView *)mapView didDeselectAnnotationView:(MKAnnotationView *)view 取消選中大頭針時觸發 - (MKOverlayRenderer *)mapView:(MKMapView *)mapView rendererForOverlay:(id <MKOverlay>)overlay 渲染地圖覆蓋物時觸發用戶位置跟蹤
在很多帶有地圖的應用中默認打開地圖都會顯示用戶當前位置,同時將當前位置標記出來放到屏幕中點方便用戶對周圍情況進行查看。如果在iOS6或者iOS7中實現這個功能只需要添加地圖控件、設置用戶跟蹤模式、在-(void)mapView:(MKMapView *)mapView didUpdateUserLocation:(MKUserLocation *)userLocation代理方法中設置地圖中心區域及顯示范圍。但是在iOS8中用法稍有不同:
1.由於在地圖中進行用戶位置跟蹤需要使用定位功能,而定位功能在iOS8中設計發生了變化,因此必須按照前面定位章節中提到的內容進行配置和請求。
2.iOS8中不需要進行中心點的指定,默認會將當前位置設置中心點並自動設置顯示區域范圍。
了解以上兩點,要進行用戶位置跟蹤其實就相當簡單了,值得一提的是-(void)mapView:(MKMapView *)mapView didUpdateUserLocation:(MKUserLocation *)userLocation這個代理方法。這個方法只有在定位(利用前面章節中的定位內容)到當前位置之後就會調用,以後每當用戶位置發生改變就會觸發,調用頻率相當頻繁。
大頭針
在iOS開發中經常會標記某個位置,需要使用地圖標注,也就是大家俗稱的“大頭針”。只要一個NSObject類實現MKAnnotation協議就可以作為一個大頭針,通常會重寫協議中coordinate(標記位置)、title(標題)、subtitle(子標題)三個屬性,然後在程序中創建大頭針對象並調用addAnnotation:方法添加大頭針即可(之所以iOS沒有定義一個基類實現這個協議供開發者使用,多數原因應該是MKAnnotation是一個模型對象,對於多數應用模型會稍有不同,例如後面的內容中會給大頭針模型對象添加其他屬性)。
KCAnnotation.h
//
// KCAnnotation.h
// MapKit
//
// Created by Kenshin Cui on 14/3/27.
// Copyright (c) 2014年 Kenshin Cui. All rights reserved.
//

#import <Foundation/Foundation.h>
#import <MapKit/MapKit.h>

@interface KCAnnotation : NSObject<MKAnnotation>

@property (nonatomic) CLLocationCoordinate2D coordinate;
@property (nonatomic, copy) NSString *title;
@property (nonatomic, copy) NSString *subtitle;

@end
KCMainViewController.m
//
// KCMainViewController.m
// MapKit Annotation
//
// Created by Kenshin Cui on 14/3/27.
// Copyright (c) 2014年 Kenshin Cui. All rights reserved.
// 37.785834 -122.406417
// 39.92 116.39
#import "KCMainViewController.h"
#import <CoreLocation/CoreLocation.h>
#import <MapKit/MapKit.h>
#import "KCAnnotation.h"
@interface KCMainViewController ()<MKMapViewDelegate>{
CLLocationManager *_locationManager;
MKMapView *_mapView;
}
@end
@implementation KCMainViewController
- (void)viewDidLoad {
[super viewDidLoad];
[self initGUI];
}
#pragma mark 添加地圖控件
-(void)initGUI{
CGRect rect=[UIScreen mainScreen].bounds;
_mapView=[[MKMapView alloc]initWithFrame:rect];
[self.view addSubview:_mapView];
//設置代理
_mapView.delegate=self;
//請求定位服務
_locationManager=[[CLLocationManager alloc]init];
if(![CLLocationManager locationServicesEnabled]||[CLLocationManager authorizationStatus]!=kCLAuthorizationStatusAuthorizedWhenInUse){
[_locationManager requestWhenInUseAuthorization];
}
//用戶位置追蹤(用戶位置追蹤用於標記用戶當前位置,此時會調用定位服務)
_mapView.userTrackingMode=MKUserTrackingModeFollow;
//設置地圖類型
_mapView.mapType=MKMapTypeStandard;
//添加大頭針
[self addAnnotation];
}
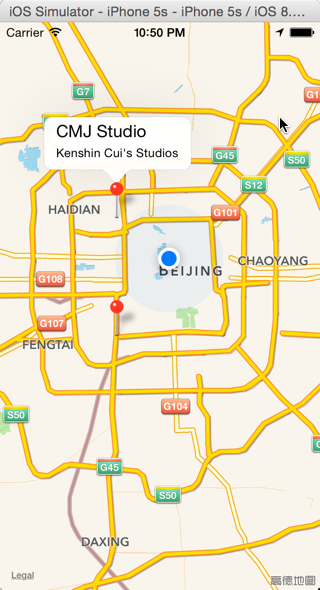
#pragma mark 添加大頭針
-(void)addAnnotation{
CLLocationCoordinate2D location1=CLLocationCoordinate2DMake(39.95, 116.35);
KCAnnotation *annotation1=[[KCAnnotation alloc]init];
annotation1.title=@"CMJ Studio";
annotation1.subtitle=@"Kenshin Cui's Studios";
annotation1.coordinate=location1;
[_mapView addAnnotation:annotation1];
CLLocationCoordinate2D location2=CLLocationCoordinate2DMake(39.87, 116.35);
KCAnnotation *annotation2=[[KCAnnotation alloc]init];
annotation2.title=@"Kenshin&Kaoru";
annotation2.subtitle=@"Kenshin Cui's Home";
annotation2.coordinate=location2;
[_mapView addAnnotation:annotation2];
}
#pragma mark - 地圖控件代理方法
#pragma mark 更新用戶位置,只要用戶改變則調用此方法(包括第一次定位到用戶位置)
-(void)mapView:(MKMapView *)mapView didUpdateUserLocation:(MKUserLocation *)userLocation{
NSLog(@"%@",userLocation);
//設置地圖顯示范圍(如果不進行區域設置會自動顯示區域范圍並指定當前用戶位置為地圖中心點)
// MKCoordinateSpan span=MKCoordinateSpanMake(0.01, 0.01);
// MKCoordinateRegion region=MKCoordinateRegionMake(userLocation.location.coordinate, span);
// [_mapView setRegion:region animated:true];
}
@end
運行效果:
設置大頭針視圖
在一些應用中系統默認的大頭針樣式可能無法滿足實際的需求,此時就需要修改大頭針視圖默認樣式。根據前面MapKit的代理方法不難發現- (MKAnnotationView *)mapView:(MKMapView *)mapView viewForAnnotation:(id <MKAnnotation>)annotation;方法可以返回一個大頭針視圖,只要實現這個方法並在這個方法中定義一個大頭針視圖MKAnnotationView對象並設置相關屬性就可以改變默認大頭針的樣式。MKAnnotationView常用屬性:
屬性 說明 annotation 大頭針模型信息,包括標題、子標題、地理位置。 image 大頭針圖片 canShowCallout 點擊大頭針是否顯示標題、子標題內容等,注意如果在- (MKAnnotationView *)mapView:(MKMapView *)mapView viewForAnnotation:(id <MKAnnotation>)annotation;方法中重新定義大頭針默認情況是無法交互的需要設置為true。 calloutOffset 點擊大頭針時彈出詳情信息視圖的偏移量 selected 是否被選中狀態 leftCalloutAccessoryView 彈出詳情左側視圖 rightCalloutAccessoryView 彈出詳情右側視圖
需要注意:
a.這個代理方法的調用時機:每當有大頭針顯示到系統可視界面中時就會調用此方法返回一個大頭針視圖放到界面中,同時當前系統位置標注(也就是地圖中藍色的位置點)也是一個大頭針,也會調用此方法,因此處理大頭針視圖時需要區別對待。
b.類似於UITableView的代理方法,此方法調用頻繁,開發過程中需要重復利用MapKit的緩存池將大頭針視圖緩存起來重復利用。
c.自定義大頭針默認情況下不允許交互,如果交互需要設置canShowCallout=true
d.如果代理方法返回nil則會使用默認大頭針視圖,需要根據情況設置。
下面以一個示例進行大頭針視圖設置,這裡設置了大頭針的圖片、彈出視圖、偏移量等信息。
KCAnnotation.h
//
// KCAnnotation.h
// MapKit
//
// Created by Kenshin Cui on 14/3/27.
// Copyright (c) 2014年 Kenshin Cui. All rights reserved.
//

#import <Foundation/Foundation.h>
#import <MapKit/MapKit.h>

@interface KCAnnotation : NSObject<MKAnnotation>

@property (nonatomic) CLLocationCoordinate2D coordinate;
@property (nonatomic, copy) NSString *title;
@property (nonatomic, copy) NSString *subtitle;

#pragma mark 自定義一個圖片屬性在創建大頭針視圖時使用
@property (nonatomic,strong) UIImage *image;

@end
KCMainViewController.m
//
// KCMainViewController.m
// MapKit Annotation
//
// Created by Kenshin Cui on 14/3/27.
// Copyright (c) 2014年 Kenshin Cui. All rights reserved.
// 37.785834 -122.406417
// 39.92 116.39
#import "KCMainViewController.h"
#import <CoreLocation/CoreLocation.h>
#import <MapKit/MapKit.h>
#import "KCAnnotation.h"
@interface KCMainViewController ()<MKMapViewDelegate>{
CLLocationManager *_locationManager;
MKMapView *_mapView;
}
@end
@implementation KCMainViewController
- (void)viewDidLoad {
[super viewDidLoad];
[self initGUI];
}
#pragma mark 添加地圖控件
-(void)initGUI{
CGRect rect=[UIScreen mainScreen].bounds;
_mapView=[[MKMapView alloc]initWithFrame:rect];
[self.view addSubview:_mapView];
//設置代理
_mapView.delegate=self;
//請求定位服務
_locationManager=[[CLLocationManager alloc]init];
if(![CLLocationManager locationServicesEnabled]||[CLLocationManager authorizationStatus]!=kCLAuthorizationStatusAuthorizedWhenInUse){
[_locationManager requestWhenInUseAuthorization];
}
//用戶位置追蹤(用戶位置追蹤用於標記用戶當前位置,此時會調用定位服務)
_mapView.userTrackingMode=MKUserTrackingModeFollow;
//設置地圖類型
_mapView.mapType=MKMapTypeStandard;
//添加大頭針
[self addAnnotation];
}
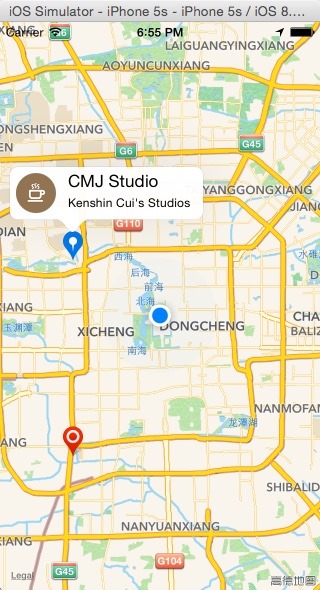
#pragma mark 添加大頭針
-(void)addAnnotation{
CLLocationCoordinate2D location1=CLLocationCoordinate2DMake(39.95, 116.35);
KCAnnotation *annotation1=[[KCAnnotation alloc]init];
annotation1.title=@"CMJ Studio";
annotation1.subtitle=@"Kenshin Cui's Studios";
annotation1.coordinate=location1;
annotation1.image=[UIImage imageNamed:@"icon_pin_floating.png"];
[_mapView addAnnotation:annotation1];
CLLocationCoordinate2D location2=CLLocationCoordinate2DMake(39.87, 116.35);
KCAnnotation *annotation2=[[KCAnnotation alloc]init];
annotation2.title=@"Kenshin&Kaoru";
annotation2.subtitle=@"Kenshin Cui's Home";
annotation2.coordinate=location2;
annotation2.image=[UIImage imageNamed:@"icon_paopao_waterdrop_streetscape.png"];
[_mapView addAnnotation:annotation2];
}
#pragma mark - 地圖控件代理方法
#pragma mark 顯示大頭針時調用,注意方法中的annotation參數是即將顯示的大頭針對象
-(MKAnnotationView *)mapView:(MKMapView *)mapView viewForAnnotation:(id<MKAnnotation>)annotation{
//由於當前位置的標注也是一個大頭針,所以此時需要判斷,此代理方法返回nil使用默認大頭針視圖
if ([annotation isKindOfClass:[KCAnnotation class]]) {
static NSString *key1=@"AnnotationKey1";
MKAnnotationView *annotationView=[_mapView dequeueReusableAnnotationViewWithIdentifier:key1];
//如果緩存池中不存在則新建
if (!annotationView) {
annotationView=[[MKAnnotationView alloc]initWithAnnotation:annotation reuseIdentifier:key1];
annotationView.canShowCallout=true;//允許交互點擊
annotationView.calloutOffset=CGPointMake(0, 1);//定義詳情視圖偏移量
annotationView.leftCalloutAccessoryView=[[UIImageView alloc]initWithImage:[UIImage imageNamed:@"icon_classify_cafe.png"]];//定義詳情左側視圖
}
//修改大頭針視圖
//重新設置此類大頭針視圖的大頭針模型(因為有可能是從緩存池中取出來的,位置是放到緩存池時的位置)
annotationView.annotation=annotation;
annotationView.image=((KCAnnotation *)annotation).image;//設置大頭針視圖的圖片
return annotationView;
}else {
return nil;
}
}
@end
運行效果:
注意:
在MapKit框架中除了MKAnnotationView之外還有一個MKPinAnnotationView,它是MKAnnotationView的子類,相比MKAnnotationView多了兩個屬性pinColor和animationDrop,分別用於設置大頭針視圖顏色和添加大頭針動畫。
擴展--自定義大頭針彈詳情視圖
通過上面的示例不難看出MKAnnotationView足夠強大(何況還有MKPinAnnotationView),很多信息都可以進行設置,但是唯獨不能修改大頭針描述詳情視圖(僅僅支持詳情中左右視圖內容)。要實現這個需求目前開發中普遍采用的思路就是:
a.點擊一個大頭針A時重新在A的坐標處添加另一個大頭針B(注意此時將A對應的大頭針視圖canShowCallout設置為false)作為大頭針詳情模型,然後在- (MKAnnotationView *)mapView:(MKMapView *)mapView viewForAnnotation:(id <MKAnnotation>)annotation;代理方法中判斷大頭針類型,如果是B則重寫MKAnnotationView(可以自定義一個類C繼承於MKAnnotationView),返回自定義大頭針視圖C。
b.定義大頭針視圖C繼承於MKAnnotationView(或者MKPinAnnotationView),在自定義大頭針視圖中添加自己的控件,完成自定義布局。
在使用百度地圖客戶端時當點擊一個搜索位置時可以看到此位置的評價等信息,視圖效果大概如下:
下面不妨試著實現一下這個效果:
大頭針模型:KCAnnotation.h
//
// KCAnnotation.h
// MapKit
//
// Created by Kenshin Cui on 14/3/27.
// Copyright (c) 2014年 Kenshin Cui. All rights reserved.
//

#import <Foundation/Foundation.h>
#import <MapKit/MapKit.h>

@interface KCAnnotation : NSObject<MKAnnotation>

@property (nonatomic) CLLocationCoordinate2D coordinate;
@property (nonatomic, copy) NSString *title;
@property (nonatomic, copy) NSString *subtitle;

#pragma mark 自定義一個圖片屬性在創建大頭針視圖時使用
@property (nonatomic,strong) UIImage *image;

#pragma mark 大頭針詳情左側圖標
@property (nonatomic,strong) UIImage *icon;
#pragma mark 大頭針詳情描述
@property (nonatomic,copy) NSString *detail;
#pragma mark 大頭針右下方星級評價
@property (nonatomic,strong) UIImage *rate;

@end
彈出詳情大頭針模型:KCCalloutAnnotation.h
//
// KCCalloutAnnotation.h
// MapKit
//
// Created by Kenshin Cui on 14/3/27.
// Copyright (c) 2014年 Kenshin Cui. All rights reserved.
//

#import <UIKit/UIKit.h>
#import <CoreLocation/CoreLocation.h>
#import <MapKit/MapKit.h>

@interface KCCalloutAnnotation : NSObject<MKAnnotation>

@property (nonatomic) CLLocationCoordinate2D coordinate;
@property (nonatomic, copy,readonly) NSString *title;
@property (nonatomic, copy,readonly) NSString *subtitle;

#pragma mark 左側圖標
@property (nonatomic,strong) UIImage *icon;
#pragma mark 詳情描述
@property (nonatomic,copy) NSString *detail;
#pragma mark 星級評價
@property (nonatomic,strong) UIImage *rate;

@end
彈出詳情大頭針視圖:KCCalloutAnnotatonView.h

//
// KCCalloutView.h
// MapKit
//
// Created by Kenshin Cui on 14/3/27.
// Copyright (c) 2014年 Kenshin Cui. All rights reserved.
// 自定義彈出標注視圖

#import <UIKit/UIKit.h>
#import <CoreLocation/CoreLocation.h>
#import <MapKit/MapKit.h>
#import "KCCalloutAnnotation.h"

@interface KCCalloutAnnotationView : MKAnnotationView

@property (nonatomic ,strong) KCCalloutAnnotation *annotation;

#pragma mark 從緩存取出標注視圖
+(instancetype)calloutViewWithMapView:(MKMapView *)mapView;

@end
KCCalloutAnnotationView.m

//
// KCCalloutView.m
// MapKit
//
// Created by Kenshin Cui on 14/3/27.
// Copyright (c) 2014年 Kenshin Cui. All rights reserved.
//

#import "KCCalloutAnnotationView.h"
#define kSpacing 5
#define kDetailFontSize 12
#define kViewOffset 80

@interface KCCalloutAnnotationView(){
  UIView *_backgroundView;
  UIImageView *_iconView;
  UILabel *_detailLabel;
  UIImageView *_rateView;
}

@end

@implementation KCCalloutAnnotationView

-(instancetype)init{
  if(self=[super init]){
    [self layoutUI];
  }
  return self;
}
-(instancetype)initWithFrame:(CGRect)frame{
  if (self=[super initWithFrame:frame]) {
    [self layoutUI];
  }
  return self;
}

-(void)layoutUI{
  //背景
  _backgroundView=[[UIView alloc]init];
  _backgroundView.backgroundColor=[UIColor whiteColor];
  //左側添加圖標
  _iconView=[[UIImageView alloc]init];

  //上方詳情
  _detailLabel=[[UILabel alloc]init];
  _detailLabel.lineBreakMode=NSLineBreakByWordWrapping;
  //[_text sizeToFit];
  _detailLabel.font=[UIFont systemFontOfSize:kDetailFontSize];

  //下方星級
  _rateView=[[UIImageView alloc]init];

  [self addSubview:_backgroundView];
  [self addSubview:_iconView];
  [self addSubview:_detailLabel];
  [self addSubview:_rateView];
}

+(instancetype)calloutViewWithMapView:(MKMapView *)mapView{
  static NSString *calloutKey=@"calloutKey1";
  KCCalloutAnnotationView *calloutView=(KCCalloutAnnotationView *)[mapView dequeueReusableAnnotationViewWithIdentifier:calloutKey];
  if (!calloutView) {
    calloutView=[[KCCalloutAnnotationView alloc]init];
  }
  return calloutView;
}

#pragma mark 當給大頭針視圖設置大頭針模型時可以在此處根據模型設置視圖內容
-(void)setAnnotation:(KCCalloutAnnotation *)annotation{
  [super setAnnotation:annotation];
  //根據模型調整布局
  _iconView.image=annotation.icon;
  _iconView.frame=CGRectMake(kSpacing, kSpacing, annotation.icon.size.width, annotation.icon.size.height);

  _detailLabel.text=annotation.detail;
  float detailWidth=150.0;
  CGSize detailSize= [annotation.detail boundingRectWithSize:CGSizeMake(detailWidth, MAXFLOAT) options:NSStringDrawingUsesLineFragmentOrigin attributes:@{NSFontAttributeName: [UIFont systemFontOfSize:kDetailFontSize]} context:nil].size;
  float detailX=CGRectGetMaxX(_iconView.frame)+kSpacing;
  _detailLabel.frame=CGRectMake(detailX, kSpacing, detailSize.width, detailSize.height);
  _rateView.image=annotation.rate;
  _rateView.frame=CGRectMake(detailX, CGRectGetMaxY(_detailLabel.frame)+kSpacing, annotation.rate.size.width, annotation.rate.size.height);

  float backgroundWidth=CGRectGetMaxX(_detailLabel.frame)+kSpacing;
  float backgroundHeight=_iconView.frame.size.height+2*kSpacing;
  _backgroundView.frame=CGRectMake(0, 0, backgroundWidth, backgroundHeight);
  self.bounds=CGRectMake(0, 0, backgroundWidth, backgroundHeight+kViewOffset);

}
@end
主視圖控制器:KCMainViewController.m
//
// KCMainViewController.m
// MapKit Annotation
//
// Created by Kenshin Cui on 14/3/27.
// Copyright (c) 2014年 Kenshin Cui. All rights reserved.
// 37.785834  -122.406417
// 39.92 116.39

#import "KCMainViewController.h"
#import <CoreLocation/CoreLocation.h>
#import <MapKit/MapKit.h>
#import "KCAnnotation.h"
#import "KCCalloutAnnotationView.h"
#import "KCCalloutAnnotationView.h"

@interface KCMainViewController ()<MKMapViewDelegate>{
  CLLocationManager *_locationManager;
  MKMapView *_mapView;
}

@end

@implementation KCMainViewController

- (void)viewDidLoad {
  [super viewDidLoad];

  [self initGUI];
}

#pragma mark 添加地圖控件
-(void)initGUI{
  CGRect rect=[UIScreen mainScreen].bounds;
  _mapView=[[MKMapView alloc]initWithFrame:rect];
  [self.view addSubview:_mapView];
  //設置代理
  _mapView.delegate=self;

  //請求定位服務
  _locationManager=[[CLLocationManager alloc]init];
  if(![CLLocationManager locationServicesEnabled]||[CLLocationManager authorizationStatus]!=kCLAuthorizationStatusAuthorizedWhenInUse){
    [_locationManager requestWhenInUseAuthorization];
  }

  //用戶位置追蹤(用戶位置追蹤用於標記用戶當前位置,此時會調用定位服務)
  _mapView.userTrackingMode=MKUserTrackingModeFollow;

  //設置地圖類型
  _mapView.mapType=MKMapTypeStandard;

  //添加大頭針
  [self addAnnotation];
}

#pragma mark 添加大頭針
-(void)addAnnotation{
  CLLocationCoordinate2D location1=CLLocationCoordinate2DMake(39.95, 116.35);
  KCAnnotation *annotation1=[[KCAnnotation alloc]init];
  annotation1.title=@"CMJ Studio";
  annotation1.subtitle=@"Kenshin Cui's Studios";
  annotation1.coordinate=location1;
  annotation1.image=[UIImage imageNamed:@"icon_pin_floating.png"];
  annotation1.icon=[UIImage imageNamed:@"icon_mark1.png"];
  annotation1.detail=@"CMJ Studio...";
  annotation1.rate=[UIImage imageNamed:@"icon_Movie_Star_rating.png"];
  [_mapView addAnnotation:annotation1];

  CLLocationCoordinate2D location2=CLLocationCoordinate2DMake(39.87, 116.35);
  KCAnnotation *annotation2=[[KCAnnotation alloc]init];
  annotation2.title=@"Kenshin&Kaoru";
  annotation2.subtitle=@"Kenshin Cui's Home";
  annotation2.coordinate=location2;
  annotation2.image=[UIImage imageNamed:@"icon_paopao_waterdrop_streetscape.png"];
  annotation2.icon=[UIImage imageNamed:@"icon_mark2.png"];
  annotation2.detail=@"Kenshin Cui...";
  annotation2.rate=[UIImage imageNamed:@"icon_Movie_Star_rating.png"];
  [_mapView addAnnotation:annotation2];
}

#pragma mark - 地圖控件代理方法
#pragma mark 顯示大頭針時調用,注意方法中的annotation參數是即將顯示的大頭針對象
-(MKAnnotationView *)mapView:(MKMapView *)mapView viewForAnnotation:(id<MKAnnotation>)annotation{
  //由於當前位置的標注也是一個大頭針,所以此時需要判斷,此代理方法返回nil使用默認大頭針視圖
  if ([annotation isKindOfClass:[KCAnnotation class]]) {
    static NSString *key1=@"AnnotationKey1";
    MKAnnotationView *annotationView=[_mapView dequeueReusableAnnotationViewWithIdentifier:key1];
    //如果緩存池中不存在則新建
    if (!annotationView) {
      annotationView=[[MKAnnotationView alloc]initWithAnnotation:annotation reuseIdentifier:key1];
//      annotationView.canShowCallout=true;//允許交互點擊
      annotationView.calloutOffset=CGPointMake(0, 1);//定義詳情視圖偏移量
      annotationView.leftCalloutAccessoryView=[[UIImageView alloc]initWithImage:[UIImage imageNamed:@"icon_classify_cafe.png"]];//定義詳情左側視圖
    }

    //修改大頭針視圖
    //重新設置此類大頭針視圖的大頭針模型(因為有可能是從緩存池中取出來的,位置是放到緩存池時的位置)
    annotationView.annotation=annotation;
    annotationView.image=((KCAnnotation *)annotation).image;//設置大頭針視圖的圖片

    return annotationView;
  }else if([annotation isKindOfClass:[KCCalloutAnnotation class]]){
    //對於作為彈出詳情視圖的自定義大頭針視圖無彈出交互功能(canShowCallout=false,這是默認值),在其中可以自由添加其他視圖(因為它本身繼承於UIView)
    KCCalloutAnnotationView *calloutView=[KCCalloutAnnotationView calloutViewWithMapView:mapView];
    calloutView.annotation=annotation;
    return calloutView;
  } else {
    return nil;
  }
}

#pragma mark 選中大頭針時觸發
//點擊一般的大頭針KCAnnotation時添加一個大頭針作為所點大頭針的彈出詳情視圖
-(void)mapView:(MKMapView *)mapView didSelectAnnotationView:(MKAnnotationView *)view{
  KCAnnotation *annotation=view.annotation;
  if ([view.annotation isKindOfClass:[KCAnnotation class]]) {
    //點擊一個大頭針時移除其他彈出詳情視圖
//    [self removeCustomAnnotation];
    //添加詳情大頭針,渲染此大頭針視圖時將此模型對象賦值給自定義大頭針視圖完成自動布局
    KCCalloutAnnotation *annotation1=[[KCCalloutAnnotation alloc]init];
    annotation1.icon=annotation.icon;
    annotation1.detail=annotation.detail;
    annotation1.rate=annotation.rate;
    annotation1.coordinate=view.annotation.coordinate;
    [mapView addAnnotation:annotation1];
  }
}

#pragma mark 取消選中時觸發
-(void)mapView:(MKMapView *)mapView didDeselectAnnotationView:(MKAnnotationView *)view{
  [self removeCustomAnnotation];
}

#pragma mark 移除所用自定義大頭針
-(void)removeCustomAnnotation{
  [_mapView.annotations enumerateObjectsUsingBlock:^(id obj, NSUInteger idx, BOOL *stop) {
    if ([obj isKindOfClass:[KCCalloutAnnotation class]]) {
      [_mapView removeAnnotation:obj];
    }
  }];
}
@end
在這個過程中需要注意幾點:
1.大頭針A作為一個普通大頭針,其中最好保存自定義大頭針視圖C所需要的模型以便根據不同的模型初始化視圖。
2.自定義大頭針視圖C的大頭針模型B中不需要title、subtitle屬性,最好設置為只讀;模型中最後保存自定義大頭針視圖C所需要的布局模型數據。
3.只有點擊非B類大頭針時才新增自定義大頭針,並且增加時要首先移除其他B類大頭針避免重疊(一般建議放到取消大頭針選擇的代理方法中)。
4.通常在自定義大頭針視圖C設置大頭針模型時布局界面,此時需要注意新增大頭針的位置,通常需要偏移一定的距離才能達到理想的效果。
運行效果:
使用自帶的地圖應用
除了可以使用MapKit框架進行地圖開發,對地圖有精確的控制和自定義之外,如果對於應用沒有特殊要求的話選用蘋果自帶的地圖應用也是一個不錯的選擇。使用蘋果自帶的應用時需要用到MapKit中的MKMapItem類,這個類有一個openInMapsWithLaunchOptions:動態方法和一個openMapsWithItems: launchOptions:靜態方法用於打開蘋果地圖應用。第一個方法用於在地圖上標注一個位置,第二個方法除了可以標注多個位置外還可以進行多個位置之間的駕駛導航,使用起來也是相當方便。在熟悉這兩個方法使用之前有必要對兩個方法中的options參數做一下簡單說明:
鍵(常量)
說明
值
MKLaunchOptionsDirectionsModeKey
路線模式,常量
MKLaunchOptionsDirectionsModeDriving 駕車模式
MKLaunchOptionsDirectionsModeWalking 步行模式
MKLaunchOptionsMapTypeKey
地圖類型,枚舉
MKMapTypeStandard :標准模式
MKMapTypeSatellite :衛星模式
MKMapTypeHybrid :混合模式
MKLaunchOptionsMapCenterKey
中心點坐標,CLLocationCoordinate2D類型
MKLaunchOptionsMapSpanKey
地圖顯示跨度,MKCoordinateSpan 類型
MKLaunchOptionsShowsTrafficKey
是否 顯示交通狀況,布爾型
MKLaunchOptionsCameraKey
3D地圖效果,MKMapCamera類型
注意:此屬性從iOS7及以後可用,前面的屬性從iOS6開始可用
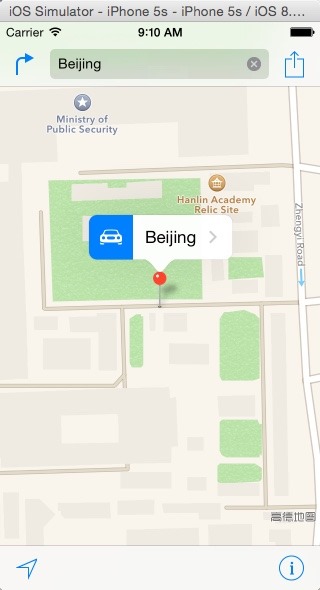
單個位置的標注
下面的代碼演示了如何在蘋果自帶地圖應用上標記一個位置,首先根據反地理編碼獲得一個CLPlacemark位置對象,然後將其轉換為MKPlacemark對象用於MKMapItem初始化,最後調用其openInMapsWithLaunchOptions:打開地圖應用並標記:
//
// KCMainViewController.m
// AppleMap
//
// Created by Kenshin Cui on 14/3/27.
// Copyright (c) 2014年 Kenshin Cui. All rights reserved.
//

#import "KCMainViewController.h"
#import <CoreLocation/CoreLocation.h>
#import <MapKit/MapKit.h>

@interface KCMainViewController ()
@property (nonatomic,strong) CLGeocoder *geocoder;
@end

@implementation KCMainViewController

- (void)viewDidLoad {
  [super viewDidLoad];

  _geocoder=[[CLGeocoder alloc]init];

  [self location];
}

#pragma mark 在地圖上定位
-(void)location{
  //根據“北京市”進行地理編碼
  [_geocoder geocodeAddressString:@"北京市" completionHandler:^(NSArray *placemarks, NSError *error) {
    CLPlacemark *clPlacemark=[placemarks firstObject];//獲取第一個地標
    MKPlacemark *mkplacemark=[[MKPlacemark alloc]initWithPlacemark:clPlacemark];//定位地標轉化為地圖的地標
    NSDictionary *options=@{MKLaunchOptionsMapTypeKey:@(MKMapTypeStandard)};
    MKMapItem *mapItem=[[MKMapItem alloc]initWithPlacemark:mkplacemark];
    [mapItem openInMapsWithLaunchOptions:options];
  }];
}
@end
運行效果:
標記多個位置
如果要標記多個位置需要調用MKMapItem的靜態方法,下面的代碼演示中需要注意,使用CLGeocoder進行定位時一次只能定位到一個位置,所以第二個位置定位放到了第一個位置獲取成功之後。
//
// KCMainViewController.m
// AppleMap
//
// Created by Kenshin Cui on 14/3/27.
// Copyright (c) 2014年 Kenshin Cui. All rights reserved.
//

#import "KCMainViewController.h"
#import <CoreLocation/CoreLocation.h>
#import <MapKit/MapKit.h>

@interface KCMainViewController ()
@property (nonatomic,strong) CLGeocoder *geocoder;
@end

@implementation KCMainViewController

- (void)viewDidLoad {
  [super viewDidLoad];

  _geocoder=[[CLGeocoder alloc]init];

  [self listPlacemark];
}

-(void)listPlacemark{
  //根據“北京市”進行地理編碼
  [_geocoder geocodeAddressString:@"北京市" completionHandler:^(NSArray *placemarks, NSError *error) {
    CLPlacemark *clPlacemark1=[placemarks firstObject];//獲取第一個地標
    MKPlacemark *mkPlacemark1=[[MKPlacemark alloc]initWithPlacemark:clPlacemark1];
    //注意地理編碼一次只能定位到一個位置,不能同時定位,所在放到第一個位置定位完成回調函數中再次定位
    [_geocoder geocodeAddressString:@"鄭州市" completionHandler:^(NSArray *placemarks, NSError *error) {
      CLPlacemark *clPlacemark2=[placemarks firstObject];//獲取第一個地標
      MKPlacemark *mkPlacemark2=[[MKPlacemark alloc]initWithPlacemark:clPlacemark2];
      NSDictionary *options=@{MKLaunchOptionsMapTypeKey:@(MKMapTypeStandard)};
      //MKMapItem *mapItem1=[MKMapItem mapItemForCurrentLocation];//當前位置
      MKMapItem *mapItem1=[[MKMapItem alloc]initWithPlacemark:mkPlacemark1];
      MKMapItem *mapItem2=[[MKMapItem alloc]initWithPlacemark:mkPlacemark2];
      [MKMapItem openMapsWithItems:@[mapItem1,mapItem2] launchOptions:options];

    }];

  }];
}
@end
運行效果:
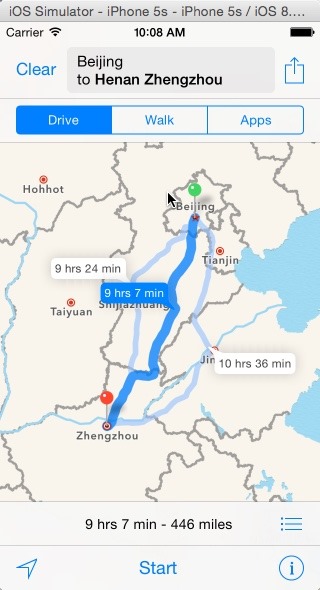
地圖導航
要使用地圖導航功能在自帶地圖應用中相當簡單,只要設置參數配置導航模式即可,例如在上面代碼基礎上設置駕駛模式,則地圖應用會啟動駕駛模式計算兩點之間的距離同時對路線進行規劃。
//
// KCMainViewController.m
// AppleMap
//
// Created by Kenshin Cui on 14/3/27.
// Copyright (c) 2014年 Kenshin Cui. All rights reserved.
//

#import "KCMainViewController.h"
#import <CoreLocation/CoreLocation.h>
#import <MapKit/MapKit.h>

@interface KCMainViewController ()
@property (nonatomic,strong) CLGeocoder *geocoder;
@end

@implementation KCMainViewController

- (void)viewDidLoad {
  [super viewDidLoad];

  _geocoder=[[CLGeocoder alloc]init];

  [self turnByTurn];
}

-(void)turnByTurn{
  //根據“北京市”地理編碼
  [_geocoder geocodeAddressString:@"北京市" completionHandler:^(NSArray *placemarks, NSError *error) {
    CLPlacemark *clPlacemark1=[placemarks firstObject];//獲取第一個地標
    MKPlacemark *mkPlacemark1=[[MKPlacemark alloc]initWithPlacemark:clPlacemark1];
    //注意地理編碼一次只能定位到一個位置,不能同時定位,所在放到第一個位置定位完成回調函數中再次定位
    [_geocoder geocodeAddressString:@"鄭州市" completionHandler:^(NSArray *placemarks, NSError *error) {
      CLPlacemark *clPlacemark2=[placemarks firstObject];//獲取第一個地標
      MKPlacemark *mkPlacemark2=[[MKPlacemark alloc]initWithPlacemark:clPlacemark2];
      NSDictionary *options=@{MKLaunchOptionsMapTypeKey:@(MKMapTypeStandard),MKLaunchOptionsDirectionsModeKey:MKLaunchOptionsDirectionsModeDriving};
      //MKMapItem *mapItem1=[MKMapItem mapItemForCurrentLocation];//當前位置
      MKMapItem *mapItem1=[[MKMapItem alloc]initWithPlacemark:mkPlacemark1];
      MKMapItem *mapItem2=[[MKMapItem alloc]initWithPlacemark:mkPlacemark2];
      [MKMapItem openMapsWithItems:@[mapItem1,mapItem2] launchOptions:options];

    }];

  }];
}
@end
運行效果:
注意:其實如果不用蘋果自帶的地圖應用也可以實現地圖導航,MapKit中提供了MKDirectionRequest對象用於計算路線,提供了MKDirections用於計算方向,這樣一來只需要調用MKMapView的addOverlay等方法添加覆蓋物即可實現類似的效果,有興趣的朋友可以試一下。
由於定位和地圖框架中用到了諸多類,有些初學者容易混淆,下面簡單對比一下。
CLLocation:用於表示位置信息,包含地理坐標、海拔等信息,包含在CoreLoaction框架中。
MKUserLocation:一個特殊的大頭針,表示用戶當前位置。
CLPlacemark:定位框架中地標類,封裝了詳細的地理信息。
MKPlacemark:類似於CLPlacemark,只是它在MapKit框架中,可以根據CLPlacemark創建MKPlacemark。
原文鏈接:http://www.cnblogs.com/kenshincui/p/4125570.html
以上就是本文的全部內容,希望對大家的學習有所幫助,也希望大家多多支持本站。