iphone應用開發之六:UITableView的詳細講解(一)
Andy-清風 原創,轉載請注明,謝謝。
1. UITableView的初始化
UITableView tableview= [[UITableView alloc] initWithFrame:CGRectMake(0, 0, 320, 420)];
[tableview setDelegate:self];
[tableview setDataSource:self];
[self.view addSubview: tableview];
[tableview release];
(1)在初始化UITableView的時候必須實現UITableView的是,在.h文件中要繼承UITableViewDelegate和UITableViewDataSource,並實現3個UITableView數據源方法和設置它的delegate為self,這個是在不直接繼承UITableViewController實現的方法。
(2) 直接在XCODE生成項目的時候繼承UITableViewController的,它會幫你自動寫好UITableView必須要實現的方法。
(3)UITableView繼承自UIScrollView。
2. UITableView的數據源
(1)UITableView是依賴外部資源為新表格單元填上內容的,我們稱為數據源,這個數據源可以根據索引路徑提供表格單元格,在UITableView中,索引路徑是NSIndexPath的對象,可以選擇分段或者分行,即是我們編碼中的section和row。
(2)UITableView有三個必須實現的核心方法,分別如下:
-(NSInteger)numberOfSectionsInTableView:(UITableView*)tableView;
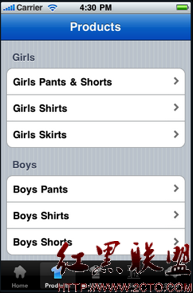
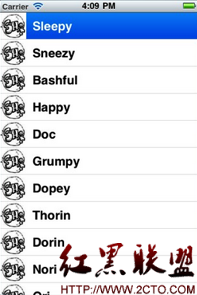
這個方法可以分段顯示或者單個列表顯示我們的數據。如下,左邊為分段顯示,右邊為單個列表顯示:
-(NSInteger)tableView:(UITableView*)tableViewnumberOfRowsInSection:(NSInteger)section;
這個方法返回每個分段的行數,不同分段返回不同的行數可以用switch來做,如果是單個列表就直接返回單個你想要的函數即可。
-(UITableViewCell*)tableView:(UITableView*)tableViewcellForRowAtIndexPath:(NSIndexPath *)indexPath;
這個方法是返回我們調用的每一個單元格。通過我們索引的路徑的section和row來確定。
3. UITableView的委托方法
使用委托是為了響應用戶的交互動作,比如下拉更新數據和選擇某一行單元格,在UITableView中有很大這種方法供我們選擇。
(1) 委托方法講解
//設置Section的數量
- (NSArray *)sectionIndexTitlesForTableView:(UITableView *)tableView{
return TitleData;
}
//設置每個section顯示的Title
- (NSString *)tableView:(UITableView *)tableViewtitleForHeaderInSection:(NSInteger)section{
return @"Andy-清風";
}
//指定有多少個分區(Section),默認為1
- (NSInteger)numberOfSectionsInTableView:(UITableView *)tableView {
return 2;
}
//指定每個分區中有多少行,默認為1
- (NSInteger)tableView:(UITableView *)tableViewnumberOfRowsInSection:(NSInteger)section{
}
//設置每行調用的cell
-(UITableViewCell *)tableView:(UITableView *)tableViewcellForRowAtIndexPath:(NSIndexPath *)indexPath {
static NSString *SimpleTableIdentifier = @"SimpleTableIdentifier";
UITableViewCell *cell = [tableViewdequeueReusableCellWithIdentifier:
SimpleTableIdentifier];
if (cell == nil) {
cell = [[[UITableViewCellalloc] initWithStyle:UITableViewCellStyleDefault
reuseIdentifier:SimpleTableIdentifier] autorelease];
}
cell.imageView.image=image;//未選cell時的圖片
cell.imageView.highlightedImage=highlightImage;//選中cell後的圖片
cell.text=@”Andy-清風”;
return cell;
}
//設置讓UITableView行縮進
-(NSInteger)tableView:(UITableView *)tableViewindentationLevelForRowAtIndexPath:(NSIndexPath *)indexPath{
NSUInteger row = [indexPath row];
return row;
}
//設置cell每行間隔的高度
- (CGFloat)tableView:(UITableView *)tableViewheightForRowAtIndexPath:(NSIndexPath *)indexPath{
return 40;
}
//返回當前所選cell
NSIndexPath *ip = [NSIndexPath indexPathForRow:row inSection:section];
[TopicsTable selectRowAtIndexPath:ip animated:YESscrollPosition:UITableViewScrollPositionNone];
//設置UITableView的style
[tableView setSeparatorStyle:UITableViewCellSelectionStyleNone];
//設置選中Cell的響應事件
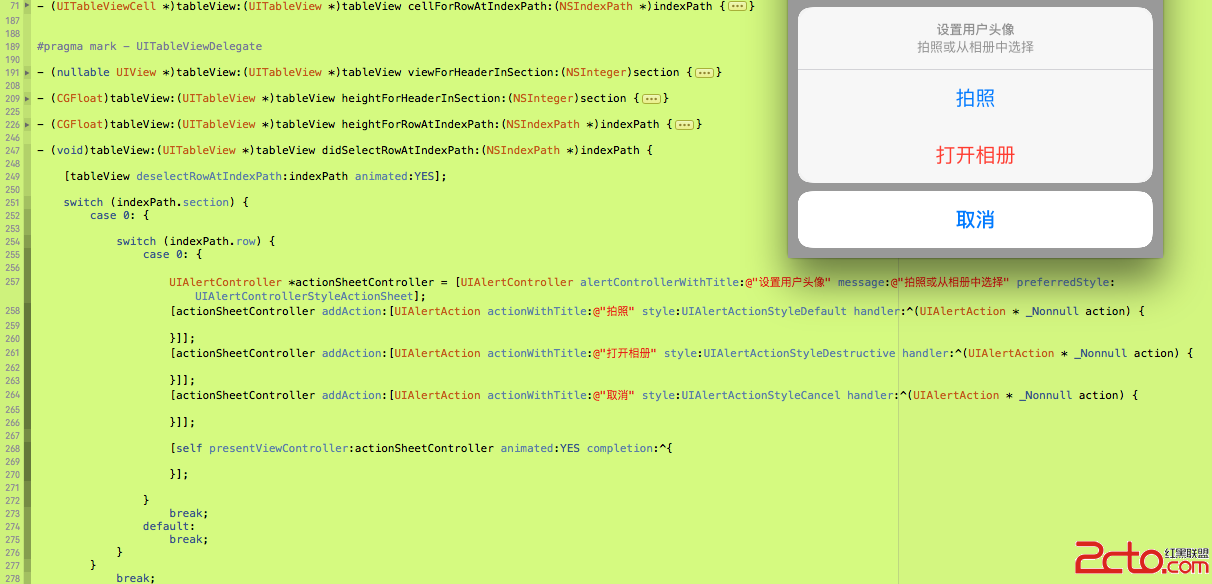
- (void)tableView:(UITableView *)tableView didSelectRowAtIndexPath:(NSIndexPath*)indexPath{
[tableView deselectRowAtIndexPath:indexPath animated:YES];//選中後的反顯顏色即刻消失
}
//設置選中的行所執行的動作
-(NSIndexPath *)tableView:(UITableView *)tableViewwillSelectRowAtIndexPath:(NSIndexPath *)indexPath
{
NSUInteger row = [indexPath row];
return indexPath;
}
//設置劃動cell是否出現del按鈕,可供刪除數據裡進行處理
- (BOOL)tableView:(UITableView *)tableView canEditRowAtIndexPath:(NSIndexPath*)indexPath {
}
//設置刪除時編輯狀態
- (void)tableView:(UITableView *)tableView commitEditingStyle:(UITableViewCellEditingStyle)editingStyle
forRowAtIndexPath:(NSIndexPath *)indexPath
{
}
//右側添加一個索引表
- (NSArray *)sectionIndexTitlesForTableView:(UITableView *)tableView{
}
(2) 其他
//選中cell時的顏色,在官方文檔有如下可以選擇
typedef enum {
UITableViewCellSelectionStyleNone,
UITableViewCellSelectionStyleBlue,
UITableViewCellSelectionStyleGray
} UITableViewCellSelectionStyle
//cell右邊按鈕格式
typedef enum {
UITableViewCellAccessoryNone, //don't show any accessory view
UITableViewCellAccessoryDisclosureIndicator, //regular chevron. doesn't track
UITableViewCellAccessoryDetailDisclosureButton, //blue button w/ chevron. tracks
UITableViewCellAccessoryCheckmark //checkmark. doesn't track
} UITableViewCellAccessoryType
//是否加換行線
typedef enum {
UITableViewCellSeparatorStyleNone,
UITableViewCellSeparatorStyleSingleLine
} UITableViewCellSeparatorStyle
//改變換行線顏色
tableView.separatorColor= [UIColor blueColor];
4. UITableViewCell
表中的每一行都代表一個UITableViewCell。可以使用圖像、文本還有輔助的圖標等來自定義你自己的UITableViewCell。你可以自定義你自己的cell如下模型或者像appstore那樣的。
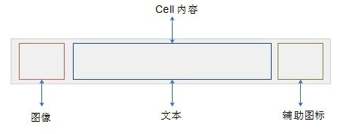
UITableViewCell為每個Cell提供了三個可以選擇的屬性,如下:
l textLabel:填寫文本
l detailTextLable:稍微詳細的副標題
l imageView:用來顯示你cell的圖片,可以通過UIImage來加載。
最後給出一個官方的demo給大家學習下,多實踐,不懂的就問下,下節課講些UITableView應用中實際會出現的問題,比如自定義啊,重用單元格,單元格的數據排序等問題。歡迎大家拍磚。
附上代碼:http://up.2cto.com/2011/1130/20111130025401502.zip

- iOS獲得以後裝備型號等信息(全)包括iPhone7和iPhone7P
- xcode8提交ipa掉敗沒法構建版本成績的處理計劃
- Objective-C 代碼與Javascript 代碼互相挪用實例
- iOS開辟之UIPickerView完成城市選擇器的步調詳解
- iPhone/iPad開辟經由過程LocalNotification完成iOS准時當地推送功效
- iOS法式開辟之應用PlaceholderImageView完成優雅的圖片加載後果
- iOS Runntime 靜態添加類辦法並挪用-class_addMethod
- iOS開辟之用javascript挪用oc辦法而非url
- iOS App中挪用iPhone各類感應器的辦法總結
- 實例講授iOS中的UIPageViewController翻頁視圖掌握器
- IOS代碼筆記UIView的placeholder的後果
- iOS中應用JSPatch框架使Objective-C與JavaScript代碼交互
- iOS中治理剪切板的UIPasteboard粘貼板類用法詳解
- iOS App開辟中的UIPageControl分頁控件應用小結
- 詳解iOS App中UIPickerView轉動選擇欄的添加辦法