Wax框架簡明教程(4)Wax HTTP+XML示例
本來是想介紹“Building NativeiOS Apps with Wax: Creating a Sample Application”一文的第二部分,它介紹了一個從iOS獲取twitter主題的Wax Application實現過程。其中,twitter的數據是用JSON封裝的 。
但很不幸,由於眾所周知的原因,國內的用戶無法直接訪問twitter的服務器 。 因此我修改了這個例子,改為用HTTP+XML的,服務器端用java實現,在調試時你可以把服務端放在本地,這樣就不受網絡限制。同時,服務器數據改用XML封裝。因為在我的經驗中,XML使用的概率遠大於JSON。
但問題在於,wax_http中沒有針對XML格式數據進行實現。你可以查看它的源代碼,它只實現了:text、json、binary三種format。如果你使用json,那麼在wax_http中根本不需要涉及json解析,正如“Building NativeiOS Apps with Wax: Creating a Sample Application”的例子所示,一切都是透明的。
因此我們就只能自己進行XML解析。本文采用的是“Luaonly XML parser”方式。這種實現最早源自AlexanderMakeeve,後面又衍生出了許多版本。
我們在github上找到了其中一個版本,是CoronaXML Module的修改版本,叫做:LuaSimple XML Parser。
這個XML parser只有一個simpleXml.lua文件,使用起來很方便——將它拷貝到你的工程目錄中就可以使用了。
一、服務端
作為示例,服務端的代碼足夠簡單,它就是directory.jsp:
<%// 重要,否則出現亂碼%>
<%@ page contentType="text/html; charset=utf-8" language="java" errorPage=""%>
<%
Stringuser=request.getParameter("user");
Stringpass=request.getParameter("pass");
out.println("<?xmlversion=\"1.0\" encoding=\"utf-8\" ?>");
if(user!=null || pass!=null){
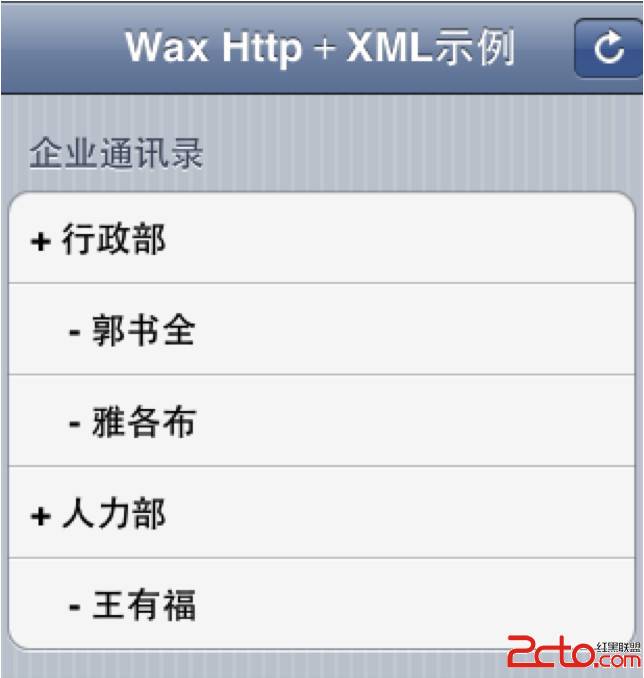
Stringxml="<list><deptname='行政部' id='01'><linkman id='001'name='郭書全'/>"+
"<linkman id='003' name='雅各布'/>"+
"</dept>"+"<dept name='人力部' id='02'><linkman id='002' name='王有福'>"+
"</linkman></dept></list>";
System.out.println(xml);
// response.setCharacterEncoding("utf-8");
out.println(xml);
}else{
out.println("<login><status>false</status></login>");
}
%>
代碼基本上是靜態的,你把它的HTML代碼保存為.htm文件也不會有什麼問題。
二、Wax實現
新建Single ViewApplication工程。加入Wax框架。關於Wax框架的安裝,你可以參考“XCode 4.2下Wax的安裝步驟”一文。
接下來我們准備實現一個WaxApplication。首先是main.m文件:
#import <UIKit/UIKit.h>
#import "wax.h"
#import "wax_http.h"
#import "wax_xml.h"
#import "wax_filesystem.h"
intmain(int argc, char *argv[]) {
NSAutoreleasePool * pool =[[NSAutoreleasePoolalloc] init];
wax_start("AppDelegate.lua", luaopen_wax_http, luaopen_wax_xml, luaopen_wax_filesystem, nil);
int retVal = UIApplicationMain(argc, argv, nil, @"AppDelegate");
[pool release];
return retVal;
}
注意代碼中的“wax_xml.h”和“luaopen_wax_xml”。原來是“wax_json.h”和“luaopen_wax_json”。我們原來是想用wax.xml代替wax.json來著,但由於wax雖然實現了wax.xml,但在wax_http中根本沒有使用,實際上“wax_xml.h”和“luaopen_wax_xml”在這裡沒有任何意義。
然後是AppDelegate.lua:
require "MyTableViewController"
waxClass{"AppDelegate", protocols = {"UIApplicationDelegate"}}
function applicationDidFinishLaunching(self, application)
local frame = UIScreen:mainScreen():bounds()
self.window =UIWindow:initWithFrame(frame)
self.controller = MyTableViewController:init()
local nc=UINavigationController:initWithRootViewController(self.controller)
self.window:setRootViewController(nc)
self.window:makeKeyAndVisible()
end
應用程序啟動時沒有直接加載MyTableViewController,而是用一個NavigationController來加載MyTableViewController。這樣可以為我們提供一個額外的NavigationBar。
最後是MyTableViewController.lua的實現:
require("xmlSimple")
waxClass{"MyTableViewController", UITableViewController}
function init(self)
self.super:initWithStyle(UITableViewStyleGrouped)
self.trends ={}
return self
end
function viewDidLoad(self)
self:setTitle("Wax Http+XML示例")
self:tableView():setAllowsSelection(false)
local button =UIBarButtonItem:initWithBarButtonSystemItem_target_action(UIBarButtonSystemItemRefresh,self, "loadDataFromTwitter")
self:navigationItem():setRightBarButtonItem(button)
end
functionloadDataFromTwitter(self)
UIApplication:sharedApplication():setNetworkActivityIndicatorVisible(true)-- show spinner
wax.http.request{"http://localhost:8080/AnyMail/directory.jsp?user=1&pass=1",callback = function(body, response)
UIApplication:sharedApplication():setNetworkActivityIndicatorVisible(false)-- hide spinner
local xml = xmlSimple:newParser()
local parseXml=xml:ParseXmlText(body)
if response:statusCode() == 200 then
self.trends = {} -- Reset the list oftrends when the trends are refreshed
--[[]]
for index,value in ipairs(parseXml.list.dept) do -- iterateover a table with numerical keys
table.insert(self.trends, "+"..value["@name"]) -- append the value to the "array"
linkman=value.linkman
puts(#linkman)
if linkman~=nil then
if #linkman>0 then
for i,v in ipairs(linkman) do
table.insert(self.trends," -"..v["@name"])
end
else
table.insert(self.trends," - "..linkman["@name"])
end
end
end
end
self:tableView():reloadData()
end}
end
function numberOfSectionsInTableView(self,tableView)
return 1
end
function tableView_numberOfRowsInSection(self,tableView, section)
return #self.trends
end
functiontableView_titleForHeaderInSection(self, tableView, section)
if section == 0 then
return"企業通訊錄"
end
return nil
end
function tableView_cellForRowAtIndexPath(self,tableView, indexPath)
local identifier = "TwitterTableViewControllerCell"
local cell =tableView:dequeueReusableCellWithIdentifier(identifier) or
UITableViewCell:initWithStyle_reuseIdentifier(UITableViewCellStyleDefault,identifier)
local object = self.trends[indexPath:row()+ 1] -- Must +1 because Lua arrays are 1 based
cell:textLabel():setText(object)
return cell
end
代碼不多,你直接把它們粘貼到文件裡就可以運行了。許多代碼比如TableViewDataSource方法的實現,在前面“Wax框架簡明教程(2)”中你已經熟悉了。我們主要關注的是 loadDataFromTwitter 函數(函數名還沒改過來...)。
首先,當然要 require("simpleXml")。然後構建一個simpleXml對象:
local xml =xmlSimple:newParser()
然後用ParseXmlText方法把xml字符串轉變為一張lua表:
localparseXml=xml:ParseXmlText(body)
在我們的例子裡,我們的XML文件內容是:
<?xml version="1.0"encoding="utf-8" ?>
<list>
<dept name='行政部' id='01'>
<linkmanid='001' name='郭書全'/>
<linkmanid='003' name='雅各布'/>
</dept>
<dept name='人力部' id='02'>
<linkmanid='002' name='王有福'></linkman>
</dept>
</list>
如果你想訪問第2個dept節點的第一個linkman子節點,那麼用parseXml.dept[2].linkman就可以了。轉化成lua表是這樣的(只是parseXml.dept[2].linkman這點節點,如果打印整張表的內容,那就太多了):
{
addProperty = function: 0x6a6f050,
@id ="002",
numProperties= function: 0x6a68200,
numChildren= function: 0x6a71a30,
properties= function: 0x6a681e0,
@name= "王有福",
addChild = function: 0x6a71a50,
___children = {
},
setName = function: 0x6a6f5a0,
name = function: 0x6a6f0b0,
___name = "linkman",
value = function: 0x6a71db0,
___props = {
1 = {
name = "id",
},
2 = {
name = "name",
value = function: 0x6a6f0b0,
},
},
children = function: 0x6a191d0,
setValue = function: 0x6a6f010,
}
接下來的事情,就是遍歷Lua表,這是Lua分內的事情,就不用我多說了。值得一提的是,針對某個節點的子節點有3種可能情況,以dept下的linkman為例:
1、該子節點不存在。這樣的話,dept[i].linkman返回nil;
2、該子節點有多個。這樣的話,dept[i].linkman返回一個數字索引的數組(Lua表),數組每個元素又是一個lua表(包含linkman的所有屬性和值);
3、該子節點只有一個。這樣的話,dept[i].linkman仍然返回一個lua表,但這個lua表直接包含了linkman所有屬性、值等信息。
也就說,2、3兩種情況的處理方法不同。對於單個子節點,我們可以直接以linkman[i]或linkman[k]的方式訪問到linkman的屬性。而對於多個子節點,linkman[i]只能訪問到一張lua表(不能用linkman[k]來訪問,因為此時linkman只包含數字鍵索引,不會包括文本鍵索引),然後通過這張lua表的index或key才能訪問到linkman的屬性。
好的,運行Wax Application。點擊導航欄上的刷新按鈕,TableView加載XML數據如下所示:
- 上一頁:IOS6橫屏
- 下一頁:Wax框架簡明教程(3)開始使用Wax


- ajax 三種完成辦法實例代碼
- IOS 波紋進度(waveProgress)動畫完成
- iOS開辟應用GDataXML框架解析收集數據
- WAMSimpleDataSource,更優雅的編寫靜態UITableView
- wax
- iOS之處理解體Collection <__NSArrayM: 0xb550c30> was mutated while being enumerated.
- 在iOS10零碎中微信前進無法發起ajax懇求的問題處理方法
- 【求證】AppStore Warning 並非針對 RN/Weex 這類技術
- 蘋果手表Apple Watch離開手機能Apple Pay嗎?
- Apple Watch升級WatchOS 2 Beta版教程
- apple watch支付寶功能及使用方法圖文詳解[多圖]
- Apple Watch搶購全攻略[多圖]
- vwallpaper2來電視頻插件iOS8使用圖文教程[多圖]
- 如何網上預訂apple watch?apple watch官網預訂教程[多圖]
- Apple Watch怎麼截屏? Apple Watch截屏圖文教程[多圖]