IOS6新特性集合視圖<UICollectionView>CircleLayout實踐
針對IOS6提出的全新特性UICollectionView做了一個實際的使用,有很多地方還是很有意義的,定制化貌似更加的靈活了,這樣對於大量的自定義來說更是“萬事俱備,東風已來”矣。在Apple Developer 中心也有Demo,那個Demo也是很有意思的,文章最後會給出下載地址。
一、戰果展示,呵呵~~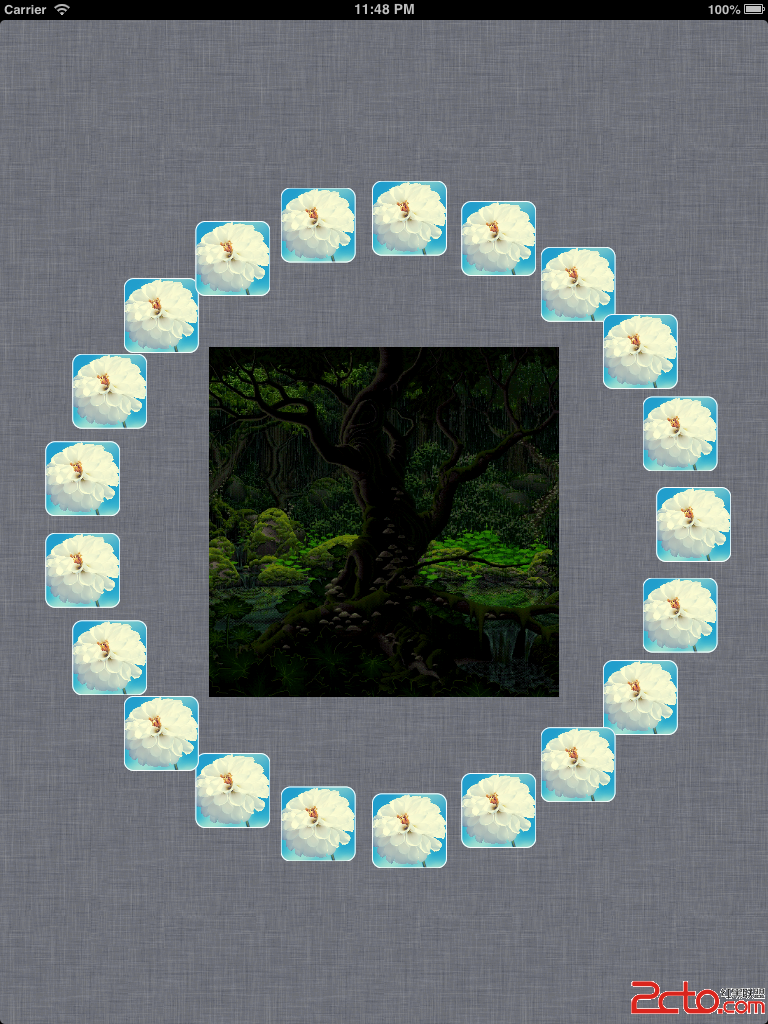
實現了一個圓形的UICollectionView的使用,當觸摸非圓周的部分時,Cell會增加,這裡注意每個小圖片就是一個cell;當觸摸圓周上的cell,也就是小圖片的時候,對應的cell就會消除。至於中間那個,嘿嘿~~是實現的一個gif效果顯示。這裡分享一個IOS設備上實現gif效果圖的圖片獲取方法。將一張gif圖片在MAC機上使用系統自帶的“預覽”打開,就可以看到一張一張的圖片了。然後按照順序“另存為”即可拿到順序的圖片了。接下來就可以參照 ios上實現gif顯示效果 這裡進行設置了。祝愉快~~~
二、代碼分析
1.1 代理方法介紹(AppDelegate)
在AppDelegate裡面,方法didFinishLaunchingWithOption中,創建ViewController,這個Controller是繼承自UICollectionViewController的,並且初始化controller的使用需要制定Controller的Layout,這個Layout就是制定CollectionView裡面的cells和supplementary views的。
樣例代碼:
[cpp]
#import "AppDelegate.h"
#import "ViewController.h"
#import "CircleLayout.h"
@implementation AppDelegate
- (BOOL)application:(UIApplication *)application didFinishLaunchingWithOptions:(NSDictionary *)launchOptions
{
self.window = [[UIWindow alloc] initWithFrame:[[UIScreen mainScreen] bounds]];
// Override point for customization after application launch.
self.viewController = [[ViewController alloc] initWithCollectionViewLayout:[[CircleLayout alloc] init]];
self.window.rootViewController = self.viewController;
[self.window makeKeyAndVisible];
return YES;
}
1.2 自定義Layout類介紹(CircleLayout)
在上面代碼中,可以看到引入了一個類CircleLayout.h ,這個類的作用就是指定頁面的Layout樣式的。從結果圖上可以看到,這個類裡面至少要實現cell的樣式、collectionView的樣式。要實現的東西不少~~~
CircleLayout類是繼承自UICollectionViewLayout的,而UICollectionViewLayout類是一個抽象基類,通過繼承它可以生成collectionView的Layout信息。而Layout的作用就是決定CollectionView中的Cell、supplementary view、decoration view的位置的。在使用UICollectionViewLayout的時候,必須謹記“先子類化,後使用” !
1.2.1 子類化
在子類化UICollectionViewLayout的時候,需要注意:
aa Layout只負責布局樣式,而不負責創建view。(view的創建是通過代理方法 datasource來實現的)
bb Layout對象中定義了view的位置以及view大小size的信息
1.2.2 UICollectionView 的三要素介紹
Cells:Layout就像一個管理者,而cell就是被管理者,每一個cell代表了collectionview中的一個item,一個collectionview可以放在一個section中,也可以放在整個UICollectionview中。使用和位置都是由Layout對象定義的。
Supplementary Views:純屬顯示的一個要素,不能被用戶選擇,而且還是可有可無的。只要你想為Section或者整個collection view 添加頁眉和頁腳,它就是了。
Decoration Views:一個裝飾品,不可被用戶選擇,類似於Supplementary View,使用和位置都是由Layout定義的。可有可無。
1.2.3 需要重載的方法介紹
每一個管理者(Layout對象)都有自己的一套方法,來管理手下的蝦兵小將:
1. collectionViewContentSize
2. shouldInvalidateLayoutForBoundsChange:
3. layoutAttributesForElementsInRect:
4. layoutAttributesForItemAtIndexPath:
5. layoutAttributesForSupplementaryViewOfKind:atIndexPath: (如果layout 支持 supplementary views)
6.layoutAttributesForDecorationViewWithReuseIdentifier:atIndexPath: (如果layout 支持 decoration views)
上述方法的具體含義和作用,可參考 SDK
1.2.4 折騰“插入”和"刪除 "
當collection view 中的數據發生了變化,例如其中的item有了變化,collection view 都需要重新檢索相應的Layout信息,來得到新的顯示。這樣collection view 就有了自己的一套檢索的方法,你只需要進行重載就可以了。
initialLayoutAttributesForInsertedItemAtIndexPath:
initialLayoutAttributesForInsertedSupplementaryElementOfKind:atIndexPath:
finalLayoutAttributesForDeletedItemAtIndexPath:
finalLayoutAttributesForDeletedSupplementaryElementOfKind:atIndexPath:
但是這裡只需要進行簡單的實現,所以只需要重載一下兩個方法:
initialLayoutAttributesForInsertedItemAtIndexPath:
finalLayoutAttributesForDeletedItemAtIndexPath:
OK,這就是自定義的CircleLayout類中需要注意的。下來上code:
CircleLayout.h 文件:
[cpp]
#import <UIKit/UIKit.h>
@interface CircleLayout : UICollectionViewLayout
//定義圓的圓心、半徑,以及cell的個數
@property (nonatomic,assign) CGPoint center;
@property (nonatomic,assign) CGFloat radius;
@property (nonatomic,assign) NSInteger cellCount;
@end
CircleLayout.m文件:
[cpp]
#import "CircleLayout.h"
//定義item的大小
#define ITEM_SIZE 70
@implementation CircleLayout
//為創建Circle做准備
- (void)prepareLayout{
[super prepareLayout];
CGSize size = self.collectionView.frame.size;
_cellCount = [[self collectionView] numberOfItemsInSection:0];
_center = CGPointMake(size.width / 2.0, size.height / 2.0);
_radius = MIN(size.width, size.height) / 2.5;
}
//設置collectionViewContentsize
- (CGSize) collectionViewContentSize{
return self.collectionView.frame.size;
}
//設置UICollectionViewLayoutAttributes
- (UICollectionViewLayoutAttributes *)layoutAttributesForItemAtIndexPath:(NSIndexPath *)indexPath{
UICollectionViewLayoutAttributes *attributes = [UICollectionViewLayoutAttributes layoutAttributesForCellWithIndexPath:indexPath];
attributes.size = CGSizeMake(ITEM_SIZE, ITEM_SIZE);
attributes.center = CGPointMake(_center.x + _radius * cosf(2 * indexPath.item * M_PI / _cellCount),
_center.y + _radius * sinf(2 * indexPath.item * M_PI / _cellCount));
return attributes;
}
//設置layoutAttributesForElementsInRect
- (NSArray *)layoutAttributesForElementsInRect:(CGRect)rect{
NSMutableArray *attributes = [NSMutableArray array];
for(NSInteger i = 0; i < self.cellCount; i++){
NSIndexPath *indexPath = [NSIndexPath indexPathForItem:i inSection:0];
[attributes addObject:[self layoutAttributesForItemAtIndexPath:indexPath]];
}
return attributes;
}
#pragma mark --
#pragma mark Layout init & final
//復寫initialLayoutAttributesForInsertedItemAtIndexPath
- (UICollectionViewLayoutAttributes *)initialLayoutAttributesForInsertedItemAtIndexPath:(NSIndexPath *)itemIndexPath
{
UICollectionViewLayoutAttributes* attributes = [self layoutAttributesForItemAtIndexPath:itemIndexPath];
attributes.alpha = 0.0;
attributes.center = CGPointMake(_center.x, _center.y);
return attributes;
}
//復寫finalLayoutAttributesForDeletedItemAtIndexPath
- (UICollectionViewLayoutAttributes *)finalLayoutAttributesForDeletedItemAtIndexPath:(NSIndexPath *)itemIndexPath
{
UICollectionViewLayoutAttributes* attributes = [self layoutAttributesForItemAtIndexPath:itemIndexPath];
attributes.alpha = 0.0;
attributes.center = CGPointMake(_center.x, _center.y);
attributes.transform3D = CATransform3DMakeScale(0.1, 0.1, 1.0);
return attributes;
}
@end
1.3 自定義Cell
關於UITableViewCell的自定義,估計大多數人都會不止一種的自定義方法吧,UICollectionViewCell也可以定制,這樣就極大的方便了那些需要震撼性UI的App開發者的使用了。UICollectionViewCell的主要功能就是管理collectionview中的每一個item了,注意只是當item在屏幕的可視范圍的時候,OK,那麼自定義的這個Cell就直接繼承自UICollectionViewCell類,在這個自定義的Cell中需要一個圖像容器UIImageView來存放每一個item上的圖片。
[cpp]
#import <UIKit/UIKit.h>
@interface CircleCell : UICollectionViewCell
@property (nonatomic,strong) UIImageView *imageView;
@end
[cpp]
#import "CircleCell.h"
#import <QuartzCore/QuartzCore.h>
@implementation CircleCell
@synthesize imageView;
- (id)initWithFrame:(CGRect)frame
{
self = [super initWithFrame:frame];
if (self) {
// Initialization code
self.contentView.layer.cornerRadius = 10.0f;
self.contentView.frame = CGRectMake(0, 0, 75, 75);
self.contentView.layer.borderWidth = 1.0f;
self.contentView.layer.borderColor = [UIColor whiteColor].CGColor;
self.contentView.backgroundColor = [UIColor underPageBackgroundColor];
self.imageView = [[UIImageView alloc]initWithImage:[UIImage imageNamed:@"1_120103225810_1.jpeg"]];
self.imageView.layer.masksToBounds = YES;
self.imageView.layer.cornerRadius = 10.0f;
self.imageView.frame = self.contentView.frame;
[self.contentView addSubview:self.imageView];
}
return self;
}
@end
完成之後,就完成了大部分的code准備工作了。接下來就是要在開始那個ViewController類中進行調用使用了。
三、最終的code
首先要實現UICollectionView的兩個代理方法:delegate & dataSource。並且要給collectionView 添加Tap 手勢哦,這樣才能讓用戶在觸摸的時候有所交互。
直接上code吧。HOHO~~
ViewController.h 文件:
[cpp]
#import <UIKit/UIKit.h>
@interface ViewController : UICollectionViewController
@property (nonatomic,assign)NSInteger cellCount;
@end
ViewController.m 文件:
[cpp] view plaincopy
#import "ViewController.h"
#import "GifLayoutView.h"
#import "CircleCell.h"
@interface ViewController ()
@end
@implementation ViewController
- (void)viewDidLoad
{
[super viewDidLoad];
// Do any additional setup after loading the view, typically from a nib.
//添加背景gif顯示圖View
GifLayoutView *gifView = [[GifLayoutView alloc]initWithFrame:CGRectMake(0, 0, 350, 350)];
gifView.center = self.collectionView.center;
[self.collectionView addSubview:gifView];
//為collectionView添加tapGesture,並注冊。
self.cellCount = 20;
UITapGestureRecognizer *tapGesture = [[UITapGestureRecognizer alloc] initWithTarget:self action:@selector(handleTapGesture:)];
[self.collectionView addGestureRecognizer:tapGesture];
[self.collectionView registerClass:[CircleCell class] forCellWithReuseIdentifier:@"Circle_Cell"];
[self.collectionView reloadData];
self.collectionView.backgroundColor = [UIColor scrollViewTexturedBackgroundColor];
}
//設置numberOfItemsInSection
- (NSInteger)collectionView:(UICollectionView *)view numberOfItemsInSection:(NSInteger)section;
{
return self.cellCount;
}
//復用Cell
- (UICollectionViewCell *)collectionView:(UICollectionView *)collectionView cellForItemAtIndexPath:(NSIndexPath *)indexPath
{
CircleCell *cell = [collectionView dequeueReusableCellWithReuseIdentifier:@"Circle_Cell" forIndexPath:indexPath];
return cell;
}
//手勢的相應事件
- (void)handleTapGesture:(UITapGestureRecognizer *)sender {
if (sender.state == UIGestureRecognizerStateEnded)
{
CGPoint initialPinchPoint = [sender locationInView:self.collectionView];
NSIndexPath* tappedCellPath = [self.collectionView indexPathForItemAtPoint:initialPinchPoint];
if (tappedCellPath!=nil)
{
self.cellCount = self.cellCount - 1;
[self.collectionView performBatchUpdates:^{
[self.collectionView deleteItemsAtIndexPaths:[NSArray arrayWithObject:tappedCellPath]];
} completion:nil];
}
else
{
self.cellCount = self.cellCount + 1;
[self.collectionView performBatchUpdates:^{
[self.collectionView insertItemsAtIndexPaths:[NSArray arrayWithObject:[NSIndexPath indexPathForItem:0 inSection:0]]];
} completion:nil];
}
}
}
- (void)didReceiveMemoryWarning
{
[super didReceiveMemoryWarning];
// Dispose of any resources that can be recreated.
}
@end
四、接下來就是見證奇跡的時刻
確認一切OK之後,Run Run Run ,幾秒之後,你就會看到最終的效果了,當然了那些圖片和Screen背景按照個人喜好設置就OK 了。
號外 號外:Apple SDK 官方UICollectionViewController Sample Code
- 上一頁:popToViewController
- 下一頁:ios 該不該加self