iOS 數據持久化(歸檔與反歸檔)
IOS 數據持久化(歸檔與反歸檔)
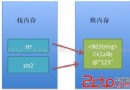
數據持久化,實際上就是將數據存放到網絡或者硬盤上,這裡是存儲到本地的硬盤上,應用程序的本地硬盤是沙盒,沙盒實際上就是一個文件夾,它下面有4個文件夾。分別是Documents,Library,APP包和tmp文件夾
Documents裡面主要是存儲用戶長期使用的文件,
Library裡面又有Caches和Preferences文件夾,
(1)Caches裡面存放的是臨時的文件,緩存。
(2)Preferences裡面存放的是偏好設置。比如:程序是否是第一次啟動
tmp裡面也是臨時的文件,不過和Caches還有區別,
APP包裡面是編譯後的一些文件,包不能修改。
一.首先創建一個Person類
.h文件
#import
//如果要對一個類的對象實現歸檔操作,必須讓該類服從NSCoding協議
@interface Person :NSObject
@property (nonatomic,copy) NSString *name;
@property (nonatomic,copy) NSString *gender;
@property (nonatomic,assign) NSInteger age;
- (id)initWithName:(NSString *)name gender:(NSString *)gender age:(NSInteger)age;
@end
#import"Person.h"
@implementation Person
- (id)initWithName:(NSString *)name gender:(NSString *)gender age:(NSInteger)age
{
self = [superinit];
if (self) {
//1.當對象為字符串, 數組, 字典, 集合時, 屬性的語義特性聲明為copy
//2.定義完屬性再給實例變量賦值時, 要使用setter方法
//3.一定要注意屬性的內存管理
self.name = name;
self.gender = gender;
self.age = age;
}
return self;
}
//當對一個對象歸檔時,會調用對象的該方法,為該對象自己的實力變量進行歸檔
- (void)encodeWithCoder:(NSCoder *)aCoder
{
[aCoderencodeObject:_nameforKey:@"name"];
[aCoderencodeObject:_genderforKey:@"gender"];
[aCoderencodeObject:@(_age)forKey:@"age"];
}
//當對一個對象反歸檔時,會調用對象的該方法,為該對象的實例變量進行反歸檔
- (id)initWithCoder:(NSCoder *)aDecoder
{
self = [superinit];
if (self) {
self.name = [aDecoder decodeObjectForKey:@"name"];
self.gender = [aDecoder decodeObjectForKey:@"gender"];
self.age = [[aDecoderdecodeObjectForKey:@"age"]integerValue];
}
return self;
}
- (void)dealloc
{
self.name =nil;
self.gender =nil;
[superdealloc];
}
@end
這裡面為了易於理解,創建TextFiled 以及其他控件一起寫出來了
#import "SecondViewController.h"
#import "Person.h"
@interfaceSecondViewController ()
@end
@implementation SecondViewController
- (id)initWithNibName:(NSString *)nibNameOrNil bundle:(NSBundle *)nibBundleOrNil
{
self = [superinitWithNibName:nibNameOrNil bundle:nibBundleOrNil];
if (self) {
// Custom initialization
}
returnself;
}
- (void)viewDidLoad
{
[superviewDidLoad];
[selfcustomizeNavigationControl];
// Do any additional setup after loading the view.
self.view.backgroundColor = [UIColorwhiteColor];
//創建視圖控件
//textFile1
UITextField *firstFiled = [[UITextFieldalloc] initWithFrame:CGRectMake(30,94, 260, 30)];
firstFiled.delegate =self;
firstFiled.tag =100;
firstFiled.placeholder =@"請輸入內容";
firstFiled.autocorrectionType =UITextAutocorrectionTypeNo;
firstFiled.borderStyle =UITextBorderStyleRoundedRect;
[self.viewaddSubview:firstFiled];
[firstFiled release];
//textFile2
UITextField *secondFiled = [[UITextFieldalloc] initWithFrame:CGRectMake(30,154, 260, 30)];
secondFiled.delegate =self;
secondFiled.tag =101;
secondFiled.autocorrectionType =UITextAutocorrectionTypeNo;
secondFiled.placeholder =@"顯示上一個輸入框的內容";
secondFiled.borderStyle =UITextBorderStyleRoundedRect;
[self.viewaddSubview:secondFiled];
[secondFiled release];
//writeButton
UIButton *pigeonholeButton = [UIButtonbuttonWithType:UIButtonTypeCustom];
pigeonholeButton.frame =CGRectMake(30, 214,100, 30);
[pigeonholeButton setTitle:@"歸檔"forState:UIControlStateNormal];
[pigeonholeButton setTitleColor:[UIColorblueColor] forState:UIControlStateNormal];
[pigeonholeButton addTarget:self action:@selector(pigeonholeClick:)forControlEvents:UIControlEventTouchUpInside];
[self.viewaddSubview:pigeonholeButton];
//readButton
UIButton *againstPigeonholeButton = [UIButtonbuttonWithType:UIButtonTypeCustom];
againstPigeonholeButton.frame =CGRectMake(190, 214, 100, 30);
[againstPigeonholeButtonsetTitle:@"反歸檔"forState:UIControlStateNormal];
[againstPigeonholeButtonsetTitleColor:[UIColorblueColor] forState:UIControlStateNormal];
[againstPigeonholeButton addTarget:self action:@selector(againstPigeonholeClick:)forControlEvents:UIControlEventTouchUpInside];
[self.viewaddSubview:againstPigeonholeButton];
}
//歸檔
- (void)pigeonholeClick:(UIButton *)pigeonholeBtn
{
//1.獲取輸入框的內容
UITextField *tf1 = (UITextField *)[self.viewviewWithTag:100];
UITextField *tf2 = (UITextField *)[self.viewviewWithTag:101];
//封裝成Person對象
Person *per = [[Personalloc] initWithName:tf1.textgender:tf2.text age:18];
//一.創建歸檔對象
NSMutableData *data = [NSMutableDatadata];
NSKeyedArchiver *archiver = [[NSKeyedArchiveralloc] initForWritingWithMutableData:data];
//二.歸檔
[archiver encodeObject:perforKey:@"Tsummer"];
//三.結束歸檔當結束歸檔之後再歸檔無效.
[archiver finishEncoding];
[per release];
[archiver release];
//四.data寫入文件
[data writeToFile:[selfgetFilePath] atomically:YES];
}
//反歸檔
- (void)againstPigeonholeClick:(UIButton *)againstPigeonholeBtn
{
//1.根據文件路徑初始化NSMutableData對象
NSMutableData *mData = [NSMutableDatadataWithContentsOfFile:[selfgetFilePath]];
//2.創建一個反歸檔對象
NSKeyedUnarchiver *unarchiver = [[NSKeyedUnarchiveralloc] initForReadingWithData:mData];
//3.反歸檔
Person *per = [unarchiverdecodeObjectForKey:@"Tsummer"];
//4.結束反歸檔
[unarchiver finishDecoding];
[unarchiver release];
UITextField *tf1 = (UITextField *)[self.viewviewWithTag:100];
tf1.text = per.gender;
UITextField *tf2 = (UITextField *)[self.viewviewWithTag:101];
tf2.text = per.name;
NSLog(@"反歸檔");
}
//獲取文件路徑
- (NSString *)getFilePath
{
//1.先獲得Documents文件夾的路徑
NSString *documentsPath = [NSSearchPathForDirectoriesInDomains(NSDocumentDirectory, NSUserDomainMask,YES) firstObject];
//(2)拼接上文件路徑
NSString *newFilePath = [documentsPath stringByAppendingPathComponent:@"Tsummer.txt"];
NSLog(@"%@", newFilePath);
return newFilePath;
}
//定制navigationControl
- (void)customizeNavigationControl
{
self.navigationItem.title =@"歸檔與反歸檔";
}
- (BOOL)textFieldShouldReturn:(UITextField *)textField
{
[textField resignFirstResponder];
returnYES;
}
- (void)didReceiveMemoryWarning
{
[superdidReceiveMemoryWarning];
// Dispose of any resources that can be recreated.
}
/*
#pragma mark - Navigation
// In a storyboard-based application, you will often want to do a little preparation before navigation
- (void)prepareForSegue:(UIStoryboardSegue *)segue sender:(id)sender
{
// Get the new view controller using [segue destinationViewController].
// Pass the selected object to the new view controller.
}
*/
@end