
【IOS 開發】基本 UI 控件詳解 (UISegmentedControl | UIImageView | UIProgressView | UISlider | UIAlertView )
一. 分段控件 (UISegmentedControl)
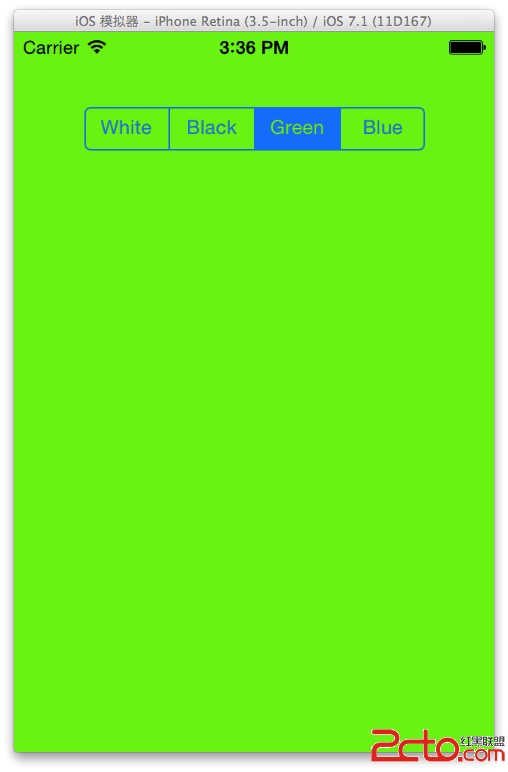
控件展示 :

1. UISegmentedControl 控件屬性
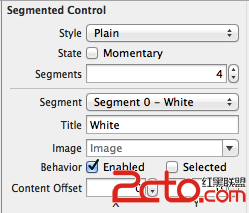
(1) Style 屬性
Style 屬性 :

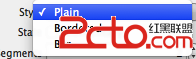
-- Plain : 分段控件使用最普通的風格;
-- Bordered : 在最普通風格上添加一圈邊框;
-- Bar : 分段控件使用工具條風格;
(2) State 屬性
State 屬性 :

-- Momentary 復選框 : 勾選復選框後, 分段控件不保存控件狀態, 如果勾選後, 點擊時高亮, 點擊後恢復原樣;
(3) Tint 屬性
Tint 屬性 :

-- 作用 : 設置分段控件被選中的高亮顏色;
-- 效果展示 :

(4) Segments 屬性
Segments 屬性 :

-- 作用 : 控制分成幾段;
-- 展示效果 :

(5) Segment 屬性
Segment 屬性 :

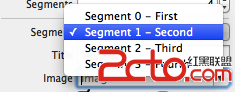
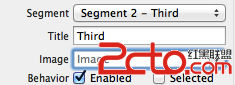
-- 作用 : 為不同的分段設置對應的 標題, 圖片 等內容;
(6) Tittle 屬性
Tittle 屬性 : 每個 Segment 都有一個 Tittle 屬性, 就是分段按鈕每個按鈕的標題;
(7) Image 屬性
Image 屬性 : 為不同的 分段 Segment 設置圖片;
(8) Behavior 屬性
Behavior 屬性 :
-- Enable 復選框 : 用於設置 Segment 是否可用;
-- Selected 復選框 : 用於設置 Segment 是否被選中;
2. 使用 UISegmentedControl 改變背景顏色
(1) 設置 UISegmentedControl 屬性
UISegmentedControl 屬性 :

-- 屬性截圖 :
(2) 設置 UISegmentedControl 響應方法
創建 UISegmentedControl 的 IBAction :
-- 按住 control 鍵將 UISegmentedControl 拖動到 OCViewController.h 中 :

-- 設置 IBAction 屬性 :
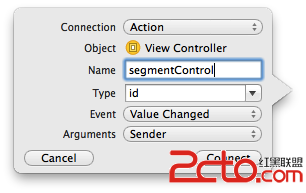
-- 方法代碼 :
- (IBAction)segmentControl:(id)sender {
    int index = [sender selectedSegmentIndex];

    switch (index) {
        case 0:
            self.baseView.backgroundColor = [UIColor whiteColor];
            break;
        case 1:
            self.baseView.backgroundColor = [UIColor blackColor];
            break;
        case 2:
            self.view.backgroundColor = [UIColor greenColor];
            break;
        case 3:
            self.view.backgroundColor = [UIColor blueColor];
            break;

        default:
            break;
    }
}
(3) 代碼示例
代碼示例 :
-- OCViewController.h :
// // OCViewController.h // UISegmentedControl // // Created by octopus on 15-12-4. // Copyright (c) 2015年 www.octopus.org.cn. All rights reserved. // #import@interface OCViewController : UIViewController //背景 UIView @property (strong, nonatomic) IBOutlet UIView *baseView; - (IBAction)segmentControl:(id)sender; @end
-- OCViewController.m :
//
//  OCViewController.m
//  UISegmentedControl
//
//  Created by octopus on 15-12-4.
//  Copyright (c) 2015年 www.octopus.org.cn. All rights reserved.
//

#import "OCViewController.h"

@interface OCViewController ()

@end

@implementation OCViewController

- (void)viewDidLoad
{
    [super viewDidLoad];
	// Do any additional setup after loading the view, typically from a nib.
}

- (void)didReceiveMemoryWarning
{
    [super didReceiveMemoryWarning];
    // Dispose of any resources that can be recreated.
}

- (IBAction)segmentControl:(id)sender {
    int index = [sender selectedSegmentIndex];

    switch (index) {
        case 0:
            self.baseView.backgroundColor = [UIColor whiteColor];
            break;
        case 1:
            self.baseView.backgroundColor = [UIColor blackColor];
            break;
        case 2:
            self.view.backgroundColor = [UIColor greenColor];
            break;
        case 3:
            self.view.backgroundColor = [UIColor blueColor];
            break;

        default:
            break;
    }
}
@end
-- 界面展示 :
3. 動態增加刪除分段
(1) 主要 API 簡介
插入 刪除分段 :
-- 插入分段 : 調用 segmentControl 的 insertSegmentWithTittle 方法, 參數一 標題, 參數二 插入索引;
[self.segmentControl insertSegmentWithTitle:tittle atIndex:count animated:YES];
-- 刪除分段 : 刪除只需注明 索引值 即可;
[self.segmentControl removeSegmentAtIndex:count - 1 animated:YES];
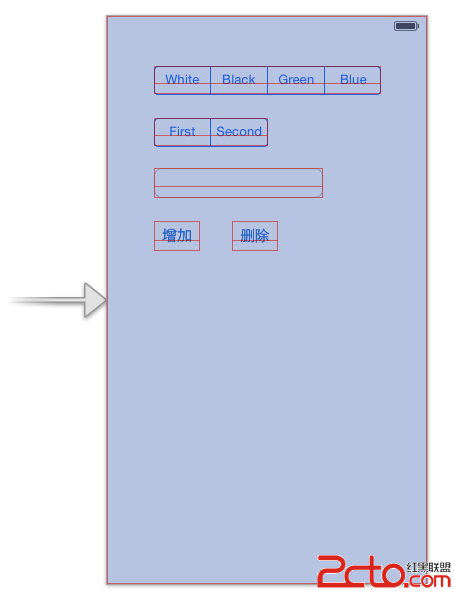
(2) 源碼示例
源碼示例 :
-- 界面設計文件 :
-- OCViewController.h :
// // OCViewController.h // UISegmentedControl // // Created by octopus on 15-12-4. // Copyright (c) 2015年 www.octopus.org.cn. All rights reserved. // #import-- OCViewController.m :@interface OCViewController : UIViewController //背景 UIView @property (strong, nonatomic) IBOutlet UIView *baseView; //分段控件 @property (strong, nonatomic) IBOutlet UISegmentedControl *segmentControl; //單行文本 @property (strong, nonatomic) IBOutlet UITextField *textField; //分段控件方法 - (IBAction)segmentControl:(id)sender; //點擊背景控件方法 - (IBAction)clickBackGround:(id)sender; //添加分段控件 - (IBAction)addSegment:(id)sender; //刪除分段控件 - (IBAction)minusSegment:(id)sender; @end
//
//  OCViewController.m
//  UISegmentedControl
//
//  Created by octopus on 15-12-4.
//  Copyright (c) 2015年 www.octopus.org.cn. All rights reserved.
//

#import "OCViewController.h"

@interface OCViewController ()

@end

@implementation OCViewController

- (void)viewDidLoad
{
    [super viewDidLoad];
	// Do any additional setup after loading the view, typically from a nib.
}

- (void)didReceiveMemoryWarning
{
    [super didReceiveMemoryWarning];
    // Dispose of any resources that can be recreated.
}

//分段控件響應方法
- (IBAction)segmentControl:(id)sender {
    int index = [sender selectedSegmentIndex];

    switch (index) {
        case 0:
            self.baseView.backgroundColor = [UIColor whiteColor];
            break;
        case 1:
            self.baseView.backgroundColor = [UIColor blackColor];
            break;
        case 2:
            self.view.backgroundColor = [UIColor greenColor];
            break;
        case 3:
            self.view.backgroundColor = [UIColor blueColor];
            break;

        default:
            break;
    }
}

- (IBAction)clickBackGround:(id)sender {
    // 點擊背景 取消虛擬鍵盤
    [self.textField resignFirstResponder];
}

//添加分段控件
- (IBAction)addSegment:(id)sender {
    NSUInteger count = self.segmentControl.numberOfSegments;

    NSString * tittle = self.textField.text;
    if ([tittle length] > 0) {
        [self.segmentControl insertSegmentWithTitle:tittle atIndex:count animated:YES];
        self.textField.text = @"";
    }
}

//刪除分段控件
- (IBAction)minusSegment:(id)sender {
    NSUInteger count = self.segmentControl.numberOfSegments;
    [self.segmentControl removeSegmentAtIndex:count - 1 animated:YES];
}
@end
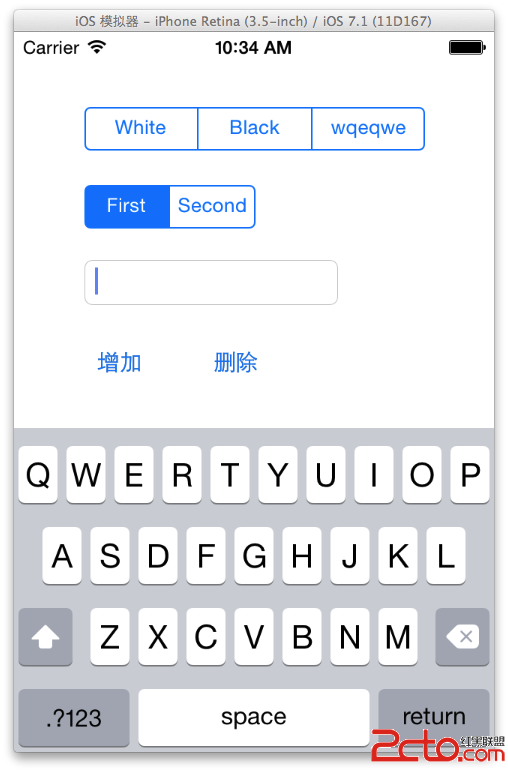
-- 界面展示 :
二. 圖像控件 (UIImageView)
1. UIImageView 控件屬性
(1) UIImageView 簡介
UIImageView 簡介 :
-- 繼承結構 : UIImageView 繼承 UIView, 該類不能響應用戶操作, 是靜態控件, (活動控件 靜態控件 被動控件);
(2) 圖片顯示屬性
設置圖片顯示的屬性 :
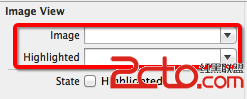
-- image (普通) : 訪問或設置該控件顯示的圖片;
-- HighlightedImage (高亮) : 設置圖片處於 高亮狀態 時顯示的圖片;
(3) 動畫顯示方法
UIImageView 動畫顯示方法 :
-- animationImages : 設置一個 NSArray 對象, 需要顯示多張圖片;
-- highlightedAnimationImages : 設置 高亮狀態 顯示的多張圖片;
-- animationDuration : 設置 UIImageView 動畫持續時間;
-- animationRepeatCount : 設置 UIImageView 動畫重復次數;
-- startAnimating : 開始播放動畫;
-- stopAnimating : 停止播放動畫;
-- isAnimating : 判斷 UIImageView 是否正在播放動畫;
(4) UIImageView 縮放屬性
UIImageView 縮放屬性 :
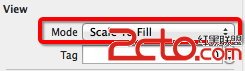
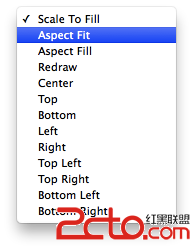
-- Scale To Fill : 不保持 縱橫縮放比, 圖片完全自適應 UIImageView 控件;
-- Aspect Fit : 保持縱橫比縮放, 保證圖片長邊完全顯示出來, 完整顯示圖片;
-- Aspect Fill : 保持縱橫比縮放, 保證圖片短邊能顯示出來, 只在水平或垂直方向某一個方向是完整的, 另一個方向截取;
-- Center : 不縮放圖片, 顯示圖片的中間區域;
-- Top : 不縮放圖片, 顯示圖片的頂部區域;
-- Bottom : 不縮放圖片, 顯示圖片底部區域;
-- Left : 不縮放圖片, 顯示圖片左邊區域;
-- Right : 不縮放圖片, 顯示圖片右邊區域;
-- Top Left : 不縮放圖片, 顯示圖片左上區域;
-- Top Right : 不縮放圖片, 顯示圖片右上區域;
-- Bottom Left : 不縮放圖片, 顯示圖片左下區域;
-- Bottom Right : 不縮放圖片, 顯示圖片右下區域;
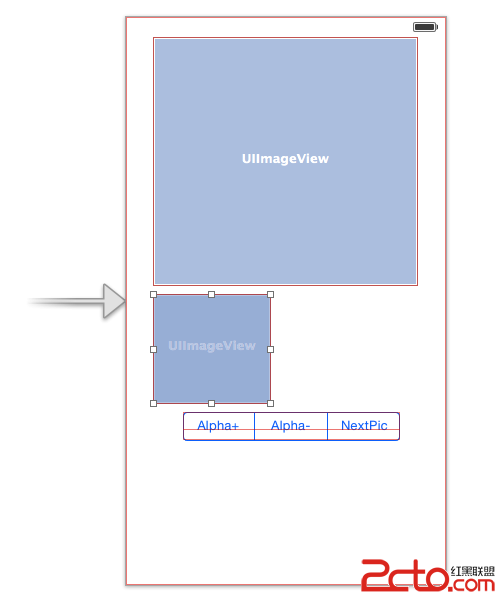
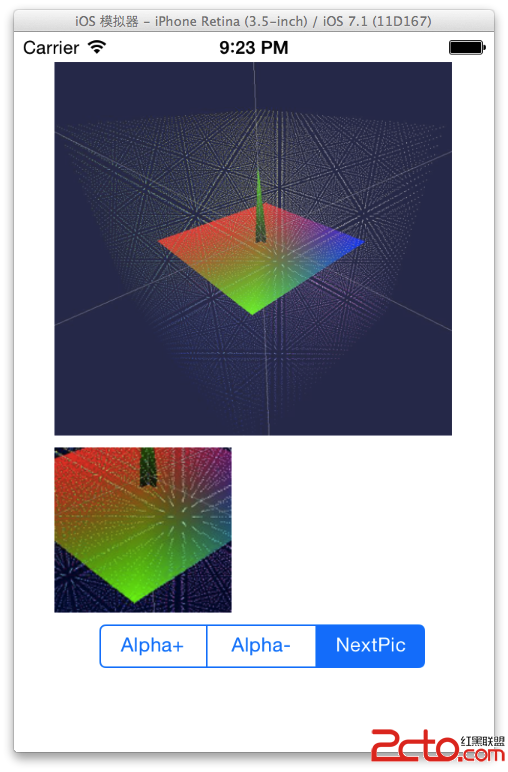
2. 圖片浏覽器示例
(1) API 簡介
手勢事件 :
-- 設置手勢點擊響應 : 每個 UIView 都有一個 userInteractionEnabled 屬性為 YES;
    //設置大圖片可以相應手勢點擊
    self.bigPicture.userInteractionEnabled = YES;
-- 創建手勢識別器 : 創建 UITapGestureRecognizer 手勢識別器, initWithTarget 表示手勢響應方法的類, action 對應方法的 selector 方法;
UITapGestureRecognizer * tap = [[UITapGestureRecognizer alloc] initWithTarget:self action:@selector(click:)];-- 為 UIView 添加手勢識別器 : 調用 UIView 的 addGestureRecognizer 方法;
[self.bigPicture addGestureRecognizer:tap];-- 設置 UIImageView 圖片 :
self.bigPicture.image = [UIImage imageNamed:[images objectAtIndex:currentImage%images.count]];-- 設置透明度 :
self.bigPicture.alpha = alpha;-- 獲取手指觸摸位置 :
    //獲取手指觸摸的位置
    CGPoint point = [recognizer locationInView:self.bigPicture];
-- 獲取圖片對應的 CGImageRef :
    //獲取原圖對應的 CGImageRef
    CGImageRef imageRef = [srcImage CGImage];
-- 根據一個圖片創建新的 CGImageRef :
    //創建新的圖片
    CGImageRef newImageRef = CGImageCreateWithImageInRect(imageRef, CGRectMake(x, y, 140, 140));
-- 根據 CGImageRef 創建 UIImage :
[UIImage imageWithCGImage:newImageRef];
(2) 代碼示例
代碼示例 :
-- 界面設計文件 :
-- OCViewController.h :
// // OCViewController.h // UIImageView // // Created by octopus on 15-12-7. // Copyright (c) 2015年 www.octopus.org.cn. All rights reserved. // #import@interface OCViewController : UIViewController //大圖片的 UIImageView @property (strong, nonatomic) IBOutlet UIImageView *bigPicture; //小圖片的 UIImageView @property (strong, nonatomic) IBOutlet UIImageView *smallPicture; //UISegmentedControl 的方法 - (IBAction)segmentControl:(id)sender; @end
-- OCViewController.m :
//
//  OCViewController.m
//  UIImageView
//
//  Created by octopus on 15-12-7.
//  Copyright (c) 2015年 www.octopus.org.cn. All rights reserved.
//

#import "OCViewController.h"

@interface OCViewController ()

@end

@implementation OCViewController

//圖片集合
NSArray * images;
//當前顯示的圖片
int currentImage;
//透明度
CGFloat alpha;

- (void)viewDidLoad
{
    [super viewDidLoad];
	// Do any additional setup after loading the view, typically from a nib.

    //初始化變量
    currentImage = 0;
    alpha = 1.0;
    images = [NSArray arrayWithObjects:@"1.png" , @"2.jpg", @"3.png", nil];

    //設置大圖片可以相應手勢點擊
    self.bigPicture.userInteractionEnabled = YES;

    UITapGestureRecognizer * tap = [[UITapGestureRecognizer alloc] initWithTarget:self action:@selector(click:)];

    [self.bigPicture addGestureRecognizer:tap];

}

- (void)didReceiveMemoryWarning
{
    [super didReceiveMemoryWarning];
    // Dispose of any resources that can be recreated.
}

- (IBAction)segmentControl:(id)sender {
    int index = [sender selectedSegmentIndex];
    switch (index) {
        case 0: //透明度+
            alpha += 0.1;
            if(alpha > 1.0){
                alpha = 1.0;
            }
            self.bigPicture.alpha = alpha;
            break;
        case 1: //透明度-
            NSLog(@"1");
            alpha -= 0.1;
            if(alpha < 0){
                alpha = 0;
            }
            self.bigPicture.alpha = alpha;
            break;
        case 2: //下一張圖片
            NSLog(@"2");
            self.bigPicture.image = [UIImage imageNamed:[images objectAtIndex:currentImage%images.count]];
            currentImage ++;
            break;

        default:
            break;
    }
}

- (void) click : (UIGestureRecognizer * ) recognizer{
    //獲取正在顯示的圖片
    UIImage * srcImage = self.bigPicture.image;
    //獲取手指觸摸的位置
    CGPoint point = [recognizer locationInView:self.bigPicture];
    //獲取原圖對應的 CGImageRef
    CGImageRef imageRef = [srcImage CGImage];
    //獲取縮放比例
    CGFloat scale = srcImage.size.width / 320;
    //獲取圖片位置
    CGFloat x = point.x * scale;
    CGFloat y = point.y * scale;
    //驗證 x y 坐標, 不要超出邊界
    if (x + 120 > srcImage.size.width - 140) {
        x = srcImage.size.width - 140;
    }

    if (y + 120 > srcImage.size.height) {
        y = srcImage.size.height - 140;
    }

    //創建新的圖片
    CGImageRef newImageRef = CGImageCreateWithImageInRect(imageRef, CGRectMake(x, y, 140, 140));
    self.smallPicture.image = [UIImage imageWithCGImage:newImageRef];

}
@end
-- 界面展示 :
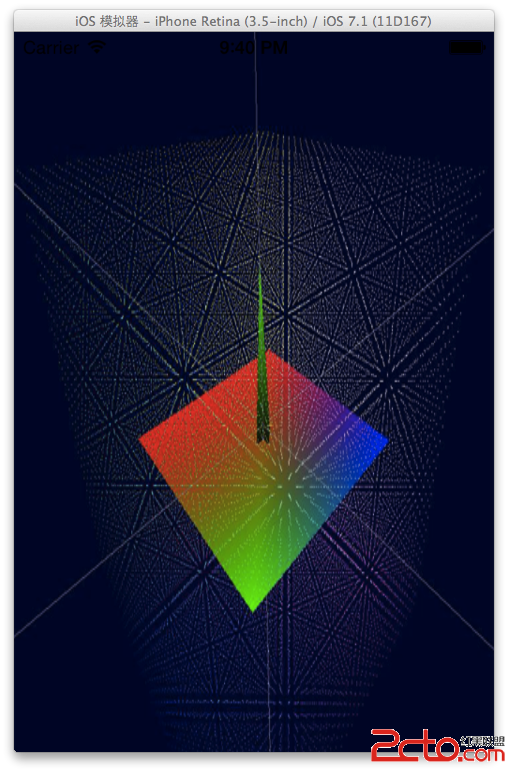
3. 幻燈片放映
(1) API 簡介
幻燈片播放相關 API :
-- 設置 UIImage 數組給 UIImageView :
    images = [NSArray arrayWithObjects:
              [UIImage imageNamed:@"1.png"],
              [UIImage imageNamed:@"2.jpg"],
              [UIImage imageNamed:@"3.png"],
              nil];
    self.imageView.animationImages = images;
-- 設置動畫的間隔 和 次數 :
    //設置 UIImageView 動畫間隔
    self.imageView.animationDuration = 5;
    //設置動畫重復次數
    self.imageView.animationRepeatCount = 0xFFFF;
-- 啟動動畫 :
    //啟動動畫
    [self.imageView startAnimating];
(2) 代碼示例
代碼示例 :
-- 界面設計文件 :
-- OCViewController.h :
// // OCViewController.h // UIimageView2 // // Created by octopus on 15-12-9. // Copyright (c) 2015年 www.octopus.org.cn. All rights reserved. // #import@interface OCViewController : UIViewController @property (strong, nonatomic) IBOutlet UIImageView *imageView; @end
-- OCViewController.m :
//
//  OCViewController.m
//  UIimageView2
//
//  Created by octopus on 15-12-9.
//  Copyright (c) 2015年 www.octopus.org.cn. All rights reserved.
//

#import "OCViewController.h"

@interface OCViewController ()

@end

@implementation OCViewController

NSArray * images;

- (void)viewDidLoad
{
    [super viewDidLoad];
	// Do any additional setup after loading the view, typically from a nib.

    //創建 UIImageView 集合
    images = [NSArray arrayWithObjects:
              [UIImage imageNamed:@"1.png"],
              [UIImage imageNamed:@"2.jpg"],
              [UIImage imageNamed:@"3.png"],
              nil];
    //設置集合給 UIImageView 的動畫
    self.imageView.animationImages = images;
    //設置 UIImageView 動畫間隔
    self.imageView.animationDuration = 5;
    //設置動畫重復次數
    self.imageView.animationRepeatCount = 0xFFFF;
    //啟動動畫
    [self.imageView startAnimating];

}

- (void)didReceiveMemoryWarning
{
    [super didReceiveMemoryWarning];
    // Dispose of any resources that can be recreated.
}

@end
-- 界面展示 :
三. 進度條控件 (UIProgressView)
1. UIProgressView 控件屬性
UIProgressView 屬性截圖 :
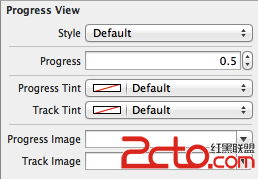
(1) Style 屬性
Style 屬性 :
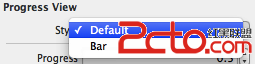
-- Default : 使用默認風格的進度條;

-- Bar : 工具條風格;

(2) progress 屬性
Progress 屬性 : 設置已進行的進度的比例值, 取值范圍 0.0 ~ 1.0;
(3) Progress Tint 屬性
Progress Tint 屬性 : 已完成的顏色;
(4) Track Tint 屬性
Track Tint 屬性 : 進度條軌道顏色;
(5) progressImage 屬性
ProgressImage 屬性 : 設置進度條完成的圖片;
-- 注意 : 該屬性在 Interface Builder 中沒有體現出來;
(6) trackImage 屬性
trackImage 屬性 : 設置進度條軌道圖片;
-- 注意 : 代碼中設置, 界面設計文件中無該屬性;
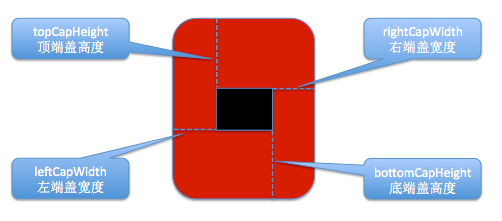
2. 可拉伸圖片
(1) 可拉伸圖片用法
可拉伸圖片作用 : 在上述進度條中, 設置的 progressImage 和 trackImage 必須是可拉伸圖片;
(2) 可拉伸圖片創建
創建可拉伸圖片 : 使用 UIImage 創建 可拉伸圖片, 通過 UIEdgeInsets 結構體定義圖片拉伸區域;
-- UIEdgeInsets 結構體 : 包括 left, top, right, bottom 四個值;
-- 縮放主體 : 圖片縮放只在 UIEdgeInsets 定義的 四個屬性值 區域縮放, 圖片的中心部分是不進行縮放的;
3. 定制進度條示例
(1) 相關 API 簡介
相關 API 簡介 :
-- 創建可拉伸的 UIImage :
UIImage * trackImage = [[UIImage imageNamed:@"Snip20151210_139.png"] resizableImageWithCapInsets:UIEdgeInsetsZero resizingMode:UIImageResizingModeTile];
-- 為進度條設置可拉伸圖片 :
    //將可拉伸圖片設置給進度條
    self.progress3.progressImage = progressImage;
    self.progress3.trackImage = trackImage;
-- 創建定時器 :
    //定時器
    timer = [NSTimer scheduledTimerWithTimeInterval:0.1 target:self selector:@selector(doProgress) userInfo:nil repeats:YES];
(2) 代碼示例
代碼示例 :
-- 界面設計文件 :
-- OCViewController.h :
// // OCViewController.h // UIProgressView // // Created by octopus on 15-12-10. // Copyright (c) 2015年 www.octopus.org.cn. All rights reserved. // #import@interface OCViewController : UIViewController @property (strong, nonatomic) IBOutlet UIProgressView *progress1; @property (strong, nonatomic) IBOutlet UIProgressView *progress2; @property (strong, nonatomic) IBOutlet UIProgressView *progress3; - (IBAction)click:(id)sender; @end
-- OCViewController.m :
//
//  OCViewController.m
//  UIProgressView
//
//  Created by octopus on 15-12-10.
//  Copyright (c) 2015年 www.octopus.org.cn. All rights reserved.
//

#import "OCViewController.h"

@interface OCViewController ()

@end

@implementation OCViewController

//定時器
NSTimer * timer;
//進度條進度
CGFloat progress;

/*
    CGFloat : 是 float 類型, 在 IOS 中定義了下面的類型
    -- 32 位 : typedef float CGFloat;// 32-bit
    -- 64 位 : typedef double CGFloat;// 64-bit

    CGPoint : 二維坐標點;
    -- 定義代碼 :
        struct CGPoint {
            CGFloat x;
            CGFloat y;
        };
        typedef struct CGPoint CGPoint;

    CGSize : 矩形的寬度和高度;
    -- 定義代碼 :
        struct CGSize {
            CGFloat width;
            CGFloat height;
        };
        typedef struct CGSize CGSize;

    CGRect : 矩形的位置和大小;
    -- 定義代碼 :
        struct CGRect {
            CGPoint origin;
            CGSize size;
        };
        typedef struct CGRect CGRect;
 */

- (void)viewDidLoad
{
    [super viewDidLoad];
	// Do any additional setup after loading the view, typically from a nib.

    //創建 可拉伸的圖片, 平鋪樣式
    UIImage * trackImage = [[UIImage imageNamed:@"Snip20151210_139.png"] resizableImageWithCapInsets:UIEdgeInsetsZero resizingMode:UIImageResizingModeTile];
    UIImage * progressImage = [[UIImage imageNamed:@"Snip20151210_140.png"] resizableImageWithCapInsets:UIEdgeInsetsZero resizingMode:UIImageResizingModeTile];

    //將可拉伸圖片設置給進度條
    self.progress3.progressImage = progressImage;
    self.progress3.trackImage = trackImage;

}

- (void)didReceiveMemoryWarning
{
    [super didReceiveMemoryWarning];
    // Dispose of any resources that can be recreated.
}

- (IBAction)click:(id)sender {
    //進度條
    progress = 0;

    //定時器
    timer = [NSTimer scheduledTimerWithTimeInterval:0.1 target:self selector:@selector(doProgress) userInfo:nil repeats:YES];

}

- (void) doProgress{
    progress += 0.1;
    if(progress > 1.0){
        [timer invalidate];
    }else{
        [self.progress1 setProgress:progress animated:YES];
        [self.progress2 setProgress:progress animated:YES];
        [self.progress3 setProgress:progress animated:YES];
    }


}

@end
-- 運行展示 : 可拉伸圖片效果沒有出現, 待調試;
四. 進度環控件 (UIActivityIndicatorView)
1. 進度環控件 (UIActivityIndicatorView) 屬性
UIActivityIndicatorView 屬性截圖 :
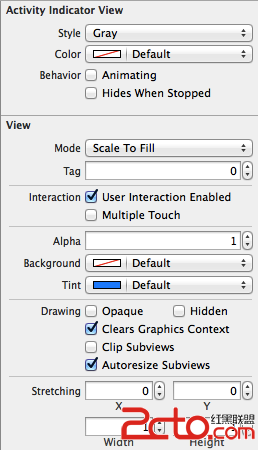
(1) Style 屬性
Style 屬性 :

-- Large White : 大的 白色 風格;
-- White : 白色風格;
-- Gray : 灰色風格;
(2) Color 屬性
Color 屬性 :
-- 作用 : 設置進度條的顏色, 設置該屬性會覆蓋之前選中的風格中的顏色;
(3) Behavior 屬性
Behavior 屬性 :

-- Animating : 顯示出來後立即轉動;
-- Hides When Stopped : 停止時自動隱藏;
(4) UIActivityIndicatorView 大小
兩種大小 :
-- 標准風格 : 像素值 20 x 20;
-- 大風格 : 像素值 37 x 37;
(5) 控制方法
UIActivityIndicatorView 控制方法 :
-- 開始轉動 : startAnimating 方法;
-- 停止轉動 : stopAnimating 方法;
2. UIActivityIndicatorView 代碼示例
(1) 創建 IBOutletConnection
創建 IBOutletConnection :
-- 按住 Option 鍵 將一個元素拖動到 OCViewController.h 中 : 其中的 Connection 屬性, 不要選擇 IBOutlet 屬性, 選擇 IBOutletConnection 屬性;
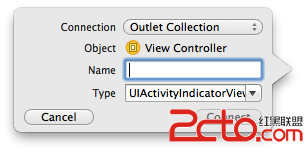
-- 將想要添加到 IBOutletConnection 中的控件拖動到 OCViewController.h 中的 IBOutletConnection 屬性變量上 :
(2) 代碼示例
代碼示例 :
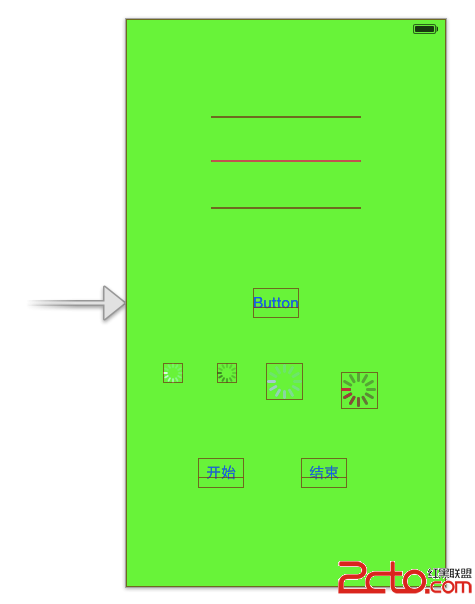
-- 界面設計文件 :
-- OCViewController.h :
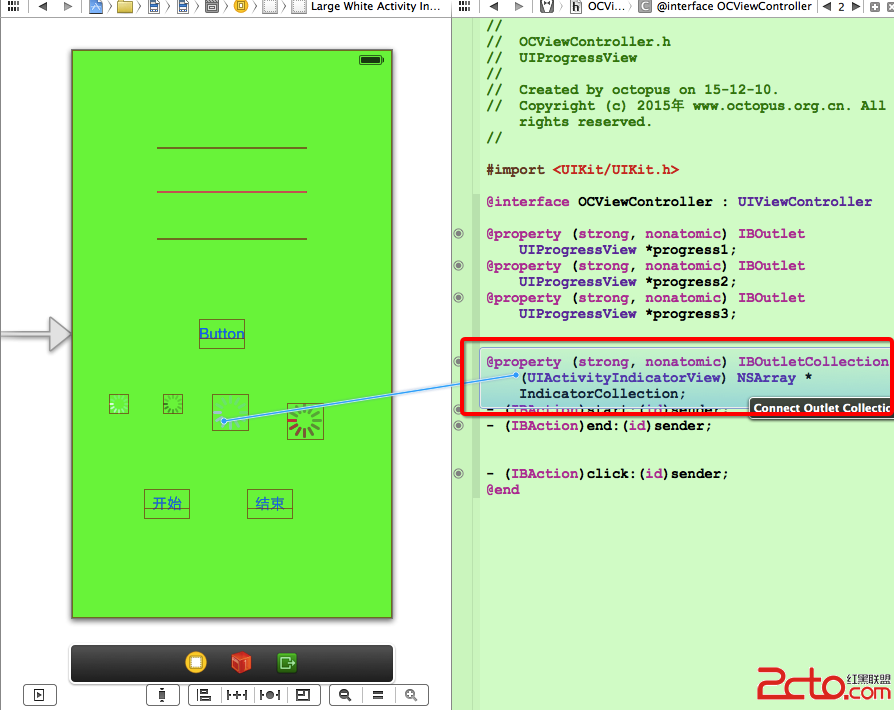
// // OCViewController.h // UIProgressView // // Created by octopus on 15-12-10. // Copyright (c) 2015年 www.octopus.org.cn. All rights reserved. // #import@interface OCViewController : UIViewController @property (strong, nonatomic) IBOutlet UIProgressView *progress1; @property (strong, nonatomic) IBOutlet UIProgressView *progress2; @property (strong, nonatomic) IBOutlet UIProgressView *progress3; @property (strong, nonatomic) IBOutletCollection(UIActivityIndicatorView) NSArray *IndicatorCollection; - (IBAction)start:(id)sender; - (IBAction)end:(id)sender; - (IBAction)click:(id)sender; @end
-- OCViewController.m :
//
//  OCViewController.m
//  UIProgressView
//
//  Created by octopus on 15-12-10.
//  Copyright (c) 2015年 www.octopus.org.cn. All rights reserved.
//

#import "OCViewController.h"

@interface OCViewController ()

@end

@implementation OCViewController

//定時器
NSTimer * timer;
//進度條進度
CGFloat progress;

/*
    CGFloat : 是 float 類型, 在 IOS 中定義了下面的類型
    -- 32 位 : typedef float CGFloat;// 32-bit
    -- 64 位 : typedef double CGFloat;// 64-bit

    CGPoint : 二維坐標點;
    -- 定義代碼 :
        struct CGPoint {
            CGFloat x;
            CGFloat y;
        };
        typedef struct CGPoint CGPoint;

    CGSize : 矩形的寬度和高度;
    -- 定義代碼 :
        struct CGSize {
            CGFloat width;
            CGFloat height;
        };
        typedef struct CGSize CGSize;

    CGRect : 矩形的位置和大小;
    -- 定義代碼 :
        struct CGRect {
            CGPoint origin;
            CGSize size;
        };
        typedef struct CGRect CGRect;
 */

- (void)viewDidLoad
{
    [super viewDidLoad];
	// Do any additional setup after loading the view, typically from a nib.

    //創建 可拉伸的圖片, 平鋪樣式
    UIImage * trackImage = [[UIImage imageNamed:@"Snip20151210_139.png"] resizableImageWithCapInsets:UIEdgeInsetsZero resizingMode:UIImageResizingModeTile];
    UIImage * progressImage = [[UIImage imageNamed:@"Snip20151210_140.png"] resizableImageWithCapInsets:UIEdgeInsetsZero resizingMode:UIImageResizingModeTile];

    //將可拉伸圖片設置給進度條
    self.progress3.progressImage = progressImage;
    self.progress3.trackImage = trackImage;

}

- (void)didReceiveMemoryWarning
{
    [super didReceiveMemoryWarning];
    // Dispose of any resources that can be recreated.
}

- (IBAction)start:(id)sender {
    for(int i = 0; i < 4; i ++){
        //從集合中獲取 UIActivityIndicatorView 控件並開啟動畫
        [[self.IndicatorCollection objectAtIndex:i] startAnimating];
    }
}

- (IBAction)end:(id)sender {
    for(int i = 0; i < 4; i ++){
        //從集合中獲取 UIActivityIndicatorView 控件並結束動畫
        [[self.IndicatorCollection objectAtIndex:i] stopAnimating];
    }
}

- (IBAction)click:(id)sender {
    //進度條
    progress = 0;

    //定時器
    timer = [NSTimer scheduledTimerWithTimeInterval:0.1 target:self selector:@selector(doProgress) userInfo:nil repeats:YES];

}

- (void) doProgress{
    progress += 0.1;
    if(progress > 1.0){
        [timer invalidate];
    }else{
        [self.progress1 setProgress:progress animated:YES];
        [self.progress2 setProgress:progress animated:YES];
        [self.progress3 setProgress:progress animated:YES];
    }


}

@end
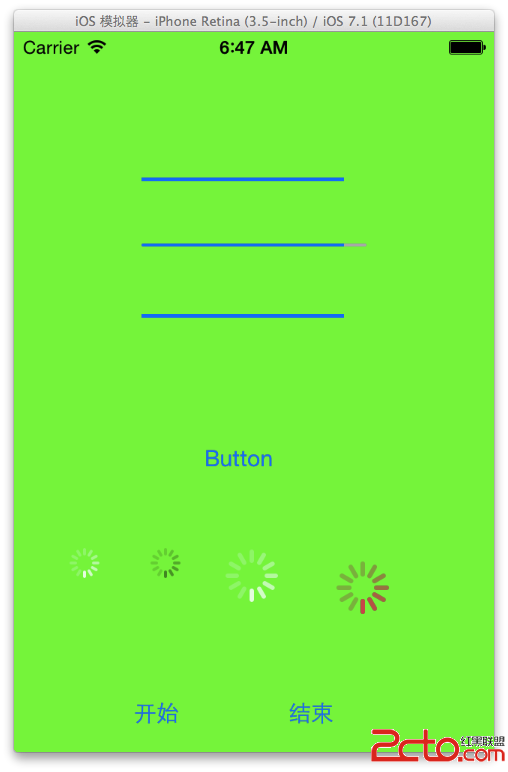
-- 頁面展示效果 :
五. 拖動條控件 (UISlider)
1. 拖動條控件 (UISlider) 簡介
屬性截圖 :
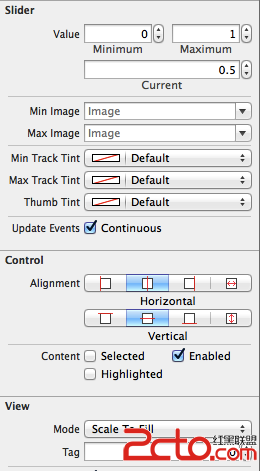
(1) UISlider 圖片設置方法
UISlider 設置圖片方法 :
-- 已完成進度軌道圖片 : "setMinimumTrackingImage : forState :";
-- 未完成進度軌道圖片 : "setMaximumTrackingImage : forState :";
-- 設置滑塊的圖片 : "setThumbImage : forState :";
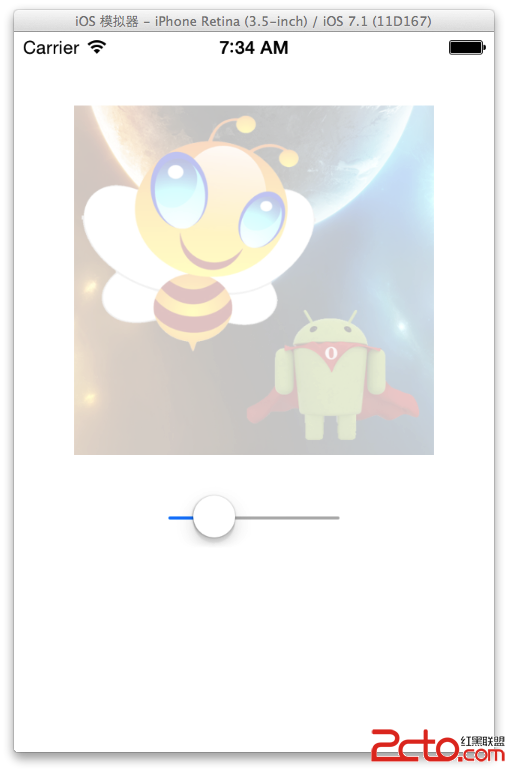
2. 拖動條改變透明度示例
代碼示例 :
-- 界面設計文件 :
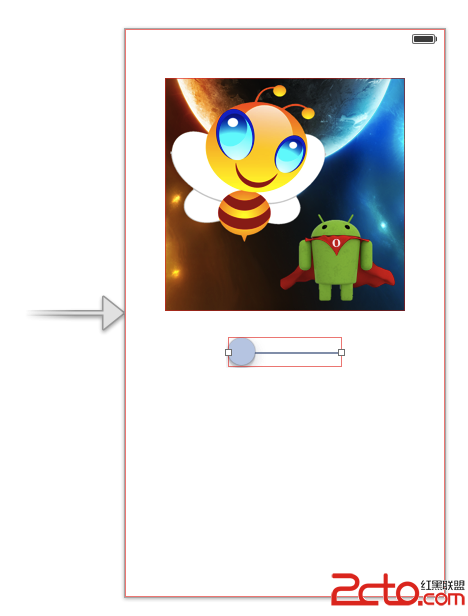
-- OCViewController.h :
// // OCViewController.h // UISlider // // Created by octopus on 15-12-14. // Copyright (c) 2015年 www.octopus.org.cn. All rights reserved. // #import@interface OCViewController : UIViewController @property (strong, nonatomic) IBOutlet UISlider *slid; @property (strong, nonatomic) IBOutlet UIImageView *image; - (IBAction)valueChange:(id)sender; @end
-- OCViewController.m :
//
//  OCViewController.m
//  UISlider
//
//  Created by octopus on 15-12-14.
//  Copyright (c) 2015年 www.octopus.org.cn. All rights reserved.
//

#import "OCViewController.h"

@interface OCViewController ()

@end

@implementation OCViewController

- (void)viewDidLoad
{
    [super viewDidLoad];
	// Do any additional setup after loading the view, typically from a nib.

    [self.image setAlpha: 0];
}

- (void)didReceiveMemoryWarning
{
    [super didReceiveMemoryWarning];
    // Dispose of any resources that can be recreated.
}

- (IBAction)valueChange:(id)sender {
    [self.image setAlpha: self.slid.value];
}
@end
-- 運行展示 :
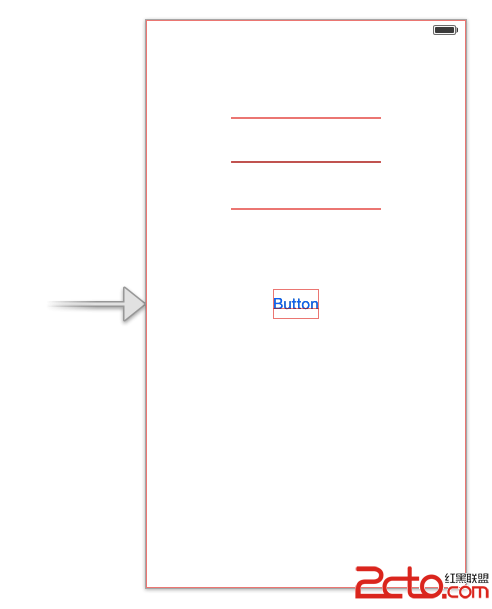
四. 警告框控件 (UIAlertView)
1. 警告框控件 (UIAlertView) 簡介
(1) UIAlertView 創建流程
UIAlertView 創建流程 :
-- 創建 UIAlertView : 創建時指定 標題, 內容, 按鈕等信息, 按鈕監聽需要創建 UIAlertView 的 UIAlertViewDelegate 委托對象;
-- 顯示 UIAlertView : 調用顯示 UIAlertView 的顯示方法;
-- 監聽按鈕 : 為委托對象實現 UIAlertViewDelegate 協議中的方法即可;
(2) UIAlertViewDelegate 協議方法
UIAlertViewDelegate 協議方法簡介 :
-- "- (void) alertView : (UIAlertView *) alertView clickedButtonAtIndex : (NSInteger) buttonIndex :" 方法 : 用戶單擊對話框中的按鈕激發的方法, buttonIndex 是點擊的按鈕的索引;
-- "- (void) willPresentAlertView : (UIAlertView *) alertView" 方法 : 對話框將要顯示時激發該方法;
-- "- (void) didPresentAlertView : (UIAlertView *) alertView" 方法 : 對話框完全顯示出來後激發該方法;
-- "- (BOOL) alertViewShouldEnableFirstOtherButton : (UIAlertView *) alertView" 方法 : 對話框中除 cancel 按鈕之後的第一個按鈕被啟用回調該方法;
-- "- (void) alertView : (UIAlertView *) alertView willDissmissWithButtonIndex : (NSInteger) buttonIndex" 方法 : 單擊某按鈕將要隱藏警告框時激發該方法;
-- "- (void) alertView : (UIAlertView *) alertView didDissmissWithButtonIndex : (NSInteger) buttonIndex" 方法 : 單擊某個按鈕已經隱藏警告框後激發該方法;
-- "- (void) alertViewCancel : (UIAlertView * ) alertView " 方法 : 對話框被取消時激發的方法;
(3) UIAlertView 輸入框風格設置
UIAlertView 的 actionSheetStyle 屬性 :
-- 主要作用 : 設置 UIAlertView 的風格, 取值是 枚舉值;
-- UIAlertViewStyleDefault 枚舉值 : 默認警告框風格;
-- UIAlertViewStyleSecureTextInput 枚舉值 : 警告框中有一個密碼輸入框;
-- UIAlertViewStylePlainTextInput 枚舉值 : 警告框中包含普通輸入框;
-- UIAlertViewStyleLoginAndPasswordInput 枚舉值 : 警告框中包含 用戶名 密碼輸入;
訪問輸入框方法 :
-- "- (UITextField *) textFieldAtIndex : (NSInteger) textFieldIndex" : 獲取 索引值 為 textFieldIndex 的文本輸入框;
.
.
2. 簡單的對話框示例
(1) 創建 UIAlertView API
創建方法 :
[[UIAlertView alloc] initWithTitle:<#(NSString *)#> message:<#(NSString *)#> delegate:<#(id)#> cancelButtonTitle:<#(NSString *)#> otherButtonTitles:<#(NSString *), ...#>, nil];
-- 參數一 : initWithTittle 對話框名稱;
-- 參數二 : message 對話框內容;
-- 參數三 : delegate 委托對象;
-- 參數四 : cancelButtonTittle 取消按鈕文字內容;
-- 參數五 : otherButtonTittles 其它按鈕文字內容;
-- 真實代碼 :
/*
創建 UIAlertView 控件, 傳入參數 標題 內容 委托對象 取消按鈕 其它按鈕
*/
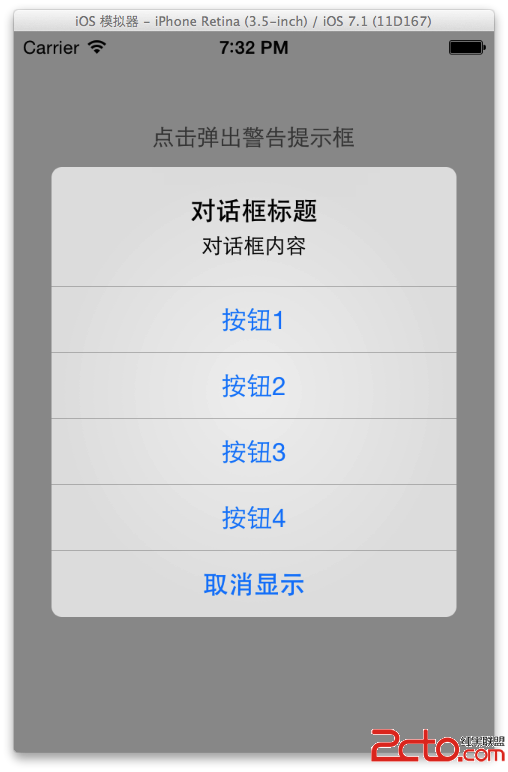
UIAlertView * alert = [[UIAlertView alloc] initWithTitle:@"對話框標題" message:@"對話框內容" delegate:self cancelButtonTitle:@"取消顯示" otherButtonTitles:@"按鈕1", @"按鈕2", @"按鈕3", @"按鈕4", nil];
顯示對話框 : [UIAlertView show];
(2) 代碼示例
代碼示例 :
-- 界面設計文件 :
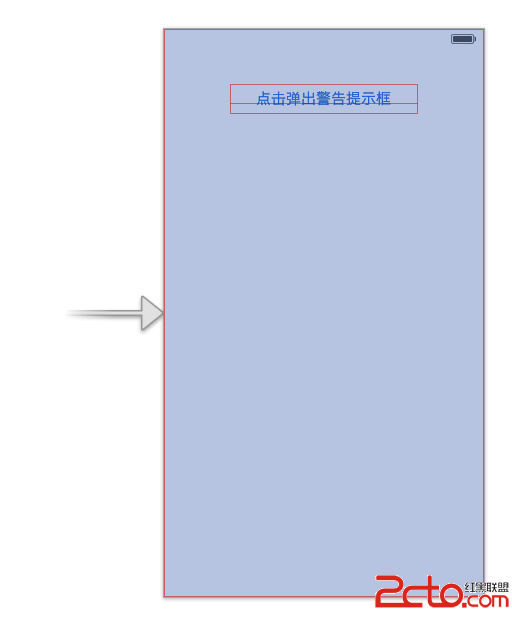
-- OCViewController.h :
// // OCViewController.h // UIAlertView // // Created by octopus on 15-12-14. // Copyright (c) 2015年 www.octopus.org.cn. All rights reserved. // #import@interface OCViewController : UIViewController //按鈕的 IBAction 方法 - (IBAction)click:(id)sender; @end
-- OCViewController.m :
//
//  OCViewController.m
//  UIAlertView
//
//  Created by octopus on 15-12-14.
//  Copyright (c) 2015年 www.octopus.org.cn. All rights reserved.
//

#import "OCViewController.h"

@interface OCViewController ()

@end

@implementation OCViewController

- (void)viewDidLoad
{
    [super viewDidLoad];
	// Do any additional setup after loading the view, typically from a nib.

}

- (void)didReceiveMemoryWarning
{
    [super didReceiveMemoryWarning];
    // Dispose of any resources that can be recreated.

}

//點擊按鈕彈出 UIAlertView 對話框
- (IBAction)click:(id)sender {
    /*
        創建 UIAlertView 控件, 傳入參數 標題 內容 委托對象 取消按鈕 其它按鈕
     */
    UIAlertView * alert = [[UIAlertView alloc] initWithTitle:@"對話框標題" message:@"對話框內容" delegate:self cancelButtonTitle:@"取消顯示" otherButtonTitles:@"按鈕1", @"按鈕2", @"按鈕3", @"按鈕4", nil];
    //調用該方法顯示 UIAlertView 控件
    [alert show];
}

//實現的 UIAlertViewDelegate 協議中的方法
- (void) alertView:(UIAlertView *)alertView clickedButtonAtIndex:(NSInteger)buttonIndex{
    NSString * msg = [NSString stringWithFormat:@"點擊了按鈕 %d", buttonIndex];
    UIAlertView * alert = [[UIAlertView alloc] initWithTitle:@"彈出框" message: msg delegate:nil cancelButtonTitle:@"取消" otherButtonTitles: nil];
    [alert show];


}
@end
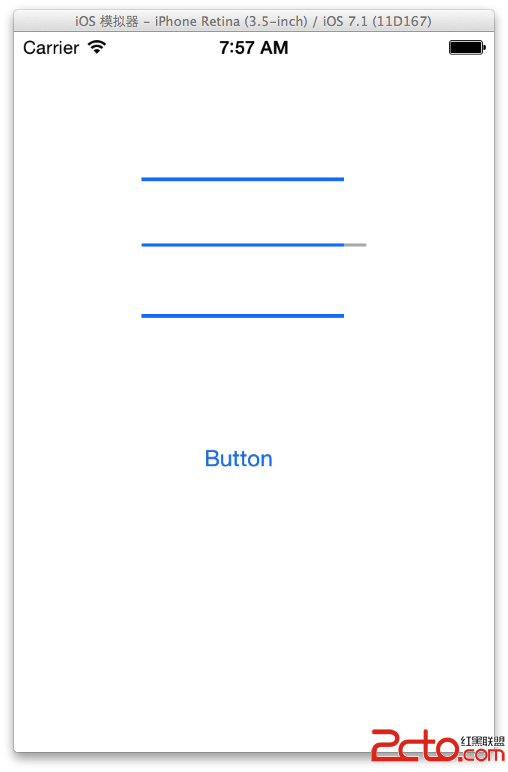
-- 運行界面展示 :
3. 警告框控件 (UIAlertView) 示例代碼
(1) 相關 API 簡介
相關 API 簡介 :
-- 設置 警告提示框 風格 :
    //設置提示框的風格 賬號密碼輸入
    alertView.alertViewStyle = UIAlertViewStyleLoginAndPasswordInput;
-- 設置輸入框鍵盤輸入類型 :
    //設置密碼輸入是數字鍵盤
    [alertView textFieldAtIndex:1].keyboardType = UIKeyboardTypeNumberPad;
-- 獲取指定索引的輸入框 :
        //獲取賬號輸入文本框
        UITextField * userNameField = [alertView textFieldAtIndex:0];
-- 生成警告提示框 :
    //創建一個帶 兩個按鈕的 提示框 確定 取消
    UIAlertView * alertView = [[UIAlertView alloc] initWithTitle:@"登錄" message:@"輸入用戶名密碼" delegate:self cancelButtonTitle:@"取消" otherButtonTitles:@"確定", nil];
-- 顯示警告提示框 :
        //顯示警告提示框
        [alertView show];
(2) 示例代碼
示例代碼 :
-- 界面設計文件 :
-- OCViewController.h :
// // OCViewController.h // TextFieldUIAlertView // // Created by octopus on 15-12-17. // Copyright (c) 2015年 www.octopus.org.cn. All rights reserved. // #import@interface OCViewController : UIViewController - (IBAction)click:(id)sender; @end
-- OCViewController.m :
//
// OCViewController.m
// TextFieldUIAlertView
//
// Created by octopus on 15-12-17.
// Copyright (c) 2015年 www.octopus.org.cn. All rights reserved.
//
#import "OCViewController.h"
@interface OCViewController ()
@end
@implementation OCViewController
- (void)viewDidLoad
{
[super viewDidLoad];
// Do any additional setup after loading the view, typically from a nib.
}
- (void)didReceiveMemoryWarning
{
[super didReceiveMemoryWarning];
// Dispose of any resources that can be recreated.
}
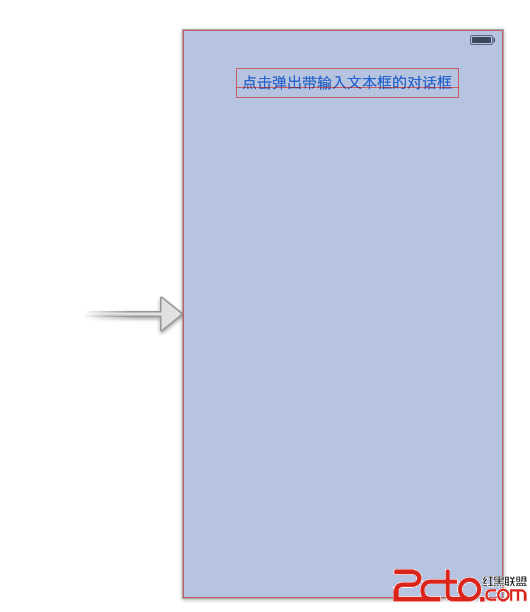
- (IBAction)click:(id)sender {
//創建一個帶 兩個按鈕的 提示框 確定 取消
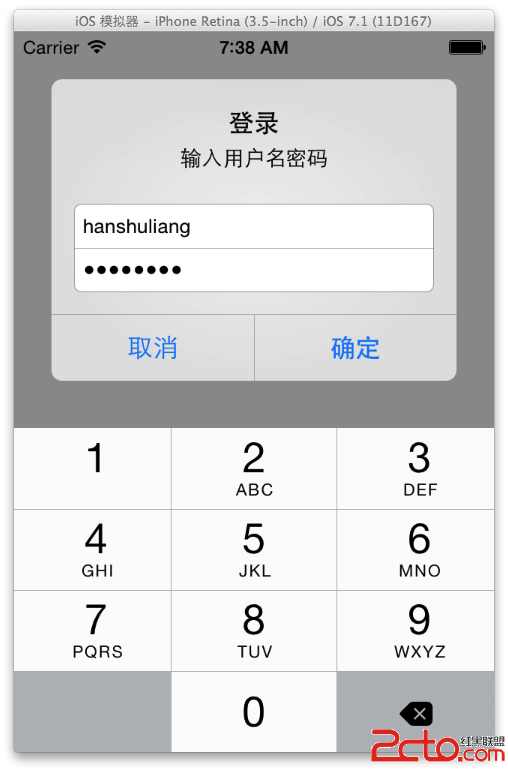
UIAlertView * alertView = [[UIAlertView alloc] initWithTitle:@"登錄" message:@"輸入用戶名密碼" delegate:self cancelButtonTitle:@"取消" otherButtonTitles:@"確定", nil];
//設置提示框的風格 賬號密碼輸入
alertView.alertViewStyle = UIAlertViewStyleLoginAndPasswordInput;
//設置密碼輸入是數字鍵盤
[alertView textFieldAtIndex:1].keyboardType = UIKeyboardTypeNumberPad;
//顯示警告提示框
[alertView show];
}
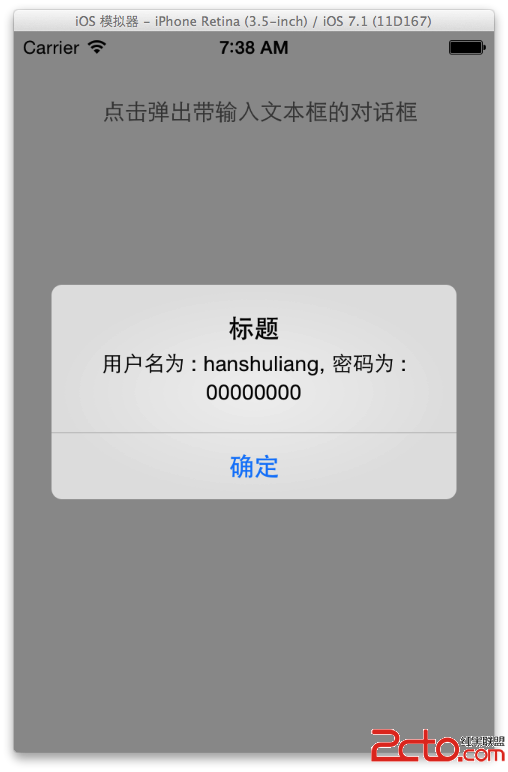
- (void) alertView:(UIAlertView *)alertView clickedButtonAtIndex:(NSInteger)buttonIndex{
if(buttonIndex == 1){
//獲取賬號輸入文本框
UITextField * userNameField = [alertView textFieldAtIndex:0];
//獲取密碼輸入文本框
UITextField * passwordField = [alertView textFieldAtIndex:1];
//生成 一個 包含賬號 密碼 輸入的字符串
NSString * content = [NSString stringWithFormat:@"用戶名為 : %@, 密碼為 : %@", userNameField.text, passwordField.text];
//生成警告提示框
UIAlertView * alertView = [[UIAlertView alloc] initWithTitle:@"標題" message:content delegate:nil cancelButtonTitle:@"確定" otherButtonTitles: nil];
//顯示警告提示框
[alertView show];
}
}
- (void) willPresentAlertView:(UIAlertView *)alertView{
//遍歷所有的 UIView 集合
for(UIView * view in alertView.subviews){
//如果類型是 UILabel
if([view isKindOfClass:[UILabel class]]){
//獲取 UILabel 控件
UILabel * label = (UILabel *) view;
//設置 UILabel 控件右對齊
label.textAlignment = UITextAlignmentRight;
}
}
}
@end
-- 界面展示效果 :
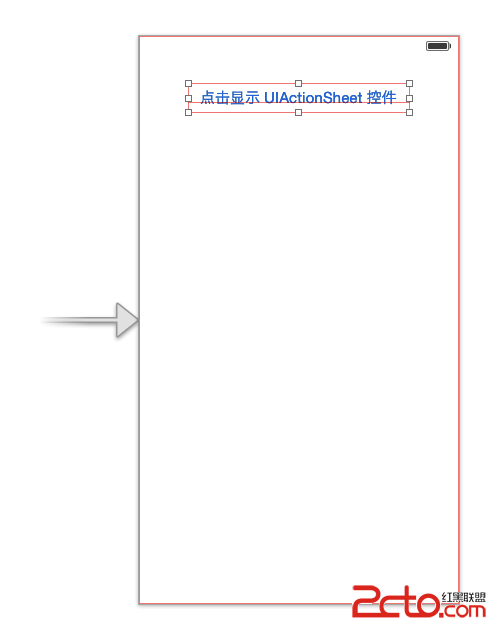
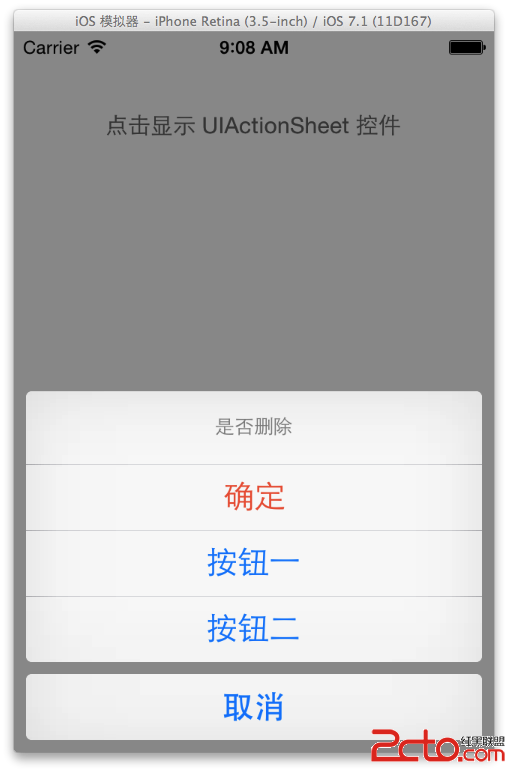
五. UIActionSheet 控件
1. UIActionSheet 簡介
(1) UIActionSheet 作用
UIActionSheet 作用 : 該控件是顯示在界面底部的按鈕列表, 該控件 有 一個標題 和 多個按鈕;
(2) UIActionSheet 按鈕
UIActionSheet 固定按鈕 :
-- 取消按鈕 : 灰色背景, 主要用於取消該 UIActionSheet 控件顯示;
-- 銷毀按鈕 : 紅色背景, 用於刪除某記錄時, 使用該按鈕確認銷毀;
(3) UIActionSheet 風格
UIActionSheet 支持風格 :
-- UIActionSheetStyleDefault : 灰色背景上顯示白色文字;
-- UIActionSheetStyleBlackTranselucent : 透明黑色背景上顯示白色文字;
-- UIActionSheetBlackOpaque : 純黑的背景上顯示白色文字;
2. UIActionSheet 示例代碼
UIActionSheet 示例代碼 :
-- 界面設計文件 :
-- OCViewController.h :
// // OCViewController.h // UIActionSheet // // Created by octopus on 15-12-17. // Copyright (c) 2015年 www.octopus.org.cn. All rights reserved. // #import@interface OCViewController : UIViewController - (IBAction)click:(id)sender; @end
-- OCViewController.m :
//
//  OCViewController.m
//  UIActionSheet
//
//  Created by octopus on 15-12-17.
//  Copyright (c) 2015年 www.octopus.org.cn. All rights reserved.
//

#import "OCViewController.h"

@interface OCViewController ()

@end

@implementation OCViewController

- (void)viewDidLoad
{
    [super viewDidLoad];
	// Do any additional setup after loading the view, typically from a nib.
}

- (void)didReceiveMemoryWarning
{
    [super didReceiveMemoryWarning];
    // Dispose of any resources that can be recreated.
}

- (IBAction)click:(id)sender {
    UIActionSheet * actionSheet = [[UIActionSheet alloc] initWithTitle:@"是否刪除" delegate:self cancelButtonTitle:@"取消" destructiveButtonTitle:@"確定" otherButtonTitles: @"按鈕一", @"按鈕二", nil];
    actionSheet.actionSheetStyle = UIActionSheetStyleAutomatic;
    [actionSheet showInView:self.view];
}

- (void) actionSheet:(UIActionSheet *)actionSheet clickedButtonAtIndex:(NSInteger)buttonIndex{
    UIAlertView * alertView = [[UIAlertView alloc] initWithTitle:@"提示" message:[NSString stringWithFormat : @"點擊了第 %d 個按鈕", buttonIndex] delegate:nil cancelButtonTitle:@"取消" otherButtonTitles: nil];
    [alertView show];
}
@end
-- 運行界面展示 :

- ios修改NavigationController的背景顏色
- iOS之@selector的函數傳遞多個參數
- iOS中運用schema協議調用APP和運用iframe翻開APP的例子
- iOS圖片隱約後果的完成辦法
- AIR Native Extension for iOS 接入第三方sdk 如何實現 AppDelegate 生命周期
- 從UIView的子類中推入視圖控制器
- Iphone HTTP請求工具類詳解
- iOS運用應用設計形式中的Strategy戰略形式的開辟實例
- iOS開發核心語言Objetive C —— 編譯器指令@property.@synthesize.自定義構造方法及類工廠
- IOS自適配利器Masonry使用指南