iOS學習筆記33-UICollectionView入門
編輯:IOS開發綜合
一、UICollectionView介紹
UICollectionView和UICollectionViewController類是iOS6新引進的API,用於展示集合視圖,布局更加靈活,可實現多列布局,用法類似於UITableView和UITableViewController類,但也有所不同。
UICollectionView可以實現如下效果,也是一個常用的控件:

二、UICollectiomView使用
UICollectionView的創建和UITableView的創建有所不同:
1. UITableView的創建只需要設置frame即可使用
UICollectionView除了需要frame,還需要一個布局參數
-(id)initWithFrame:(CGRect)frame /* 尺寸 */
        collectionViewLayout:(UICollectionViewLayout *)layout;/* 布局參數 */
UITableView可以不需要注冊Cell視圖類,手動創建Cell視圖類UICollectionView必須注冊視圖類,才能顯示,不需要手動創建
UICollectionView的布局參數:
是一個UICollectionViewLayout類的對象,但我們一般使用它的子類
UICollectionViewFlowLayout 設置布局對象的滾動方向屬性scrollDirection:
typedef NS_ENUM(NSInteger, UICollectionViewScrollDirection) {
        UICollectionViewScrollDirectionVertical,  /*垂直滾動*/
        UICollectionViewScrollDirectionHorizontal /* 水平滾動 */
};
垂直滾動,表示Cell方塊布局是從左往右,從上到下排列的布局 水平滾動,表示Cell方塊布局是從上往下,從左到右排列的布局 和UITableView不同,UICollectionView只能在這裡設置頂部視圖和底部視圖的大小 設置為垂直滾動時,頂部和底部視圖的寬度為UICollectionView的寬度,無法設置 設置為水平滾動時,頂部和底部視圖的高度為UICollectionView的高度,無法設置
UICollectionView的常用對象方法
/* 向容器視圖注冊Cell方塊視圖,有2種方式,一種是類名注冊,一種是Xib注冊 */
- (void)registerClass:(Class)cellClass /* 視圖類 */
        forCellWithReuseIdentifier:(NSString *)identifier;/* 綁定標識 */
- (void)registerNib:(UINib *)nib /* Xib */
        forCellWithReuseIdentifier:(NSString *)identifier;/* 綁定標識 */

/* 從緩存池中取出Cell方塊視圖對象,如果緩存池沒有,自動調用alloc/initWithFrame創建 */
- (UICollectionViewCell *)dequeueReusableCellWithReuseIdentifier:(NSString *)identifier
                          forIndexPath:(NSIndexPath *)indexPath;

/* kind參數設置 */
NSString *const UICollectionElementKindSectionHeader;/* 頂部視圖用這個 */
NSString *const UICollectionElementKindSectionFooter;/* 底部視圖用這個 */
/* 向容器視圖注冊頂部視圖或者底部視圖,有2種方式,一種是類名注冊,一種是Xib注冊 */
- (void)registerClass:(Class)viewClass
        forSupplementaryViewOfKind:(NSString *)kind /* 參考上面 */
               withReuseIdentifier:(NSString *)identifier;/* 綁定標識 */
- (void)registerNib:(UINib *)nib
        forSupplementaryViewOfKind:(NSString *)kind /* 參考上面 */
               withReuseIdentifier:(NSString *)identifier;/* 綁定標識 */

/* 從緩存池中取出頂部視圖對象或者底部視圖對象,如果緩存池沒有,自動調用alloc/initWithFrame創建 */
- (UICollectionReusableView *)dequeueReusableSupplementaryViewOfKind:(NSString *)kind
                              withReuseIdentifier:(NSString *)identifier
                                     forIndexPath:(NSIndexPath *)indexPath;
UICollectionView的數據源方法
@required
/* 設置容器視圖各個組都有多少個Cell方塊 */
- (NSInteger)collectionView:(UICollectionView *)collectionView
     numberOfItemsInSection:(NSInteger)section;
/* 設置Cell方塊視圖,類似於UITableViewCell的設置 */
- (UICollectionViewCell *)collectionView:(UICollectionView *)collectionView
                  cellForItemAtIndexPath:(NSIndexPath *)indexPath;
@optional
/* 容器視圖有多少個組,默認返回1 */
- (NSInteger)numberOfSectionsInCollectionView:(UICollectionView *)collectionView;
/* 設置頂部視圖和底部視圖,通過kind參數分辨是設置頂部還是底部 */
- (UICollectionReusableView *)collectionView:(UICollectionView *)collectionView
           viewForSupplementaryElementOfKind:(NSString *)kind
                                 atIndexPath:(NSIndexPath *)indexPath;
UICollectionViewDelegate的常用方法
/* 選中Cell方塊時調用 */
- (void)collectionView:(UICollectionView *)collectionView
        didSelectItemAtIndexPath:(NSIndexPath *)indexPath;
/* 取消選中Cell方塊時調用 */
- (void)collectionView:(UICollectionView *)collectionView
        didDeselectItemAtIndexPath:(NSIndexPath *)indexPath;
我們使用更多的是UICollectionViewDelegate子協議UICollectionViewDelegateFlowLayout
該協議不僅包含父協議所有方法,還可以進行一些布局設置
UICollectionViewDelegateFlowLayout的常用布局方法
/* 設置每個方塊的尺寸大小 */
- (CGSize)collectionView:(UICollectionView *)collectionView
                  layout:(UICollectionViewLayout*)collectionViewLayout
  sizeForItemAtIndexPath:(NSIndexPath *)indexPath;
/* 設置方塊視圖和邊界的上下左右間距 */
- (UIEdgeInsets)collectionView:(UICollectionView *)collectionView
                        layout:(UICollectionViewLayout*)collectionViewLayout
        insetForSectionAtIndex:(NSInteger)section;

下面是我自定義的Cell視圖類、頂部視圖類、底部視圖類,目錄結構如下:

方塊視圖LTCollectionViewCell.h
#import
@interface LTCollectionViewCell : UICollectionViewCell
@property (strong, nonatomic) UILabel *textLabel;
/* 方塊視圖的緩存池標示 */
+ (NSString *)cellIdentifier;
/* 獲取方塊視圖對象 */
+ (instancetype)cellWithCollectionView:(UICollectionView *)collectionView
                          forIndexPath:(NSIndexPath *)indexPath;
@end
方塊視圖LTCollectionViewCell.m
#import "LTCollectionViewCell.h"
@implementation LTCollectionViewCell
/* 方塊視圖的緩存池標示 */
+ (NSString *)cellIdentifier{
    static NSString *cellIdentifier = @"CollectionViewCellIdentifier";
    return cellIdentifier;
}
/* 獲取方塊視圖對象 */
+ (instancetype)cellWithCollectionView:(UICollectionView *)collectionView
                          forIndexPath:(NSIndexPath *)indexPath
{
    //從緩存池中尋找方塊視圖對象,如果沒有,該方法自動調用alloc/initWithFrame創建一個新的方塊視圖返回
    LTCollectionViewCell *cell =
        [collectionView dequeueReusableCellWithReuseIdentifier:[LTCollectionViewCell cellIdentifier]
                                                  forIndexPath:indexPath];
    return cell;
}
/* 注冊了方塊視圖後,當緩存池中沒有底部視圖的對象時候,自動調用alloc/initWithFrame創建 */
- (instancetype)initWithFrame:(CGRect)frame{
    if (self = [super initWithFrame:frame]) {
        //創建label
        UILabel *textLabel = [[UILabel alloc] init];
        //設置label尺寸
        CGFloat x = 5;
        CGFloat y = 5;
        CGFloat width = frame.size.width - 10;
        CGFloat height = frame.size.height - 10;
        textLabel.frame = CGRectMake(x, y, width, height);
        //設置label屬性
        textLabel.numberOfLines = 0;
        textLabel.textAlignment = NSTextAlignmentCenter;
        textLabel.font = [UIFont systemFontOfSize:15];
        //添加到父控件
        [self.contentView addSubview:textLabel];
        self.textLabel = textLabel;
    }
    return self;
}
@end
頂部視圖LTCollectionHeaderView.h
#import
@interface LTCollectionHeaderView : UICollectionReusableView
@property (strong, nonatomic) UILabel *textLabel;
/* 頂部視圖的緩存池標示 */
+ (NSString *)headerViewIdentifier;
/* 獲取頂部視圖對象 */
+ (instancetype)headerViewWithCollectionView:(UICollectionView *)collectionView
                                forIndexPath:(NSIndexPath *)indexPath;
@end
頂部視圖LTCollectionHeaderView.m
#import "LTCollectionHeaderView.h"

@implementation LTCollectionHeaderView
/* 頂部視圖的緩存池標示 */
+ (NSString *)headerViewIdentifier{
    static NSString *headerIdentifier = @"headerViewIdentifier";
    return headerIdentifier;
}
/* 獲取頂部視圖對象 */
+ (instancetype)headerViewWithCollectionView:(UICollectionView *)collectionView
                                forIndexPath:(NSIndexPath *)indexPath
{
    //從緩存池中尋找頂部視圖對象,如果沒有,該方法自動調用alloc/initWithFrame創建一個新的頂部視圖返回
    LTCollectionHeaderView *headerView =
        [collectionView dequeueReusableSupplementaryViewOfKind:UICollectionElementKindSectionHeader
                                           withReuseIdentifier:[LTCollectionHeaderView headerViewIdentifier]
                                                  forIndexPath:indexPath];
    return headerView;
}
/* 注冊了頂部視圖後,當緩存池中沒有頂部視圖的對象時候,自動調用alloc/initWithFrame創建 */
- (instancetype)initWithFrame:(CGRect)frame{
    if (self = [super initWithFrame:frame]) {
        //創建label
        UILabel *textLabel = [[UILabel alloc] init];
        //設置label尺寸
        CGFloat x = 5;
        CGFloat y = 5;
        CGFloat width = frame.size.width - 10;
        CGFloat height = frame.size.height - 10;
        textLabel.frame = CGRectMake(x, y, width, height);
        //設置label屬性
        textLabel.numberOfLines = 0;
        textLabel.textAlignment = NSTextAlignmentCenter;
        //添加到父控件
        [self addSubview:textLabel];
        self.textLabel = textLabel;
    }
    return self;
}
@end
底部視圖LTCollectionFooterView.h
#import
@interface LTCollectionFooterView : UICollectionReusableView
@property (strong, nonatomic) UILabel *textLabel;
/* 底部視圖的緩存池標示 */
+ (NSString *)footerViewIdentifier;
/* 獲取底部視圖對象 */
+ (instancetype)footerViewWithCollectionView:(UICollectionView *)collectionView
                                forIndexPath:(NSIndexPath *)indexPath;
@end
底部視圖LTCollectionFooterView.m
#import "LTCollectionFooterView.h"

@implementation LTCollectionFooterView
/* 底部視圖的緩存池標示 */
+ (NSString *)footerViewIdentifier{
    static NSString *footerIdentifier = @"footerViewIdentifier";
    return footerIdentifier;
}
/* 獲取底部視圖對象 */
+ (instancetype)footerViewWithCollectionView:(UICollectionView *)collectionView
                                forIndexPath:(NSIndexPath *)indexPath
{
    //從緩存池中尋找底部視圖對象,如果沒有,該方法自動調用alloc/initWithFrame創建一個新的底部視圖返回
    LTCollectionFooterView *footerView =
            [collectionView dequeueReusableSupplementaryViewOfKind:UICollectionElementKindSectionFooter
                                               withReuseIdentifier:[LTCollectionFooterView footerViewIdentifier]
                                                      forIndexPath:indexPath];
    return footerView;
}
/* 注冊了底部視圖後,當緩存池中沒有底部視圖的對象時候,自動調用alloc/initWithFrame創建 */
- (instancetype)initWithFrame:(CGRect)frame{
    if (self = [super initWithFrame:frame]) {
        //創建label
        UILabel *textLabel = [[UILabel alloc] init];
        //設置label尺寸
        CGFloat x = 5;
        CGFloat y = 5;
        CGFloat width = frame.size.width - 10;
        CGFloat height = frame.size.height - 10;
        textLabel.frame = CGRectMake(x, y, width, height);
        //設置label屬性
        textLabel.numberOfLines = 0;
        textLabel.textAlignment = NSTextAlignmentCenter;
        //添加到父控件
        [self addSubview:textLabel];
        self.textLabel = textLabel;
    }
    return self;
}
@end
下面是使用實例:
1. 視圖控制器屬性和相關方法
#import "ViewController.h"
#import "LTCollectionViewCell.h"
#import "LTCollectionHeaderView.h"
#import "LTCollectionFooterView.h"

@interface ViewController ()
@property (strong, nonatomic) UICollectionView *collectionView;/*< 容器視圖 */
@end
@implementation ViewController

- (void)viewDidLoad {
    [super viewDidLoad];
    //初始化容器視圖
    [self initCollectionView];
}
2. 初始化容器視圖
/* 初始化容器視圖 */
- (void)initCollectionView
{
    CGFloat x = 0;
    CGFloat y = 20;
    CGFloat width = self.view.frame.size.width;
    CGFloat height = self.view.frame.size.height - 20;
    //創建布局對象
    UICollectionViewFlowLayout *layout = [[UICollectionViewFlowLayout alloc] init];
    //設置滾動方向為垂直滾動,說明方塊是從左上到右下的布局排列方式
    layout.scrollDirection = UICollectionViewScrollDirectionVertical;
    //設置頂部視圖和底部視圖的大小,當滾動方向為垂直時,設置寬度無效,當滾動方向為水平時,設置高度無效
    layout.headerReferenceSize = CGSizeMake(100, 40);
    layout.footerReferenceSize = CGSizeMake(100, 40);
    //創建容器視圖
    CGRect frame = CGRectMake(x, y, width, height);
    UICollectionView *collectionView = [[UICollectionView alloc] initWithFrame:frame
                                                          collectionViewLayout:layout];
    collectionView.delegate = self;//設置代理
    collectionView.dataSource = self;//設置數據源
    collectionView.backgroundColor = [UIColor whiteColor];//設置背景,默認為黑色
    //添加到主視圖
    [self.view addSubview:collectionView];
    self.collectionView = collectionView;

    //注冊容器視圖中顯示的方塊視圖
    [collectionView registerClass:[LTCollectionViewCell class]
            forCellWithReuseIdentifier:[LTCollectionViewCell cellIdentifier]];
    //注冊容器視圖中顯示的頂部視圖
    [collectionView registerClass:[LTCollectionHeaderView class]
       forSupplementaryViewOfKind:UICollectionElementKindSectionHeader
              withReuseIdentifier:[LTCollectionHeaderView headerViewIdentifier]];
    //注冊容器視圖中顯示的底部視圖
    [collectionView registerClass:[LTCollectionFooterView class]
       forSupplementaryViewOfKind:UICollectionElementKindSectionFooter
              withReuseIdentifier:[LTCollectionFooterView footerViewIdentifier]];

}
3. UICollectionViewDataSource數據源方法
#pragma mark - UICollectionViewDataSource
/* 設置容器中有多少個組 */
- (NSInteger)numberOfSectionsInCollectionView:(UICollectionView *)collectionView{
    return 10;
}
/* 設置每個組有多少個方塊 */
- (NSInteger)collectionView:(UICollectionView *)collectionView
     numberOfItemsInSection:(NSInteger)section
{
    return 20;
}
/* 設置方塊的視圖 */
- (UICollectionViewCell *)collectionView:(UICollectionView *)collectionView
                  cellForItemAtIndexPath:(NSIndexPath *)indexPath
{
    //獲取cell視圖,內部通過去緩存池中取,如果緩存池中沒有,就自動創建一個新的cell
    LTCollectionViewCell *cell =
            [LTCollectionViewCell cellWithCollectionView:collectionView
                                            forIndexPath:indexPath];
    //設置cell屬性
    cell.contentView.backgroundColor = [UIColor redColor];
    cell.textLabel.text = [NSString stringWithFormat:@"Cell %2ld",indexPath.row];

    return cell;
}
/* 設置頂部視圖和底部視圖 */
- (UICollectionReusableView *)collectionView:(UICollectionView *)collectionView
           viewForSupplementaryElementOfKind:(NSString *)kind
                                 atIndexPath:(NSIndexPath *)indexPath
{
    if ( [kind isEqualToString:UICollectionElementKindSectionHeader] ) {//頂部視圖
        //獲取頂部視圖
        LTCollectionHeaderView *headerView =
            [LTCollectionHeaderView headerViewWithCollectionView:collectionView
                                                    forIndexPath:indexPath];
        //設置頂部視圖屬性
        headerView.backgroundColor = [UIColor orangeColor];
        headerView.textLabel.text = [NSString stringWithFormat:@"-Header-%ld-",indexPath.section];
        return headerView;

    } else if( [kind isEqualToString:UICollectionElementKindSectionFooter] ) {//底部視圖
        //獲取底部視圖
        LTCollectionFooterView *footerView =
             [LTCollectionFooterView footerViewWithCollectionView:collectionView
                                                     forIndexPath:indexPath];
        //設置底部視圖屬性
        footerView.backgroundColor = [UIColor greenColor];
        footerView.textLabel.text = [NSString stringWithFormat:@"-Footer-%ld-",indexPath.section];
        return footerView;
    }
    return nil;
}
4. UICollectionViewDelegateFlowLayout布局代理方法
#pragma mark - UICollectionViewDelegateFlowLayout
/* 設置各個方塊的大小尺寸 */
- (CGSize)collectionView:(UICollectionView *)collectionView
                  layout:(UICollectionViewLayout*)collectionViewLayout
  sizeForItemAtIndexPath:(NSIndexPath *)indexPath
{
    CGFloat width = 50;
    CGFloat height = 50;
    return CGSizeMake(width, height);
}
/* 設置每一組的上下左右間距 */
- (UIEdgeInsets)collectionView:(UICollectionView *)collectionView
                        layout:(UICollectionViewLayout*)collectionViewLayout
        insetForSectionAtIndex:(NSInteger)section
{
    return UIEdgeInsetsMake(10, 10, 10, 10);
}
5. 父協議UICollectionViewDelegate的代理方法
#pragma mark - UICollectionViewDelegate
/* 方塊被選中會調用 */
- (void)collectionView:(UICollectionView *)collectionView
        didSelectItemAtIndexPath:(NSIndexPath *)indexPath
{
    NSLog(@"點擊選擇了第%ld組第%ld個方塊",indexPath.section,indexPath.row);
}
/* 方塊取消選中會調用 */
- (void)collectionView:(UICollectionView *)collectionView
        didDeselectItemAtIndexPath:(NSIndexPath *)indexPath
{
    NSLog(@"取消選擇第%ld組第%ld個方塊",indexPath.section,indexPath.row);
}
@end
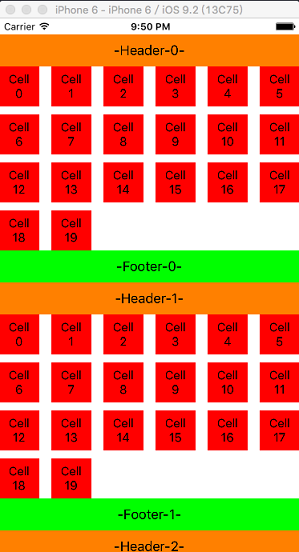
效果圖如下,左邊為垂直滾動效果,右邊為水平滾動效果

如果修改下布局代理方法的上下左右邊界距離:
/* 設置每一組的上下左右間距 */
- (UIEdgeInsets)collectionView:(UICollectionView *)collectionView
                        layout:(UICollectionViewLayout*)collectionViewLayout
        insetForSectionAtIndex:(NSInteger)section
{
    return UIEdgeInsetsMake(0, 0, 0, 0);
}
- 上一頁:iOS地圖開發-基本使用
- 下一頁:iOS學習筆記30-系統服務(三)藍牙


相關文章
+