iOS之讓你的App動起來
前言
本文只要描述了iOS中的Core Animation(核心動畫:隱式動畫、顯示動畫)、貝塞爾曲線、UIView動畫的封裝。
Core Animation,中文翻譯為核心動畫,它是一組非常強大的動畫處理API,使用它能做出非常炫麗的動畫效果,而且往往是事半功倍。也就是說,使用少量的代碼就可以實現非常強大的功能。Core Animation可以用在Mac OS X和iOS平台。Core Animation的動畫執行過程都是在後台操作的,不會阻塞主線程。要注意是,Core Animation是直接作用在CALayer上的,並非UIView。
CALayer與UIView的關系:
在iOS中,你能看得見摸得著的東西基本上都是UIView,比如一個按鈕、一個文本標簽、一個文本輸入框、一個圖標等等,這些都是UIView。其實UIView之所以能顯示在屏幕上,完全是因為它內部的一個圖層:在創建UIView對象時,UIView內部會自動創建一個圖層(即CALayer對象),通過UIView的layer屬性可以訪問這個層。
CALayer是個與UIView很類似的概念,同樣有layer,sublayer...,同樣有backgroundColor、frame等相似的屬性,我們可以將UIView看做一種特殊的CALayer,只不過UIView可以響應事件而已。一般來說,layer可以有兩種用途,二者不互相沖突:一是對view相關屬性的設置,包括圓角、陰影、邊框等參數,二是實現對view的動畫操控。因此對一個view進行core animation動畫,本質上是對該view的.layer進行動畫操縱。
動畫分為隱式動畫和顯示動畫,我們先來看看
隱式動畫:
Core Animation基於一個假設,說屏幕上的任何東西都可以(或者可能)做動畫。動畫並不需要你在Core Animation中手動打開,相反需要明確地關閉,否則他會一直存在。
當你改變CALayer的一個可做動畫的屬性,它並不能立刻在屏幕上體現出來。相反,它是從先前的值平滑過渡到新的值。這一切都是默認的行為,你不需要做額外的操作。
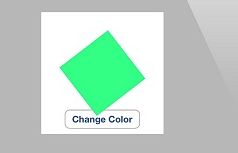
這看起來這太棒了,似乎不太真實,我們來用一個demo解釋一下:首先和第一章“圖層樹”一樣創建一個藍色的方塊,然後添加一個按鈕,隨機改變它的顏色。點擊按鈕,你會發現圖層的顏色平滑過渡到一個新值,而不是跳變。
隨機改變圖層顏色:
@interface ViewController ()
@property (nonatomic, weak) IBOutlet UIView*layerView;
@property (nonatomic, weak) IBOutlet CALayer*colorLayer;
@end
@implementation ViewController
- (void)viewDidLoad
{
[super viewDidLoad];
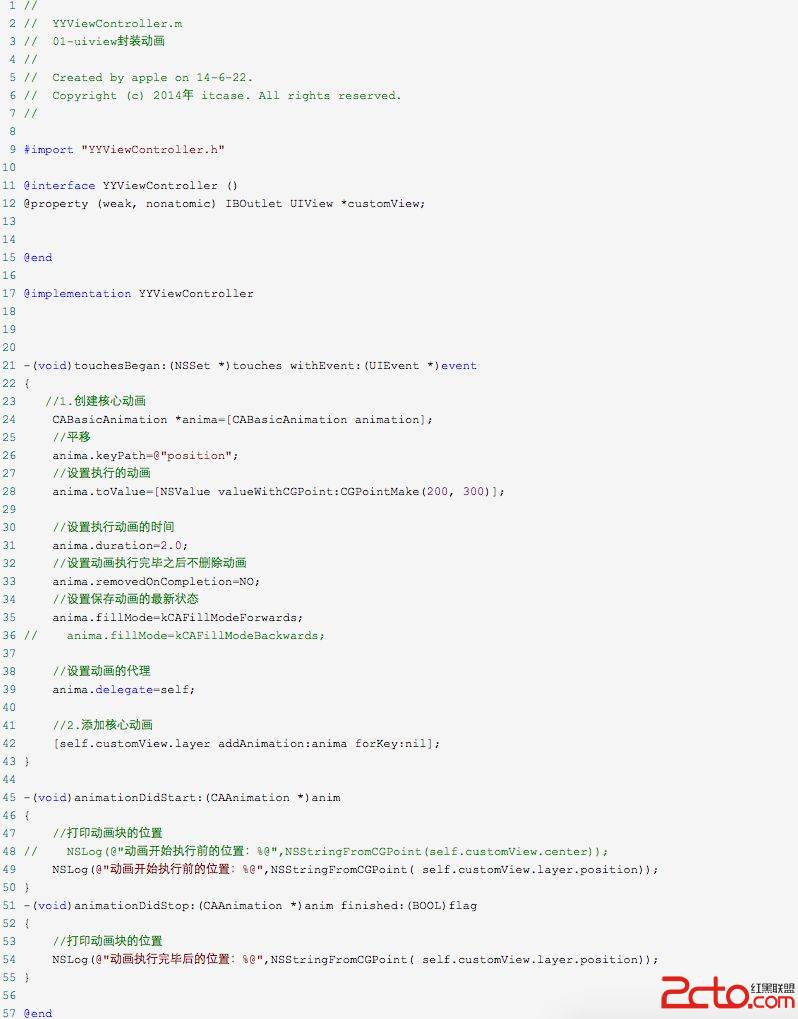
//create sublayer
self.colorLayer =[CALayer layer];
self.colorLayer.frame= CGRectMake(50.0f,50.0f,100.0f,100.0f);
self.colorLayer.backgroundColor=[UIColor blueColor].CGColor;
//add it to our view
[self.layerView.layer addSublayer:self.colorLayer];
}
-(IBAction)changeColor
{//randomize the layer background color
CGFloat red = arc4random() /(CGFloat)INT_MAX;
CGFloat green= arc4random() /(CGFloat)INT_MAX;
CGFloat blue= arc4random() /(CGFloat)INT_MAX;
self.colorLayer.backgroundColor= [UIColor colorWithRed:red green:green blue:blue alpha:1.0].CGColor;
}
@end
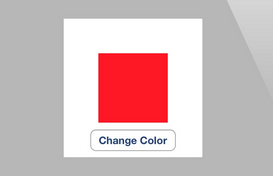
運行效果圖
這其實就是所謂的隱式動畫。之所以叫隱式是因為我們並沒有指定任何動畫的類型。我們僅僅改變了一個屬性,然後Core Animation來決定如何並且何時去做動畫。Core Animaiton同樣支持顯式動畫,下面詳細說明。
但當你改變一個屬性,Core Animation是如何判斷動畫類型和持續時間的呢?實際上動畫執行的時間取決於當前事務的設置,動畫類型取決於圖層行為。
事務實際上是Core Animation用來包含一系列屬性動畫集合的機制,任何用指定事務去改變可以做動畫的圖層屬性都不會立刻發生變化,而是當事務一旦提交的時候開始用一個動畫過渡到新值。
事務是通過CATransaction類來做管理,這個類的設計有些奇怪,不像你從它的命名預期的那樣去管理一個簡單的事務,而是管理了一疊你不能訪問的事務。CATransaction沒有屬性或者實例方法,並且也不能用+alloc和-init方法創建它。但是可以用+begin和+commit分別來入棧或者出棧。
任何可以做動畫的圖層屬性都會被添加到棧頂的事務,你可以通過+setAnimationDuration:方法設置當前事務的動畫時間,或者通過+animationDuration方法來獲取值(默認0.25秒)。
Core Animation在每個run loop周期中自動開始一次新的事務(run loop是iOS負責收集用戶輸入,處理定時器或者網絡事件並且重新繪制屏幕的東西),即使你不顯式的用[CATransaction begin]開始一次事務,任何在一次run loop循環中屬性的改變都會被集中起來,然後做一次0.25秒的動畫。
明白這些之後,我們就可以輕松修改變色動畫的時間了。我們當然可以用當前事的+setAnimationDuration:方法來修改動畫時間,但在這裡我們首先起一個新的事務,於是修改時間就不會有別的副作用。因為修改當前事務的時間可能會導致同一時刻別的動畫(如屏幕旋轉),所以最好還是在調整動畫之前壓入一個新的事務。
運行程序,你會發現色塊顏色比之前變得更慢了。
使用CATransaction控制動畫時間:
-(IBAction)changeColor
{//begin a new transaction
[CATransaction begin];
//set the animation duration to 1 second
[CATransaction setAnimationDuration:1.0];
//randomize the layer background color
CGFloat red = arc4random() /(CGFloat)INT_MAX;
CGFloat green= arc4random() /(CGFloat)INT_MAX;
CGFloat blue= arc4random() /(CGFloat)INT_MAX;
self.colorLayer.backgroundColor= [UIColor colorWithRed:red green:green blue:blue alpha:1.0].CGColor;
//commit the transaction
[CATransaction commit];
}
如果你用過UIView的動畫方法做過一些動畫效果,那麼應該對這個模式不陌生。UIView有兩個方法,+beginAnimations:context:和+commitAnimations,和CATransaction的+begin和+commit方法類似。實際上在+beginAnimations:context:和+commitAnimations之間所有視圖或者圖層屬性的改變而做的動畫都是由於設置了CATransaction的原因。
在iOS4中,蘋果對UIView添加了一種基於block的動畫方法:+animateWithDuration:animations:。這樣寫對做一堆的屬性動畫在語法上會更加簡單,但實質上它們都是在做同樣的事情。
CATransaction的+begin和+commit方法在+animateWithDuration:animations:內部自動調用,這樣block中所有屬性的改變都會被事務所包含。這樣也可以避免開發者由於對+begin和+commit匹配的失誤造成的風險。
完成塊
基於UIView的block的動畫允許你在動畫結束的時候提供一個完成的動作。CATranscation接口提供的+setCompletionBlock:方法也有同樣的功能。我們來調整上個例子,在顏色變化結束之後執行一些操作。我們來添加一個完成之後的block,用來在每次顏色變化結束之後切換到另一個旋轉90的動畫。
在顏色動畫完成之後添加一個回調:
-(IBAction)changeColor
{//begin a new transaction
[CATransaction begin];
//set the animation duration to 1 second
[CATransaction setAnimationDuration:1.0];
//add the spin animation on completion
[CATransaction setCompletionBlock:^{
//rotate the layer 90 degrees
CGAffineTransform transform =self.colorLayer.affineTransform;
transform=CGAffineTransformRotate(transform, M_PI_4);
self.colorLayer.affineTransform=transform;
}];
//randomize the layer background color
CGFloat red = arc4random() /(CGFloat)INT_MAX;
CGFloat green= arc4random() /(CGFloat)INT_MAX;
CGFloat blue= arc4random() /(CGFloat)INT_MAX;
self.colorLayer.backgroundColor= [UIColor colorWithRed:red green:green blue:blue alpha:1.0].CGColor;
//commit the transaction
[CATransaction commit];
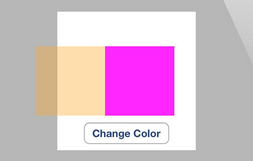
運行效果圖
注意旋轉動畫要比顏色漸變快得多,這是因為完成塊是在顏色漸變的事務提交並出棧之後才被執行,於是,用默認的事務做變換,默認的時間也就變成了0.25秒。
圖層行為
現在來做個實驗,試著直接對UIView關聯的圖層做動畫而不是一個單獨的圖層。清單7.4是對清單7.2代碼的一點修改,移除了colorLayer,並且直接設置layerView關聯圖層的背景色。
清單7.4 直接設置圖層的屬性
@interfaceViewController ()
@property (nonatomic, weak) IBOutlet UIView*layerView;
@end
@implementation ViewController
- (void)viewDidLoad
{
[super viewDidLoad];
//set the color of our layerView backing layer directly
self.layerView.layer.backgroundColor =[UIColor blueColor].CGColor;
}
-(IBAction)changeColor
{//begin a new transaction
[CATransaction begin];
//set the animation duration to 1 second
[CATransaction setAnimationDuration:1.0];
//randomize the layer background color
CGFloat red = arc4random() /(CGFloat)INT_MAX;
CGFloat green= arc4random() /(CGFloat)INT_MAX;
CGFloat blue= arc4random() /(CGFloat)INT_MAX;
self.layerView.layer.backgroundColor= [UIColor colorWithRed:red green:green blue:blue alpha:1.0].CGColor;
//commit the transaction
[CATransaction commit];
}
運行程序,你會發現當按下按鈕,圖層顏色瞬間切換到新的值,而不是之前平滑過渡的動畫。發生了什麼呢?隱式動畫好像被UIView關聯圖層給禁用了。
試想一下,如果UIView的屬性都有動畫特性的話,那麼無論在什麼時候修改它,我們都應該能注意到的。所以,如果說UIKit建立在Core Animation(默認對所有東西都做動畫)之上,那麼隱式動畫是如何被UIKit禁用掉呢?
我們知道Core Animation通常對CALayer的所有屬性(可動畫的屬性)做動畫,但是UIView把它關聯的圖層的這個特性關閉了。為了更好說明這一點,我們需要知道隱式動畫是如何實現的。
我們把改變屬性時CALayer自動應用的動畫稱作行為,當CALayer的屬性被修改時候,它會調-actionForKey:方法,傳遞屬性的名稱。剩下的操作都在CALayer的頭文件中有詳細的說明,實質上是如下幾步:
圖層首先檢測它是否有委托,並且是否實現CALayerDelegate協議指定的-actionForLayer:forKey方法。如果有,直接調用並返回結果。
如果沒有委托,或者委托沒有實現-actionForLayer:forKey方法,圖層接著檢查包含屬性名稱對應行為映射的actions字典。如果actions字典沒有包含對應的屬性,那麼圖層接著在它的style字典接著搜索屬性名。最後,如果在style裡面也找不到對應的行為,那麼圖層將會直接調用定義了每個屬性的標准行為的-defaultActionForKey:方法。
所以一輪完整的搜索結束之後,-actionForKey:要麼返回空(這種情況下將不會有動畫發生),要麼是CAAction協議對應的對象,最後CALayer拿這個結果去對先前和當前的值做動畫。於是這就解釋了UIKit是如何禁用隱式動畫的:每個UIView對它關聯的圖層都扮演了一個委托,並且提供了-actionForLayer:forKey的實現方法。當不在一個動畫塊的實現中,UIView對所有圖層行為返回nil,但是在動畫block范圍之內,它就返回了一個非空值。我們可以用一個demo做個簡單的實驗:
測試UIView的actionForLayer:forKey:實現:
@interface ViewController ()
@property (nonatomic, weak) IBOutlet UIView*layerView;
@end
@implementation ViewController
- (void)viewDidLoad
{
[super viewDidLoad];
//test layer action when outside of animation block
NSLog(@"Outside: %@", [self.layerView actionForLayer:self.layerView.layer forKey:@"backgroundColor"]);
//begin animation block
[UIView beginAnimations:nil context:nil];
//test layer action when inside of animation block
NSLog(@"Inside: %@", [self.layerView actionForLayer:self.layerView.layer forKey:@"backgroundColor"]);
//end animation block
[UIView commitAnimations];
}
@end
運行程序,控制台顯示結果如下:
$ LayerTest[21215:c07] Outside: $ LayerTest[21215:c07] Inside:
於是我們可以預言,當屬性在動畫塊之外發生改變,UIView直接通過返回nil來禁用隱式動畫。但如果在動畫塊范圍之內,根據動畫具體類型返回相應的屬性,在這個例子就是CABasicAnimation。
當然返回nil並不是禁用隱式動畫唯一的辦法,CATransacition有個方法叫做+setDisableActions:,可以用來對所有屬性打開或者關閉隱式動畫。如果在清單7.2的[CATransaction begin]之後添加下面的代碼,同樣也會阻止動畫的發生:
[CATransaction setDisableActions:YES];
總結一下,我們知道了如下幾點
UIView關聯的圖層禁用了隱式動畫,對這種圖層做動畫的唯一辦法就是使用UIView的動畫函數(而不是依賴CATransaction),或者繼承UIView,並覆蓋-actionForLayer:forKey:方法,或者直接創建一個顯式動畫。
對於單獨存在的圖層,我們可以通過實現圖層的-actionForLayer:forKey:委托方法,或者提供一個actions字典來控制隱式動畫。
我們來對顏色漸變的例子使用一個不同的行為,通過給colorLayer設置一個自定義的actions字典。我們也可以使用委托來實現,但是actions字典可以寫更少的代碼。那麼到底改如何創建一個合適的行為對象呢?
行為通常是一個被Core Animation隱式調用的顯式動畫對象。這裡我們使用的是一個實現了CATransaction的實例,叫做推進過渡。不過對於現在,知道CATransition響應CAAction協議,並且可以當做一個圖層行為就足夠了。結果很贊,不論在什麼時候改變背景顏色,新的色塊都是從左側滑入,而不是默認的漸變效果。
實現自定義行為
@interfaceViewController ()
@property (nonatomic, weak) IBOutlet UIView*layerView;
@property (nonatomic, weak) IBOutlet CALayer*colorLayer;
@end
@implementation ViewController
- (void)viewDidLoad
{
[super viewDidLoad];
//create sublayer
self.colorLayer =[CALayer layer];
self.colorLayer.frame= CGRectMake(50.0f,50.0f,100.0f,100.0f);
self.colorLayer.backgroundColor=[UIColor blueColor].CGColor;//add a custom actionCATransition *transition =[CATransition animation];
transition.type=kCATransitionPush;
transition.subtype=kCATransitionFromLeft;
self.colorLayer.actions= @{@"backgroundColor": transition};
//add it to our view
[self.layerView.layer addSublayer:self.colorLayer];
}
-(IBAction)changeColor
{//randomize the layer background color
CGFloat red = arc4random() /(CGFloat)INT_MAX;
CGFloat green= arc4random() /(CGFloat)INT_MAX;
CGFloat blue= arc4random() /(CGFloat)INT_MAX;
self.colorLayer.backgroundColor= [UIColor colorWithRed:red green:green blue:blue alpha:1.0].CGColor;
}
@end
運行效果圖
呈現與模型
CALayer的屬性行為其實很不正常,因為改變一個圖層的屬性並沒有立刻生效,而是通過一段時間漸變更新。這是怎麼做到的呢?
當你改變一個圖層的屬性,屬性值的確是立刻更新的(如果你讀取它的數據,你會發現它的值在你設置它的那一刻就已經生效了),但是屏幕上並沒有馬上發生改變。這是因為你設置的屬性並沒有直接調整圖層的外觀,相反,他只是定義了圖層動畫結束之後將要變化的外觀。
當設置CALayer的屬性,實際上是在定義當前事務結束之後圖層如何顯示的模型。Core Animation扮演了一個控制器的角色,並且負責根據圖層行為和事務設置去不斷更新視圖的這些屬性在屏幕上的狀態。
我們討論的就是一個典型的微型MVC模式。CALayer是一個連接用戶界面(就是MVC中的view)虛構的類,但是在界面本身這個場景下,CALayer的行為更像是存儲了視圖如何顯示和動畫的數據模型。實際上,在蘋果自己的文檔中,圖層樹通常都是值的圖層樹模型。
在iOS中,屏幕每秒鐘重繪60次。如果動畫時長比60分之一秒要長,Core Animation就需要在設置一次新值和新值生效之間,對屏幕上的圖層進行重新組織。這意味著CALayer除了“真實”值(就是你設置的值)之外,必
須要知道當前顯示在屏幕上的屬性值的記錄。
每個圖層屬性的顯示值都被存儲在一個叫做呈現圖層的獨立圖層當中,他可以通過-presentationLayer方法來訪問。這個呈現圖層實際上是模型圖層的復制,但是它的屬性值代表了在任何指定時刻當前外觀效果。換句話說,你可以通過呈現圖層的值來獲取當前屏幕上真正顯示出來的值,如下圖。
我們在第一章中提到除了圖層樹,另外還有呈現樹。呈現樹通過圖層樹中所有圖層的呈現圖層所形成。注意呈現圖層僅僅當圖層首次被提交(就是首次第一次在屏幕上顯示)的時候創建,所以在那之前調用-presentationLayer將會返回nil。
你可能注意到有一個叫做–modelLayer的方法。在呈現圖層上調用–modelLayer將會返回它正在呈現所依賴的CALayer。通常在一個圖層上調用-modelLayer會返回–self(實際上我們已經創建的原始圖層就是一種數據模型)。
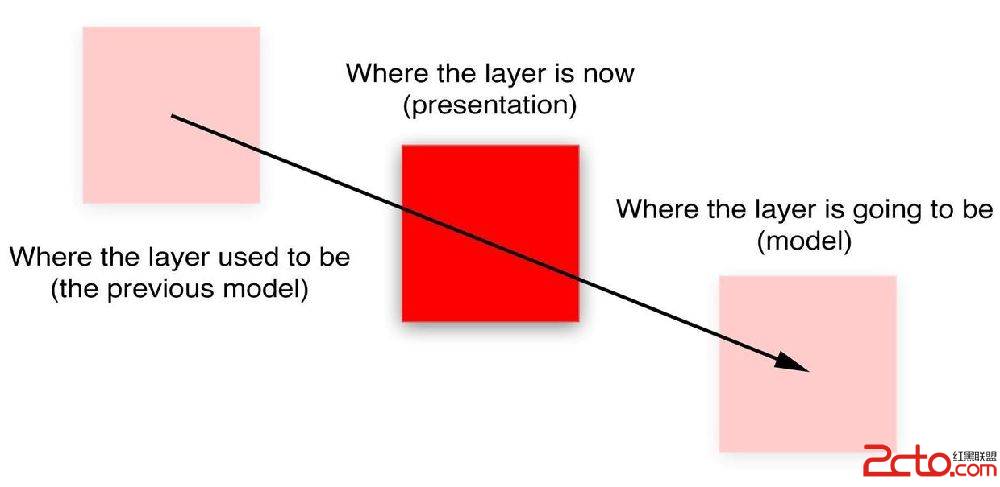
一個移動的圖層是如何通過數據模型呈現的
大多數情況下,你不需要直接訪問呈現圖層,你可以通過和模型圖層的交互,來讓Core Animation更新顯示。兩種情況下呈現圖層會變得很有用,一個是同步動畫,一個是處理用戶交互。
如果你在實現一個基於定時器的動畫,而不僅僅是基於事務的動畫,這個時候准確地知道在某一時刻圖層顯示在什麼位置就會對正確擺放圖層很有用了。
如果你想讓你做動畫的圖層響應用戶輸入,你可以使用-hitTest:方法來判斷指定圖層是否被觸摸,這時候對呈現圖層而不是模型圖層調用-hitTest:會顯得更有意義,因為呈現圖層代表了用戶當前看到的圖層位置,而不是當前動畫結束之後的位置。
我們可以用一個簡單的案例來證明後者。在這個例子中,點擊屏幕上的任意位置將會讓圖層平移到那裡。點擊圖層本身可以隨機改變它的顏色。我們通過對呈現圖層調用-hitTest:來判斷是否被點擊。
如果修改代碼讓-hitTest:直接作用於colorLayer而不是呈現圖層,你會發現當圖層移動的時候它並不能正確顯示。這時候你就需要點擊圖層將要移動到的位置而不是圖層本身來響應點擊(這就是為什麼用呈現圖層來響應交互的原因)。
使用presentationLayer圖層來判斷當前圖層位置
@interfaceViewController ()
@property (nonatomic, strong) CALayer*colorLayer;
@end
@implementation ViewController
- (void)viewDidLoad
{
[super viewDidLoad];
//create a red layer
self.colorLayer =[CALayer layer];
self.colorLayer.frame= CGRectMake(0,0,100,100);
self.colorLayer.position= CGPointMake(self.view.bounds.size.width /2, self.view.bounds.size.height /2);
self.colorLayer.backgroundColor=[UIColor redColor].CGColor;
[self.view.layer addSublayer:self.colorLayer];
}
- (void)touchesBegan:(NSSet *)touches withEvent:(UIEvent *)event{
//get the touch point
CGPoint point =[[touches anyObject] locationInView:self.view];
//check if we‘ve tapped the moving layer
if([self.colorLayer.presentationLayer hitTest:point]) {
//randomize the layer background color
CGFloat red = arc4random() /(CGFloat)INT_MAX;
CGFloat green= arc4random() /(CGFloat)INT_MAX;
CGFloat blue= arc4random() /(CGFloat)INT_MAX;
self.colorLayer.backgroundColor= [UIColor colorWithRed:red green:green blue:blue alpha:1.0].CGColor;
}else{
//otherwise (slowly) move the layer to new position
[CATransaction begin];
[CATransaction setAnimationDuration:4.0];
self.colorLayer.position=point;
[CATransaction commit];
}
}
總結
這一章討論了隱式動畫,還有Core Animation對指定屬性選擇合適的動畫行為的機制。同時你知道了UIKit是如何充分利用Core Animation的隱式動畫機制來強化它的顯式系統,以及動畫是如何被默認禁用並且當需要的時候啟用的。最後,你了解了呈現和模型圖層,以及Core Animation是如何通過它們來判斷出圖層當前位置以及將要到達的位置。
顯示動畫:
上一章介紹了隱式動畫的概念。隱式動畫是在iOS平台創建動態用戶界面的一種直接方式,也是UIKit動畫機
制的基礎,不過它並不能涵蓋所有的動畫類型。在這一章中,我們將要研究一下顯式動畫,它能夠對一些屬性做指定的自定義動畫,或者創建非線性動畫,比如沿著
任意一條曲線移動。
屬性動畫
首先我們來探討一下屬性動畫。屬性動畫作用於圖層的某個單一屬性,並指定了它的一個目標值,或者一連串將要做動畫的值。屬性動畫分為兩種:基礎和關鍵幀。
基礎動畫
動畫其實就是一段時間內發生的改變,最簡單的形式就是從一個值改變到另一個值,這也是CABasicAnimation最主要的功能。
CABasicAnimation是CAPropertyAnimation的一個子類,CAPropertyAnimation同時也是Core Animation所有動畫類型的抽象基類。作為一個抽象類,CAAnimation本身並沒有做多少工作,它提供了一個計時函數,
一個委托(用於反饋動畫狀態)以及一個removedOnCompletion,用於標識動畫是否該在結束後自動釋放(默認YES,為了防止內存洩露)。
CAAnimation同時實現了一些協議,包括CAAction(允許CAAnimation的子類可以提供圖層行為),以及
CAMediaTiming。CAPropertyAnimation通過指定動畫的keyPath作用於一個單一屬性,CAAnimation通常應用於一個指定的CALayer,於是這裡指的也就是一個圖層的keyPath了。實際上它是一個關鍵路徑(一些用點表示法可以在層級關系中指向任意嵌套的對象),而不僅僅是一個屬性的名稱,因為這意味著動畫不僅可以作用於圖層本身的屬性,而且還包含了它的子成員的屬性,甚至是一些虛擬的屬性(後面會詳細解釋)。
CAPropertyAnimation通過指定動畫的keyPath作用於一個單一屬性,CAAnimation通常應用於一個指定的CALayer,於是這裡指的也就是一個圖層的keyPath了。實際上它是一個關鍵路徑(一些用點表示法可以在層級關系中指向任意嵌套的對象),而不僅僅是一個屬性的名稱,因為這意味著動畫不僅可以作用於圖層本身的屬性,而且還包含了它的子成員的屬性,甚至是一些虛擬的屬性(後面會詳細解釋)。
CABasicAnimation繼承於CAPropertyAnimation,並添加了如下屬性:
id fromValue
id toValue
id byValue
從命名就可以得到很好的解釋:fromValue代表了動畫開始之前屬性的值,toValue代表了動畫結束之後的值,byValue代表了動畫執行過程中改變的值。
通過組合這三個屬性就可以有很多種方式來指定一個動畫的過程。它們被定義成id類型而不是一些具體的類型是因為屬性動畫可以用作很多不同種的屬性類型,包括數字類型,矢量,變換矩陣,甚至是顏色或者圖片。
形象的說,在iOS中,展示動畫可以類比於顯示生活中的“拍電影”。拍電影有三大要素:演員+劇本+開拍,概念類比如下:
演員--->CALayer,規定電影的主角是誰
劇本--->CAAnimation,規定電影該怎麼演,怎麼走,怎麼變換
開拍--->AddAnimation,開始執行
CAAnimation是什麼呢?
CAAnimation可分為四種:
1.CABasicAnimation
通過設定起始點,終點,時間,動畫會沿著你這設定點進行移動。可以看做特殊的CAKeyFrameAnimation
2.CAKeyframeAnimation
Keyframe顧名思義就是關鍵點的frame,你可以通過設定CALayer的始點、中間關鍵點、終點的frame,時間,動畫會沿你設定的軌跡進行移動
3.CAAnimationGroup
Group也就是組合的意思,就是把對這個Layer的所有動畫都組合起來。PS:一個layer設定了很多動畫,他們都會同時執行,如何按順序執行我到時候再講。
4.CATransition
這個就是蘋果幫開發者封裝好的一些動畫
二、動手干活
實踐出真知,看個例子就知道:
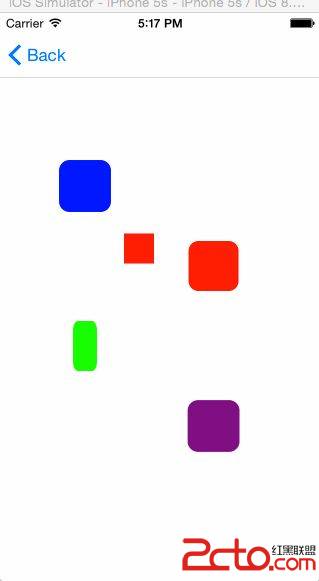
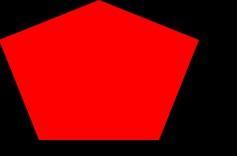
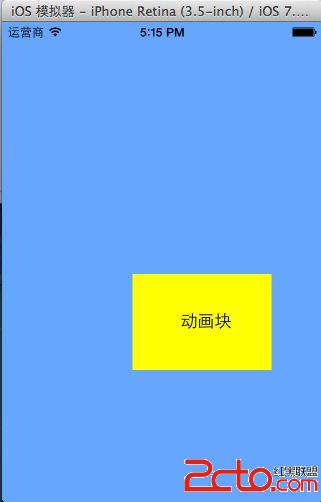
比如我們想實現一個類似心跳的縮放動畫可以這麼做,分為演員初始化、設定劇本、電影開拍三個步驟:
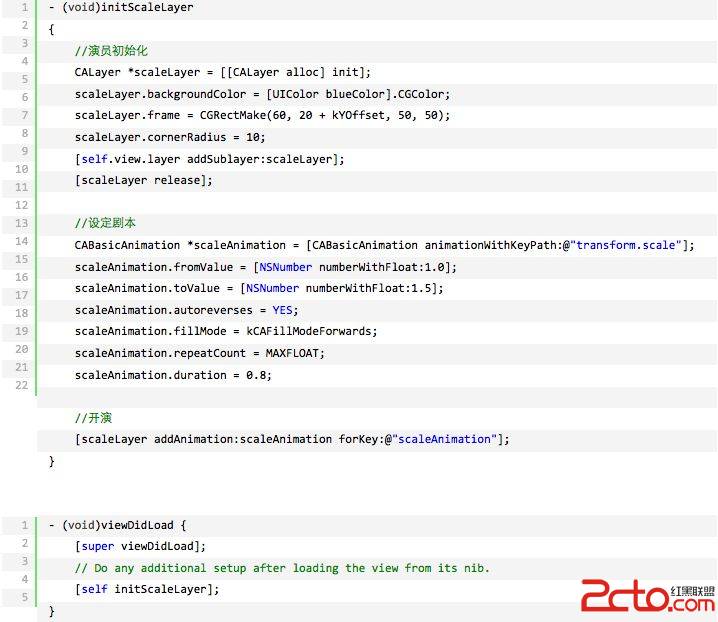
效果請參考附圖中的藍色方塊。其他效果可以依葫蘆畫瓢輕松實現。想要實現不同的效果,最關鍵的地方在於CABasicAnimation對象的初始化方式中keyPath的設定。在iOS中有以下幾種不同的keyPath,代表著不同的效果:
此外,我們還可以利用GroupAnimation實現多種動畫的組合,在GroupAnimation中的各個動畫類型是同時進行的。
最後運行效果:
貝塞爾曲線:
使用UIBezierPath類可以創建基於矢量的路徑,這個類在UIKit中。此類是Core Graphics框架關於path的一個封裝。使用此類可以定義簡單的形狀,如橢圓或者矩形,或者有多個直線和曲線段組成的形狀。
1.Bezier Path 基礎
UIBezierPath對象是CGPathRef數據類型的封裝。path如果是基於矢量形狀的,都用直線和曲線段去創建。我們使用直線段去創建矩形和多邊形,使用曲線段去創建弧(arc),圓或者其他復雜的曲線形狀。每一段都包括一個或者多個點,繪圖命令定義如何去诠釋這些點。每一個直線段或者曲線段的結束的地方是下一個的開始的地方。每一個連接的直線或者曲線段的集合成為subpath。一個UIBezierPath對象定義一個完整的路徑包括一個或者多個subpaths。
創建和使用一個path對象的過程是分開的。創建path是第一步,包含一下步驟:
(1)創建一個Bezierpath對象。
(2)使用方法moveToPoint:去設置初始線段的起點。
(3)添加line或者curve去定義一個或者多個subpaths。
(4)改變UIBezierPath對象跟繪圖相關的屬性。
例如,我們可以設置stroked path的屬性lineWidth和lineJoinStyle。也可以設置filled path的屬性usesEvenOddFillRule。
當創建path,我們應該管理path上面的點相對於原點(0,0),這樣我們在隨後就可以很容易的移動path了。為了繪
制path對象,我們要用到stroke和fill方法。這些方法在current graphic
context下渲染path的line和curve段。
2、使用UIBezierPath創建多邊形---在path下面添加直線條形成多邊形
多邊形是一些簡單的形狀,這些形狀是由一些直線線條組成,我們可以用moveToPoint: 和 addLineToPoint:方法去構建。
方法moveToPoint:設置我們想要創建形狀的起點。從這點開始,我們可以用方法addLineToPoint:去創建一個形狀的線段。
我們可以連續的創建line,每一個line的起點都是先前的終點,終點就是指定的點。
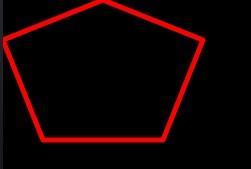
下面的代碼描述了如何用線段去創建一個五邊形。第五條線通過調用closePath方法得到的,它連接了最後一個點(0,40)和第一個點(100,0)
說明:closePath方法不僅結束一個shape的subpath表述,它也在最後一個點和第一個點之間畫一條線段,如果我們畫多邊形的話,這個一個便利的方法我們不需要去畫最後一條線。
//OnlyoverridedrawRect:ifyouperformcustomdrawing.
//Anemptyimplementationadverselyaffectsperformanceduringanimation.
-(void)drawRect:(CGRect)rect
{
UIColor*color=[UIColorredColor];
[colorset];//設置線條顏色
UIBezierPath*aPath=[UIBezierPathbezierPath];
aPath.lineWidth=5.0;
aPath.lineCapStyle=kCGLineCapRound;//線條拐角
aPath.lineJoinStyle=kCGLineCapRound;//終點處理
//Setthestartingpointoftheshape.
[aPathmoveToPoint:CGPointMake(100.0,0.0)];
//Drawthelines
[aPathaddLineToPoint:CGPointMake(200.0,40.0)];
[aPathaddLineToPoint:CGPointMake(160,140)];
[aPathaddLineToPoint:CGPointMake(40.0,140)];
[aPathaddLineToPoint:CGPointMake(0.0,40.0)];
[aPathclosePath];//第五條線通過調用closePath方法得到的
[aPathstroke];//Drawsline根據坐標點連線
}
注:這個類要繼承自UIView。
運行的結果如下圖:
如果修改最後一句代碼:[aPathfill];
運行結果就如下:
這樣就知道stroke 和 fill 方法的區別了吧!
3、使用UIBezierPath創建矩形
使用這個方法即可:
CreatesandreturnsanewUIBezierPathobjectinitializedwitharectangularpath.
+(UIBezierPath*)bezierPathWithRect:(CGRect)rect
demo代碼:
-(void)drawRect:(CGRect)rect
{
UIColor*color=[UIColorredColor];
[colorset];//設置線條顏色
UIBezierPath*aPath=[UIBezierPathbezierPathWithRect:CGRectMake(20,20,100,50)];
aPath.lineWidth=5.0;
aPath.lineCapStyle=kCGLineCapRound;//線條拐角
aPath.lineJoinStyle=kCGLineCapRound;//終點處理
[aPathstroke];
}
4、使用UIBezierPath創建圓形或者橢圓形
使用這個方法即可:
CreatesandreturnsanewUIBezierPathobjectinitializedwithanovalpathinscribedinthespecifiedrectangle
+(UIBezierPath*)bezierPathWithOvalInRect:(CGRect)rect
這個方法根據傳入的rect矩形參數繪制一個內切曲線。
當傳入的rect是一個正方形時,繪制的圖像是一個內切圓;當傳入的rect是一個長方形時,繪制的圖像是一個內切橢圓。
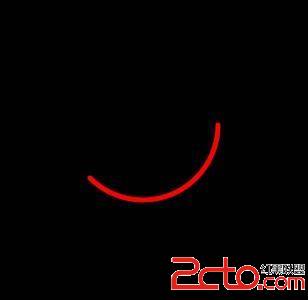
5、使用UIBezierPath創建一段弧線
使用這個方法:
CreatesandreturnsanewUIBezierPathobjectinitializedwithanarcofacircle.
+(UIBezierPath*)bezierPathWithArcCenter:(CGPoint)centerradius:(CGFloat)radiusstartAngle:(CGFloat)startAngleendAngle:(CGFloat)endAngleclockwise:(BOOL)clockwise
Parameters
center
Specifiesthecenterpointofthecircle(inthecurrentcoordinatesystem)usedtodefinethearc.
radius
Specifiestheradiusofthecircleusedtodefinethearc.
startAngle
Specifiesthestartingangleofthearc(measuredinradians).
endAngle
Specifiestheendangleofthearc(measuredinradians).
clockwise
Thedirectioninwhichtodrawthearc.
ReturnValue
Anewpathobjectwiththespecifiedarc.
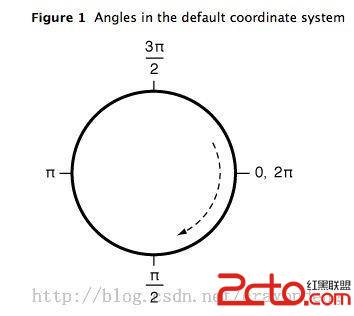
其中的參數分別指定:這段圓弧的中心,半徑,開始角度,結束角度,是否順時針方向。
下圖為弧線的參考系。
demo代碼:
#definepi3.14159265359
#defineDEGREES_TO_RADIANS(degrees)((pi*degrees)/180)
-(void)drawRect:(CGRect)rect
{
UIColor*color=[UIColorredColor];
[colorset];//設置線條顏色
UIBezierPath*aPath=[UIBezierPathbezierPathWithArcCenter:CGPointMake(150,150)
radius:75
startAngle:0
endAngle:DEGREES_TO_RADIANS(135)
clockwise:YES];
aPath.lineWidth=5.0;
aPath.lineCapStyle=kCGLineCapRound;//線條拐角
aPath.lineJoinStyle=kCGLineCapRound;//終點處理
[aPathstroke];
}
結果如下圖:
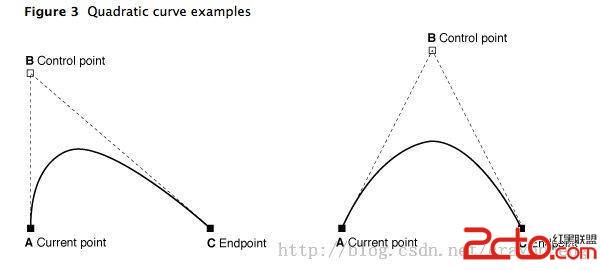
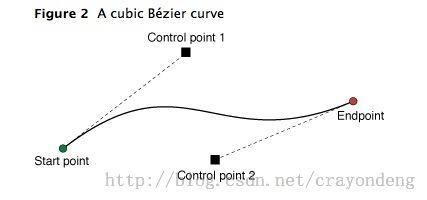
6、UIBezierPath類提供了添加二次貝塞爾曲線和三次貝塞爾曲線的支持。
曲線段在當前點開始,在指定的點結束。曲線的形狀有開始點,結束點,一個或者多個控制點的切線定義。下圖顯示了兩種曲線類型的相似,以及控制點和curve形狀的關系。
(1)繪制二次貝塞爾曲線
使用到這個方法:
AppendsaquadraticBéziercurvetothereceiver’spath.
-(void)addQuadCurveToPoint:(CGPoint)endPointcontrolPoint:(CGPoint)controlPoint
Parameters
endPoint
Theendpointofthecurve.
controlPoint
Thecontrolpointofthecurve.
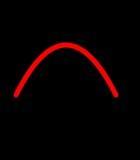
demo代碼:
-(void)drawRect:(CGRect)rect
{
UIColor*color=[UIColorredColor];
[colorset];//設置線條顏色
UIBezierPath*aPath=[UIBezierPathbezierPath];
aPath.lineWidth=5.0;
aPath.lineCapStyle=kCGLineCapRound;//線條拐角
aPath.lineJoinStyle=kCGLineCapRound;//終點處理
[aPathmoveToPoint:CGPointMake(20,100)];
[aPathaddQuadCurveToPoint:CGPointMake(120,100)controlPoint:CGPointMake(70,0)];
[aPathstroke];
}
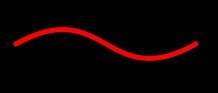
(2)繪制三次貝塞爾曲線
使用到這個方法:
AppendsacubicBéziercurvetothereceiver’spath.
-(void)addCurveToPoint:(CGPoint)endPointcontrolPoint1:(CGPoint)controlPoint1controlPoint2:(CGPoint)controlPoint2
Parameters
endPoint
Theendpointofthecurve.
controlPoint1
Thefirstcontrolpointtousewhencomputingthecurve.
controlPoint2
Thesecondcontrolpointtousewhencomputingthecurve.
demo代碼:
-(void)drawRect:(CGRect)rect
{
UIColor*color=[UIColorredColor];
[colorset];//設置線條顏色
UIBezierPath*aPath=[UIBezierPathbezierPath];
aPath.lineWidth=5.0;
aPath.lineCapStyle=kCGLineCapRound;//線條拐角
aPath.lineJoinStyle=kCGLineCapRound;//終點處理
[aPathmoveToPoint:CGPointMake(20,50)];
[aPathaddCurveToPoint:CGPointMake(200,50)controlPoint1:CGPointMake(110,0)controlPoint2:CGPointMake(110,100)];
[aPathstroke];
}
7.使用Core Graphics函數去修改path。
UIBezierPath類只是CGPathRef數據類型和path繪圖屬性的一個封裝。雖然通常我們可以用
UIBezierPath類的方法去添加直線段和曲線段,UIBezierPath類還提供了一個屬性CGPath,我們可以用來直接修改底層的path
data type。如果我們希望用Core Graphics 框架函數去創建path,則我們要用到此屬性。
有兩種方法可以用來修改和UIBezierPath對象相關的path。可以完全的使用Core
Graphics函數去修改path,也可以使用Core
Graphics函數和UIBezierPath函數混合去修改。第一種方法在某些方面相對來說比較容易。我們可以創建一個CGPathRef數據類型,
並調用我們需要修改path信息的函數。
下面的代碼就是賦值一個新的CGPathRef給UIBezierPath對象。
// Create the path data
CGMutablePathRef cgPath = CGPathCreateMutable();
CGPathAddEllipseInRect(cgPath, NULL, CGRectMake(0, 0, 300, 300));
CGPathAddEllipseInRect(cgPath, NULL, CGRectMake(50, 50, 200, 200));
// Now create the UIBezierPath object
UIBezierPath* aPath = [UIBezierPath bezierPath];
aPath.CGPath = cgPath;
aPath.usesEvenOddFillRule = YES;
// After assigning it to the UIBezierPath object, you can release
// your CGPathRef data type safely.
CGPathRelease(cgPath);
如果我們使用Core Graphics函數和UIBezierPath函數混合方法,我們必須小心的移動path 信息在兩者之間。因為UIBezierPath類擁有自己底層的CGPathRef data type,我們不能簡單的檢索該類型並直接的修改它。相反,我們應該生成一個副本,然後修改此副本,然後賦值此副本給CGPath屬性,如下代碼:
Mixing Core Graphics andUIBezierPathcalls
UIBezierPath* aPath = [UIBezierPath bezierPathWithOvalInRect:CGRectMake(0, 0, 300, 300)];
// Get the CGPathRef and create a mutable version.
CGPathRef cgPath = aPath.CGPath;
CGMutablePathRef mutablePath = CGPathCreateMutableCopy(cgPath);
// Modify the path and assign it back to the UIBezierPath object
CGPathAddEllipseInRect(mutablePath, NULL, CGRectMake(50, 50, 200, 200));
aPath.CGPath = mutablePath;
// Release both the mutable copy of the path.
CGPathRelease(mutablePath);
8.rendering(渲染)Bezier Path對象的內容。
當創建一個UIBezierPath對象之後,我們可以使用它的stroke和fill方法在current graphics context中去渲染它。在調用這些方法之前,我們要進行一些其他的任務去確保正確的繪制path。
使用UIColor類的方法去stroke和fill想要的顏色。
設置形狀在目標視圖中的位置。如果我們創建的path相對於原點(0,0),則我們可以給current drawing
context應用一個適當的affie
transform。例如,我想drawing一個形狀起始點在(0,0),我可以調用函數CGContextTranslateCTM,並指定水平和垂
直方向的translation值為10。調整graphic
context相對於調整path對象的points是首選的方法,因為我們可以很容易的保存和撤銷先前的graphics state。
更新path對象的drawing 屬性。當渲染path時,UIBezierPath實例的drawing屬性會覆蓋graphics context下的屬性值。
下面的代碼實現了在一個自定義view中實現drawRect:方法中去繪制一個橢圓。橢圓邊框矩形的左上角位於視圖坐標系統的點(50,50)處。
Drawing a path in a view
- (void)drawRect:(CGRect)rect
{
// Create an oval shape to draw.
UIBezierPath* aPath = [UIBezierPath bezierPathWithOvalInRect:
CGRectMake(0, 0, 200, 100)];
// Set the render colors
[[UIColor blackColor] setStroke];
[[UIColor redColor] setFill];
CGContextRef aRef = UIGraphicsGetCurrentContext();
// If you have content to draw after the shape,
// save the current state before changing the transform
//CGContextSaveGState(aRef);
// Adjust the view's origin temporarily. The oval is
// now drawn relative to the new origin point.
CGContextTranslateCTM(aRef, 50, 50);
// Adjust the drawing options as needed.
aPath.lineWidth = 5;
// Fill the path before stroking it so that the fill
// color does not obscure the stroked line.
[aPath fill];
[aPath stroke];
// Restore the graphics state before drawing any other content.
//CGContextRestoreGState(aRef);
}
UIView封裝動畫:
1.簡單說明
UIKit直接將動畫集成到UIView類中,當內部的一些屬性發生改變時,UIView將為這些改變提供動畫支持
執行動畫所需要的工作由UIView類自動完成,但仍要在希望執行動畫時通知視圖,為此需要將改變屬性的代碼放在[UIViewbeginAnimations:nilcontext:nil]和[UIViewcommitAnimations]之間
常見方法解析:
+ (void)setAnimationDelegate:(id)delegate 設置動畫代理對象,當動畫開始或者結束時會發消息給代理對象
+ (void)setAnimationWillStartSelector:(SEL)selector 當動畫即將開始時,執行delegate對象的selector,並且把beginAnimations:context:中傳入的參數傳進selector
+ (void)setAnimationDidStopSelector:(SEL)selector 當動畫結束時,執行delegate對象的selector,並且把beginAnimations:context:中傳入的參數傳進selector
+ (void)setAnimationDuration:(NSTimeInterval)duration 動畫的持續時間,秒為單位
+ (void)setAnimationDelay:(NSTimeInterval)delay 動畫延遲delay秒後再開始
+ (void)setAnimationStartDate:(NSDate *)startDate 動畫的開始時間,默認為now
+ (void)setAnimationCurve:(UIViewAnimationCurve)curve 動畫的節奏控制
+ (void)setAnimationRepeatCount:(float)repeatCount 動畫的重復次數
+ (void)setAnimationRepeatAutoreverses:(BOOL)repeatAutoreverses 如果設置為YES,代表動畫每次重復執行的效果會跟上一次相反
+ (void)setAnimationTransition:(UIViewAnimationTransition)transitionforView:(UIView *)viewcache:(BOOL)cache 設置視圖view的過渡效果, transition指定過渡類型, cache設置YES代表使用視圖緩存,性能較好
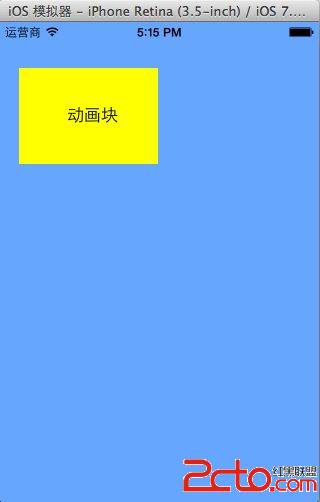
2.代碼示例:
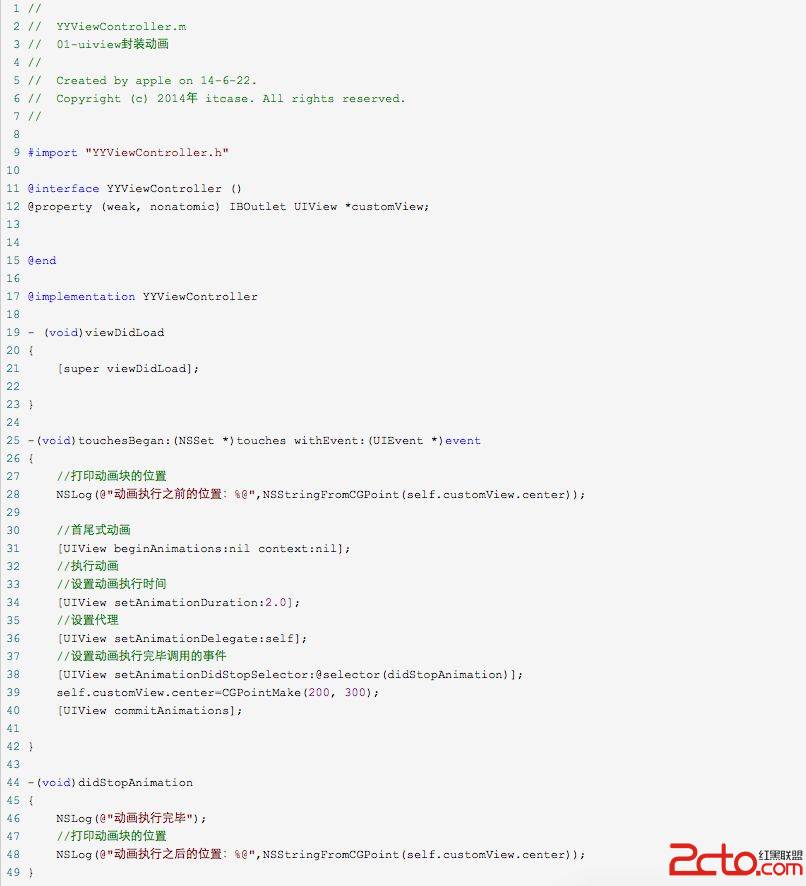
執行結果:
打印動畫塊的位置:

3.UIView封裝的動畫與CALayer動畫的對比
使用UIView和CALayer都能實現動畫效果,但是在真實的開發中,一般還是主要使用UIView封裝的動畫,而很少使用CALayer的動畫。
CALayer核心動畫與UIView動畫的區別:
UIView封裝的動畫執行完畢之後不會反彈。即如果是通過CALayer核心動畫改變layer的位置狀態,表面上看雖然已經改變了,但是實際上它的位置是沒有改變的。
代碼示例:
打印結果:

二、block動畫
1.簡單說明
+ (void)animateWithDuration:(NSTimeInterval)duration delay:(NSTimeInterval)delay options:(UIViewAnimationOptions)options animations:(void (^)(void))animations completion:(void (^)(BOOL finished))completion
參數解析:
duration:動畫的持續時間
delay:動畫延遲delay秒後開始
options:動畫的節奏控制
animations:將改變視圖屬性的代碼放在這個block中
completion:動畫結束後,會自動調用這個block
轉場動畫
+ (void)transitionWithView:(UIView *)view duration:(NSTimeInterval)duration options:(UIViewAnimationOptions)options animations:(void (^)(void))animations completion:(void (^)(BOOL finished))completion
參數解析:
duration:動畫的持續時間
view:需要進行轉場動畫的視圖
options:轉場動畫的類型
animations:將改變視圖屬性的代碼放在這個block中
completion:動畫結束後,會自動調用這個block
+ (void)transitionFromView:(UIView *)fromView toView:(UIView *)toViewduration:(NSTimeInterval)duration options:(UIViewAnimationOptions)options completion:(void (^)(BOOL finished))completion
方法調用完畢後,相當於執行了下面兩句代碼:
// 添加toView到父視圖
[fromView.superview addSubview:toView];
// 把fromView從父視圖中移除
[fromView removeFromSuperview];
參數解析:
duration:動畫的持續時間
options:轉場動畫的類型
completion:動畫結束後,會自動調用這個block
2.代碼示例
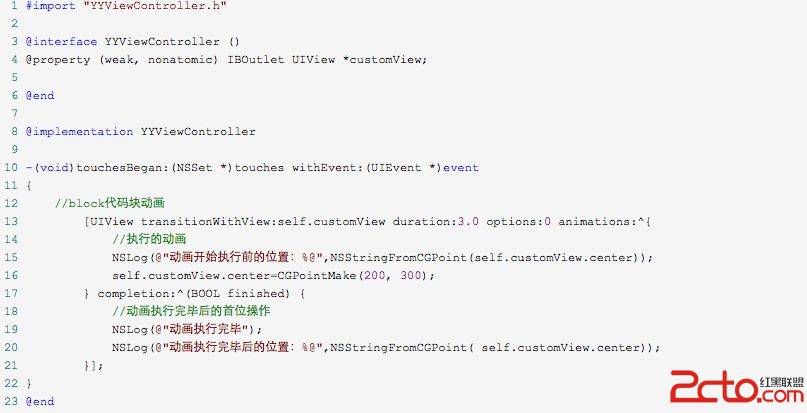
打印結果:

提示:self.customView.layer.position和self.customView.center等價,因為position的默認值為(0.5,0.5)。
三、補充
1.UIImageView的幀動畫
UIImageView可以讓一系列的圖片在特定的時間內按順序顯示
相關屬性解析:
animationImages:要顯示的圖片(一個裝著UIImage的NSArray)
animationDuration:完整地顯示一次animationImages中的所有圖片所需的時間
animationRepeatCount:動畫的執行次數(默認為0,代表無限循環)
相關方法解析:
- (void)startAnimating; 開始動畫
- (void)stopAnimating; 停止動畫
- (BOOL)isAnimating; 是否正在運行動畫
2.UIActivityIndicatorView
是一個旋轉進度輪,可以用來告知用戶有一個操作正在進行中,一般用initWithActivityIndicatorStyle初始化
方法解析:
- (void)startAnimating; 開始動畫
- (void)stopAnimating; 停止動畫
- (BOOL)isAnimating; 是否正在運行動畫
UIActivityIndicatorViewStyle有3個值可供選擇:
UIActivityIndicatorViewStyleWhiteLarge//大型白色指示器
UIActivityIndicatorViewStyleWhite//標准尺寸白色指示器
UIActivityIndicatorViewStyleGray//灰色指示器,用於白色背景
封裝轉場動畫:
.h代碼:
#import
#import
@interface ZciotAnimation : NSObject
+ (void)ZciotAnimation:(int)type ForView:(UIView *)view Subtype:(int)subtype BackgroundImage:(NSString *)image;
@end
.m代碼:
#import "ZciotAnimation.h"
#define DURATION 0.7f
typedef enum : NSUInteger {
Fade = 1, //淡入淡出
Push, //推擠
Reveal, //揭開
MoveIn, //覆蓋
Cube, //立方體
SuckEffect, //吮吸
OglFlip, //翻轉
RippleEffect, //波紋
PageCurl, //翻頁
PageUnCurl, //反翻頁
CameraIrisHollowOpen, //開鏡頭
CameraIrisHollowClose, //關鏡頭
CurlDown, //下翻頁
CurlUp, //上翻頁
FlipFromLeft, //左翻轉
FlipFromRight, //右翻轉
} AnimationType;
@implementation ZciotAnimation
+ (void)ZciotAnimation:(int)type ForView:(UIView *)view Subtype:(int)subtype BackgroundImage:(NSString *)image
{
AnimationType animationType = type;
NSString *subtypeString;
switch (subtype) {
case 0:
subtypeString = kCATransitionFromLeft;
break;
case 1:
subtypeString = kCATransitionFromBottom;
break;
case 2:
subtypeString = kCATransitionFromRight;
break;
case 3:
subtypeString = kCATransitionFromTop;
break;
default:
break;
}
// _subtype += 1;
// if (_subtype > 3) {
// _subtype = 0;
// }
switch (animationType) {
case Fade:
[self transitionWithType:kCATransitionFade WithSubtype:subtypeString ForView:view];
break;
case Push:
[self transitionWithType:kCATransitionPush WithSubtype:subtypeString ForView:view];
break;
case Reveal:
[self transitionWithType:kCATransitionReveal WithSubtype:subtypeString ForView:view];
break;
case MoveIn:
[self transitionWithType:kCATransitionMoveIn WithSubtype:subtypeString ForView:view];
break;
case Cube:
[self transitionWithType:@"cube" WithSubtype:subtypeString ForView:view];
break;
case SuckEffect:
[self transitionWithType:@"suckEffect" WithSubtype:subtypeString ForView:view];
break;
case OglFlip:
[self transitionWithType:@"oglFlip" WithSubtype:subtypeString ForView:view];
break;
case RippleEffect:
[self transitionWithType:@"rippleEffect" WithSubtype:subtypeString ForView:view];
break;
case PageCurl:
[self transitionWithType:@"pageCurl" WithSubtype:subtypeString ForView:view];
break;
case PageUnCurl:
[self transitionWithType:@"pageUnCurl" WithSubtype:subtypeString ForView:view];
break;
case CameraIrisHollowOpen:
[self transitionWithType:@"cameraIrisHollowOpen" WithSubtype:subtypeString ForView:view];
break;
case CameraIrisHollowClose:
[self transitionWithType:@"cameraIrisHollowClose" WithSubtype:subtypeString ForView:view];
break;
case CurlDown:
[self animationWithView:view WithAnimationTransition:UIViewAnimationTransitionCurlDown];
break;
case CurlUp:
[self animationWithView:view WithAnimationTransition:UIViewAnimationTransitionCurlUp];
break;
case FlipFromLeft:
[self animationWithView:view WithAnimationTransition:UIViewAnimationTransitionFlipFromLeft];
break;
case FlipFromRight:
[self animationWithView:view WithAnimationTransition:UIViewAnimationTransitionFlipFromRight];
break;
default:
break;
}
[self addBgImageWithImageName:image BackgroundView:view];
}
#pragma CATransition動畫實現
+ (void)transitionWithType:(NSString *)type WithSubtype:(NSString *)subtype ForView:(UIView *)view
{
//創建CATransition對象
CATransition *animation = [CATransition animation];
//設置運動時間
animation.duration = DURATION;
//設置運動type
animation.type = type;
if (subtype != nil) {
//設置子類
animation.subtype = subtype;
}
//設置運動速度
animation.timingFunction = UIViewAnimationOptionCurveEaseInOut;
[view.layer addAnimation:animation forKey:@"animation"];
}
#pragma UIView實現動畫
+ (void) animationWithView : (UIView *)view WithAnimationTransition : (UIViewAnimationTransition) transition
{
[UIView animateWithDuration:DURATION animations:^{
[UIView setAnimationCurve:UIViewAnimationCurveEaseInOut];
[UIView setAnimationTransition:transition forView:view cache:YES];
}];
}
#pragma 給View添加背景圖
+ (void)addBgImageWithImageName:(NSString *)imageName BackgroundView:(UIView *)view
{
view.backgroundColor = [UIColor colorWithPatternImage:[UIImage imageNamed:imageName]];
}
@end
封裝好了之後,你在需要使用動畫的地方調用api就行了:

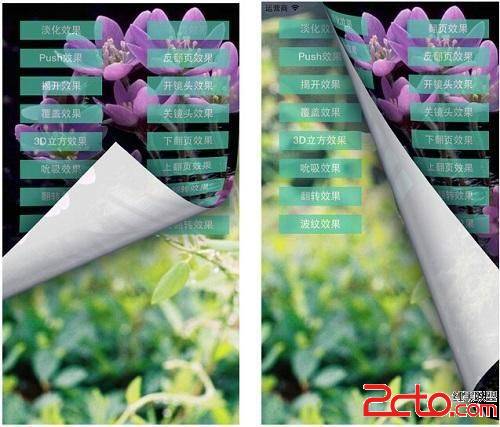
部分動畫效果圖:
總結:
到這了就基本上介紹完了iOS動畫部分,有空我會將封裝的demo傳到github上。