iOS純Autolayout實現UITableView的二級分類下拉菜單展開動畫,Autolayout真的快的飛起
編輯:IOS開發綜合
最近在做項目,也遇到了各種奇奇怪怪的需求,有個需求一開始看起來有點難搞,但是在大神的指導下,既然做不到那種氣泡,那我們就用魔術般切換Cell不就好了麼,我用的是純Autolayout,直觀暴力,用習慣了真的強,把效果貼出來還蠻不錯的,花了一
小時寫出了Demo給大家分享下。
先看需求
Demo效果


哇噻,福利還不錯哦,不能讓寫Demo變得很無聊嘛

1.首先我用的tableView實現的
2.我用了兩套cell切換 第二套cell內嵌了collectionView
3.最關鍵的是由於用的tableView實現,點擊每個image的時候回調進行了一些邏輯處理
4.高度計算和模型解析用了FDTemplateLayout和MJExtension 想用的請進傳送!!
第一步
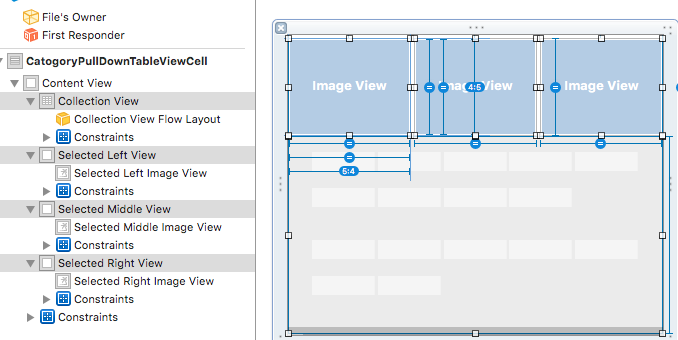
上面也提到了我用了兩套cell,而且我用的也不是代碼布局UI,那麼直接點,貼幾個圖
你們自行感受下
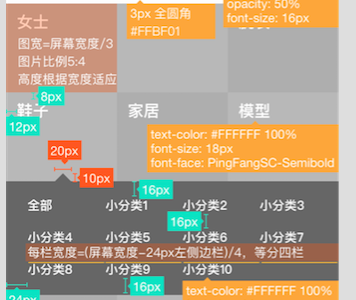
普通狀態下
下拉狀態下
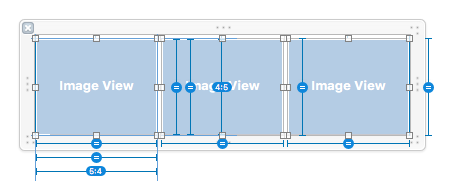
熟練用IB的應該很容易能看明白,三個ImageView三等分屏幕,高度是寬度的0.8倍,
這裡的collectionView高度固定給的200,內容小於200縮短,大於200滾動
無需繁瑣的代碼,這布局幾分鐘就寫完了,啦啦啦啦

第二步
還是貼一段解析本地數據的用法,我用的MJExtension,好用啊,也是非常迅速
快到不能呼吸,貌似我另一篇文章也有介紹,這裡不多說了
- (void)requestCategoryInfo:(requestHelperBlock)block
{
    NSString *path = [[NSBundle mainBundle] pathForResource:@"Category" ofType:@"json"];
    NSString *categoryStr = [NSString stringWithContentsOfFile:path usedEncoding:nil error:nil];
    NSArray *categoryArr = [categoryStr mj_JSONObject];
    // 直接給數組裡面的字典進行模型賦值
    [CategoryInfomation mj_setupReplacedKeyFromPropertyName:^NSDictionary *{
        return @{@"categoryID":@"id",
                 @"categoryPic":@"pic",
                 @"categoryName":@"group",
                 @"secondClassificationLists":@"list"
                 };
    }];
    [CategoryInfomation mj_setupObjectClassInArray:^NSDictionary *{

        return @{@"secondClassificationLists":@"SecondCategoryInfomation"};
    }];
    // 子模型
    [SecondCategoryInfomation mj_setupReplacedKeyFromPropertyName:^NSDictionary *{
        return @{@"secondCategoryID":@"id",
                 @"secondCategoryName":@"name"
                 };
    }];
    // 通過數組加載數組模型,這裡的類TWTBuyerMarket就是模型數組裡面的小集合
    NSMutableArray *dataLists = [CategoryInfomation mj_objectArrayWithKeyValuesArray:categoryArr];

    // 把對應的每個分組的一級分組加入到二級分組裡面去
    for (CategoryInfomation *category in dataLists)
    {
        NSMutableArray *secondLists = category.secondClassificationLists;
        SecondCategoryInfomation *secondNewModel = [[SecondCategoryInfomation alloc] init];
        secondNewModel.secondCategoryID = category.categoryID;
        secondNewModel.secondCategoryName = category.categoryName;
        [secondLists insertObject:secondNewModel atIndex:0];
    }

    if (block)
    {
        block(dataLists,nil);
    }

}
第三步
tableView的布局就不介紹了,高度計算簡單提下
// 給CollectionView加載對應的數據  selectedIndex傳的是具體的 0 1 2哪一個被點擊了 同時拿出collectionView的高度
    NSInteger idx = indexpath.row * 3 + selectedIndex;
    CategoryInfomation *category = self.categoryLists[idx];
    cell.secondClassificationLists = category.secondClassificationLists;
    cell.collectionView.width = SCREEN_WIDTH;
    [cell.collectionView reloadData];
    cell.selectedHeightConstraint.constant = cell.collectionView.collectionViewLayout.collectionViewContentSize.height > 200 ? 200 : cell.collectionView.collectionViewLayout.collectionViewContentSize.height;
- (CGFloat)tableView:(UITableView *)tableView heightForRowAtIndexPath:(NSIndexPath *)indexPath
{
    CGFloat singleWidth = (SCREEN_WIDTH - 6) / 3;
    __weak typeof(self)weakSelf = self;
    // 能被整除,那麼肯定都展示三個
    if (self.canDivisible)
    {
        CategoryInfomation *category = self.categoryLists[indexPath.row * 3 + 0];
        CategoryInfomation *category1 = self.categoryLists[indexPath.row * 3 + 1];
        CategoryInfomation *category2 = self.categoryLists[indexPath.row * 3 + 2];
        // 三個鐘有一個是需要打開的,那麼就加載選擇狀態下的cell
        if (category.needShowSecondClassification || category1.needShowSecondClassification || category2.needShowSecondClassification)
        {
            NSInteger selectedIndex;
            if (category.needShowSecondClassification)
            {
                selectedIndex = 0;
            }
            else if (category1.needShowSecondClassification)
            {
                selectedIndex = 1;
            }
            else
            {
                selectedIndex = 2;
            }
            return [tableView fd_heightForCellWithIdentifier:selectedIdentify cacheByIndexPath:indexPath configuration:^(CategoryNormalTableViewCell *cell)
                    {
                        [weakSelf configSelectedCell:cell indexpath:indexPath selectedIndex:selectedIndex];
                    }];
        }
        else
        {
            return 0.8 * singleWidth + 3;

        }

    }
    return 0;
}
第四步 (主要邏輯就在這裡)
點擊事件切換cell,實現Demo的效果,直接看代碼來的實在

#pragma mark - 點擊圖片的代理回調
- (void)clickImageViewCallBack:(CategoryNormalTableViewCell *)cell imageIndex:(NSInteger)idx
{
    // 獲取到那個Indexpath
    NSIndexPath *indexpath = [self.tableView indexPathForCell:cell];
    // 獲取到數組裡面的第幾個
    NSInteger index = indexpath.row * 3 + idx;
    // 獲取對象
    CategoryInfomation *category = self.categoryLists[index];
    // 修改字段
    // 點擊同一個
    if (self.tempCategoryInfomation == category)
    {
        category.needShowSecondClassification = !category.needShowSecondClassification;
    }
    else
    {
        category.needShowSecondClassification = YES;
    }

    // 點擊的每一次事件,都要讓上一次存儲的對象的需要展開變為NO
    if (self.tempCategoryInfomation)
    {
        // 如果是同一行的情況下
        if (indexpath.row  == self.tempIndexpath.row)
        {
            // 如果是同一個產品
            if (self.tempCategoryInfomation == category)
            {


            }
            else // 不同一個產品
            {
                self.tempCategoryInfomation.needShowSecondClassification = NO;
            }
            [self.tableView reloadRowsAtIndexPaths:@[indexpath] withRowAnimation:UITableViewRowAnimationAutomatic];
            self.tempIndexpath = indexpath;
            self.tempCategoryInfomation = category;
            return;

        }
        else // 不是同一行的時候
        {
            self.tempCategoryInfomation.needShowSecondClassification = NO;
            [self.tableView reloadRowsAtIndexPaths:@[self.tempIndexpath] withRowAnimation:UITableViewRowAnimationAutomatic];
        }

    }

    [self.tableView reloadRowsAtIndexPaths:@[indexpath] withRowAnimation:UITableViewRowAnimationAutomatic];
    // 往上滾動,以免點擊後面幾行遮住二級分類
    [self.tableView scrollToRowAtIndexPath:indexpath atScrollPosition:UITableViewScrollPositionTop animated:YES];

    // 記得把本地點擊的信息存儲下來
    self.tempIndexpath = indexpath;
    self.tempCategoryInfomation = category;
}
結束啦!!!!!!
如果有朋友用了Reveal,可以直接打開看看結構哦,已經給您加載好了,這個東西非常強,還能看淘寶和京東等所有
App的結構,太強了
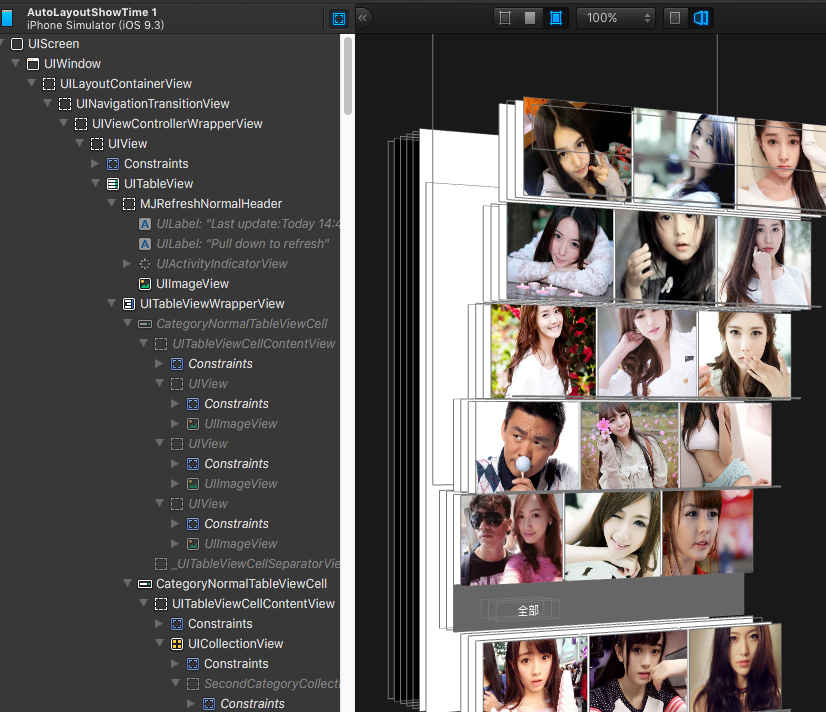
太強大了,這東西誰用誰知道啊
Demo地址別忘記啦
點擊打開鏈接

相關文章
+