Xcode基本操作

2.偏好設置
通過“command+,”快捷鍵或”Xcode|Preferences”菜單呼出偏好設置。
(1)主題及字體(Preferences->Fonts & Colors)
選中一種主題(theme),例如“Midnight”,然後shift選擇Source Editor/Console中的所有項,點擊Fonts設置字體。Xcode默認字體為menlo,可選Consolas、Monaco等其他等寬字體。
(2)文本編輯配置(Preferences->Text Editing)
Editing:
Show Line Numbers:在gutter中顯示行號。
Code folding ribbon:顯示折疊ribbon。
Page guide at column:顯示一行最多支持80個字符的提示分割線。
Indentation:
Prefer indent using:Spaces(為保持一致的視覺呈現和行末注釋對齊,建議使用空格)
Tab width:4 spaces(tabexpand,1個tab=4個空格)
Indent width:4 spaces(自動縮進步長=4個空格)
(3)SCM(Preferences->Source Control)
Enable Source Control:啟用/禁用XCode自帶Source Control Manager(SCM)。
(4)SDK/Simulator(Preferences->Downloads)
Downloads->Components:可下載SDK和Simulator。
(5)構建輸出目錄(Preferences->Locations->Locations)
當選擇為Default時,Derived Data的目錄為~/Library/Developer/Xcode/DerivedData。
當選擇為Relative時,Derived Data的目錄為當前.xcodeproj所在的目錄。
當選擇為Custom時,Derived Data的目錄需自定義。
不建議使用絕對路徑,因為寫死之後,換環境或換平台,又要重新修改路徑,建議使用相對路徑(Relative)。
3.代碼閱讀
(1)View Navigator
command+0:Show/Hide left tool panel
command+1-8:Project/Symbol/Find/Issue/Test/Debug/Breakpoint/Log Navigator
option+command+0:Show/Hide right tool panel
option+command+1/2:show the file/quick help inspector
(2)View Editor Organization
control+1:Show Related Items(例如Superclasses/Subclasses、Callers/Callees、Protocol Implementor/Implemented、Includes/Included By)。可輸入實時搜索匹配。
control+2/3:Show Previous/Next History。可輸入實時搜索匹配。
control+4:Show Top Level Items。
control+5:Show Group Files(當前文件夾內的所有文件)。可輸入實時搜索匹配。
control+6:Show Document Items(當前文件的Symbols)。可輸入實時搜索匹配。
可直接選中符號,然後“Navigate->Reveal in Symbol Navigator”,打開該接口的符號列表。
(3)Focus Switch
command+J:焦點切換(Move Focus),可配合鼠標和方向鍵。帶‘+’的“Move focus to a new assistant editor”可以快速在輔助編輯窗口中打開頭文件(*.h)/實現文件(*.m,*.mm)。
shift+command+J:在項目導航中定位當前文件(Reveal in Project Navigator)。
(4)Symbol Jump
control+command+↑/↓:切換頭文件/實現文件(switch between a source file (.m,*.mm,*.cc) and the associated header file(.h))。
shift+command+O:Open Quickly,可快速查找文件、符號。
command+點擊Editor中選中的符號:跳轉到符號定義(jump to definition)。
control+command+J:跳轉到指定符號的定義處或實現處(Go to Declaration/Definition)。有時工程正在Loading、Indexing或Processing files時,“command+點擊”無法響應,此時可試試control+command+J。
在Project Navigator中選中文件右鍵或通過菜單“File->Show in Finder”:在Finder中定位該文件。
(5)Symbol Navigator
command+點擊Editor中選中的非單一層次定義符號:Show in Symbol Navigator:
filter0:底部輸入符號(show symbols with matching name)= filter1 result+filter3 result
filter1:show only class and protocol symbols (hide other global symbol types),包括project和system層次。
filter2:show only project-defined symbols,過濾顯示當前工程中的符號。filter2的結果是filter1的子集,較常用。
filter3:show only containers(hide members),過濾顯示包含該單詞的符號。
(6)Help
option+點按:查看選中符號的幫助提示(Quick Help for Selected Item)。
option+雙擊:打開選中符號的幫助文檔。
4.代碼編輯
(1)File | New
control+command+N:File | New | Workspace
shift+command+N:File | New | Project
(2)Text Editing
command+[/]:向前/向後縮進
option+command+[/]:Move Line Up/Down
command+/:注釋選中的代碼
Parentheses/Brackets/Braces Matching:雙擊某個分隔符(如()、[]、{} 等),Xcode會選中匹配代碼塊。
(3)Eidtor Window/Tab Switch
command+shift+[/]:切換標簽頁
單指左右滑動(control+command+←/→):在單標簽頁打開的多個文件間切換
(4)Code Folding
option+command+←/→:折疊當前代碼塊
option+shift+command+←/→:折疊該文件內所有代碼塊(方法/函數)
(5)Console & Scheme
shift+command+Y:顯示控制台(Show/Hide the debug area)
option+command+R:編輯配置(Edit Scheme)
(6)Gutter & Ribbon
焦點列:灰色深度與代碼嵌套深度相關,鼠標懸停可突出顯示右側相應代碼塊,鼠標單擊可折疊右側相應代碼塊(Code Folding)。
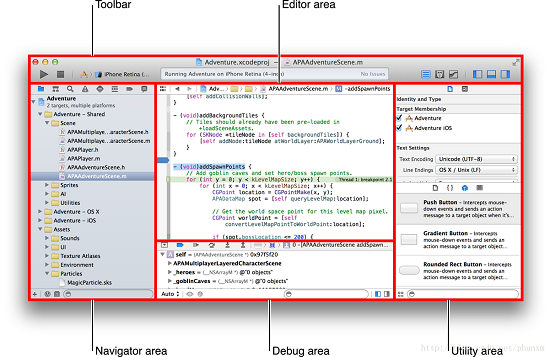
說明:從左到右,依次是“導航窗格(Navigator)->邊列(Gutter)->焦點列(Focus
Ribbon)->代碼編輯窗口(Standard Editor)”。
(7)Auto Completion
esc(command+.):就當前輸入上下文呼出/隱藏Auto
Completion提示:上下方向鍵在提示中選擇選項,enter(return)選中,tab可一截一截匹配;tab可在各個占位符之間移動。
輸入Objective-C對象及 ],自動完成中綴符(infixnatation)包圍。
(8)Find & Replace
command+F:當前文件查找。
option+command+F:當前文件替換。
Find:可指定查找內容(Text/References/Definitions/Regular Expression);
放大鏡:下拉可查看最近查找歷史;
In Project:查找范圍(可指定Group);
Text:匹配規則(可指定Containing,Matching,Starting with,Ending with);
Case:是否區分大小寫(可指定 Matching/Ignoring)。
shift+command+F(command+3):全局查找。也可以在選擇符號後,右鍵(control+點擊)->Find Selected Text in workspace...
option+shift+command+F:全局替換。
Replace:逐個替換;
All:所有替換;
Done:替換完成。
5.輔助編輯(Assistant Editor)
Assistant Editor有點類似VC中的Code Definition Window。
option+command+enter:打開Assistant Editor。
command+enter:關閉Assistant Editor。
使用快捷鍵進行切換或跳轉動作時,若同時按下option可以在輔助編輯窗口中打開相應文件或符號(For optional navigation (Option-clicking or Option-choosing a file), opens the file in a new Assistant editor pane.)。若在輔助窗口中操作,則在主窗口(Standard Editor)中打開。
option+點擊Project Navigator中選中的文件:在輔助編輯窗口中打開選中文件。
option+command+點擊Editor中選中的符號:在輔助編輯窗口中打開符號定義(jump to definition in assistant editor)。
option+control+command+↑/↓:在輔助窗口中打開對應的頭文件(*.h)/實現文件(*.m,*.mm,*.cc)。
點擊查看shift+command+O、shift+command+F(command+3)選中的文件或符號時,可同時按下option在輔助編輯窗口中打開。
在control+1~6中打開選擇結果時,均可同時按下option在輔助編輯窗口中打開。
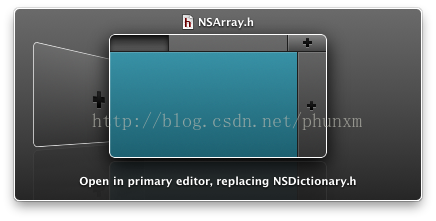
若在按下option的同時按下shift通常會出現一個導航窗格,可選擇在new window/tab/assistant-editor顯示打開。
ForOption-Shift navigation (Option-Shift-click or Option-Shift-choose a file), Xcode displays a graphical navigation chooser showing the current layout. The chooserprompts you to open the file in anyopen editor pane in any window and tab, or to open the file in anew editor pane, window, or tab.

6.環境變量(Build Setting Macros)
(1)查看環境變量宏
命令行進入HelloWorld工程目錄,執行xcodebuild命令並帶上“-showBuildSettings”參數:
$ xcodebuild -project HelloWorld.xcodeproj -target HelloWorld -configuration Debug -showBuildSettings > xcodebuild_showBuildSettings.txt
則xcodebuild_showBuildSettings.txt中保存了Build settings for action build and target "HelloWorld”,其中dump了所有的環境變量。
(2)Xcode5(Mac OS X 10.9)的部分環境變量
約定1:~=當前賬戶的HOME目錄,例如“/Users/faner”。
約定2:build構建基礎路徑:BUILD_PATH = ~/Library/Developer/Xcode/DerivedData/Build。可通過“File->Project Settings”查看Derived Data Location。
約定3:環境變量宏(Build Setting Macros)引用格式:${MACRO},同Build Phases Run Script中的語法。
下面是摘選自xcodebuild_showBuildSettings.txt的部分常用環境變量。
(a) ARCH & PLATFORM & SDK
ARCHS = i386
CURRENT_ARCH = i386
PLATFORM_DIR = /Applications/Xcode.app/Contents/Developer/Platforms/MacOSX.platform
PLATFORM_NAME = macosx
SDKROOT = /Applications/Xcode.app/Contents/Developer/Platforms/MacOSX.platform/Developer/SDKs/MacOSX10.9.sdk
SDK_DIR = /Applications/Xcode.app/Contents/Developer/Platforms/MacOSX.platform/Developer/SDKs/MacOSX10.9.sdk
SDK_NAME = macosx10.9
(b) PROJECT & SOURCE
PROJECT = HelloWorld
PROJECT_DIR =~/Projects/Learn Objective-C/HelloWorld
PROJECT_FILE_PATH =${PROJECT_DIR}/HelloWorld.xcodeproj
PROJECT_NAME = HelloWorld
SOURCE_ROOT =${PROJECT_DIR}
SRCROOT =${PROJECT_DIR}
(c) BUILD & CONFIGURATION
BUILD_DIR =BUILD_PATH/Products
BUILD_ROOT =BUILD_PATH/Products
BUILT_PRODUCTS_DIR =BUILD_PATH/Products/Debug
CONFIGURATION = Debug
CONFIGURATION_BUILD_DIR =BUILD_PATH/Products/Debug
CONFIGURATION_TEMP_DIR =BUILD_PATH/Intermediates/HelloWorld.build/Debug
(d) PRODUCT & TARGET
PRODUCT_NAME = HelloWorld
PRODUCT_TYPE = com.apple.product-type.tool// Project Template: Command Line Tool
TARGET_BUILD_DIR =BUILD_PATH/Products/Debug
TARGET_NAME = HelloWorld
(3)設置環境變量
Product -> Edit Scheme(option+command+R)->Arguments->Environment Variables中可以添加自定義環境變量(Name為名稱,Value為值)。
7.運行調試
(1)Console
shift+command+Y:顯示控制台(Show/Hide the debug area)
shift + command + K:清除控制台(Clean)
(2)Build
Product -> Edit Scheme(option+command+R)->Info->Build Configuration:選擇生成版本(Debug or Release)
command + B:構建(Buid)
(3)Target
一個Target是指在一個Project中構建的一個產品,它包含了構建該產品的所有文件,以及如何構建該產品的配置。
一個定義好構建過程的Target成為一個Scheme,可在Scheme中定義Target的六種構建過程:Build/Run/Test/Profile/Analyze/Archive。
Product -> Edit Scheme(option+command+R)->Manage Schemes可對Scheme的六種構建過程進行配置(可配置項包括Info、Arguments、Options)。
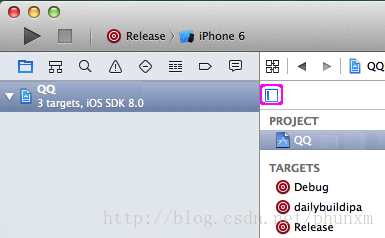
在Project Navigator中選中某個xcodeproj(例如QQ.xcodeproj),將進入Project Setting頁面,可點擊左側圖標show/hide project and targets list:

點擊targets項可分別設置各target的Build Settings;右擊可對target進行delete。
(4)Issue & Errors
編譯錯誤(error)和警告(warning)過多時,只顯示編譯錯誤:

點擊底端的感歎號,即可只顯示編譯錯誤,忽略編譯警告:

(5)Run
command + R:運行(Run),可能會先編譯。若按下control直接運行上次build的product(Run Without Building)。
command + .:停止運行(Stop)
(6)Breakpoint
command + \:當前行設置/取消斷點;通過鼠標點擊藍色斷點來啟用/禁用當前行斷點。
command + Y:全局激活或禁用所有的斷點,激活進入調試模式(此時斷點藍色可見)。
邊列(Gutter)中的斷點/警告可右鍵呼出Reveal in Breakpoint/Issue Navigator。
trick:編輯斷點(Edit Breakpoint):
Condition:設置斷點的觸發條件,例如“i==3”(注意不能有空格)表示當i等於3時該斷點才會被觸發。
Ignore:設置斷點需要被忽略多少次才會中斷,若設置成5則表示第6次遇到該斷點時才觸發。
Action:設置斷點觸發時的動作,可以為Debugger Command、Log Message、Shell Command或Sound。
例如可設置以下Debugger Command:
(1)讀取std::string sig的內存buffer值:mem read sig.c_str() -c sig.size();
(2)打印NSData實例sig:po sig
(7)Debug
F6:下一步(Step Over),逐過程單步調試,不進入函數體。
(fn+)F7:進入(Step Into)函數體。可能與多媒體鍵有沖突,故需要fn輔助。
(fn+)F8:跳出(Step Out)函數體。可能與多媒體鍵有沖突,例如呼叫iTunes,故需要fn輔助。
control+command+Y:逐斷點(continue)繼續執行。
trick:移動指令指針(Move the instruction pointer):

斷點調試運行時,可以將綠色指針箭頭(Line 47)移動到其他行(Line 49)或其他斷點(Line 51)實現跳轉執行。
(8)Watch
shift+command+M:Debug Workflow->View Memory。
command+K:Debug Workflow->Clear Console。
Debug Workflow->ShowDisassembly When Debugging,可進行匯編指令級調試。
trick:修改變量內存值(change memory value while debugging):
調試運行時,可以在底部的調試窗口(Debug Area,可通過Shift+Command+Y呼出)右鍵某個變量,除了可以進行View Memory/View Value As之外,還可以選擇Edit Value運行時編輯內存變量的值。
這種手動設置指定值,在調試某些難以復現的bug或進行邊界測試非常有用,可以避免在驗證某個問題時反復改值重新編譯。
(9)lldb調試命令:
n/next:step over;
s/step:step into;
finish:step out;
c/continue:goto next breakpoint;
expr/expression:Evaluate a C/ObjC/C++ expression(動態執行C/ObjC/C++表達式);
p/print/expr/expression:print as a C/C++ basic variable;
po/expr -O/expression -O:Print as an Objective-C object;
call:調用。其實上述p/po後接表達式(expression)也有調用的功能,一般只在不需要顯式輸出,或是無返回值時使用call,用於動態調試插入調用代碼。
例如可以在viewDidLoad:裡面設置斷點,然後在程序中斷的時候輸入以下命令:
call [self.view setBackgroundColor:[UIColor redColor]]
繼續運行程序,view的背景顏色將變成紅色!
bt(backtrace),打印當前調用堆棧(crash堆棧),“bt all”可打印所有thread的堆棧(相當於command+6的Debug Session Navigation)。
image:可用於尋址,有多個組合命令,比較實用的一種用法是尋找棧地址對應的代碼(行)位置。
例如某個UITableView總共有2個section,當其引用的currentSection.index≥2時將會引起[UITableView rectForHeaderInSection:]調用異常,可使用expr動態改值制造crash場景模擬調試。
此時crash時的控制台bt顯示異常出現在應用層代碼“0x00d055b8 - [FACategoryTableView FACategorySectionHeaderDidTouched:] + 744”處(其中0x00d055b8為當前棧(代碼段)偏移量,744為棧幀偏移量——PC指針相對函數入口的偏移)。
那麼具體是FACategoryTableView.m文件哪一行代碼調用引起的異常呢?此時通過“image lookup --address”後接bt的call stack中的代碼段偏移地址(0x00d055b8)即可定位出異常調用的代碼行位置。
x/memory read:dump指定地址的內存(Read from the memory of the process being debugged),後接起止地址或-c指定count加起始地址。可help mem read查看幫助:
Syntax:
memory read
Command Options Usage:
size指定內存塊(block/item)的大小,默認為1byte。
--size
count指定內存塊(block/item)的個數,可配合起始地址使用。
-c
format指定內容顯示格式,格式符同print:c-char,s-string,d-decimal,x-hex。
-f
Command Samples:
(a)起止地址
(lldb)mem read 0x10b88f0c 0x10b88f0c+9
0x10b88f0c: 39 38 37 36 35 34 33 32 31 987654321
(b)起始地址+內存塊count
(lldb)mem read 0x10b88f0c -c 9
0x10b88f0c: 39 38 37 36 35 34 33 32 31 987654321
(c)起始地址+內存塊size+內存塊count(dump hex format)
(lldb)memory read -s 1 -f x -c 9 0x10b88f0c
0x10b88f0c: 0x39 0x38 0x37 0x36 0x35 0x34 0x33 0x32
0x10b88f14: 0x31
(d)起始地址+內存塊size+內存塊count(dump char format)
(lldb)memory read -s 1 -f c -c 9 0x10b88f0c
0x10b88f0c: 987654321
(e)起始地址+內存塊size+內存塊count(dump string format)
(lldb)mem read 0x10b5cf2c -f s -c 1
0x10b88f0c: "987654321"
(f)起始地址+內存塊size+內存塊count(dump int format)
(lldb)memory read -s 4 -f x -c 3 0x10b88f0c
0x10b88f0c: 0x36373839 0x32333435 0x109f0031
memory write:改寫指定地址的內存(Write to the memory of the process being debugged)。可help mem write查看幫助:
Syntax: memory write
(10)啟用NSZombieEnabled調試EXC_BAD_ACCESS
當你對已釋放的對象發送消息(90%的可能是對引用計數為0的對象再release)或release那些autorelease對象時,就會出現報EXC_BAD_ACCESS這樣的錯誤。
默認設置下 Xcode不會給你定位具體是哪一行代碼不該去使用已釋放的對象,或者release用錯了。
Product -> Edit Scheme(option+command+R) -> Diagnostics ,勾選“Objective-C”之後的“Enable Zombie Objects”。
設置NSZombieEnabled環境變量後,一個對象銷毀時會被轉化為_NSZombie;設置NSZombieEnabled後,當你向一個已經釋放的對象發送消息,這個對象就不只是報EXC_BAD_ACCESS Crash,還會放出一個錯誤消息,然後以一種可預測的可以產生debug斷點的方式消失, 因此我們可以找到具體或者大概是哪個對象被錯誤的釋放或引用了。
注意:NSZombieEnabled只能在調試的時候使用,千萬不要忘記在產品發布的時候去掉,因為NSZombieEnabled不會真正去釋放dealloc對象的內存,一直開啟後果自負!
參考
《Xcode Overview-About Xcode》《Xcode Keyboard Shortcuts and Gestures》
《Xcode Key Bindings & Gestures》《提升Xcode效率的小技巧》
《Xcode5.1離線安裝》《Xcode插件》《用Vim編輯器輔助Xcode》《Vim命令圖解和xVim使用》
《Xcode的文件組織》《Xcode設置命令行啟動參數》
《Xcode環境變量及路徑設置》《Xcode構建輸出目錄》
《從VC到Xcode》《workspace & subProject & target》
《Xcode創建靜態庫》《Xcode4制作靜態庫1》《Xcode4制作靜態庫2》
《Xcode4.3下制作framework》《Xcode添加依賴的靜態庫工程》
《Building static libraries with the iPhone SDK》《Static Libraries and Cross-Project References》
《Start Developing iOS Apps Today》
《使用Xcode創建Hello World項目》《使用Xcode5和Interface Builder創建Hello World App》
《LLDB Quick Start Guide》《LLDB to GDB Command Map》《Xcode gdb/lldb調試命令》
《Xcode LLDB Debug教程》《LLDB調試命令初探》《iOS應用崩潰日志揭秘》《經營你的iOS應用日志》
(via:曾夢想仗劍走天涯的博客)
- iOS9與XCode7中不克不及應用http銜接的疾速處理方法
- xcode8 封閉掌握台不打印不信息的處理辦法(圖文詳解)
- 史上最具體的CocoaPods裝置教程(圖文)
- IOS Xcode中快捷鍵年夜全
- iOS中處理Xcode 8掌握台亂碼的方法
- IOS開辟之適配iOS10及Xcode8的留意點
- xcode8提交ipa掉敗沒法構建版本成績的處理計劃
- XCode 加速編譯鏈接速度的辦法
- 2016 cocoapods的裝置和應用辦法和版本進級碰到的成績
- IOS 陀螺儀開辟(CoreMotion框架)實例詳解
- 進修iOS自界說導航掌握器UINavigationController
- Xcode 8打印log日記的成績小結及處理辦法
- iOS10 適配和Xcode8設置裝備擺設總結
- iOS Xcode8更新後輸入log日記封閉的辦法
- Xcode8、iOS10進級成績記載


