Auto Layout 使用心得
Auto Layout 使用心得(一)--初體驗
本系列文章將從一個慢慢摸索中的新手的角度介紹 Auto Layout,講述我在這兩個月的學習中對它一點一滴的感受,最終目的是讓大家在閱讀完之後能夠自己上手使用,並完成絕大多數簡單的布局約束。
此系列文章代碼倉庫在 https://github.com/johnlui/AutoLayout ,有不明白的地方可以參考我的 Auto Layout 設置哦,下載到本地打開就可以了。
簡介
Auto Layout 是蘋果在 Xcode 5 (iOS 6) 中新引入的布局方式,旨在解決 3.5 寸和 4 寸屏幕的適配問題。屏幕適配工作在 iPhone 6 及 plus 發布以後變得更加重要,而且以往的“笨辦法”的工作量大幅增加,所以很多人開始學習使用 Auto Layout 技術。
初體驗
0. 開發環境
本系列文章的開發環境為:
OS X 10.10.2
Xcode Version 6.2 (6C131e)
1. 新建應用
新建一個 Single View Application,命名為 AutoLayout,如下:

點擊選中 Main.storyboard,右側內容如下:

1、2 兩個按鈕將會在未來的開發中產生巨大的作用,他們將擁有本系列文章的全局名稱:按鈕1,按鈕2。請先記下他們的位置。
2. 直接上手,開始使用
這也是我對學習新的軟件編程技術的基本學習方法:有一個具體客觀驅動的目標,例如做一個真正要給客戶用的軟件,而不是“為了學習新技術提高自己”這類偽目標。
讓我們直接上手:繪制一個距離左右邊都有一定距離、固定高度、垂直居中的按鈕,叫“Swift on iOS”。
1. 第一步,從右側拖過來一個按鈕,置於頁面最中間。會有參考線出現,這一步很容易:

2. 選中這個 button,將按鈕背景色和前景色進行如下設置:

3. 將按鈕左側邊界往左拖動直到自動吸附,留下一定的距離。右側進行同樣操作:

4. 選中這個 button,修改文字為 Swift on iOS:

5. 選中這個 button,點擊 按鈕2 ,選擇這一項:

這時候 button 周圍會出現一些藍色的線條,這些就是 Auto Layout 的約束項。
3. 大功告成,查看效果
3.5:

4:

4.7:

5.5:

4. 分析
選中這個 button,在右側查看自動生成的約束項:

只有三項,這三項的意思分別是:和父視圖縱向居中對齊、右側和父視圖對齊、左側和父視圖對齊。
我們很容易就能理解這樣可以定位一個按鈕,但是總感覺少了點什麼。實際上這三個自動生成的約束項並不能描述一個 button 的位置,因為少了一個關鍵的屬性:button 的高度。以後我們會詳細地討論。
5. 核心思想
本質分析
Auto Layout 的本質是依靠 某幾項約束條件 來達到對某一個元素的定位。我們可以在某個地方只使用一個約束,以達到一個小目的,例如防止內容遮蓋、防止邊界溢出等。但我的最佳實踐證明,如果把頁面上每一個元素的位置都用 Auto Layout 進行 “嚴格約束” 的話,那麼 Auto Layout 可以幫我們省去非常多的計算 frame 的代碼。
“嚴格約束” 是什麼?
簡單來說,嚴格約束就是對某一個元素的絕對定位,讓它在任一屏幕尺寸下都有著唯一的位置。這裡的絕對定位不是定死的位置,而是對一個元素 完善的約束條件。
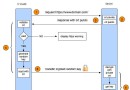
讓我們看圖說話:

我們要在一個直角坐標系裡描述一個矩形。
那麼只需要指定這個矩形的位置和大小。
那麼只要給出上圖中的四個值即可:到左邊界的距離,到上邊界的距離,寬度,高度。
這四個約束是最簡單的情況。在對一個元素進行嚴格約束時,請直接在腦中構建這個元素,並且加上幾條約束條件,如果他無法縮放和動彈,那麼嚴格約束就是成功的!
必須牢記,使用 Auto Layout 時最重要的是:對頁面上每一個元素都進行嚴格約束,不嚴格的約束是萬惡之源。
Auto Layout 使用心得(二)--實現三等分
此系列文章代碼倉庫在 https://github.com/johnlui/AutoLayout ,有不明白的地方可以參考我的 Auto Layout 設置哦,下載到本地打開就可以了。
准備
上一篇文章中,我們共同進行了 Auto Layout 的初體驗,在本篇我們將一起嘗試用 Auto Layout 實現三等分。
Auto Layout 的本質原理
Auto Layout 的本質是用一些約束條件對元素進行約束,從而讓他們顯示在我們想讓他們顯示的地方。
約束主要分為以下幾種(歡迎補充):
相對於父 view 的約束。如:距離上邊距 10,左邊距 10。
相對於前一個元素的約束。如:距離上一個元素 20,距離左邊的元素 5 等。
對齊類約束。如:跟父 view 左對齊,跟上一個元素居中對齊等。
相等約束。如:跟父 view 等寬。
三等分設計思路
許多人剛開始接觸 Auto Layout,可能會以為它只能實現上面的1、2功能,其實後面3、4兩個功能才是強大、特別的地方。接下來我們將嘗試設計橫向三等分:
第一個元素距離左邊一定距離。
最後一個元素距離右邊一定距離。
三者高度恆定,寬度相等。
1和2、2和3的橫向間距固定。
干貨,實現過程的動圖:

運行結果
4 寸:

4.7 寸:

縱向三等分實現方式類似,大家可以自己嘗試一下哦~
Auto Layout 使用心得(三)—— 自定義 cell 並使用 Auto Layout
此系列文章代碼倉庫在 https://github.com/johnlui/AutoLayout ,有不明白的地方可以參考我的 Auto Layout 設置哦,下載到本地打開就可以了。
簡介
本篇中我們將嘗試自定義一個 UITableViewCell,並使用 Auto Layout 對其進行約束。
自定義 cell 基礎
在前面的項目中,我們采用 StoryBoard 來組織頁面,StoryBoard 可以視為許多個 xib 的集合,所以我們可以得到兩個信息:
這個項目通過初始化主 StoryBoard 文件來展現 APP,而 UIViewController 類文件是通過 StoryBoard 文件的綁定來初始化並完成功能的。
我們可以創建新的 StoryBoard 文件或者新的 xib 文件來構造 UI,然後動態地加載進頁面。
創建文件
我們可以一次性創建 xib 文件和類的代碼文件。
新建 Cocoa Touch Class:

設置和下圖相同即可:

檢查成果

分別選中上圖中的 1、2 兩處,檢查 3 處是否已經自動綁定為 firstTableViewCell,如果沒有綁定,請先檢查選中的元素確實是 2,然後手動綁定即可。
完成綁定工作
切換一頁,如下圖進行 Identifier 設置:

新建 Table View Controller 頁面
新建一個 Table View Controller 頁面,並把我們之前創建的 Swift on iOS 那個按鈕的點擊事件綁定過去,我們得到:

然後創建一個名為 firstTableViewController 的 UITableViewController 類,創建流程跟前面基本一致。不要創建 xib。然後選中 StoryBoard 中的 Table View Controller(選中之後有藍色邊框包裹),在右側對它和 firstTableViewController 類進行綁定:

調用自定義 cell
修改 firstTableViewController 類中的有效代碼如下:
import UIKit
class firstTableViewController: UITableViewController {
    override func viewDidLoad() {
        super.viewDidLoad()
        var nib = UINib(nibName: "firstTableViewCell", bundle: nil)
        self.tableView.registerNib(nib, forCellReuseIdentifier: "firstTableViewCell")
    }
    override func didReceiveMemoryWarning() {
        super.didReceiveMemoryWarning()
    }
    // MARK: - Table view data source
    override func numberOfSectionsInTableView(tableView: UITableView) -> Int {
        return 1
    }
    override func tableView(tableView: UITableView, numberOfRowsInSection section: Int) -> Int {
        return 10
    }
    override func tableView(tableView: UITableView, cellForRowAtIndexPath indexPath: NSIndexPath) -> UITableViewCell {
        let cell = tableView.dequeueReusableCellWithIdentifier("firstTableViewCell", forIndexPath: indexPath) as firstTableViewCell
        cell.textLabel?.text = indexPath.row.description
        return cell
    }
}
viewDidLoad() 中添加的兩行代碼是載入 xib 的操作。最下面的三個 func 分別是定義:
self.tableView 中有多少個 section
每個 section 中分別有多少個條目
實例化每個條目,提供內容
如果你得到以下頁面,說明你調用自定義 cell 成功了!

給自定義 cell 添加元素並使用 Auto Layout 約束
首先向 Images.xcassets 中隨意加入一張圖片。
然後在左側文件樹中選中 firstTableViewCell.xib,從右側組件庫中拖進去一個 Image View,並且在右側將其尺寸設置如下圖右側:

給 ImageView 添加約束:

選中該 ImageView(左箭頭所示),點擊自動 Auto Layout(右箭頭所示),即可。
給 ImageView 設置圖片:

再從右側組件庫中拖入一個 UILabel,吸附到最右側,垂直居中,為其添加自動約束,這一步不再贅述。
在 firstTableViewCell 類中綁定 xib 中拖進去的元素
選中 firstTableViewCell.xib,切換到雙視圖,直接進行拖動綁定:

綁定完成!
約束 cell 的高度
在 firstTableViewController 中添加以下方法:
override func tableView(tableView: UITableView, heightForRowAtIndexPath indexPath: NSIndexPath) -> CGFloat {
    return 50
}
給自定義的 UILabel 添加內容
修改 firstTableViewController 中以下函數為:
override func tableView(tableView: UITableView, cellForRowAtIndexPath indexPath: NSIndexPath) -> UITableViewCell {
    let cell = tableView.dequeueReusableCellWithIdentifier("firstTableViewCell", forIndexPath: indexPath) as firstTableViewCell
    cell.firstLabel.text = indexPath.row.description
    return cell
}
查看結果
4.0 寸:

4.7 寸:

如果你得到以上結果,那麼恭喜你自定義 cell 並使用 Auto Layout 成功!
Auto Layout 使用心得(四)—— 22 行代碼實現拖動回彈
此系列文章代碼倉庫在 https://github.com/johnlui/AutoLayout ,有不明白的地方可以參考我的 Auto Layout 設置哦,下載到本地打開就可以了。
簡介
本文中,我們將一起使用 UIPanGestureRecognizer 和 Auto Layout,通過 22 行代碼實現拖動回彈效果。
搭建界面
刪除首頁中間的按鈕,添加一個 View ,設置一種背景色便於辨認,然後對其進行絕對約束:

拖動一個 UIPanGestureRecognizer 到該 View 上:

界面搭建完成。
屬性綁定
切換到雙向視圖,分別右鍵拖動 UIPanGestureRecognizer 和該 View 的 Top Space 的 Auto Layout 屬性到 ViewController 中綁定:

然後將 UIPanGestureRecognizer 右鍵拖動綁定:
編寫代碼
class ViewController: UIViewController {

    var middleViewTopSpaceLayoutConstant: CGFloat!
    var middleViewOriginY: CGFloat!

    @IBOutlet weak var middleView: UIView!
    @IBOutlet weak var middleViewTopSpaceLayout: NSLayoutConstraint!
    @IBOutlet var panGesture: UIPanGestureRecognizer!
    override func viewDidLoad() {
        super.viewDidLoad()

        panGesture.addTarget(self, action: Selector("pan"))
        middleViewTopSpaceLayoutConstant = middleViewTopSpaceLayout.constant
        middleViewOriginY = middleView.frame.origin.y
    }
    override func didReceiveMemoryWarning() {
        super.didReceiveMemoryWarning()
        // Dispose of any resources that can be recreated.
    }

    func pan() {
        if panGesture.state == UIGestureRecognizerState.Ended {
            UIView.animateWithDuration(0.4, delay: 0, options: UIViewAnimationOptions.CurveEaseInOut, animations: { () -> Void in
                self.middleView.frame.origin.y = self.middleViewOriginY
                }, completion: { (success) -> Void in
                    if success {
                        self.middleViewTopSpaceLayout.constant = self.middleViewTopSpaceLayoutConstant
                    }
            })
            return
        }
        let y = panGesture.translationInView(self.view).y
        middleViewTopSpaceLayout.constant = middleViewTopSpaceLayoutConstant + y
    }
}
查看效果

22 行代碼,拖動回彈效果完成!
Auto Layout 使用心得(五)--根據文字、圖片自動計算 UITableViewCell 高度
此系列文章代碼倉庫在 https://github.com/johnlui/AutoLayout ,有不明白的地方可以參考我的 Auto Layout 設置哦,下載到本地打開就可以了。
簡介
本文中,我們將一起使用 Auto Layout 技術,讓 UITableViewCell 的高度隨其內部的 UILabel 和 UIImageView 的內容自動變化。
搭建界面
恢復之前刪除的按鈕
放置一個按鈕,恢復到 firstTableViewController 的連接:

別忘了添加約束讓他居中哦。
修改 firstTableViewCell
將 firstTableViewCell 的尺寸設置為 600 * 81,將 logo 的尺寸設置為 80 * 80。將 logo 的約束修改為如下圖所示:

修改 label 的尺寸和位置,添加約束如下圖:

給 ViewController 增加 UINavigationController 嵌套
為了便於返回。操作如下圖:

查看結果

根據 label 自動計算 firstTableViewCell 高度
選中 label,設置 lines 行數為 0,表示不限長度自動折行:

修改 label 的文字內容讓其超出一行:
import UIKit
class firstTableViewController: UITableViewController {

    var labelArray = Array() // 用於存儲 label 文字內容
    override func viewDidLoad() {
        super.viewDidLoad()
        var nib = UINib(nibName: "firstTableViewCell", bundle: nil)
        self.tableView.registerNib(nib, forCellReuseIdentifier: "firstTableViewCell")

        // 循環生成 label 文字內容
        for i in 1...10 {
            var text = ""
            for j in 1...i {
                text += "Auto Layout"
            }
            labelArray.append(text)
        }
    }
    override func didReceiveMemoryWarning() {
        super.didReceiveMemoryWarning()
    }
    // MARK: - Table view data source
    override func tableView(tableView: UITableView, heightForRowAtIndexPath indexPath: NSIndexPath) -> CGFloat {
        return 50
    }
    override func numberOfSectionsInTableView(tableView: UITableView) -> Int {
        return 1
    }
    override func tableView(tableView: UITableView, numberOfRowsInSection section: Int) -> Int {
        return labelArray.count
    }
    override func tableView(tableView: UITableView, cellForRowAtIndexPath indexPath: NSIndexPath) -> UITableViewCell {
        let cell = tableView.dequeueReusableCellWithIdentifier("firstTableViewCell", forIndexPath: indexPath) as! firstTableViewCell
        cell.firstLabel.text = labelArray[indexPath.row]
        return cell
    }
}
現在到了最關鍵的時刻,驅動 UITableViewCell 適應 Label 內容:
1. 使用 estimatedHeightForRowAtIndexPath 替代 heightForRowAtIndexPath
estimatedHeightForRowAtIndexPath 是 iOS 7 推出的新 API。如果列表行數有一萬行,那麼 heightForRowAtIndexPath 就會在列表顯示之前計算一萬次,而 estimatedHeightForRowAtIndexPath 只會計算當前屏幕中顯示著的幾行,會大大提高數據量很大時候的性能。
2. 新建一個 prototypeCell 成員變量以復用,並在 viewDidLoad 中初始化
class firstTableViewController: UITableViewController {

    var labelArray = Array() // 用於存儲 label 文字內容

    var prototypeCell: firstTableViewCell!
    override func viewDidLoad() {
        super.viewDidLoad()
        var nib = UINib(nibName: "firstTableViewCell", bundle: nil)
        self.tableView.registerNib(nib, forCellReuseIdentifier: "firstTableViewCell")

        // 初始化 prototypeCell 以便復用
        prototypeCell = tableView.dequeueReusableCellWithIdentifier("firstTableViewCell") as! firstTableViewCell

......
3. 計算出高度
override func tableView(tableView: UITableView, estimatedHeightForRowAtIndexPath indexPath: NSIndexPath) -> CGFloat {
    let cell = prototypeCell
    cell.firstLabel.text = labelArray[indexPath.row]
    return cell.contentView.systemLayoutSizeFittingSize(UILayoutFittingCompressedSize).height + 1
}
4. 查看效果

超級大坑
上面讓 firstTableViewCell 根據 label 自動計算高度的過程中,有一個超級大坑:如果給左側 UIImageView 賦的圖片較大(大於 80px),將看到如下奇怪的結果:

這只是因為圖片把 UITableViewCell 撐大了,並不是我們的計算沒有效果。
解決大坑:進攻是最好的防守!根據圖片自動計算 firstTableViewCell 高度
首先,把圖片的渲染模式改成 Aspect Fit:

給 Images.xcassets 增加三張圖片,命名為 0、1、2,尺寸從小到大:

給 cellForRowAtIndexPath 增加代碼:
if indexPath.row < 3 {
    cell.logoImageView.image = UIImage(named: indexPath.row.description)
}
查看效果:

前兩個 cell 看起來比較正常,第三個為什麼多出了那麼多空白?這就是使用 Auto Layout 限制圖片寬度為 80px 的原生問題:寬度雖然限制了,高度卻依然是原圖的高度。解決辦法也很簡單:如果圖片寬度大於 80px,就重繪一張 80px 寬度的圖片填充進去。
新建一個 Group(虛擬文件夾),叫 Extensions,並在其內部新建 UIImage.swift 文件,內容如下:
import UIKit
extension UIImage {
    func resizeToSize(size: CGSize) -> UIImage {
        UIGraphicsBeginImageContext(size)
        self.drawInRect(CGRectMake(0, 0, size.width, size.height))
        let newImage = UIGraphicsGetImageFromCurrentImageContext()
        UIGraphicsEndImageContext()

        return newImage
    }
}
給 UIImage 類擴展了一個名為 resizeToSize 的方法,返回一個按照要求的大小重繪過的 UIImage 對象。修改 cellForRowAtIndexPath 的代碼為:
override func tableView(tableView: UITableView, cellForRowAtIndexPath indexPath: NSIndexPath) -> UITableViewCell {
    let cell = tableView.dequeueReusableCellWithIdentifier("firstTableViewCell", forIndexPath: indexPath) as! firstTableViewCell
    cell.firstLabel.text = labelArray[indexPath.row]

    if indexPath.row < 3 {
        var image = UIImage(named: indexPath.row.description)!
        if image.size.width > 80 {
            image = image.resizeToSize(CGSizeMake(80, image.size.height * (80 / image.size.width)))
        }
        cell.logoImageView.image = image
    }
    return cell
}
搞定!
查看效果

從上圖可以看出,cell 已經可以根據圖片和文字中比較高的一個完全自適應。
致謝
感謝 《動態計算UITableViewCell高度詳解》,給我提供了許多基礎知識和靈感。


- iOS設置UIButton文字顯示地位和字體年夜小、色彩的辦法
- 詳解iOS中Button按鈕的狀況和點擊事宜
- Mac下獲得AppStore裝置包文件途徑
- iOS運用中UICollectionViewCell定制Button
- 淺析IOS開辟TouchID指紋解鎖功效
- IOS 處理UIButton 點擊卡頓/延遲的成績
- iOS完成相似微信和付出寶的暗碼輸出框(UIKeyInput協定)
- IOS 運用內顯示 AppStore 某個運用的概況
- IOS代碼筆記之勾選記住暗碼全體button
- iOS中的導航欄UINavigationBar與對象欄UIToolBar要點解析
- iOS中的音頻辦事和音頻AVAudioPlayer音頻播放器應用指南
- iOS中UIActivityIndicatorView的用法及齒輪期待動畫實例
- 詳解iOS運用中自界說UIBarButtonItem導航按鈕的創立辦法
- 詳解iOS中UIView的layoutSubviews子視圖結構辦法應用
- 詳解iOS中UIButton的三年夜UIEdgeInsets屬性用法