Auto Layout壓縮阻力及內容吸附講解

本文為投稿文章,作者:梁炜V
在Auto Layout的使用中,有兩個很重要的布局概念:Content Compression Resistance 和 Content Hugging,從字面的翻譯我們大概可以分別翻譯為:壓縮阻力 以及內容吸附。但是光從字面意思來理解很難知道它們如何使用以及確切的設計意圖。我最開始也是很迷糊而且在使用Auto Layout的過程中也沒有使用過它們,直到最近稍稍研究了一下,發現它們的作用甚是巨大,所以我為了加深記憶,把我最近學習到的關於它們的概念在此稍作整理加以記錄。
> 注:以下為了表述方便,將`Content Compression Resistance`記為`壓縮阻力`,將`Content Hugging`記為`內容吸附`。
Content Compression Resistance
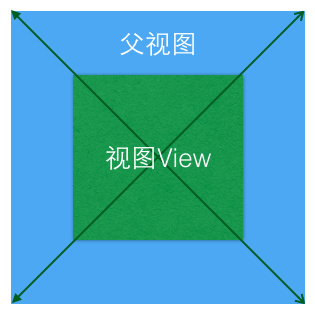
壓縮阻力屬性為了記憶更加形象我們可以把它理解為離我遠點,不許擠到我,它的優先級(Priority)越高,它的這種抗擠壓的能力也就越強,我們可以通過代碼在控件的水平或垂直方向上分別設置1(最低優先級)到1000(最高優先級)之間的優先級,默認是750,例如我們可以為一個 UILabel 控件設置一個它在水平方向上優先級為 500的壓縮阻力:
[label setContentCompressionResistancePriority:500 forAxis:UILayoutConstraintAxisHorizontal];
用圖來表示,我們可以大致表示如下,視圖的壓縮阻力就好似它自身往外的張力,優先級越高,視圖自己維持自身顯示完整性的能力就越強:
Content Hugging
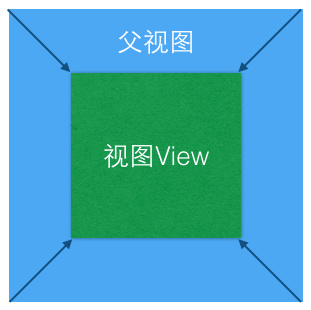
內容吸附 屬性為了記憶方便我們可以把它理解為 抱緊(Hug),視圖的大小不會隨著superView的變大而擴大,而是只維持能完全顯示自己內容的大小,它的這種優先級越高,吸附的能力就越強,和 壓縮阻力 一樣,內容吸附 的優先級也可以通過代碼來設置,只是它的默認優先級是 250:
[label setContentHuggingPriority:251 forAxis:UILayoutConstraintAxisHorizontal];
用圖來表示,我們可以大致表示如下,視圖的內容吸附就好似視圖自己有向內抱緊自己的力量一樣,優先級越高,它的這種能力就越強:
以上講了 內容吸附 和 壓縮阻力 的基本概念,但是這兩個屬性是建立在 Intrinsic Content Size 這一概念上的,我們暫且把它翻譯為 固有尺寸,所有基於UIView的視圖都有 intrinsicContentSize 這個屬性,下面我們就介紹一下什麼是 固有尺寸。
Intrinsic Content Size
每個視圖都有壓縮阻力優先級(Content Compression Resistance Priority)和內容吸附優先級(Content Hugging Priority),但只有視圖明確了它的固有尺寸後,這兩種優先級才會起作用。我們首先來看一下官方的解釋:
Custom views typically have content that they display of which the layout system is unaware. Overriding this method allows a custom view to communicate to the layout system what size it would like to be based on its content. This intrinsic size must be independent of the content frame, because there’s no way to dynamically communicate a changed width to the layout system based on a changed height, for example.
If a custom view has no intrinsic size for a given dimension, it can return UIViewNoIntrinsicMetric for that dimension.
大致的意思就是我們自定義的視圖在默認情況下,它的固有尺寸是返回(UIViewNoIntrinsicMetric,UIViewNoIntrinsicMetric),也就是(-1,-1),只有我們根據自定義視圖本身的Content來重寫該方法,我們自定義的視圖才能明確的知道他在顯示系統中該展示的大小。
UILabel和UIButton等這些控件,系統默認是根據他們的內容實現了固有尺寸,所以我們在使用的時候只需要確定origin或者Center它們就能正確的顯示。
由此可見,固有尺寸是為了實現視圖的 大小自適應 而存在的。
以下我來自定義一個視圖,來測試一下 固有尺寸 是否有效,由於項目中大家都是用[Masonry](http://https://github.com/SnapKit/Masonry)來處理Auto Layout,所以一下的例子都使用 Masonry 來布局。
重寫Intrinsic Content Size
我們新建一個繼承自UIView的自定義視圖IntrinsicView,在一個ViewController中添加一個我們自定義的視圖,設置它水平居中,頂部和父視圖對齊。
- (void)layoutSubIntrinsicView
{
    IntrinsicView *intrinsicView = [IntrinsicView new];
    intrinsicView.backgroundColor = [UIColor colorWithRed:.2 green:.4 blue:.6 alpha:1];
    [self.view addSubview:intrinsicView];
    [intrinsicView mas_makeConstraints:^(MASConstraintMaker *make) {
    make.centerX.mas_equalTo(self.view);
    make.top.mas_equalTo(self.mas_topLayoutGuideBottom);
}];
}
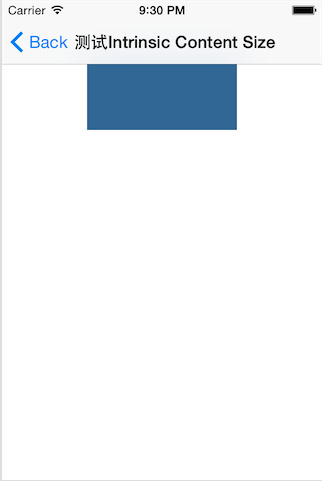
運行後發現什麼也沒顯示,因為我們沒有設置它的寬高,而它默認的固有尺寸是(-1 ,-1)。我們去重寫IntrinsicView的- (CGSize)intrinsicContentSize方法:
@implementation IntrinsicView

- (CGSize)intrinsicContentSize
{
    return CGSizeMake(150, 66);
}

@end
運行後顯示如下:
1、測試內容吸附優先級
為了測試內容吸附優先級我們在頁面上添加兩個IntrinsicView,分別是topView和bottomView,設置他們都水平居中,然後分別和頁面的頂部和底部對齊:
- (void)layoutSubIntrinsicView
{
    IntrinsicView *topView = [IntrinsicView new];
    topView.backgroundColor = [UIColor colorWithRed:.2 green:.4 blue:.6 alpha:1];
    [self.view addSubview:topView];
    [topView mas_makeConstraints:^(MASConstraintMaker *make) {
        make.centerX.mas_equalTo(self.view);
        make.top.mas_equalTo(self.mas_topLayoutGuideBottom);//和導航欄底部對齊
    }];

    IntrinsicView *bottomView = [IntrinsicView new];
    bottomView.backgroundColor = [UIColor colorWithRed:.2 green:.4 blue:.6 alpha:1];
    [self.view addSubview:bottomView];
    [bottomView mas_makeConstraints:^(MASConstraintMaker *make) {
        make.centerX.mas_equalTo(self.view);
        make.bottom.mas_equalTo(self.mas_bottomLayoutGuideBottom);//和頁面底部對齊
    }];
}
運行後展示如下:
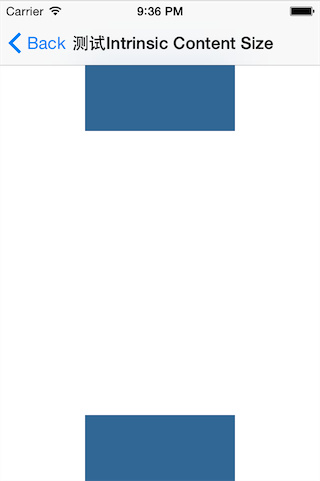
下面我們設置 topView 和 bottomView 之間的間距為 40,也就是 topView.bottom + 40 = bottomView.top。
- (void)layoutSubIntrinsicView
{
    IntrinsicView *topView = [IntrinsicView new];
    topView.backgroundColor = [UIColor colorWithRed:.2 green:.4 blue:.6 alpha:1];
    [self.view addSubview:topView];
    [topView mas_makeConstraints:^(MASConstraintMaker *make) {
        make.centerX.mas_equalTo(self.view);
        make.top.mas_equalTo(self.mas_topLayoutGuideBottom);//和導航欄底部對齊
}];

    IntrinsicView *bottomView = [IntrinsicView new];
    bottomView.backgroundColor = [UIColor colorWithRed:.2 green:.4 blue:.6 alpha:1];
    [self.view addSubview:bottomView];
    [bottomView mas_makeConstraints:^(MASConstraintMaker *make) {
        make.centerX.mas_equalTo(self.view);
        make.top.mas_equalTo(topView.mas_bottom).offset(40);
        make.bottom.mas_equalTo(self.mas_bottomLayoutGuideBottom);//和頁面底部對齊
 }];
}
運行後展示效果如下:
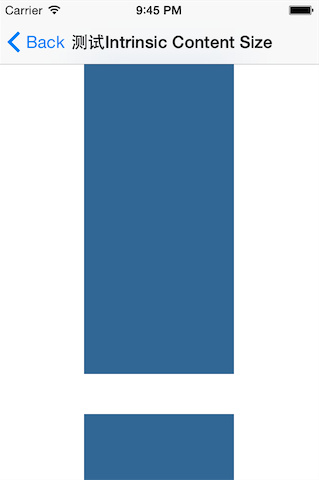
我們發現 topView 被拉伸了,如果我們不想 topView 被拉伸,就可以利用 內容吸附 的特性,因為我們定義了 IntrinsicView 的固有尺寸,設置 topView 的 內容吸附 優先級比 bottomView 的優先級高,我們上面介紹了 內容吸附 的默認優先級是 250,我們把 topView 的 內容吸附 優先級設置為 251,在原來 layoutSubIntrinsicView 函數的最後添加如下語句:
[topView setContentHuggingPriority:251 forAxis:UILayoutConstraintAxisVertical];
運行後如下所示,達到了我們想要的效果:
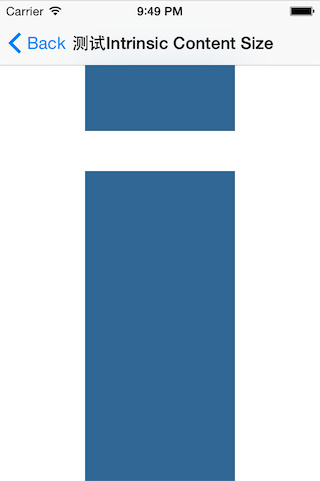
>251是我隨意定的比250大的值,可以是大於250小於1000的任何值。
2、測試壓縮阻力優先級
我們通常會遇到如下圖所示的需求:
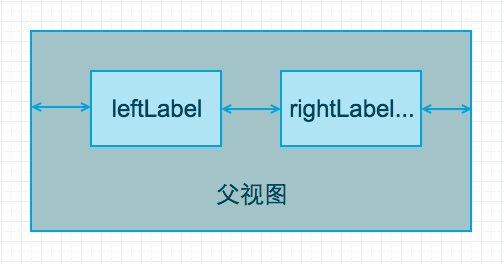
在某個頁面上水平放置兩個UILabel,leftLabel 的左邊和父視圖的間距固定,rightLabel 的右邊和父視圖的右邊有一個小於等於某個間隔的約束,leftLabel 和rightLabel 之間有一個固定間距,它們的寬度根據他們顯示的內容自適應,關鍵代碼如下:
[leftLabel mas_makeConstraints:^(MASConstraintMaker *make) {
    //左邊和父視圖間隔固定為10
    make.left.mas_equalTo(self.view).offset(10);
    make.top.mas_equalTo(80);//隨意設定的值
}];

[rightLabel mas_makeConstraints:^(MASConstraintMaker *make) {
    make.top.mas_equalTo(leftLabel);
    //和leftLabel的右邊間距固定為20
    make.left.mas_equalTo(leftLabel.mas_right).offset(20);
    //這裡注意是‘lessThanOrEqualTo’,也就是‘rightLabel’的右邊界
    //和父視圖的間距至少為10,內容少時,間距自動調大
    make.right.mas_lessThanOrEqualTo(self.view).offset(-10);
}];
在他們的顯示內容寬度不超過父視圖寬度時,兩個label的內容都能正常的完全顯示,但是當它們需要顯示的內容長度總和超過父視圖的寬度時,就會顯示如下:
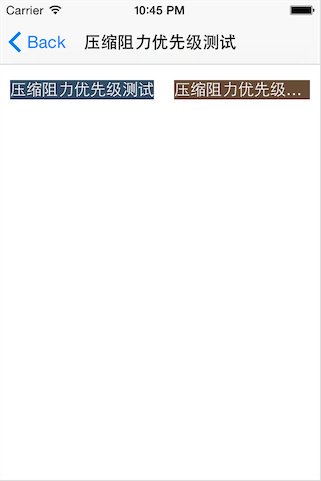
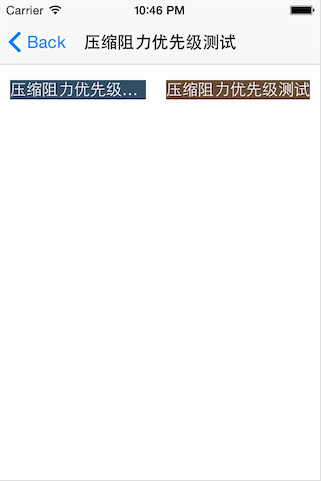
一個label被壓縮了, rightLabel 顯示不完全,如果在這種情況下,我們想 leftLabel 被壓縮,而 rightLabel 盡量完全顯示,由於UILabel這類控件,系統自己已經根據它們顯示的實際內容實現了 固有尺寸 的方法,我們可以利用 壓縮阻力 的特性,將 rightLabel 的 壓縮阻力 優先級設置得比 leftLabel 高,上面介紹了 壓縮阻力 的默認優先級是 750,我們把`rightLabel`的優先級設置為 751,在上面代碼的最下面添加如下代碼:
[rightLabel setContentCompressionResistancePriority:751 forAxis:UILayoutConstraintAxisHorizontal];
運行後顯示如下,達到了我們預期的效果:
3、在自動計算UITableViewCell高度中的使用
對於變高cell的處理,以前我們都是在`heightForRowAtIndexPath`方法裡面,拼湊要展示的變高cell的高度,當我們改變cell中兩個控件在垂直方向的布局,或者再添加一個控件時,還要去修改計算cell高度的方法來適應新的變化,非常不方便。但是有了自動布局後,利用好`壓縮阻力`和`內容吸附`的優先級,可以很精確很簡單的由系統來計算出變高cell的高度。
假定我們有如下需求:
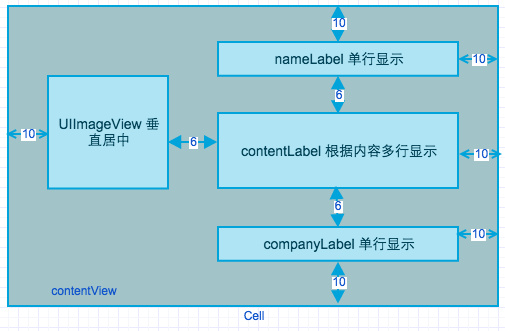
我們看到,這個變高cell裡面高度不定的是中間的`ContentLabel`,它會根據內容長度來折行顯示,UILabel要折行顯示我們需要設置它的`preferredMaxLayoutWidth`和`numberOfLines`兩個屬性的值。
首先假定`Model`的定義如下:
@interface CellModel : NSObject

@property (nonatomic, copy) NSString *name;
@property (nonatomic, copy) NSString *company;
@property (nonatomic, copy) NSString *content;
@property (nonatomic, assign) CGFloat cacheHeight;//緩存當前Model顯示的cell高度

@end
自定義的`UITableViewCell`的關鍵代碼如下:
//圖片距左邊距離為10,上下居中
    [_cellImageView mas_makeConstraints:^(MASConstraintMaker *make) {
        make.left.mas_equalTo(self.contentView).offset(10);
        make.centerY.mas_equalTo(self.contentView);
        make.top.mas_greaterThanOrEqualTo(self.contentView).offset(10);
        make.bottom.mas_lessThanOrEqualTo(self.contentView).offset(-10);
    }];
    //標題Label,一行顯示
    [_nameLabel mas_makeConstraints:^(MASConstraintMaker *make) {
        make.left.mas_equalTo(self.cellImageView.mas_right).offset(6);
        make.right.mas_lessThanOrEqualTo(self.contentView).offset(-10);
        make.top.mas_equalTo(self.contentView).offset(10);
    }];
    //內容label,多行顯示
    _contentLabel.numberOfLines = 0;
    [self.contentView addSubview:_contentLabel];
    [_contentLabel mas_makeConstraints:^(MASConstraintMaker *make) {
        make.left.mas_equalTo(self.nameLabel);
        make.top.mas_equalTo(self.nameLabel.mas_bottom).offset(6);
    }];
    //標題Label,一行顯示
    [_companyLabel mas_makeConstraints:^(MASConstraintMaker *make) {
        make.left.mas_equalTo(self.contentLabel);
        make.right.mas_lessThanOrEqualTo(self.contentView).offset(-10);
        make.top.mas_equalTo(self.contentLabel.mas_bottom).offset(6);
        make.bottom.mas_equalTo(self.contentView).offset(-10);//設定了這個自動計算cell高度時才知道具體cell的高度
    }];

    [_nameLabel setContentHuggingPriority:UILayoutPriorityRequired forAxis:UILayoutConstraintAxisVertical];
    [_companyLabel setContentHuggingPriority:UILayoutPriorityRequired forAxis:UILayoutConstraintAxisVertical];
    [_contentLabel setContentHuggingPriority:UILayoutPriorityRequired forAxis:UILayoutConstraintAxisVertical];
上面的代碼中設置了幾個`UILabel`的`內容吸附`優先級為最高,這樣它們就不會隨著cell高度的變化而拉伸高度。上面設置了`contentLabel`的`numberOfLines = 0`,還需要設置`preferredMaxLayoutWidth`才能正確換行顯示。由於`UITableViewCell`在顯示出來之前是不知道寬度的,但是為了獲取正確的寬度我們可以在`- (void)layoutSubviews`方法裡面設置:
- (void)layoutSubviews
{
    _contentLabel.preferredMaxLayoutWidth = CGRectGetWidth(self.contentView.frame) - 128 - 10 - 6;//後面的數字是前後以及圖片的寬度
    [super layoutSubviews];//這個調用是為了改變後更新布局
}
這樣我們設置好cell以及Model以後,其他的方法都和普通的使用一樣,唯一不一樣的就是計算cell高度的`UITableView`代理方法`heightForRowAtIndexPath`,它的實現如下:
- (CGFloat)tableView:(UITableView *)tableView heightForRowAtIndexPath:(NSIndexPath *)indexPath
{
    static CodeLayoutCell *singleCell = nil;
    static dispatch_once_t onceToken;
    dispatch_once(&onceToken, ^{
    //這裡持有一個cell是為了下面自動計算cell高度的需要
        singleCell = [tableView dequeueReusableCellWithIdentifier:kCellIdentifier];
    });
    //取出Model,如果有緩存的高度值就不計算了
    CellModel *model = _dataSourceArray[indexPath.row];
    if (model.cacheHeight != 0) {
        return model.cacheHeight;
    }
    [singleCell layoutIfNeeded];//強制布局,得到contentView的寬度
    [singleCell setNewCellModel:model];
    //由系統根據我們設定的Layout規則來計算cell顯示的Size
    CGSize size = [singleCell.contentView systemLayoutSizeFittingSize:UILayoutFittingCompressedSize];
    model.cacheHeight = size.height + 1;//cell和cell.contentView的高度相差1

    return model.cacheHeight;
}
運行的效果如下:
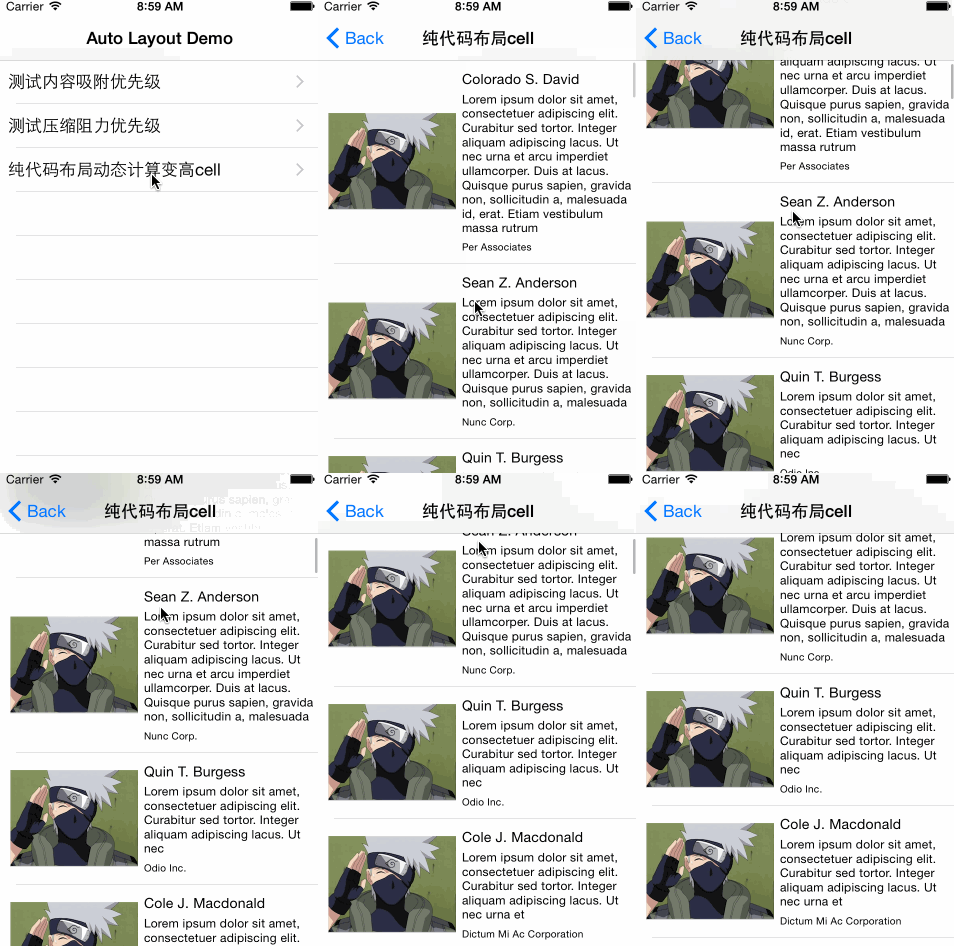
當圖片的高度大於三個`UIlabel`加上各自上下的間隔的高度時,由於我們設置了三個Label的`內容吸附`最高的優先級,所以為了滿足它們的高度,圖片的內容就進行了壓縮,如下:
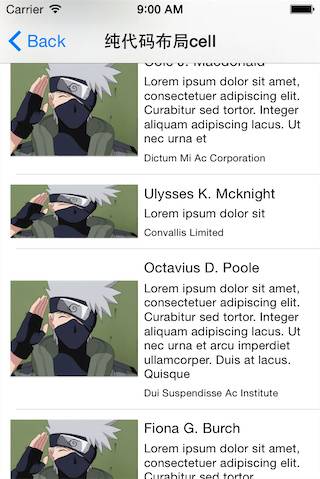
第二個cell的圖片被壓縮了,如何才能保證它不被壓縮呢?留給讀到這裡的人自己實現吧!????
暫時先寫到這裡吧,由於剛接觸這兩個屬性,難免會有遺誤之處,請大家多多諒解!
完整的Demo,請戳[這裡]
- iOS設置UIButton文字顯示地位和字體年夜小、色彩的辦法
- 詳解iOS中Button按鈕的狀況和點擊事宜
- Mac下獲得AppStore裝置包文件途徑
- iOS運用中UICollectionViewCell定制Button
- 淺析IOS開辟TouchID指紋解鎖功效
- IOS 處理UIButton 點擊卡頓/延遲的成績
- iOS完成相似微信和付出寶的暗碼輸出框(UIKeyInput協定)
- IOS 運用內顯示 AppStore 某個運用的概況
- IOS代碼筆記之勾選記住暗碼全體button
- iOS中的導航欄UINavigationBar與對象欄UIToolBar要點解析
- iOS中的音頻辦事和音頻AVAudioPlayer音頻播放器應用指南
- iOS中UIActivityIndicatorView的用法及齒輪期待動畫實例
- 詳解iOS運用中自界說UIBarButtonItem導航按鈕的創立辦法
- 詳解iOS中UIView的layoutSubviews子視圖結構辦法應用
- 詳解iOS中UIButton的三年夜UIEdgeInsets屬性用法


