教你實現類似於格瓦拉啟動頁中的放大轉場動畫(OC&Swift)
本文是投稿文章,作者:HenryCheng
一、前言
用過格瓦拉電影,或者其他app可能都知道,一種點擊按鈕用放大效果實現轉場的動畫現在很流行,效果大致如下
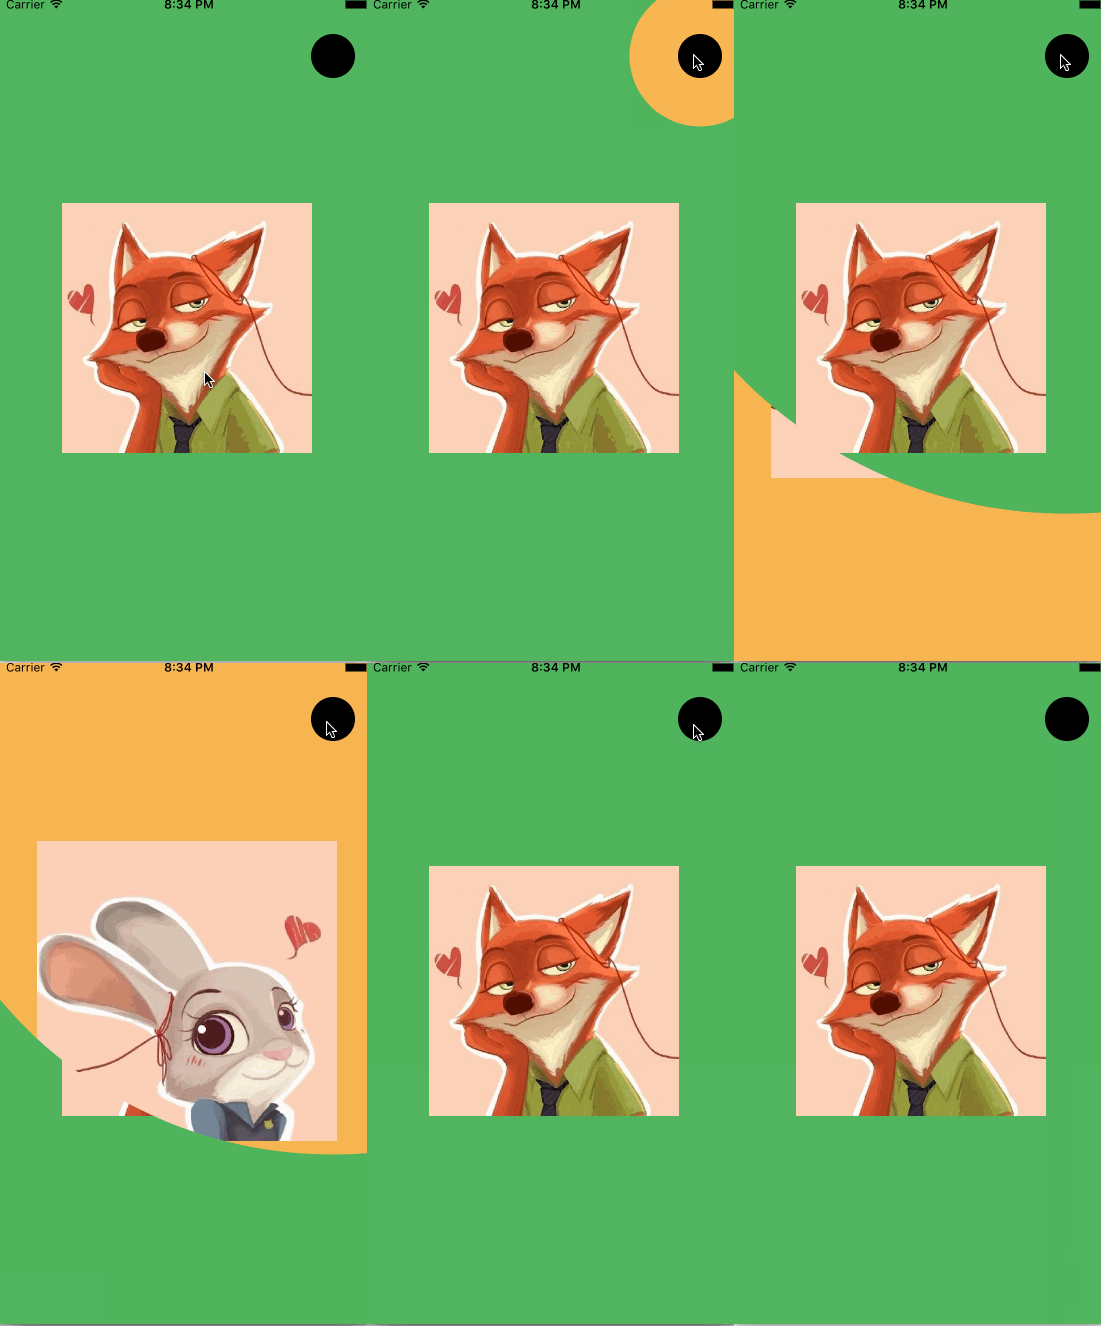
在iOS中,在同一個導航控制器你可以自定義轉場動畫實現兩個viewController之間的過渡。實際上在iOS7之後,通過實現UIViewControllerAnimatedTransitioning或者UIViewControllerContextTransitioning協議,就可以簡單的自定義轉場動畫,比如一個NavigationController的push和pop。還有一點你需要知道的是,我如果有一個矩形,有一個圓,想要在這個矩形上剪出和圓大小相同的面積,那麼就要用到CALayer的mask屬性,下面用圖表達可能會直觀些:
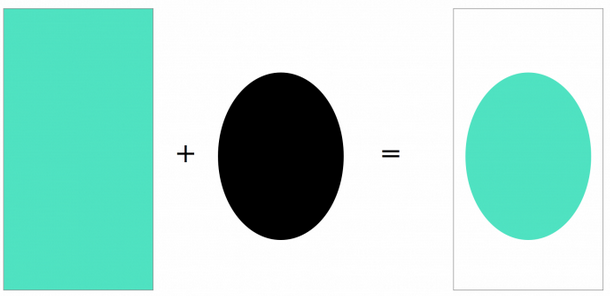
laye.mask
現在可能你對mask屬性有一點了解了,下面代碼的實現中你將會看到具體的實現過程。先做這麼多了解,下面開始一步步實現效果。
二、開始實現簡單的push效果
新建工程,這裡用的是Swift,選中storyboard,然後加上一個導航,如下
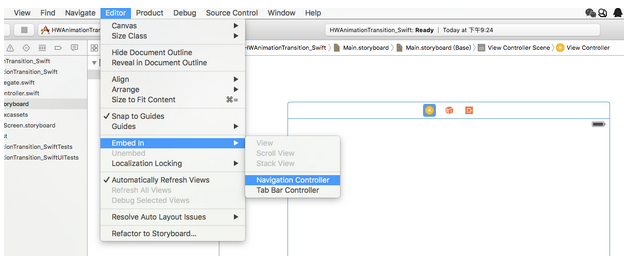
添加導航控制器
然後效果如下
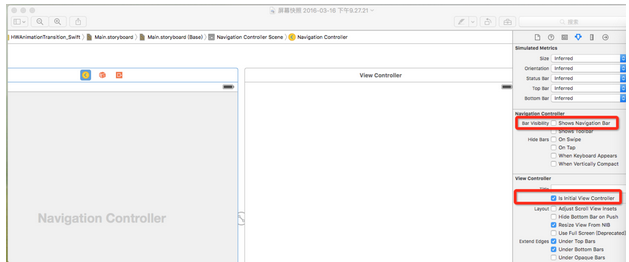
去掉導航欄
把右側的Shows Navigation Bar去掉,因為這個demo裡面並不需要導航欄,同時保證Is Instal View Controller是被勾上的(不知道的童鞋可以去掉看一下效果),這裡默認的都是勾選上的。然後在新建一個viewController,並設置其繼承於ViewController,如下
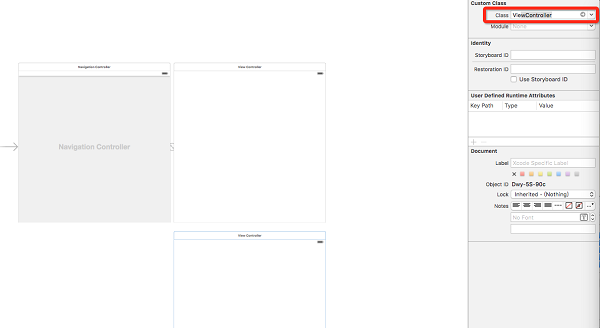
新建一個viewController
然後在兩個VC上分別在同樣的位置添加兩個完全相同的按鈕,位置約束在右上角距離右邊和上邊分別為20,20的距離,為了區分,將這兩個VC設置不同的背景色,如下
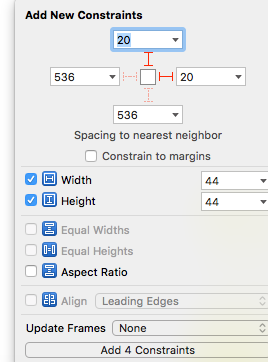
按鈕的約束位置以及大小

添加按鈕以及背景色以後效果
然後右鍵一直按住第一個按鈕拖拽至第二個VC(也就是黃色背景的)點擊show
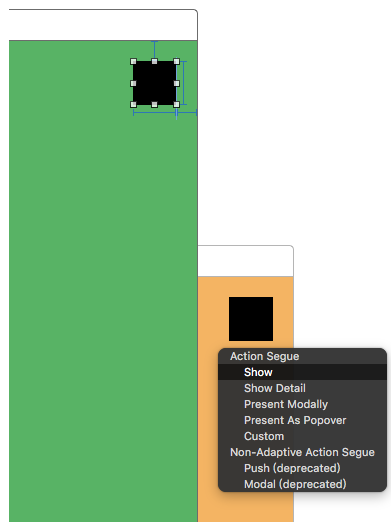
實現第一個 VC 按鈕點擊方法
這時候兩個VC之間就會出現一條線,然後點擊線中間,設置identifier為PushSegue,這裡設置一個標識符,為後面的跳轉做准備,效果如下:
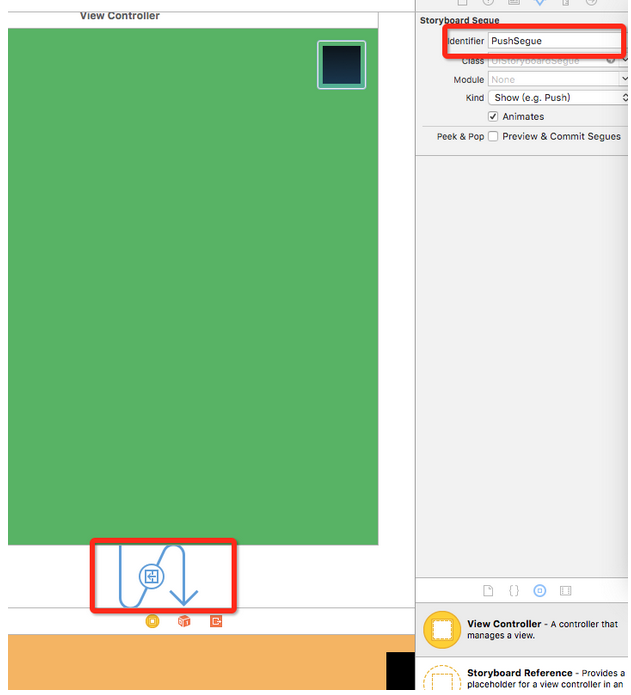
設置identifier
將兩個按鈕連接成ViewController的同一個屬性,名為popBtn,然後將第二個VC的按鈕實現一個點擊方法(因為我們要pop回來)名為popClick,如下
import UIKit

class ViewController: UIViewController {

    @IBOutlet weak var popBtn: UIButton!
    override func viewDidLoad() {
        super.viewDidLoad()
        // Do any additional setup after loading the view, typically from a nib.
    }

    @IBAction func popClick(sender: AnyObject) {

        self.navigationController?.popViewControllerAnimated(true)
    }

    override func didReceiveMemoryWarning() {
        super.didReceiveMemoryWarning()
        // Dispose of any resources that can be recreated.
    }

}
最後,分別在兩個VC的中間添加一個imageView,最後的效果圖如下
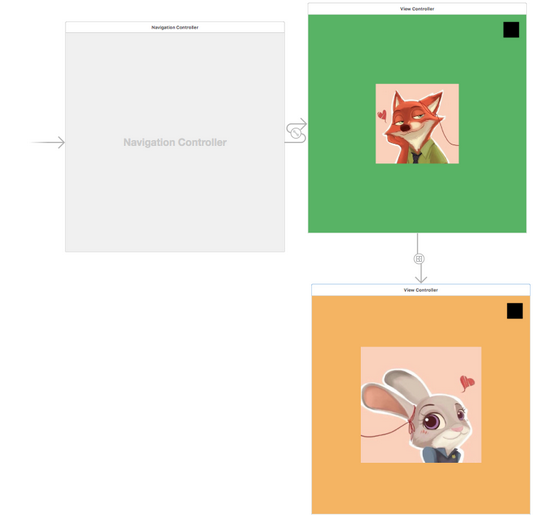
最後效果圖
如果到這裡你還沒錯的話,那麼運行一下你的工程,運行的效果將會是這樣
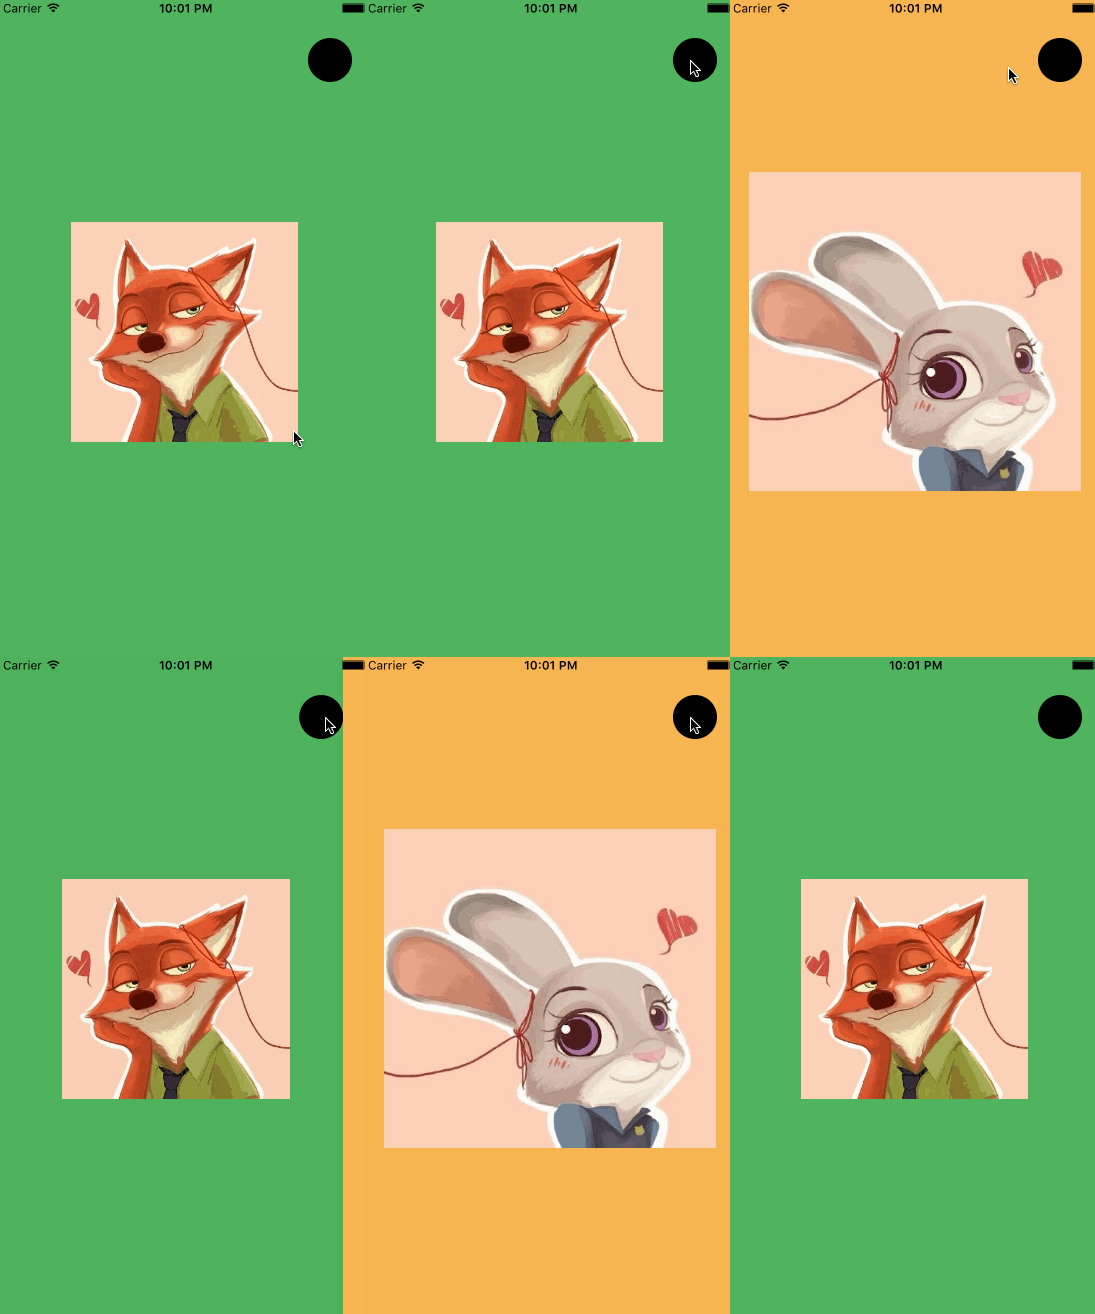
最後的運行效果圖
沒錯,也就是一個簡單的push效果,現在准備工作已經做好了,想要實現放大效果的動畫,還要繼續往下進行。
三、開始實現放大效果
通過上面的步驟,我們已經做好了准備工作,我們還要知道的一點是,要想自定義導航的push或pop效果,需要實現UINavigationControllerDelegate協議裡面的
func navigationController(navigationController: UINavigationController,
        interactionControllerForAnimationController animationController: UIViewControllerAnimatedTransitioning) -> UIViewControllerInteractiveTransitioning? {
            return nil
    }
這個協議方法,我們先新建一個繼承於NSObject的名為HWNavigationDelegate的一個類,然後引入UINavigationControllerDelegate,實現上面的協議方法,使返回值暫時為nil(從上面代碼中可以看出返回值是一個可選值,所以這裡可以先用nil,待會再具體實現)。然後你的HWNavigationDelegate裡面的代碼大致如下
//
//  HWNavigationDelegate.swift
//  HWAnimationTransition_Swift
//
//  Created by HenryCheng on 16/3/16.
//  Copyright ? 2016年 www.igancao.com. All rights reserved.
//

import UIKit

class HWNavigationDelegate: NSObject, UINavigationControllerDelegate {

    func navigationController(navigationController: UINavigationController, animationControllerForOperation operation: UINavigationControllerOperation, fromViewController fromVC: UIViewController, toViewController toVC: UIViewController) -> UIViewControllerAnimatedTransitioning? {

       return nil;
    }
}
現在繼續打開storyboard,然後在右下角搜索Object,並將其拖拽至左邊Navigation Controller Source裡,
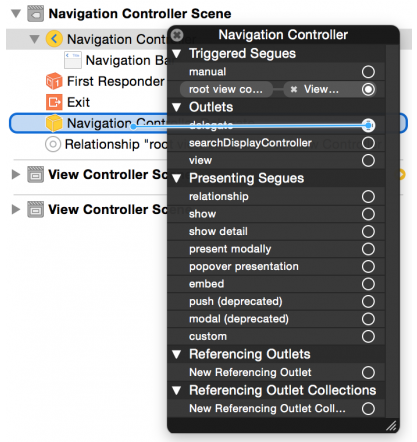
添加Object
並在選中Object,在右邊將其類改成剛剛創建的HWNavigationDelegate
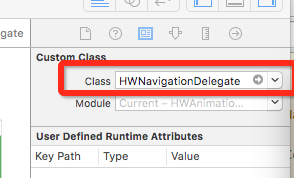
HWNavigationDelegate.png
最後在左側,點擊UINavigationController,並將其delegate設置為剛才的Object

設置導航的delegate
現在上面HWNavigationDelegate裡面導航的協議方法的返回值還是nil,我們需要創建一個實現動畫效果的類,並使其返回,這裡我們新建一個同樣繼承於NSObject的名為HWTransitionAnimator的類,並使其實現UIViewControllerAnimatedTransitioning協議,和其中的協議方法,為了便於閱讀,這裡貼出所有的代碼,
//
//  HWTransitionAnimator.swift
//  HWAnimationTransition_Swift
//
//  Created by HenryCheng on 16/3/16.
//  Copyright ? 2016年 www.igancao.com. All rights reserved.
//

import UIKit

class HWTransitionAnimator: NSObject, UIViewControllerAnimatedTransitioning {
    weak var transitionContext: UIViewControllerContextTransitioning?

    func transitionDuration(transitionContext: UIViewControllerContextTransitioning?) -> NSTimeInterval {

        return 0.5
    }

    func animateTransition(transitionContext: UIViewControllerContextTransitioning) {

        self.transitionContext = transitionContext

        let containerView = transitionContext.containerView()
        let fromVC = transitionContext.viewControllerForKey(UITransitionContextFromViewControllerKey) as! ViewController
        let toVC = transitionContext.viewControllerForKey(UITransitionContextToViewControllerKey) as! ViewController
        let button = fromVC.popBtn
        containerView?.addSubview(toVC.view)
        let circleMaskPathInitial = UIBezierPath(ovalInRect: button.frame)
        let extremePoint = CGPoint(x: button.center.x - 0, y: button.center.y - CGRectGetHeight(toVC.view.bounds))
        let radius = sqrt((extremePoint.x * extremePoint.x) + (extremePoint.y * extremePoint.y))
        let circleMaskPathFinal = UIBezierPath(ovalInRect: CGRectInset(button.frame, -radius, -radius))

        let maskLayer = CAShapeLayer()
        maskLayer.path = circleMaskPathFinal.CGPath
        toVC.view.layer.mask = maskLayer

        let maskLayerAnimation = CABasicAnimation(keyPath: "path")
        maskLayerAnimation.fromValue = circleMaskPathInitial.CGPath
        maskLayerAnimation.toValue = circleMaskPathFinal.CGPath
        maskLayerAnimation.duration = self.transitionDuration(transitionContext)
        maskLayerAnimation.delegate = self
        maskLayer.addAnimation(maskLayerAnimation, forKey: "path")

    }

    override func animationDidStop(anim: CAAnimation, finished flag: Bool) {

        self.transitionContext?.completeTransition(!self.transitionContext!.transitionWasCancelled())
        self.transitionContext?.viewControllerForKey(UITransitionContextFromViewControllerKey)?.view.layer.mask = nil
    }

}
關於上面的所有代碼,其中func animateTransition(transitionContext: UIViewControllerContextTransitioning),func animateTransition(transitionContext: UIViewControllerContextTransitioning)分別是設置時間和動畫過程的方法,都是UIViewControllerAnimatedTransitioning的協議方法,func animationDidStop是實現動畫結束後的操作,這裡動畫結束後需要做取消動畫和將fromViewController釋放掉的操作。裡面的
let circleMaskPathInitial = UIBezierPath(ovalInRect: button.frame)
let extremePoint = CGPoint(x: button.center.x - 0, y: button.center.y - CGRectGetHeight(toVC.view.bounds))
let radius = sqrt((extremePoint.x * extremePoint.x) + (extremePoint.y * extremePoint.y))
let circleMaskPathFinal = UIBezierPath(ovalInRect: CGRectInset(button.frame, -radius, -radius))

let maskLayer = CAShapeLayer()
maskLayer.path = circleMaskPathFinal.CGPath
toVC.view.layer.mask = maskLayer
這段代碼,下面第二段代碼的maskLayer這個上面開始的時候就說過了,第一段代碼其實就是一個計算的過程,求出最後大圓效果的半徑,原理如圖(粗糙的畫了一下,畫得不好見諒^_^)
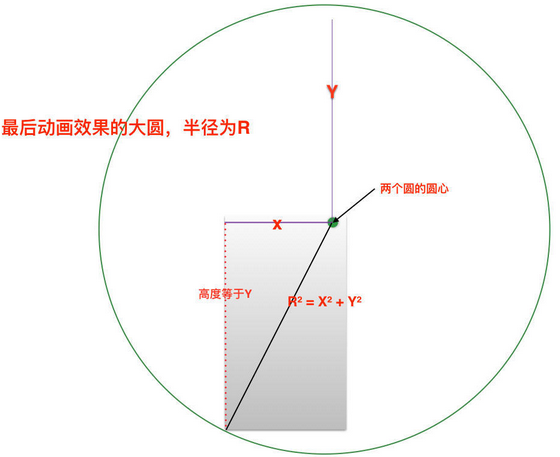
動畫效果關鍵的實現原理圖
最後將剛才HWNavigationDelegate裡的協議方法返回值修改成HWTransitionAnimator的對象就可以了
func navigationController(navigationController: UINavigationController, animationControllerForOperation operation: UINavigationControllerOperation, fromViewController fromVC: UIViewController, toViewController toVC: UIViewController) -> UIViewControllerAnimatedTransitioning? {
        return HWTransitionAnimator()
    }
如果上面步驟,你操作沒錯的話,運行工程效果如下
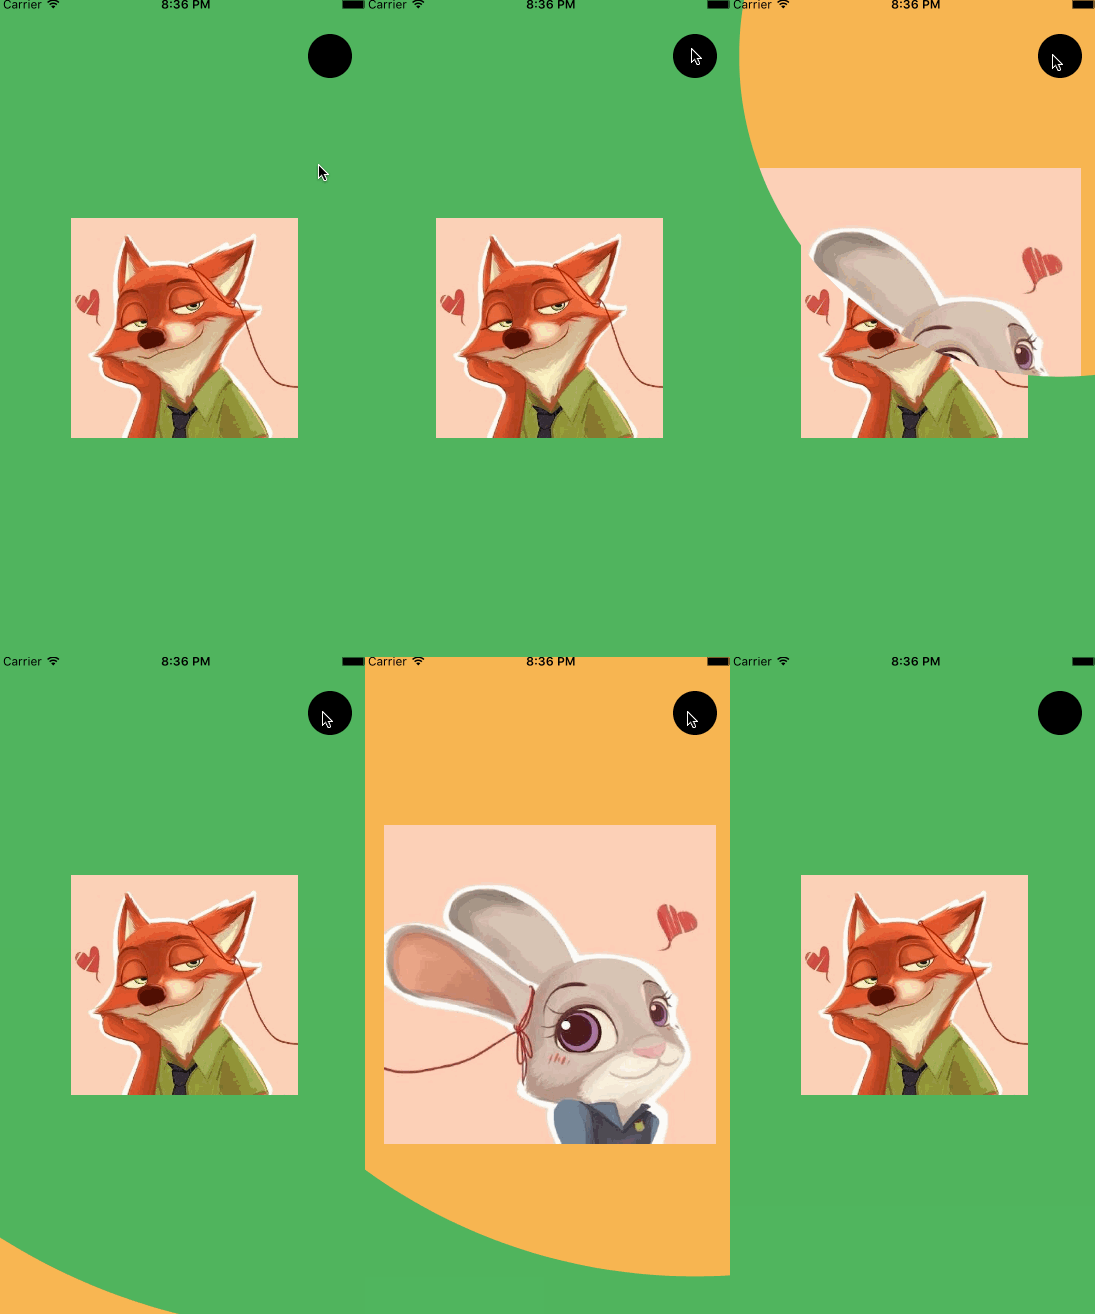
tap_swift
四、添加手勢引導動畫
添加手勢實現動畫效果,我們在剛才的HWNavigationDelegate類裡實現UINavigationControllerDelegate的另外一個斜一方法
func navigationController(navigationController: UINavigationController,
        interactionControllerForAnimationController animationController: UIViewControllerAnimatedTransitioning) -> UIViewControllerInteractiveTransitioning? {
            return self.interactionController
    }
這裡的self.interactionController就是我們的導航控制器,如下圖
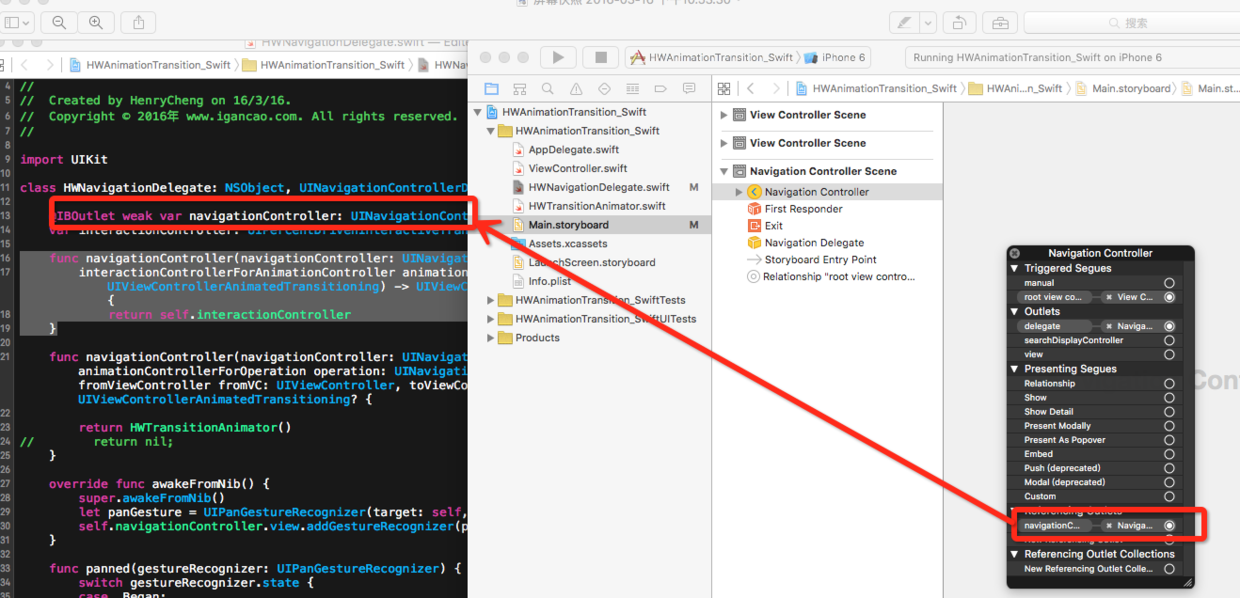
設置導航屬性
然後重寫awakeFromNib()方法,關於整個HWNavigationDelegate最後的代碼實現,如下
//
//  HWNavigationDelegate.swift
//  HWAnimationTransition_Swift
//
//  Created by HenryCheng on 16/3/16.
//  Copyright ? 2016年 www.igancao.com. All rights reserved.
//

import UIKit

class HWNavigationDelegate: NSObject, UINavigationControllerDelegate {

    @IBOutlet weak var navigationController: UINavigationController!
    var interactionController: UIPercentDrivenInteractiveTransition?

    func navigationController(navigationController: UINavigationController,
        interactionControllerForAnimationController animationController: UIViewControllerAnimatedTransitioning) -> UIViewControllerInteractiveTransitioning? {
            return self.interactionController
    }

    func navigationController(navigationController: UINavigationController, animationControllerForOperation operation: UINavigationControllerOperation, fromViewController fromVC: UIViewController, toViewController toVC: UIViewController) -> UIViewControllerAnimatedTransitioning? {

        return HWTransitionAnimator()
//        return nil;
    }

    override func awakeFromNib() {
        super.awakeFromNib()
        let panGesture = UIPanGestureRecognizer(target: self, action: Selector("panned:"))
        self.navigationController.view.addGestureRecognizer(panGesture)
    }

    func panned(gestureRecognizer: UIPanGestureRecognizer) {
        switch gestureRecognizer.state {
        case .Began:

            self.interactionController = UIPercentDrivenInteractiveTransition()
            if self.navigationController?.viewControllers.count > 1 {
                self.navigationController?.popViewControllerAnimated(true)
            } else {
                self.navigationController?.topViewController!.performSegueWithIdentifier("PushSegue", sender: nil)
            }
        case .Changed:

            let translation = gestureRecognizer.translationInView(self.navigationController!.view)
            let completionProgress = translation.x / CGRectGetWidth(self.navigationController!.view.bounds)
            self.interactionController?.updateInteractiveTransition(completionProgress)
        case .Ended:

            if (gestureRecognizer.velocityInView(self.navigationController!.view).x > 0) {
                self.interactionController?.finishInteractiveTransition()
            } else {
                self.interactionController?.cancelInteractiveTransition()
            }
            self.interactionController = nil

        default:
            self.interactionController?.cancelInteractiveTransition()
            self.interactionController = nil
        }
    }
}
這裡需要注意的是gestureRecognizer的幾個狀態
Begin :手勢被識別時時,初始化UIPercentDrivenInteractiveTransition實例對象和設置屬性,比如如果是第一個VC就實現push,反之則是pop
Changed:開始手勢到結束手勢的一個過程,上面代碼中是根據偏移量改變self.interactionController的位置
Ended:手勢結束以後的操作,設置動畫結束或者取消動畫,最後將self.interactionController置為nil
default:其他的狀態運行你的工程,拖拽屏幕時效果如下
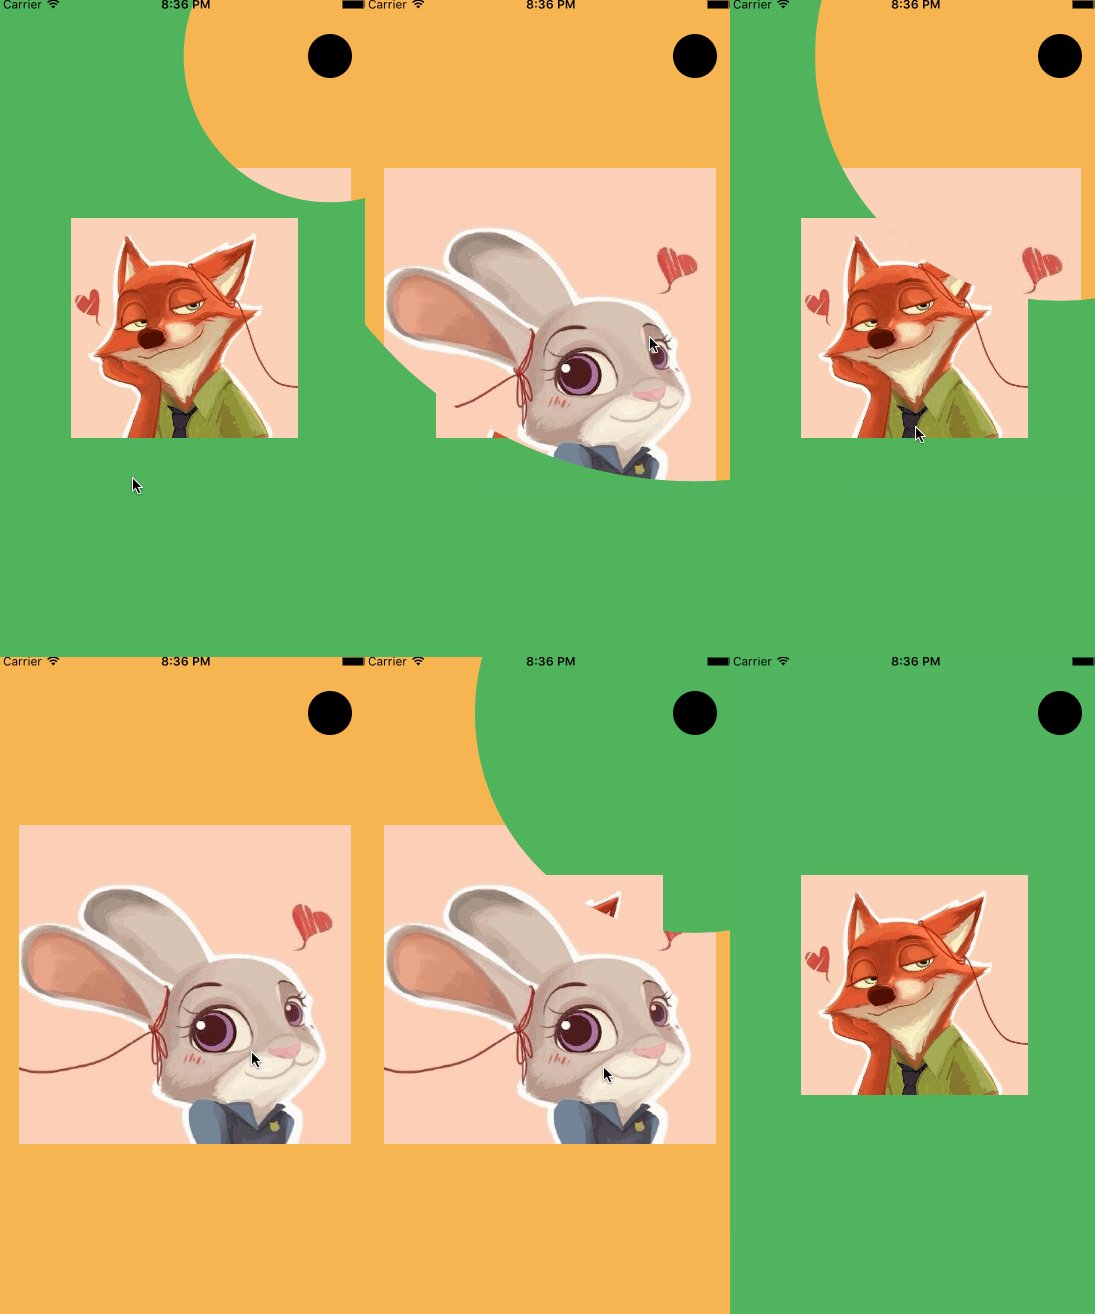
pan_swift.gif
五、最後
由於最近工作比較忙,好久沒有寫博客了,趁著這回功夫將這個小動畫分享一下,希望大家喜歡,時間不早了,該回去休息了(在公司加班完成的,喜歡的就star一下吧),最後,這裡只是swift版本的代碼,同時如果你需要全部代碼的話,你可以在下面下載
HWAnimationTransition_Swift(swift版本)
HWAnimationTransition_OC (OC版本)
- 手把手教你完成微信藐視頻iOS代碼完成
- 教你若何處理XCODE進級後插件不克不及用成績
- iOS------教你如何APP怎樣加急審核
- iOS利用AFNetworking實現文件上傳的示例代碼
- iOS 使用 socket 實現即時通信示例(非第三方庫)
- ios swift3.0實現二維碼掃描、生成、識別示例代碼
- IOS 開發狀態欄隱藏的實現辦法
- IOS購物車界面實現效果示例
- iOS中UITableView Cell實現自定義單選功能
- iOS實現錄音轉碼MP3及轉碼BASE64上傳示例
- AIR Native Extension for iOS 接入第三方sdk 如何實現 AppDelegate 生命周期
- iOS使用分類(category)實現有序字典
- iOS 利用runtime 實現全局字體的改變
- 類比Spring框架來實現OC中的依賴注入
- 基於 socket.io, 簡單實現多平台類似你猜我畫 socket 數據傳輸


