ResearchKit官方文檔——獲取授權

翻譯自蘋果官方文檔,譯者:@星夜暮晨,@有情況_R
通常而言,涉及人類受試者的研究報告往往需要進行某種形式的倫理審查。根據國家的不同,這項審查工作可能是由某個倫理審查委員會 (Institutional Review Board, IRB),或者某個倫理委員會 (Ethics Committee, EC) 進行。對於某些研究而言,可能需要獲取授權 (Consent) 才能夠進行調查研究,這意味著研究者必須確保每個研究參與者都已經充分了解了研究的性質,並且研究者還必須要獲得每個受試者所簽署的授權。此外,授權也可能會成為應用審查的條件之一。
ResearchKit 框架可以很容易地展示您的授權文件,並且獲得受試者的簽名。請注意,ResearchKit 框架中不包含數字簽名的支持。如果需要使用可證實並且不可撤銷的簽名的話,那麼您必須要在表單簽名的時候,負責生成一個數字簽名,或者生成一個可用來證明受試者身份的 PDF 文件。
要使用 ResearchKit 框架來獲取授權,您開始需要創建一個授權文檔模型對象 (ORKConsentDocument) 來表示授權文檔。在這個授權文檔模型當中,對您授權文檔的每一個章節,以及需要的簽名進行編碼。當您在文檔模型中創建完您的授權表單結構之後,就可以通過向文檔中添加一個可視化授權步驟 (ORKVisualConsentStep) ,來展示一個可視的、包含動畫的序列來幫助用戶理解文檔信息。要展示需要審查的文檔並獲取簽名的話,將這個文檔添加到一個授權審核步驟當中 (ORKConsentReviewStep). 。要同時展示可視授權以及授權審核步驟的話,可以創建一個包含步驟的授權任務,然後使用一個 ORKTaskViewController 對象將它們展示出來。
您還可以將其他的步驟添加到您的授權序列當中。例如,授權共享步驟 (ORKConsentSharingStep) 可以用來明確獲取相關的授權,以便能與其他研究者共享您的研究中所收集的那些數據,只要您獲得了 IRB 或者 EC 的許可。或者,您還可以添加指令、表單或者問題步驟來詢問關於理解程度的問題,以確保您的潛在受試者能夠完全理解研究的性質。
1. 創建授權文檔模型
要創建授權文檔模型,首先要決定您想要如何展示您的授權文檔。根據您想要展示給用戶的信息的樣式,將您的內容按照章節進行分類。當您構造完授權文檔的結構之後,您就可以使用授權文檔模型對象 (ORKConsentDocument) 來復制相同的結構。
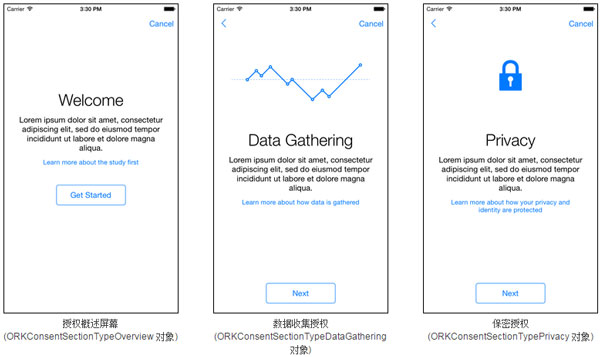
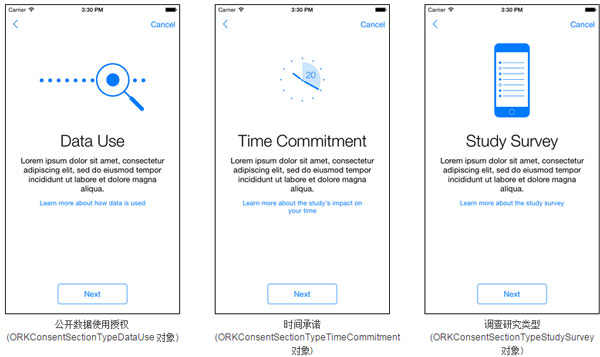
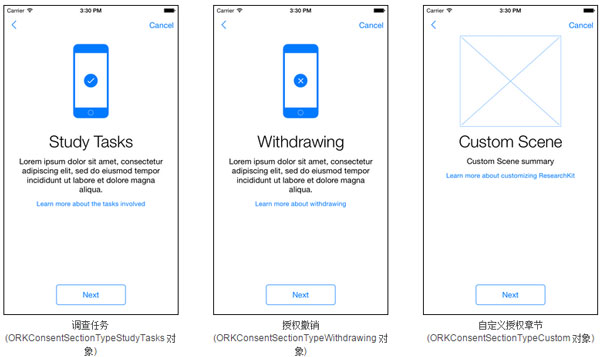
ResearchKit 框架提供了一些通常包含在授權文檔中的預定義章節:
概述 (ORKConsentSectionTypeOverview)
數據收集 (ORKConsentSectionTypeDataGathering)
保密 (ORKConsentSectionTypePrivacy)
數據使用 (ORKConsentSectionTypeDataUse)
時間承諾 (ORKConsentSectionTypeTimeCommitment)
調查 (ORKConsentSectionTypeStudySurvey)
任務 (ORKConsentSectionTypeStudyTasks)
撤銷授權 (ORKConsentSectionTypeWithdrawing)
預定義的章節包含了相應的圖像和本地化的標題。要使用預定義的章節,使用 ORKConsentSection 對象的 content 或者 htmlContent 屬性來為這個章節提供一個簡短的一句話概述,並且提供當用戶點擊 "Learn More" 按鈕時所顯示的內容。 您可以按預期的順序使用預定義的章節,ResearchKit 框架將會為不同章節之間的過渡提供動畫效果,從而給予流暢的用戶體驗。
當您創建完章節之後,您就可以創建一個步驟來顯示章節了。
OBJECTIVE-C
ORKConsentDocument *document = [ORKConsentDocument new];
ORKConsentSection *section1 =
[[ORKConsentSection alloc] initWithType:ORKConsentSectionTypeDataGathering];
section1.title = @"在這裡輸入章節的標題...";
section1.summary = @"在這裡輸入章節的概述...";
section1.content = @"在 Learn More 中顯示的內容...";
// 為之後的章節創建額外的章節對象
document.sections = @[section1, ...];
ORKVisualConsentStep *step =
[[ORKVisualConsentStep alloc] initWithIdentifier:kVisualConsent document:document];
// 然後接下來創建並展示一個包含此步驟的任務
SWIFT
let document = ORKConsentDocument()
let section1 = ORKConsentSection(type: .DataGathering)
section1.title = "在這裡輸入章節的標題..."
section1.summary = "在這裡輸入章節的概述..."
section1.content = "在 Learn More 中顯示的內容..."
// 為之後的章節創建額外的章節對象
document.sections = [section1, ...]
let step = ORKVisualConsentStep(identifier: Identifiers.VisualConsent.rawValue, document: document)
// 然後接下來創建並展示一個包含此步驟的任務
如果預定義的授權章節沒有充分涵蓋您授權文檔所擁有的章節的話,您可以自行創建自定義章節。您也可以自行創建圖像和動畫,並將他們添加到您的授權章節當中,已完成整個步驟。您所添加的動畫應該是 H.264 視頻;為了得到最好的結果,您應當先嘗試匹配包含在 ResearchKit 框架中的所有資源。
創建可視化授權步驟
可視化授權步驟展示了授權文檔的所有章節。您需要負責使用相應的內容來填充可視化授權步驟;ORKVisualConsentStep 對象中沒有包含任何的默認內容。
OBJECTIVE-C
// 為每一頁的可視化授權添加授權章節;例如:
ORKConsentSection *section1 =
[[ORKConsentSection alloc] initWithType:ORKConsentSectionTypeDataGathering];
document.sections = @[section1, ...];
// 向可視化授權步驟中添加文檔以及(或者)審核步驟:
ORKVisualConsentStep *visualConsent =
[[ORKVisualConsentStep alloc] initWithIdentifier:kVisualConsentIdentifier document:document];
// 創建並展示包含此步驟的任務
SWIFT
// 為每一頁的可視化授權添加授權章節;例如:
let section1 = ORKConsentSection(type: .DataGathering)
document.sections = [section1, ...]
// 向可視化授權步驟中添加文檔以及(或者)審核步驟:
let step = ORKVisualConsentStep(identifier: Identifiers.VisualConsent.rawValue, document: document)
// 創建並展示包含此步驟的任務
可視化步步驟示例如下:
添加審核步驟
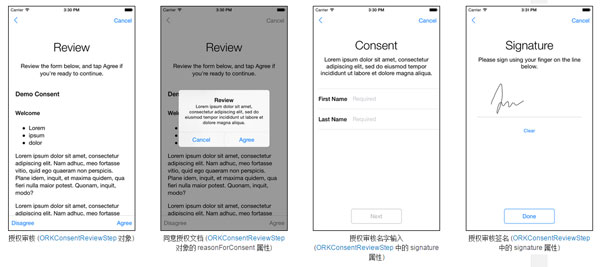
用戶可以審核位於授權審核步驟 (ORKConsentReviewStep) 中的授權審核文檔。根據您對簽名的需求,您也可以要求用戶輸入他們的姓名,並且在屏幕上進行簽名。
授權審核的內容不僅可以由您的文檔模型中通過將所有的授權章節相互串聯而產生,還可以通過在授權文檔的 htmlReviewContent 屬性中提供完全獨立的 HTML 審核內容。
當用戶同意授權表單中的內容後,會顯示一個確認對話框。該對話框的文本可以通過使用 ORKConsentReviewStep 的 reasonForConsent 屬性完成自定義。
如果步驟的 signature 屬性包含了一個 requiresName 值為 YES(true) 的簽名對象的話,那麼授權審核步驟中將會包含名字輸入頁面。類似地,如果步驟的 signature 屬性包含了一個 requiresSignature 屬性為 YES (true) 的簽名對象的話,那麼授權審核步驟中將會包含簽名輸入頁面。
OBJECTIVE-C
ORKConsentDocument *consent = [[ORKConsentDocument alloc] init];
consent.title = @"授權示例";
consent.signaturePageTitle = @"授權";
ORKConsentReviewStep *reviewStep =
[[ORKConsentReviewStep alloc] initWithIdentifier:kConsentReviewIdentifier
signature:consent.signatures[0]
inDocument:consent];
reviewStep.text = @"Lorem ipsum ..";
reviewStep.reasonForConsent = @"Lorem ipsum ...";
// 向任務中添加內容並將其展示
SWIFT
let consent = ORKConsentDocument()
consent.title = "授權示例"
consent.signaturePageTitle = "授權"
guard let signatures = consent.signatures where signatures.count > 0 else { return }
let reviewStep = ORKConsentReviewStep(identifier: Identifiers.ConsentReview.rawValue, signature: signatures[0], inDocument: consent)
reviewStep.text = "Lorem ipsum .."
reviewStep.reasonForConsent = "Lorem ipsum .."
// 向任務中添加內容並將其展示
審核步驟的示例界面如下所示:
授權共享步驟
應用程序使用 ResearchKit 框架的主要目的在於,它們需要收集用於某項具體研究的相關數據。但是如果您想要讓受試者同意您與其他的研究人員共享研究數據的話,那麼受試者必須要能夠控制這一個權限。
授權共享步驟 (ORKConsentSharingStep) 可以被用來明確地獲取相關許可,允許您將您在研究中收集的用戶數據與其他研究人員進行共享,只要您的 IRB 或者 EC 准許的話(如果可用的話)。要使用授權共享步驟,您可以將其添加到任務當中,或許您可以在授權審核步驟之前添加它。
OBJECTIVE
ORKConsentSharingStep *sharingStep =
[[ORKConsentSharingStep alloc] initWithIdentifier:kConsentSharingIdentifier
investigatorShortDescription:@"機構名稱"
investigatorLongDescription:@"機構名稱及合作機構"
localizedLearnMoreHTMLContent:@"Lorem ipsum..."];
// 然後向任務中添加此步驟,然後在任務視圖控制器中將其展示
SWIFT
let sharingStep = ORKConsentSharingStep(identifier: Identifiers.ConsentSharing.rawValue,
investigatorShortDescription: "機構名稱",
investigatorLongDescription: "機構名稱及合作機構",
localizedLearnMoreHTMLContent: "Loremn ipsum...")
// 然後向任務中添加此步驟,然後在任務視圖控制器中將其展示
2. 創建授權任務
當您創建完步驟之後,創建一個 ORKOrderedTask 任務,然後將這些步驟添加到此任務當中。要展示任務的話,請將您的任務掛接到一個任務視圖控制器上,然後展示該控制器。
下面的代碼片段展示了如何創建一個帶有可視化授權步驟和授權審核步驟的任務:
OBJECTIVE-C
ORKVisualConsentStep *visualStep =
[[ORKVisualConsentStep alloc] initWithIdentifier:kVisualConsentIdentifier
document:consent];
ORKConsentReviewStep *reviewStep =
[[ORKConsentReviewStep alloc] initWithIdentifier:kConsentReviewIdentifier
signature:consent.signatures[0]
inDocument:consent];
// 配置這些步驟
// 創建一個包含這些步驟的任務
ORKOrderedTask *task =
[[ORKOrderedTask alloc] initWithIdentifier:kConsentTaskIdentifier
steps:@[visualStep,reviewStep]];
ORKTaskViewController *taskViewController =
[[ORKTaskViewController alloc] initWithTask:task taskRunUUID:nil];
// 然後展示任務視圖控制器
SWIFT
let visualStep = ORKVisualConsentStep(identifier: Identifiers.VisualConsent.rawValue,
document: consent)
let reviewStep = ORKConsentReviewStep(identifier: Identifiers.ConsentReview.rawValue,
signature: signatures[0],
inDocument: consent)
// 配置這些步驟
// 創建一個包含這些步驟的任務
let task = ORKOrderedTask(identifier: Identifiers.ConsentTask.rawValue,
steps: [visualStep, reviewStep])
let taskViewController = ORKTaskViewController(task: task, taskRunUUID: nil)
// 然後展示任務視圖控制器
3. 生成 PDF 文件(可選)
ResearchKit 框架可以幫助您生成一個經過簽名的授權書 PDF 文件,並提供給用戶。例如,您的應用程序可以在本地生成一個 PDF 文件,然後將其寫入到硬盤上面,或者將其通過郵件發送給受試者,也可以將其發送給服務器。
要做到這一點,首先需要從已完成的授權審核中獲取任意一種簽名,然後將這個生成的簽名應用到您授權文檔的拷貝當中。接下來,調用 ORKConsentDocument 的 makePDFWithCompletionHandler: 方法,如下所示:
OBJECTIVE-C
ORKConsentDocument *documentCopy = [document copy];
ORKConsentSignatureResult *signatureResult =
(ORKConsentSignatureResult *)[[[taskViewController result] stepResultForStepIdentifier:kConsentReviewIdentifier] firstResult];
[signatureResult applyToDocument:documentCopy];
[documentCopy makePDFWithCompletionHandler:^(NSData *pdfData, NSError *error) {
// 將 PDF 數據寫入到硬盤當中,或者通過郵件發送出去,也可以將其發送到服務器當中
}];
SWIFT
if let signatureResult = taskViewController.result.stepResultForStepIdentifier("").firstResult as ORKConsentSignatureResult,
documentCopy = document.copy() as ORKConsentDocument {
signatureResult.applyToDocument(documentCopy)
    documentCopy.makePDFWithCompletionHandler { data, error in
        // 將 PDF 數據寫入到硬盤當中,或者通過郵件發送出去,也可以將其發送到服務器當中
    }
}
您只能將一個簽名結果應用到授權文檔的拷貝當中。
- IOS 開辟自界說條形ProgressView的實例
- IOS 陀螺儀開辟(CoreMotion框架)實例詳解
- iOS10告訴框架UserNotification懂得與運用
- iOS簡略登錄LoginViewController、注冊RegisterViewController等功效完成辦法
- iOS Remote Notification長途新聞推送處置
- Mac下獲得AppStore裝置包文件途徑
- IOS 波紋進度(waveProgress)動畫完成
- React Native搭建iOS開辟情況
- iOS中應用UISearchBar控件限制輸出字數的完成辦法
- iOS中searchBar(搜刮框)光標初始地位後移
- 若何完成IOS_SearchBar搜刮欄及症結字高亮
- 處理Alamofire庫在iOS7下設置Head有效的成績
- IOS 運用內顯示 AppStore 某個運用的概況
- iOS 9 Core Spotlight搜刮實例代碼
- iOS App開辟中的UISegmentedControl分段組件用法總結


