IOS開發-UIView之動畫效果的實現方法(合集)
前言:在開發APP中,我們會經常使用到動畫效果。使用動畫可以讓我們的APP更酷更炫,最重要的是優化用戶體驗,但取決於動畫的質量。像QQ、微信、新浪微博等APP,動畫效果就很好了,至少我很喜歡它們的動畫,讓我使用起來感覺很順暢,心情很開朗。本文會介紹UIView效果的實現方法,非核心動畫。
一、使用UIView類實現動畫
基本寫法,代碼必須放在Begin和Commit之間:
[UIView beginAnimations:nil context:nil]; // 開始動畫
// Code...
[UIView commitAnimations]; // 提交動畫
簡單例子:
[UIView beginAnimations:nil context:nil]; // 開始動畫
[UIView setAnimationDuration:10.0]; // 動畫時長

/**
 *  圖像向下移動
 */
CGPoint point = _imageView.center;
point.y += 150;
[_imageView setCenter:point];

[UIView commitAnimations]; // 提交動畫
同時運行多個動畫效果:
[UIView beginAnimations:nil context:nil];
[UIView setAnimationDuration:3.0];
[_imageView setAlpha:0.0];
[UIView commitAnimations];

[UIView beginAnimations:nil context:nil];
[UIView setAnimationDuration:3.0];
CGPoint point = _imageView.center;
point.y += 150;
[_imageView setCenter:point];
[UIView commitAnimations];
以上代碼實現的動畫效果為(同時執行):
1、圖像向下平移150像像
2、設置圖像透明度為0。
指定上下文:
CGContextRef context = UIGraphicsGetCurrentContext();
[UIView beginAnimations:nil context:context];
[UIView setAnimationDuration:2.0];
[_imageView setAlpha:0];
[UIView commitAnimations];
UIGraphicsGetCurrentContext():獲取當前視圖的上下文
其它方法及屬性:
以下方法及屬性不為全部,只例舉部分(其它沒提及到的方法及屬性請自行嘗試,謝謝):
// 開始動畫
+ (void)beginAnimations:(NSString *)animationID context:(void *)context;

// 提交動畫
+ (void)commitAnimations;

// 設置動畫曲線,默認是勻速進行:
+ (void)setAnimationCurve:(UIViewAnimationCurve)curve;

// 設置動畫時長:
+ (void)setAnimationDuration:(NSTimeInterval)duration;

// 默認為YES。為NO時跳過動畫效果,直接跳到執行後的狀態。
+ (void)setAnimationsEnabled:(BOOL)enabled;

// 設置動畫延遲執行(delay:秒為單位):
+ (void)setAnimationDelay:(NSTimeInterval)delay;

// 動畫的重復播放次數
+ (void)setAnimationRepeatCount:(float)repeatCount;

// 如果為YES,逆向(相反)動畫效果,結束後返回動畫逆向前的狀態; 默認為NO:
+ (void)setAnimationRepeatAutoreverses:(BOOL)repeatAutoreverses;

// 設置動畫代理:
+ (void)setAnimationDelegate:(id)delegate;

// 動畫將要開始時執行方法××(必須要先設置動畫代理):
+ (void)setAnimationWillStartSelector:(SEL)selector;

// 動畫已結束時執行方法××(必須要先設置動畫代理):
+ (void)setAnimationDidStopSelector:(SEL)selector;

/**
 *  設置動畫過渡效果
 *
 *  @param transition 動畫的過渡效果
 *  @param view 過渡效果作用視圖
 *  @param cache 如果為YES,開始和結束視圖分別渲染一次並在動畫中創建幀;否則,視圖將會渲染每一幀。例如,你不需要在視圖轉變中不停的更新,你只需要等到轉換完成再去更新視圖。
 */
+ (void)setAnimationTransition:(UIViewAnimationTransition)transition forView:(UIView *)view cache:(BOOL)cache;

// 刪除所有動畫層
// 注意:層指的是layout,例:[_imageView.layer removeAllAnimations];
- (void)removeAllAnimations;
二、使用UIView的動畫塊代碼:
方法一:
[UIView animateWithDuration:4.0 // 動畫時長
                 animations:^{
                     // code
                 }];
方法二:
[UIView animateWithDuration:4.0 // 動畫時長
                 animations:^{
                     // code...
                 }
                 completion:^(BOOL finished) {
                     // 動畫完成後執行
                     // code...
                 }];
方法三:
[UIView animateWithDuration:4.0 // 動畫時長
                      delay:2.0 // 動畫延遲
                    options:UIViewAnimationOptionCurveEaseIn // 動畫過渡效果
                 animations:^{
                     // code...
                 }
                 completion:^(BOOL finished) {
                     // 動畫完成後執行
                     // code...
                 }];
方法四,Spring Animationring Animation):
在IOS7開始,系統動畫效果廣泛應用Spring Animation:
[UIView animateWithDuration:4.0 // 動畫時長
                      delay:0.0 // 動畫延遲
     usingSpringWithDamping:1.0 // 類似彈簧振動效果 0~1
      initialSpringVelocity:5.0 // 初始速度
                    options:UIViewAnimationOptionCurveEaseInOut // 動畫過渡效果
                 animations:^{
                     // code...
                     CGPoint point = _imageView.center;
                     point.y += 150;
                     [_imageView setCenter:point];
                 } completion:^(BOOL finished) {
                     // 動畫完成後執行
                     // code...
                     [_imageView setAlpha:1];
                 }];
usingSpringWithDamping:它的范圍為 0.0f 到 1.0f ,數值越小「彈簧」的振動效果越明顯。
initialSpringVelocity:初始的速度,數值越大一開始移動越快。值得注意的是,初始速度取值較高而時間較短時,也會出現反彈情況。
轉:Spring Animation 是線性動畫或 ease-out 動畫的理想替代品。由於 iOS 本身大量使用的就是 Spring Animation,用戶已經習慣了這種動畫效果,因此使用它能使 App 讓人感覺更加自然,用 Apple 的話說就是「instantly familiar」。此外,Spring Animation 不只能對位置使用,它適用於所有可被添加動畫效果的屬性。
方法五,關鍵幀動畫:
UIView動畫已經具備高級的方法來創建動畫,而且可以更好地理解和構建動畫。IOS7以後蘋果新加了一個animateKeyframesWithDuration的方法,我們可以使用它來創建更多更復雜更酷炫的動畫效果,而不需要去使用到核心動畫(CoreAnimatino)。
創建關鍵幀方法:
/**
 *  添加關鍵幀方法
 *
 *  @param duration   動畫時長
 *  @param delay      動畫延遲
 *  @param options    動畫效果選項
 *  @param animations 動畫執行代碼
 *  @param completion 動畫結束執行代碼
 */
+ (void)animateKeyframesWithDuration:(NSTimeInterval)duration
                               delay:(NSTimeInterval)delay
                             options:(UIViewKeyframeAnimationOptions)options
                          animations:(void (^)(void))animations
                          completion:(void (^)(BOOL finished))completion;
添加關鍵幀方法:
/**
 *  添加關鍵幀
 *
 *  @param frameStartTime 動畫相對開始時間
 *  @param frameDuration  動畫相對持續時間
 *  @param animations     動畫執行代碼
 */
+ (void)addKeyframeWithRelativeStartTime:(double)frameStartTime
                        relativeDuration:(double)frameDuration
                              animations:(void (^)(void))animations;
以上說的相對時間,也就是說:“它們自身會根據動畫總持續時長自動匹配其運行時長”。
下面用一個簡單的示例作解答,彩虹變化視圖:
void (^keyFrameBlock)() = ^(){
    // 創建顏色數組
    NSArray *arrayColors = @[[UIColor orangeColor],
                             [UIColor yellowColor],
                             [UIColor greenColor],
                             [UIColor blueColor],
                             [UIColor purpleColor],
                             [UIColor redColor]];
    NSUInteger colorCount = [arrayColors count];
    // 循環添加關鍵幀
    for (NSUInteger i = 0; i < colorCount; i++) {
        [UIView addKeyframeWithRelativeStartTime:i / (CGFloat)colorCount
                                relativeDuration:1 / (CGFloat)colorCount
                                      animations:^{
                                          [_graduallyView setBackgroundColor:arrayColors[i]];
                                      }];
    }
};
[UIView animateKeyframesWithDuration:4.0
                               delay:0.0
                             options:UIViewKeyframeAnimationOptionCalculationModeCubic | UIViewAnimationOptionCurveLinear
                          animations:keyFrameBlock
                          completion:^(BOOL finished) {
                              // 動畫完成後執行
                              // code...
                          }];
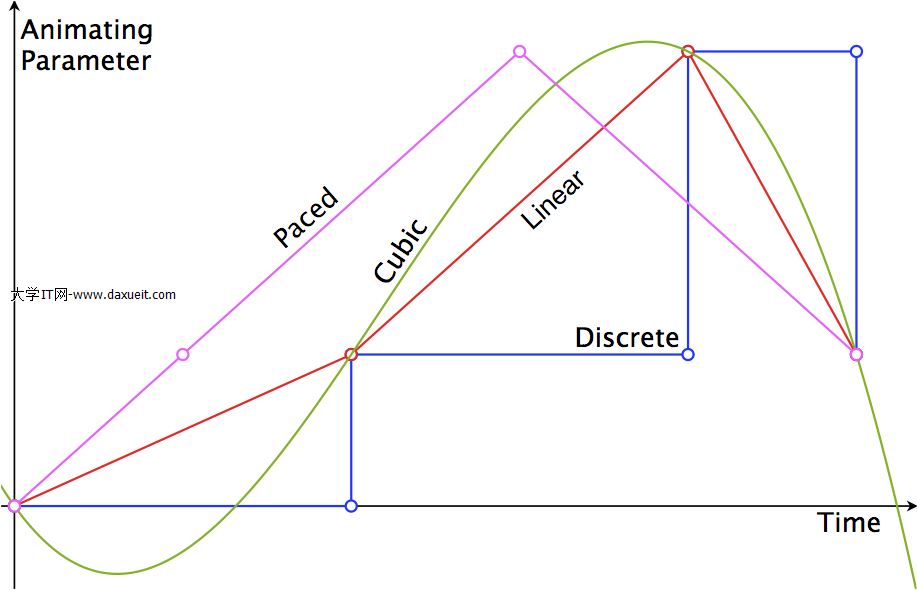
動畫過渡效果(Options),新增了以下幾個:
UIViewKeyframeAnimationOptionCalculationModeLinear     = 0 << 10, // default
UIViewKeyframeAnimationOptionCalculationModeDiscrete   = 1 << 10,
UIViewKeyframeAnimationOptionCalculationModePaced      = 2 << 10,
UIViewKeyframeAnimationOptionCalculationModeCubic      = 3 << 10,
UIViewKeyframeAnimationOptionCalculationModeCubicPaced = 4 << 10
下面我們看一張圖,讓我們更容易理解:
小結:
UIView實現動畫的方法有很多種。簡單的動畫效果你可以隨意丟,比較復雜的動畫效果你可以選用關鍵幀KeyFrame方法。
至於選用哪種,就需要根據產品需求去進行判斷。
博文作者:GarveyCalvin
博文出處:http://www.cnblogs.com/GarveyCalvin/
本文版權歸作者和博客園共有,歡迎轉載,但須保留此段聲明,並給出原文鏈接,謝謝合作!
- 上一頁:iOS NSURLSession的使用
- 下一頁:ios多線程和進程的區別