Reveal詳細安裝教程
編輯:IOS技巧綜合
Reveal的詳細安裝使用
標簽: Reveal 工具 調試 iOS
一、終端的操作
首先最重要的一點,要先把Reveal軟件放到Application中,否則路徑是錯的,後面的設置也就沒有作用了
打開終端,輸入vim ~/.lldbinit
接著輸入
此時終端屬於 insert 狀態 按command alias reveal_load_sim expr (void*)dlopen("/Applications/Reveal.app/Contents/SharedSupport/iOS-Libraries/libReveal.dylib", 0x2); command alias reveal_load_dev expr (void*)dlopen([(NSString*)[(NSBundle*)[NSBundle mainBundle] pathForResource:@"libReveal" ofType:@"dylib"] cStringUsingEncoding:0x4], 0x2); command alias reveal_start expr (void)[(NSNotificationCenter*)[NSNotificationCenter defaultCenter] postNotificationName:@"IBARevealRequestStart" object:nil]; command alias reveal_stop expr (void)[(NSNotificationCenter*)[NSNotificationCenter defaultCenter] postNotificationName:@"IBARevealRequestStop" object:nil];ESC退出插入狀態
接下來 就要退出終端了shift+q鍵入命令行狀態
在終端輸入
wq即保存退出
二、xcode內的設置
點擊該方法左邊的行號區域,增加一個斷點,之後右擊該斷點,選擇Edit Breakpoint

點擊Action項邊右的Add Action,然後輸入reveal_load_sim

勾選上Options上的Automatically continue after evaluating選項 如下圖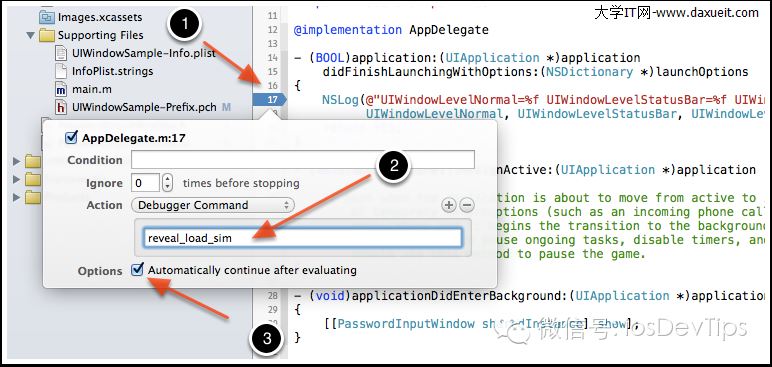
三、見證神奇的時刻
現在我們可以運行模擬器,然後打開Reveal,就可以在Reveal界面的左上角,看到有模擬器可以連接調試,選擇它,則可以在Reveal中查看和調試該iOS程序的界面了。


相關文章
+- Objective-C 宏界說具體引見
- IOS 開辟自界說條形ProgressView的實例
- Objective-C 代碼與Javascript 代碼互相挪用實例
- 在uiview 的tableView中點擊cell進入跳轉到另外一個界面的完成辦法
- IOS 陀螺儀開辟(CoreMotion框架)實例詳解
- iOS仿熱點話題熱門輪播界面tableView
- IOS中UITableView轉動到指定地位
- iOS簡略登錄LoginViewController、注冊RegisterViewController等功效完成辦法
- iOS Remote Notification長途新聞推送處置
- Mac下獲得AppStore裝置包文件途徑
- IOS 波紋進度(waveProgress)動畫完成
- iOS開辟之UITableView左滑刪除等自界說功效
- React Native搭建iOS開辟情況
- Objective-C 經典字典數組排序 - 省郊區
- iOS法式開辟之應用PlaceholderImageView完成優雅的圖片加載後果