
iOS仿京東分類菜單實例實現
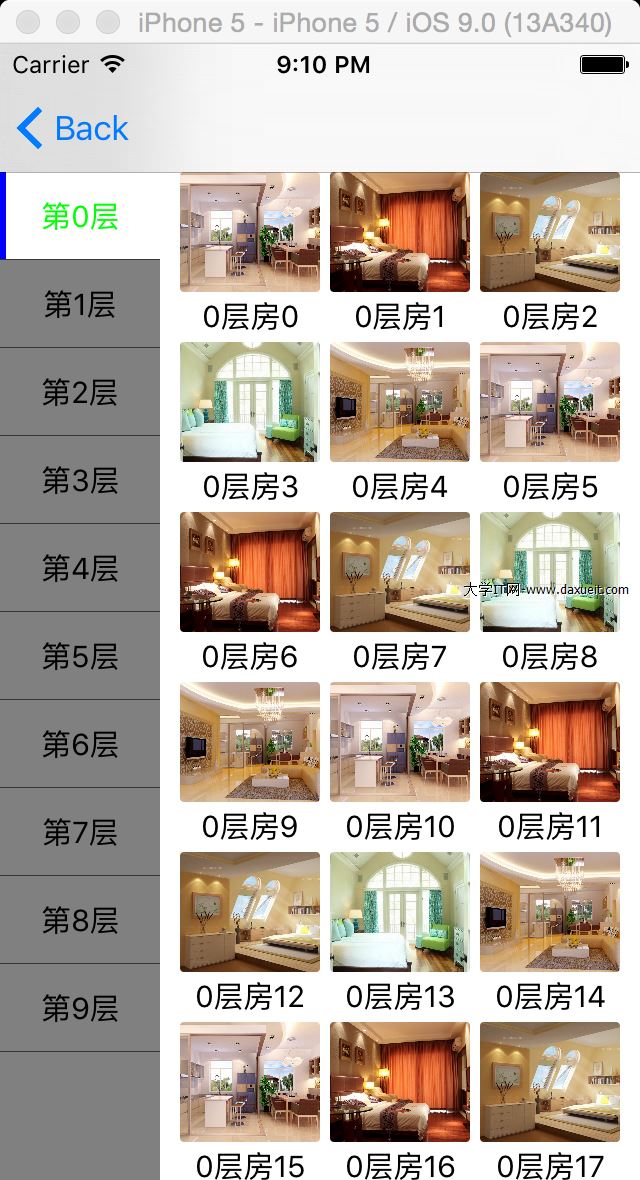
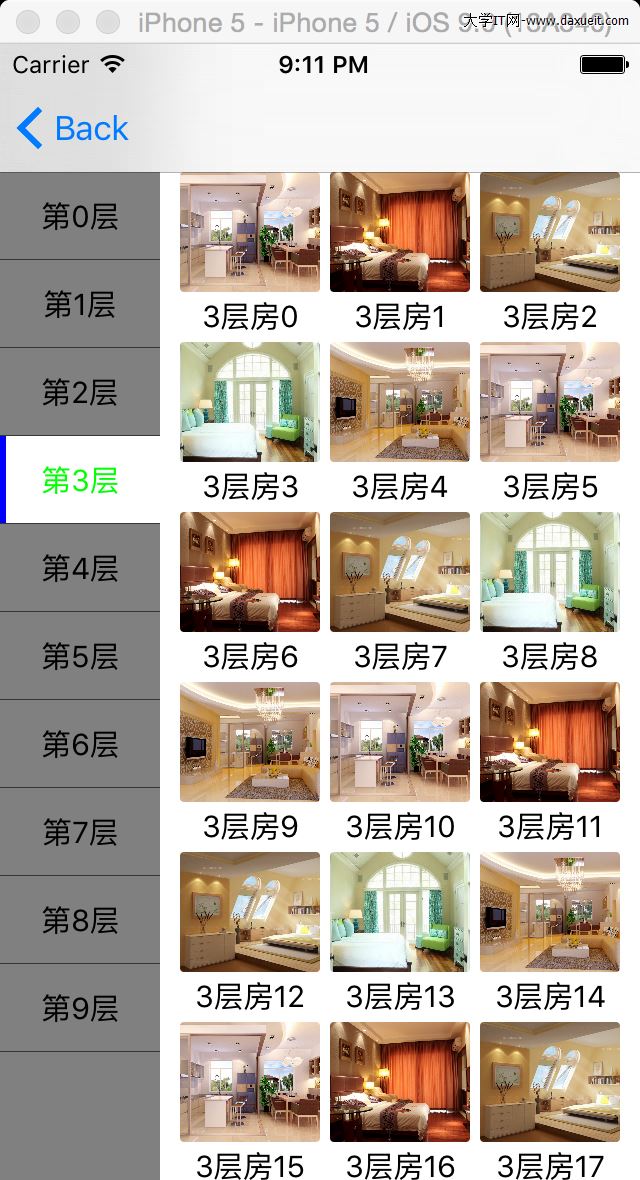
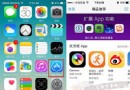
在APP開發過程中此功能還是比較常見的模塊,左邊為菜單展示,右邊為菜單下數據的展示,選擇不同的菜單右邊的數據源進行更新,此實例主要運用到UITableView,UICollectionView,OC謂詞一些知識,結合Masonry進行布局;實現的效果如下:
涉及的知識點:
1:UITableView的運用,包含選中與非選中行不同展示,默認行分隔線的色彩跟與左邊距離的調整,自動滾動到最頂端的實現等
2:UICollectionView的運用,包含單元格的加載,及重用時遇到的錯亂問題,記錄滾動位置的當前值;
3:數組的運用,包含運用謂詞對數組過濾
一:左邊表格單元行的實現內容
1.1 左邊單元行的數據實體,(注意:offsetScorller是為了後面記錄右邊數據的滾動位置值)
#import <Foundation/Foundation.h>

@interface leftTagModel : NSObject

//ID值
@property(assign,nonatomic)long tagID;
//名稱
@property(copy,nonatomic)NSString *tagName;
//圖標地址(為後期可能帶圖標做准備)
@property(copy,nonatomic)NSString *tagImageUrl;

//這個來定位右邊數據源滾動的位置
@property(assign,nonatomic) float offsetScorller;
@end
1.2左邊單元行的創建(注意:關於行的背影色以及字體顯示色彩的修改)
#import <UIKit/UIKit.h>
#import "leftTagModel.h"

@interface leftTableCell : UITableViewCell

@property(strong,nonatomic)leftTagModel *curLeftTagModel;
//是否被選中
@property(assign,nonatomic)BOOL hasBeenSelected;

@end
#import "leftTableCell.h"

@interface leftTableCell()
@property(strong,nonatomic)UIView *leftColorView;
@property(strong,nonatomic)UILabel *nameLabel;
@end

//左邊色彩條寬度
static const CGFloat leftColorViewWidth=3;
//文字字體大小
static const CGFloat textFontSize=15;


@implementation leftTableCell

- (id)initWithStyle:(UITableViewCellStyle)style reuseIdentifier:(NSString *)reuseIdentifier
{
    self = [super initWithStyle:style reuseIdentifier:reuseIdentifier];
    if (self) {
        //設置背影色
        self.backgroundColor=[UIColor grayColor];
        self.accessoryType = UITableViewCellAccessoryNone;

        if (self.leftColorView==nil) {
            self.leftColorView=[[UIView alloc]init];
            self.leftColorView.backgroundColor=[UIColor blueColor];
            self.leftColorView.hidden=YES;
            [self.contentView addSubview:self.leftColorView];
            [self.leftColorView mas_makeConstraints:^(MASConstraintMaker *make) {
                make.left.mas_equalTo(self.contentView.mas_left).with.offset(0);
                make.top.mas_equalTo(self.contentView.mas_top).with.offset(0);
                make.bottom.mas_equalTo(self.contentView.mas_bottom).with.offset(0);
                make.width.mas_equalTo(leftColorViewWidth);
            }];
        }

        if (self.nameLabel==nil) {
            self.nameLabel=[[UILabel alloc]init];
            self.nameLabel.font=[UIFont systemFontOfSize:textFontSize];
            self.nameLabel.textAlignment=NSTextAlignmentCenter;
            [self.nameLabel sizeToFit];
            [self.contentView addSubview:self.nameLabel];
            [self.nameLabel mas_makeConstraints:^(MASConstraintMaker *make) {
                make.center.mas_equalTo(self.contentView);
                make.height.mas_equalTo(@20);
            }];
        }
    }
    return self;
}


- (void)awakeFromNib {
    // Initialization code
}

- (void)setSelected:(BOOL)selected animated:(BOOL)animated {
    [super setSelected:selected animated:animated];

    // Configure the view for the selected state
}

/**
 *  @author wujunyang, 15-10-10 14:10:52
 *
 *  @brief  設置選中跟沒有選中的變化
 *
 *  @param hasBeenSelected 是否被選中
 *
 *  @since <#version number#>
 */
-(void)setHasBeenSelected:(BOOL)hasBeenSelected
{
    _hasBeenSelected=hasBeenSelected;
    if (_hasBeenSelected) {
        self.backgroundColor=[UIColor whiteColor];
        self.nameLabel.textColor=[UIColor greenColor];
        self.leftColorView.hidden=NO;
    }
    else
    {
        self.backgroundColor=[UIColor grayColor];
        self.nameLabel.textColor=[UIColor blackColor];
        self.leftColorView.hidden=YES;
    }
}

-(void)setCurLeftTagModel:(leftTagModel *)curLeftTagModel
{
    _curLeftTagModel=curLeftTagModel;
    self.nameLabel.text=_curLeftTagModel.tagName;
}

@end
二:右邊列表的單元格實現
2.1右邊單元格實體(注意tagID是為跟左邊的數據源進行關聯)
#import <Foundation/Foundation.h>

@interface noHeadRightModel : NSObject

//實體leftTageModel中的主鍵值
@property(assign,nonatomic)long tagID;

@property(assign,nonatomic)long roomID;
@property(copy,nonatomic)NSString *roomName;
@property(copy,nonatomic)NSString *roomImageUrl;
@end
2.2單元格的實現
#import <UIKit/UIKit.h>
#import "noHeadRightModel.h"

@interface rightCollectionViewCell : UICollectionViewCell

@property(strong,nonatomic)noHeadRightModel *curNoHeadRightModel;

+(CGSize)ccellSize;

@end
#import "rightCollectionViewCell.h"

@interface rightCollectionViewCell()
@property(strong,nonatomic)UIImageView *roomImageView;
@property(strong,nonatomic)UILabel *roomLabel;
@end

static const CGFloat collectionCellHeight=80;
static const CGFloat labelHeight=20;

@implementation rightCollectionViewCell

//這邊很關鍵 CollectionViewCell重用
- (id)initWithFrame:(CGRect)frame
{
    self = [super initWithFrame:frame];
    if (self) {
        if (self.roomImageView==nil) {
            self.roomImageView=[[UIImageView alloc] initWithFrame:CGRectMake(0, 0, ([UIScreen mainScreen].bounds.size.width-80-10*3)/3, collectionCellHeight-labelHeight)];
            self.roomImageView.contentMode=UIViewContentModeScaleAspectFill;
            self.roomImageView.clipsToBounds = YES;
            self.roomImageView.layer.masksToBounds = YES;
            self.roomImageView.layer.cornerRadius = 2.0;
            [self.contentView addSubview:self.roomImageView];
        }

        if (self.roomLabel==nil) {
            self.roomLabel=[[UILabel alloc]init];
            self.roomLabel.font=[UIFont systemFontOfSize:15];
            self.roomLabel.textAlignment=NSTextAlignmentCenter;
            [self.roomLabel sizeToFit];
            [self.contentView addSubview:self.roomLabel];
            [self.roomLabel mas_makeConstraints:^(MASConstraintMaker *make) {
                make.top.mas_equalTo(self.roomImageView.mas_bottom).with.offset(2);
                make.centerX.mas_equalTo(self.roomImageView).with.offset(0);
                make.height.mas_equalTo(labelHeight);
            }];
        }
    }
    return self;
}

-(void)setCurNoHeadRightModel:(noHeadRightModel *)curNoHeadRightModel
{
    _curNoHeadRightModel=curNoHeadRightModel;
    self.roomImageView.image=[UIImage imageNamed:_curNoHeadRightModel.roomImageUrl];
    self.roomLabel.text=_curNoHeadRightModel.roomName;
}


+(CGSize)ccellSize
{
    return CGSizeMake(([UIScreen mainScreen].bounds.size.width-80-10*3)/3,collectionCellHeight);
}
@end
注意:在集合UICollectionView重用單元一直出現錯亂,加載的數據有問題,是因為沒有把布局放在- (id)initWithFrame:(CGRect)frame導致;
三:主頁面的展示內容
3.1測試數據的構造跟左右兩控件的初始化
#import "menuTableViewController.h"


#define kScreenWidth [UIScreen mainScreen].bounds.size.width
#define kScreenHeight [UIScreen mainScreen].bounds.size.height

@interface menuTableViewController ()<UITableViewDataSource, UITableViewDelegate,UICollectionViewDataSource, UICollectionViewDelegate>

@property (strong, nonatomic) UITableView *myTableView;
//左邊列表的數據源
@property (nonatomic, strong) NSMutableArray *dataList;
//右邊列表的過濾數據源
@property(nonatomic,strong)NSMutableArray *rightdataList;
//右邊列表數據源
@property(nonatomic,strong)NSMutableArray *allRightDataList;
//當前被選中的ID值
@property(strong,nonatomic)leftTagModel *curSelectModel;
//右邊列表
@property (strong, nonatomic) UICollectionView *myCollectionView;
//是否保持右邊滾動時位置
@property(assign,nonatomic) BOOL isKeepScrollState;
@property(assign,nonatomic) BOOL isReturnLastOffset;
@property(assign,nonatomic) NSInteger selectIndex;
@end

//表格的寬度
static const CGFloat tableWidthSize=80;
//行的高度
static const CGFloat tableCellHeight=44;
//表格跟集合列表的空隙
static const CGFloat leftMargin =10;

@implementation menuTableViewController

- (void)viewDidLoad {
    [super viewDidLoad];

    //初始化
    self.view.backgroundColor=[UIColor whiteColor];
    self.dataList=[[NSMutableArray alloc]init];
    self.rightdataList=[[NSMutableArray alloc]init];
    self.allRightDataList=[[NSMutableArray alloc]init];
    self.isReturnLastOffset=YES;
    //是否允許右位保持滾動位置
    self.isKeepScrollState=YES;
    //測試數據
    for (int i=0; i<10; i++) {

        //左邊列表數據
        leftTagModel *item=[[leftTagModel alloc]init];
        item.tagID=i;
        item.tagName=[NSString stringWithFormat:@"第%d層",i];
        [self.dataList addObject:item];

        //右邊列表數據
        for (int j=0; j<55; j++) {
            noHeadRightModel *model=[[noHeadRightModel alloc]init];
            model.tagID=i;
            model.roomID=j;
            model.roomName=[NSString stringWithFormat:@"%d層房%d",i,j];
            model.roomImageUrl=[NSString stringWithFormat:@"room%d",j%5];
            [self.allRightDataList addObject:model];
        }
    }

    //創建列表
    if (!_myTableView) {
        _myTableView = [[UITableView alloc] initWithFrame:CGRectMake(0,0,tableWidthSize, kScreenHeight) style:UITableViewStylePlain];
        _myTableView.backgroundColor=[UIColor grayColor];
        _myTableView.showsVerticalScrollIndicator = NO;
        _myTableView.showsHorizontalScrollIndicator=NO;
        _myTableView.dataSource = self;
        _myTableView.delegate = self;
        _myTableView.tableFooterView=[[UIView alloc]init];
        _myTableView.separatorColor= [UIColor colorWithRed:52.0f/255.0f green:53.0f/255.0f blue:61.0f/255.0f alpha:1];
        [_myTableView registerClass:[leftTableCell class] forCellReuseIdentifier:NSStringFromClass([leftTableCell class])];

        if ([self.myTableView respondsToSelector:@selector(setLayoutMargins:)]) {
            self.myTableView.layoutMargins=UIEdgeInsetsZero;
        }
        if ([self.myTableView respondsToSelector:@selector(setSeparatorInset:)]) {
            self.myTableView.separatorInset=UIEdgeInsetsZero;
        }
        [self.view addSubview:_myTableView];
    }

    //創建集合表格
    if (!_myCollectionView) {
        UICollectionViewFlowLayout *layout = [[UICollectionViewFlowLayout alloc] init];
        self.myCollectionView = [[UICollectionView alloc] initWithFrame:CGRectMake(tableWidthSize+leftMargin,64, kScreenWidth-tableWidthSize-2*leftMargin, kScreenHeight) collectionViewLayout:layout];
        self.myCollectionView.backgroundColor=[UIColor whiteColor];
        self.myCollectionView.showsHorizontalScrollIndicator=NO;
        self.myCollectionView.showsVerticalScrollIndicator=NO;
        [self.myCollectionView registerClass:[rightCollectionViewCell class] forCellWithReuseIdentifier:NSStringFromClass([rightCollectionViewCell class])];
        self.myCollectionView.dataSource = self;
        self.myCollectionView.delegate = self;
        [self.view addSubview:self.myCollectionView];
    }

    self.selectIndex=0;
    //默認選擇第一個
    if (self.dataList.count>0) {
        self.curSelectModel=[self.dataList objectAtIndex:self.selectIndex];
        [self.myTableView selectRowAtIndexPath:[NSIndexPath indexPathForRow:self.selectIndex inSection:0] animated:YES scrollPosition:UITableViewScrollPositionTop];
        [self.myTableView reloadData];

        //右邊數據加載
        [self predicateDataSoure];
    }
}

- (void)didReceiveMemoryWarning {
    [super didReceiveMemoryWarning];
}
注意:isKeepScrollState是為了讓右邊是否記錄下當前滾動位置,若不想則可以把它設置為NO,它便會自動滾動到Y為0的位置;上面的代碼中還包含若列表有數據則默認選中第一個的實現功能,[self predicateDataSoure]則是實現的對數組進行過濾的操作,實用的OC謂詞的方式;
/**
 *  @author wujunyang, 15-10-11 20:10:28
 *
 *  @brief  過濾右邊集合的數據
 *
 *  @since <#version number#>
 */
-(void)predicateDataSoure
{
    //過濾右邊的集合數據
    NSPredicate *pre=[NSPredicate predicateWithFormat:[NSString stringWithFormat:@"tagID=%ld",self.curSelectModel.tagID]];
    self.rightdataList=[[self.allRightDataList filteredArrayUsingPredicate:pre] mutableCopy];
    [self.myCollectionView reloadData];
}
3.2表格中相應的UITableViewDataSource, UITableViewDelegate實現內容
#pragma mark UITableViewDataSource, UITableViewDelegate

-(NSInteger)numberOfSectionsInTableView:(UITableView *)tableView
{
    return self.dataList.count;
}

- (NSInteger)tableView:(UITableView *)tableView numberOfRowsInSection:(NSInteger)section{
    return 1;
}

- (UITableViewCell *)tableView:(UITableView *)tableView cellForRowAtIndexPath:(NSIndexPath *)indexPath{
    leftTableCell *cell = [tableView dequeueReusableCellWithIdentifier:NSStringFromClass([leftTableCell class]) forIndexPath:indexPath];
    cell.curLeftTagModel = [self.dataList objectAtIndex:indexPath.section];
    cell.hasBeenSelected = (cell.curLeftTagModel==self.curSelectModel);

    //修改表格行默認分隔線存空隙的問題
    if ([cell respondsToSelector:@selector(setLayoutMargins:)]) {
        cell.layoutMargins=UIEdgeInsetsZero;
    }
    if ([cell respondsToSelector:@selector(setSeparatorInset:)]) {
        cell.separatorInset=UIEdgeInsetsZero;
    }

    return cell;
}

- (CGFloat)tableView:(UITableView *)tableView heightForRowAtIndexPath:(NSIndexPath *)indexPath{
    return tableCellHeight;
}

- (void)tableView:(UITableView *)tableView didSelectRowAtIndexPath:(NSIndexPath *)indexPath{
    [tableView deselectRowAtIndexPath:indexPath animated:YES];

    _selectIndex=indexPath.section;
    self.curSelectModel=[self.dataList objectAtIndex:indexPath.section];
    [self.myTableView reloadData];

    [self predicateDataSoure];
    //處理點擊在滾動置頂的問題
    [tableView scrollToRowAtIndexPath:indexPath atScrollPosition:UITableViewScrollPositionTop animated:YES];

    self.isReturnLastOffset=NO;

    if (self.isKeepScrollState) {
        [self.myCollectionView scrollRectToVisible:CGRectMake(0, self.curSelectModel.offsetScorller, self.myCollectionView.frame.size.width, self.myCollectionView.frame.size.height) animated:NO];
    }
    else{

        [self.myCollectionView scrollRectToVisible:CGRectMake(0, 0, self.myCollectionView.frame.size.width, self.myCollectionView.frame.size.height) animated:NO];
    }
}
上面有兩個知識點是關於表格默認分隔線距離左邊的調整,把默認沒有頂到左邊的樣式進行修改,另一個是關於點擊時自動滾動到置頂的實現方式;
3.3集合列表的UICollectionViewDataSource, UICollectionViewDelegate實現
- (NSInteger)collectionView:(UICollectionView *)collectionView numberOfItemsInSection:(NSInteger)section{
    return self.rightdataList.count;
}

- (UICollectionViewCell *)collectionView:(UICollectionView *)collectionView cellForItemAtIndexPath:(NSIndexPath *)indexPath{
    rightCollectionViewCell *ccell = [collectionView dequeueReusableCellWithReuseIdentifier:NSStringFromClass([rightCollectionViewCell class]) forIndexPath:indexPath];
    noHeadRightModel *model=[self.rightdataList objectAtIndex:indexPath.row];
    ccell.curNoHeadRightModel=model;
    return ccell;
}


- (CGSize)collectionView:(UICollectionView *)collectionView layout:(UICollectionViewLayout*)collectionViewLayout sizeForItemAtIndexPath:(NSIndexPath *)indexPath{
    return [rightCollectionViewCell ccellSize];
}
- (UIEdgeInsets)collectionView:(UICollectionView *)collectionView layout:(UICollectionViewLayout*)collectionViewLayout insetForSectionAtIndex:(NSInteger)section{
    return UIEdgeInsetsZero;
}
- (CGFloat)collectionView:(UICollectionView *)collectionView layout:(UICollectionViewLayout*)collectionViewLayout minimumLineSpacingForSectionAtIndex:(NSInteger)section{
    return 5;
}
- (CGFloat)collectionView:(UICollectionView *)collectionView layout:(UICollectionViewLayout*)collectionViewLayout minimumInteritemSpacingForSectionAtIndex:(NSInteger)section{
    return 5;
}

- (void)collectionView:(UICollectionView *)collectionView didSelectItemAtIndexPath:(NSIndexPath *)indexPath{
    noHeadRightModel *model=[self.rightdataList objectAtIndex:indexPath.row];
    NSLog(@"你選擇的%@",model.roomName);
}
3.4記錄滾動的位置(右邊列表的當前滾動位置記錄下來,存在左邊數據源的實體中,然後在左邊的列表點擊事件中進行判斷)
#pragma mark---記錄滑動的坐標(把右邊滾動的Y值記錄在列表的一個屬性中)

-(void)scrollViewWillBeginDragging:(UIScrollView *)scrollView
{
    if ([scrollView isEqual:self.myCollectionView]) {
        self.isReturnLastOffset=YES;
    }
}

-(void)scrollViewDidEndDragging:(UIScrollView *)scrollView willDecelerate:(BOOL)decelerate
{
    if ([scrollView isEqual:self.myCollectionView]) {
        leftTagModel * item=self.dataList[self.selectIndex];
        item.offsetScorller=scrollView.contentOffset.y;
        self.isReturnLastOffset=NO;
    }

}

-(void)scrollViewDidEndDecelerating:(UIScrollView *)scrollView{
    if ([scrollView isEqual:self.myCollectionView]) {
        leftTagModel * item=self.dataList[self.selectIndex];
        item.offsetScorller=scrollView.contentOffset.y;
        self.isReturnLastOffset=NO;

    }

}

-(void)scrollViewDidScroll:(UIScrollView *)scrollView{
    if ([scrollView isEqual:self.myCollectionView] && self.isReturnLastOffset) {
        leftTagModel * item=self.dataList[self.selectIndex];
        item.offsetScorller=scrollView.contentOffset.y;
    }
}
- iPhone數據恢復教程:如何找回iPhone5丟失的文件
- ios9.1公測版怎麼升級 ios9.1公測版升級詳細圖文教程
- iPhone7低電量模式在哪?iPhone7與7 Plus開啟低電量模式方法
- Cydia打不開怎麼辦?Cydia進不去現象的解決方法圖解
- 蘋果錄屏專家怎麼信任 蘋果錄屏專家打不開解決辦法
- iphone6s home鍵過熱怎麼回事 iphone6s home鍵過熱為什麼
- iOS8.4.1怎麼升級 iOS8.4.1正式版升級圖文教程
- 有眾app怎麼報警?有眾軟件報警操作教程[圖]
- 蘋果iphone掉水裡了應該怎麼辦 iphone掉水裡處理辦法
- iphone的pps閃退原因是什麼?