iOS 視圖:重繪與UIScrollView(內容根據iOS編程編寫)
我們繼續之前的Hypnosister應用,當用戶開始觸摸的時候,圓形的顏色會改變。
首先,在JXHypnosisView頭文件中聲明一個屬性,用來表示圓形的顏色。
#import "JXHypnosisView.h"

@interface JXHypnosisView ()

/** 顏色 */
@property (nonatomic,strong) UIColor * circleColor;

@end

@implementation JXHypnosisView

- (instancetype)initWithFrame:(CGRect)frame {
    self = [super initWithFrame:frame];
    if (self) {
        // 設置 JXHypnosisView 對象的背景顏色為透明
        self.backgroundColor = [UIColor clearColor];
    }
    return self;
}

- (void)drawRect:(CGRect)rect {

    CGRect bounds = self.bounds;

    // 根據bounds計算中心點
    CGPoint center;
    center.x = bounds.origin.x + bounds.size.width / 2.0;
    center.y = bounds.origin.y + bounds.size.height / 2.0;

    // 是最外層圓形成為視圖的外接圓
    float maxRadius = hypotf(bounds.size.width, bounds.size.height) / 2.0;

    UIBezierPath * path = [[UIBezierPath alloc] init];

    for (float currentRadius = maxRadius; currentRadius > 0; currentRadius -= 20) {

        // 用來設置繪制起始位置
        [path moveToPoint:CGPointMake(center.x + currentRadius, center.y)];

        [path addArcWithCenter:center
                        radius:currentRadius
                    startAngle:0.0
                      endAngle:M_PI * 2.0
                     clockwise:YES];
    }

    // 設置線條寬度為 10 點
    path.lineWidth = 10;

    // 設置繪制顏色為灰色
    [[UIColor lightGrayColor] setStroke];

    // 繪制路徑
    [path stroke];


    // 創建UIImage對象
    UIImage * logoImage = [UIImage imageNamed:@"train"];
    // 繪制圖像
    [logoImage drawInRect:bounds];

}

@end
加入的三行代碼稱為JXHypnosisView的類擴展。類擴展中聲明一個顏色屬性。
在JXHypnosisView實現文件中我們可以為顏色屬性設置一個默認值
#import "JXHypnosisView.h"

@interface JXHypnosisView ()

/** 顏色 */
@property (nonatomic,strong) UIColor * circleColor;

@end

@implementation JXHypnosisView

- (instancetype)initWithFrame:(CGRect)frame {
    self = [super initWithFrame:frame];
    if (self) {
        // 設置 JXHypnosisView 對象的背景顏色為透明
        self.backgroundColor = [UIColor clearColor];
        self.circleColor = [UIColor lightGrayColor];
    }
    return self;
}

- (void)drawRect:(CGRect)rect {

    CGRect bounds = self.bounds;

    // 根據bounds計算中心點
    CGPoint center;
    center.x = bounds.origin.x + bounds.size.width / 2.0;
    center.y = bounds.origin.y + bounds.size.height / 2.0;

    // 是最外層圓形成為視圖的外接圓
    float maxRadius = hypotf(bounds.size.width, bounds.size.height) / 2.0;

    UIBezierPath * path = [[UIBezierPath alloc] init];

    for (float currentRadius = maxRadius; currentRadius > 0; currentRadius -= 20) {

        // 用來設置繪制起始位置
        [path moveToPoint:CGPointMake(center.x + currentRadius, center.y)];

        [path addArcWithCenter:center
                        radius:currentRadius
                    startAngle:0.0
                      endAngle:M_PI * 2.0
                     clockwise:YES];
    }

    // 設置線條寬度為 10 點
    path.lineWidth = 10;

    // 設置繪制顏色為灰色
    [[UIColor lightGrayColor] setStroke];

    // 繪制路徑
    [path stroke];


    // 創建UIImage對象
    UIImage * logoImage = [UIImage imageNamed:@"train"];
    // 繪制圖像
    [logoImage drawInRect:bounds];

}

@end
在drawRect:方法中修改設置線條顏色的代碼。使用circleColor作為線條顏色
#import "JXHypnosisView.h"

@interface JXHypnosisView ()

/** 顏色 */
@property (nonatomic,strong) UIColor * circleColor;

@end

@implementation JXHypnosisView

- (instancetype)initWithFrame:(CGRect)frame {
    self = [super initWithFrame:frame];
    if (self) {
        // 設置 JXHypnosisView 對象的背景顏色為透明
        self.backgroundColor = [UIColor clearColor];
        self.circleColor = [UIColor lightGrayColor];
    }
    return self;
}

- (void)drawRect:(CGRect)rect {

    CGRect bounds = self.bounds;

    // 根據bounds計算中心點
    CGPoint center;
    center.x = bounds.origin.x + bounds.size.width / 2.0;
    center.y = bounds.origin.y + bounds.size.height / 2.0;

    // 是最外層圓形成為視圖的外接圓
    float maxRadius = hypotf(bounds.size.width, bounds.size.height) / 2.0;

    UIBezierPath * path = [[UIBezierPath alloc] init];

    for (float currentRadius = maxRadius; currentRadius > 0; currentRadius -= 20) {

        // 用來設置繪制起始位置
        [path moveToPoint:CGPointMake(center.x + currentRadius, center.y)];

        [path addArcWithCenter:center
                        radius:currentRadius
                    startAngle:0.0
                      endAngle:M_PI * 2.0
                     clockwise:YES];
    }

    // 設置線條寬度為 10 點
    path.lineWidth = 10;

    // 設置繪制顏色為灰色
    [[UIColor lightGrayColor] setStroke];
    [self.circleColor setStroke];
    // 繪制路徑
    [path stroke];


    // 創建UIImage對象
    UIImage * logoImage = [UIImage imageNamed:@"train"];
    // 繪制圖像
    [logoImage drawInRect:bounds];

}

@end
構建並運行,結果應該跟之前一樣。下一步我們來編寫視圖被觸摸的時候改變圓形顏色的代碼:
當用戶觸摸的時候會收到一個方法touchesBegan:(NSSet<UITouch *> *)touches withEvent:(UIEvent *)event,現在我們只需要將之覆蓋
#import "JXHypnosisView.h"

@interface JXHypnosisView ()

/** 顏色 */
@property (nonatomic,strong) UIColor * circleColor;

@end

@implementation JXHypnosisView

- (instancetype)initWithFrame:(CGRect)frame {
    self = [super initWithFrame:frame];
    if (self) {
        // 設置 JXHypnosisView 對象的背景顏色為透明
        self.backgroundColor = [UIColor clearColor];
        self.circleColor = [UIColor lightGrayColor];
    }
    return self;
}

- (void)drawRect:(CGRect)rect {

    CGRect bounds = self.bounds;

    // 根據bounds計算中心點
    CGPoint center;
    center.x = bounds.origin.x + bounds.size.width / 2.0;
    center.y = bounds.origin.y + bounds.size.height / 2.0;

    // 是最外層圓形成為視圖的外接圓
    float maxRadius = hypotf(bounds.size.width, bounds.size.height) / 2.0;

    UIBezierPath * path = [[UIBezierPath alloc] init];

    for (float currentRadius = maxRadius; currentRadius > 0; currentRadius -= 20) {

        // 用來設置繪制起始位置
        [path moveToPoint:CGPointMake(center.x + currentRadius, center.y)];

        [path addArcWithCenter:center
                        radius:currentRadius
                    startAngle:0.0
                      endAngle:M_PI * 2.0
                     clockwise:YES];
    }

    // 設置線條寬度為 10 點
    path.lineWidth = 10;

    // 設置繪制顏色為灰色
    [[UIColor lightGrayColor] setStroke];
    [self.circleColor setStroke];
    // 繪制路徑
    [path stroke];


    // 創建UIImage對象
    UIImage * logoImage = [UIImage imageNamed:@"train"];
    // 繪制圖像
    [logoImage drawInRect:bounds];

}

- (void)touchesBegan:(NSSet<UITouch *> *)touches withEvent:(UIEvent *)event {

    // 取三個 0~1 之間的數字
    float red = (arc4random() % 100) /100.0;
    float green = (arc4random() % 100) /100.0;
    float blue = (arc4random() % 100) /100.0;

    UIColor * randomColor = [UIColor colorWithRed:red
                                            green:green
                                             blue:blue
                                            alpha:1.0];

    self.circleColor = randomColor;
}
@end
構建並運行,我們發現好像程序並沒有改變任何顏色,這是因為JXHypnosisView並沒有重繪自己。
-
運行循環和重繪視圖
iOS應用啟動時會開始一個運行循環(run loop).運行循環的工作是監聽事件,例如觸摸,當事件發生時,運行循環就會為相應的事件找到合適的處理方法。這些處理方法會調用其他方法而這些其他方法就又會調用更多其他方法。這樣子,只有當這些所有方法執行完畢的時候,控制權才會再次回到運行循環。
當應用將控制權交還給運行循環時,運行循環會首先檢查是否有等待重繪的視圖(即在當前循環收到過setNeedsDisplay消息的視圖),然後向所有等待重繪的視圖發送drawRect:消息,最後視圖層次結構中所有視圖的圖層會再次組合成一幅完整的圖像並繪制到屏幕上。
iOS做了兩個方面優化來保證用戶界面的流暢性---不重繪顯示的內容沒有改變的視圖;在每次事件處理中期中只發送一次drawRect消息。在事件處理周期中,視圖的屬性可能會發生多次改變,如果視圖在每次屬性改變的時候都要重繪自己,就會減慢界面的響應速度。想法,iOS會在運行循環的最後階段集中處理所有需要重繪的視圖,尤其是對於屬性發生多次改變的視圖,在每次事件處理周期中只重繪一次。
在本應用中,首先可以肯定的是,我們的觸摸處理的方法已經正確捕獲了觸摸事件,但是雖然運行循環在執行完touchesBegan:(NSSet<UITouch *> *)touches withEvent:(UIEvent *)event後再次獲得了控制權,但是並沒有向JXHypnosisView發送drawRect消息。
為了標記視圖需要重繪,必須向其發送setNeedsDisplay消息。iOS SDK 中提供的視圖對象會自動在顯示的內容發生改變時向自身發送setNeedsDisplay消息,以UILabel 對象為例,在某個UILabel 對象收到setText:消息後,就會將自身標記為要重繪(因為其所顯示的文字內容改變了,所以必須將自己重繪到圖層上)。而對自定義的UIView 子類,必須手動向其發送setNeedsDisplay消息。
在JXHypnosisView.m中,為 circleColor 屬性實現自定義的存方法,當 circleColor 改變時,向視圖發送setNeedsDisplay消息
#import "JXHypnosisView.h"

@interface JXHypnosisView ()

/** 顏色 */
@property (nonatomic,strong) UIColor * circleColor;

@end

@implementation JXHypnosisView

- (instancetype)initWithFrame:(CGRect)frame {
    self = [super initWithFrame:frame];
    if (self) {
        // 設置 JXHypnosisView 對象的背景顏色為透明
        self.backgroundColor = [UIColor clearColor];
        self.circleColor = [UIColor lightGrayColor];
    }
    return self;
}

- (void)drawRect:(CGRect)rect {

    CGRect bounds = self.bounds;

    // 根據bounds計算中心點
    CGPoint center;
    center.x = bounds.origin.x + bounds.size.width / 2.0;
    center.y = bounds.origin.y + bounds.size.height / 2.0;

    // 是最外層圓形成為視圖的外接圓
    float maxRadius = hypotf(bounds.size.width, bounds.size.height) / 2.0;

    UIBezierPath * path = [[UIBezierPath alloc] init];

    for (float currentRadius = maxRadius; currentRadius > 0; currentRadius -= 20) {

        // 用來設置繪制起始位置
        [path moveToPoint:CGPointMake(center.x + currentRadius, center.y)];

        [path addArcWithCenter:center
                        radius:currentRadius
                    startAngle:0.0
                      endAngle:M_PI * 2.0
                     clockwise:YES];
    }

    // 設置線條寬度為 10 點
    path.lineWidth = 10;

    // 設置繪制顏色為灰色
    [[UIColor lightGrayColor] setStroke];
    [self.circleColor setStroke];
    // 繪制路徑
    [path stroke];


    // 創建UIImage對象
    UIImage * logoImage = [UIImage imageNamed:@"train"];
    // 繪制圖像
    [logoImage drawInRect:bounds];

}

- (void)touchesBegan:(NSSet<UITouch *> *)touches withEvent:(UIEvent *)event {

    // 取三個 0~1 之間的數字
    float red = (arc4random() % 100) /100.0;
    float green = (arc4random() % 100) /100.0;
    float blue = (arc4random() % 100) /100.0;

    UIColor * randomColor = [UIColor colorWithRed:red
                                            green:green
                                             blue:blue
                                            alpha:1.0];

    self.circleColor = randomColor;
}

// 為屬性實現自定義的存方法
- (void)setCircleColor:(UIColor *)circleColor {
    _circleColor = circleColor;
    [self setNeedsDisplay];
}
@end
再次構建運行,就可以實現我們的需求了。
還有一種優化方法:只重繪視圖的某一區域。可以通過向視圖發送setNeedsDisplayInRect:消息標記視圖的某一區域要重繪。當視圖收到drawRect消息時,setNeedsDisplayInRect:會將 CGRect 類型的參數傳遞給drawRect:重繪視圖的指定區域。但是通常我們不推薦這樣做。
-
類擴展
現在我們討論將 circleColor 屬性生命在JXHypnosisView的類擴展中和聲明在頭文件中的區別。
頭文件是一個類的 “用戶手冊” ,其他類可以可以通過頭文件知道該類的工能和使用方法。使用頭文件的目的是向其他類公開該類聲明的屬性和方法。也就是說頭文件中聲明的屬性和方法對其他類是可見的。
但是,並不是每一個屬性或者方法都要想其他類公開。只會在類的內部使用的屬性和方法應當聲明在類擴展中。circleColor 屬性只會被JXHypnosisView使用,其他類不需要使用該屬性,因此會被聲明在類擴展中。
子類同樣無法訪問父類在理擴展中聲明的屬性和方法。有時候需要讓其他開發者了解類的某些內部屬性和方法,以便更好的理解類的工作原理和使用方法。可以在另一個文件中聲明類擴展,並將該文件導入類的實現文件中。
-
使用 UIScrollView
接下來我們繼續為Hypnosister 應用添加一個UIScrollView 對象,使其成為應用窗口的子視圖,然後再將JXHypnosisView 作為子視圖加入UIScrollView 對象。個對象之間的關系如圖
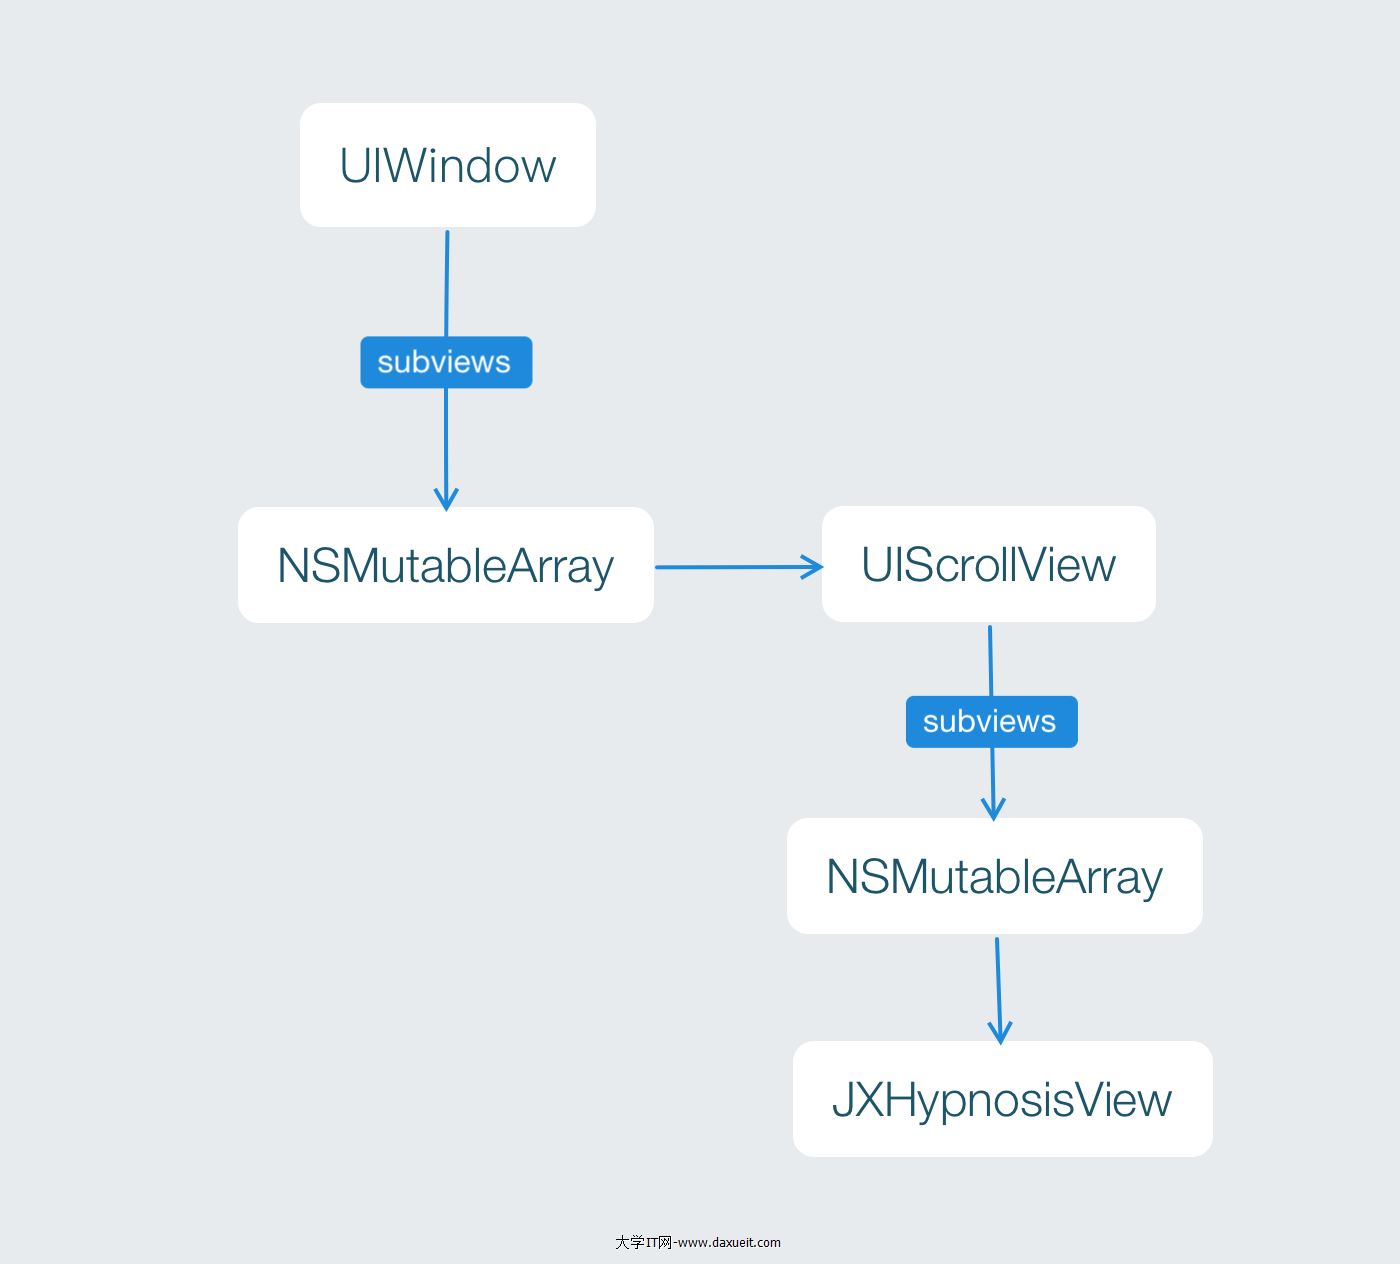
通常情況下,UIScrollView 對象適用於那些尺寸大於屏幕的視圖。當某個視圖是 UIScrollView 對象的子視圖的時候,該對象會畫出該視圖的某塊區域(形狀為矩形)。當用戶按住這塊矩形區域並拖動的時候,UIScrollView 對昂會改變該矩形所顯示的子視圖區域。我們可以將UIScrollView 對象看成是鏡頭,而其子視圖是拍攝的場景。這裡移動的是 “鏡頭” ,而不是 “景觀”。UIScrollView對象的尺寸就是這個 “鏡頭”的尺寸,而其能夠拍攝的范圍是由其屬性contentsize決定的。通常情況下contentsize的數值就是子視圖的尺寸。
UIScrollView是UIView 的子類,同樣可以使用initWithFrame消息初始化,還可以將其作為子視圖添加到別的視圖中。
在ViewController.m中,創建一個有著超大尺寸的JXHypnosisView 對象,並將其加入到一個UIScrollView 對象,然後將這個對象添加到視圖上。
#import "ViewController.h"
#import "JXHypnosisView.h"

@interface ViewController ()

@end

@implementation ViewController

- (void)viewDidLoad {
    [super viewDidLoad];

    // 創建 CGRect 結構
  CGRect rect = CGRectMake(100, 200, 200, 300);

    // 創建視圖
    JXHypnosisView * firstView = [[JXHypnosisView alloc] initWithFrame:rect];


    // 創建兩個 CGRect 結構分別作為 UIScrollView 對象和 JXHypnosisView 對象的 frame
    CGRect screenRect = self.view.bounds;
    CGRect bigRect = screenRect;
    bigRect.size.width *= 2.0;
    bigRect.size.height *= 2.0;

    // 創建一個 UIScrollView 對象,將其尺寸設置為當前視圖窗口大小
    UIScrollView * scrollView = [[UIScrollView alloc] initWithFrame:screenRect];
    [self.view addSubview:scrollView];

    // 創建一個有著超級大尺寸的 JXHypnosisView 對象並將其加入 UIScrollView 對象
    JXHypnosisView * hypnosisView = [[JXHypnosisView alloc] initWithFrame:bigRect];
    [scrollView addSubview:hypnosisView];

    // 告訴 UIScrollView 對象 “取景”范圍有多大
    scrollView.contentSize = bigRect.size;

    // 將視圖添加到控制器View上
    [self.view addSubview:firstView];

}

@end
構建並運行,可以上,下,左右來拖動查看超大的尺寸
拖動與分頁
UIScrollView 對象還可以滑動顯示所有加入 UIScrollView 對象的子視圖
在ViewController.m中,將JXHypnosisView 對象的尺寸改回與屏幕的尺寸相同,然後再創建一個 JXHypnosisView對象,將其尺寸也設置為與屏幕尺寸相同並加入UIScrollView 對象。此外,還要將UIScrollView 對象的contentSize的寬度設置為屏幕寬度的2倍,高度不變
#import "ViewController.h"
#import "JXHypnosisView.h"

@interface ViewController ()

@end

@implementation ViewController

- (void)viewDidLoad {
    [super viewDidLoad];

    // 創建兩個 CGRect 結構分別作為 UIScrollView 對象和 JXHypnosisView 對象的 frame
    CGRect screenRect = self.view.bounds;
    CGRect bigRect = screenRect;
    bigRect.size.width *= 2.0;
    bigRect.size.height *= 2.0;

    // 創建一個 UIScrollView 對象,將其尺寸設置為當前視圖窗口大小
    UIScrollView * scrollView = [[UIScrollView alloc] initWithFrame:screenRect];
    [self.view addSubview:scrollView];

    // 創建一個有著超級大尺寸的 JXHypnosisView 對象並將其加入 UIScrollView 對象
    JXHypnosisView * hypnosisView = [[JXHypnosisView alloc] initWithFrame:bigRect];
    [scrollView addSubview:hypnosisView];

    // 創建一個大小與屏幕相同的 JXHypnosisView 對象並將其加入 UIScrollView 對象
    JXHypnosisView * hypnosisView = [[JXHypnosisView alloc] initWithFrame:screenRect];
    [scrollView addSubview:hypnosisView];

    // 創建第二個大小與屏幕相同的 JXHypnosisView 對象並放置在第一個 JXHypnosisView 對象的右側,使其剛好移出到屏幕外
    screenRect.origin.x += screenRect.size.width;
    JXHypnosisView * anotherView = [[JXHypnosisView alloc] initWithFrame:screenRect];
    [scrollView addSubview:anotherView];

    // 告訴 UIScrollView 對象 “取景”范圍有多大
    scrollView.contentSize = bigRect.size;


}

@end
構建並運行,拖動屏幕會發現有兩個JXHypnosisView對象