IOS自定義UIView
編輯:IOS技巧綜合
IOS中一般會用到幾種方式自定義UIView
1、繼承之UIView的存代碼的自定義View
2、使用xib和代碼一起使用的自定義View
3、存xib的自定義View(不需要業務處理的那種)
本文主要就介紹下存代碼的自定義UIView和能夠在storeboard中實時顯示效果的自定義UIView
先上效果圖
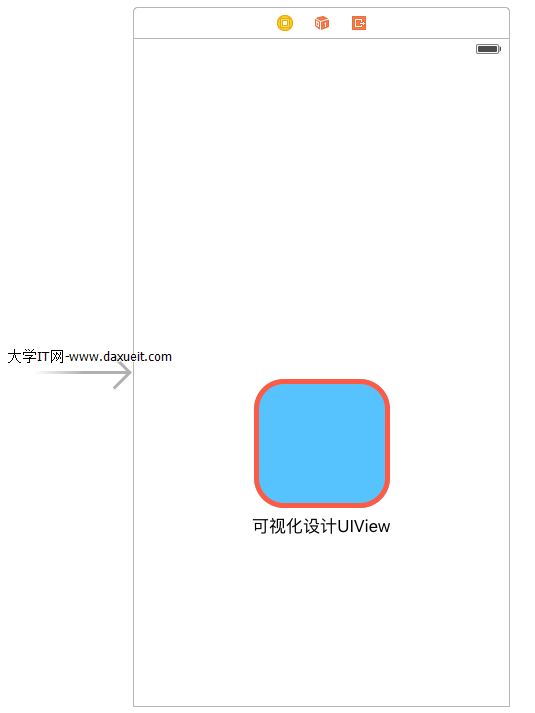
上面為設計界面,能夠直接顯示一個View的圓角與邊框線
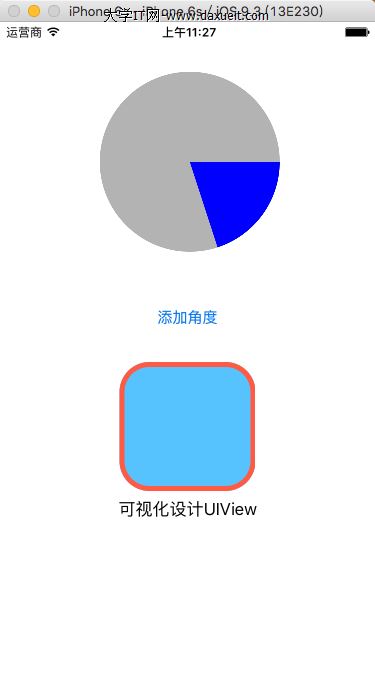
上面那個圓形餅圖是用純代碼自定義的
1.實現在storeboard中實時顯示效果的自定義UIView
1、創建MyView.h 繼承 UIView
#import <UIKit/UIKit.h>

// 設置類為可視化設計
IB_DESIGNABLE
@interface MyView : UIView

// IBInspectable 為可視化設計屬性

// 邊框寬度
@property (nonatomic,assign)IBInspectable float borderWidth;

// 邊框顏色
@property (nonatomic,retain)IBInspectable UIColor* borderColor;

// 圓角
@property (nonatomic,assign)IBInspectable float cornerRadius;


@end
這裡要注意的就是上面的兩個關鍵標簽
IB_DESIGNABLE :代表的是這個類可以在storeboard中顯示實時的效果
IBInspectable :代表把這個屬性能在storeboard中修改
2、MyView.m的實現
//
//  MyView.m
//  01_CirProgress
//
//  Created by xgao on 15/10/29.
//  Copyright (c) 2015年 xgao. All rights reserved.
//

#import "MyView.h"


@implementation MyView


// 邊框寬度
- (void)setBorderWidth:(float)borderWidth{

    self.layer.borderWidth = borderWidth;
}

// 邊框顏色
- (void)setBorderColor:(UIColor *)borderColor{

    self.layer.borderColor = borderColor.CGColor;
}

// 圓角
- (void)setCornerRadius:(float)cornerRadius{

    self.layer.cornerRadius = cornerRadius;
}

@end
3、在storeboad中添加一個view,並且設置這個view的類為 我們剛才創建的 MyView
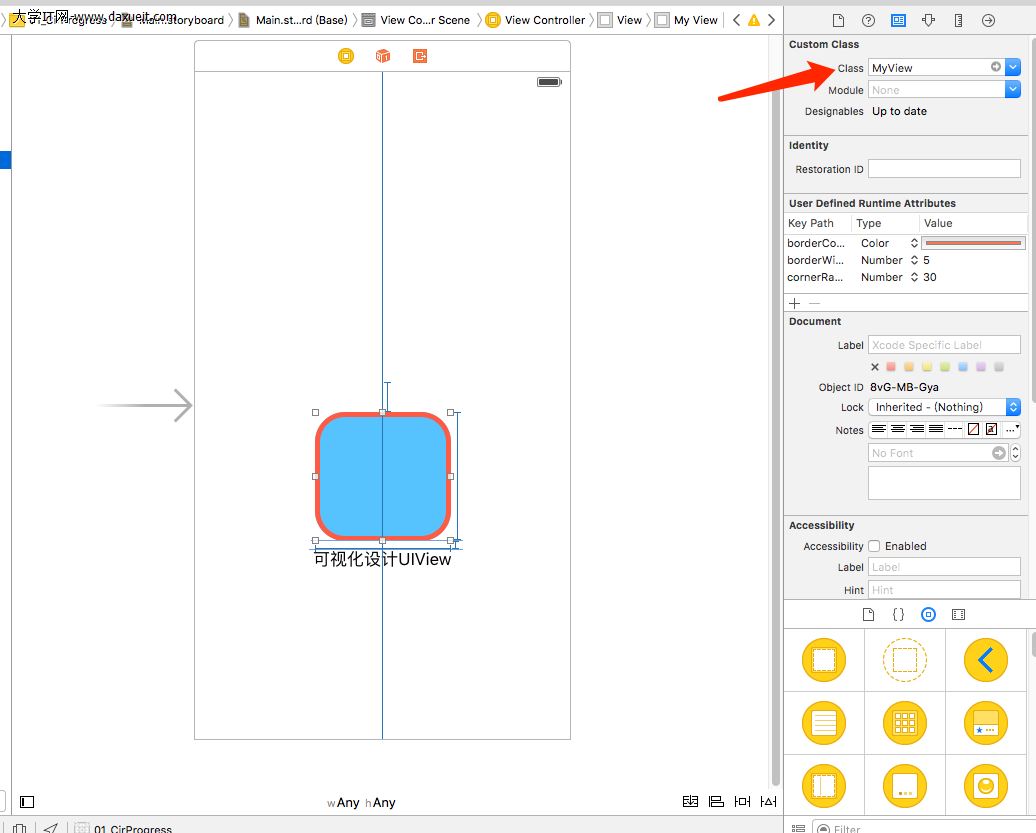
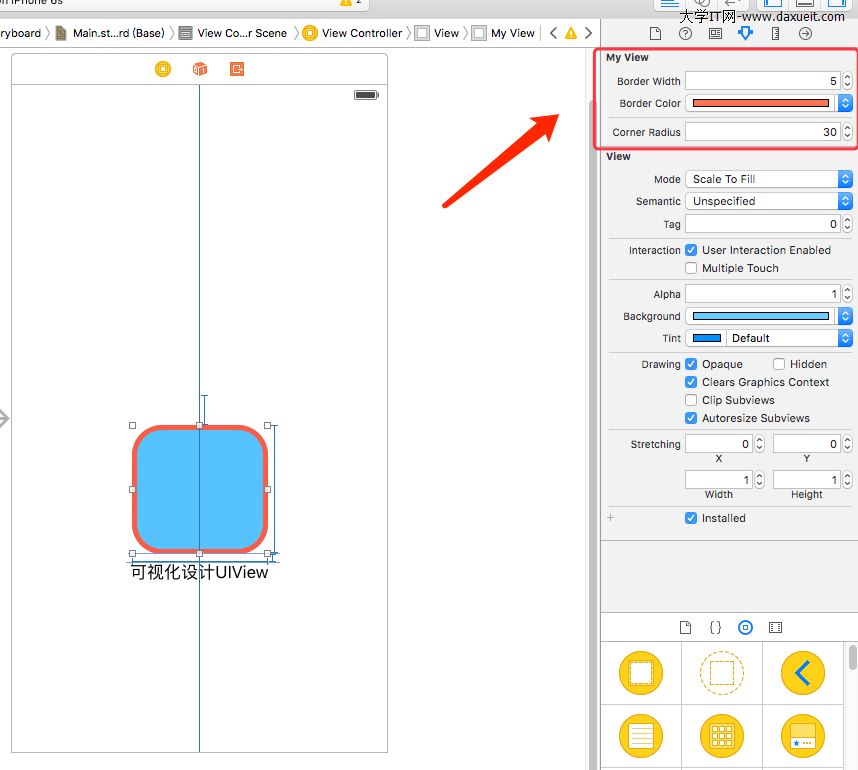
上圖裡面的那些屬性就是我們在.h文件裡面加了IBInspectable關鍵字的屬性,這裡就能實時修改看效果了。
2.實現純代碼的自定義View
1、創建一個繼承UIView的 MyProgress 類文件,MyProgress.h 如下:
#import <UIKit/UIKit.h>

@interface MyProgress : UIView

// 當時進度值
@property (nonatomic,assign) float progressValue;


@end
2、MyProgress.m 如下:
#import "MyProgress.h"

@implementation MyProgress
{
    float _proValue;
}

// 重寫初始化方法
- (id)initWithFrame:(CGRect)frame{
    self = [super initWithFrame:frame];
    if (self) {

        // 設置背影為透明色
        self.backgroundColor = [UIColor clearColor];
    }
    return self;
}

// 重設progressValue屬性
- (void)setProgressValue:(float)progressValue
{
    _progressValue = progressValue;

    // 重新畫UI
    [self setNeedsDisplay];
}

// 繪圖
- (void)drawRect:(CGRect)rect {

    // 獲取畫圖的上下文
    CGContextRef ctx = UIGraphicsGetCurrentContext();


    /**** 繪制圓形背景線 ****/

    // 圓的半徑
    float r = rect.size.width / 2.0;

    // 全圓
    CGFloat endAngle = M_PI * 2;

    // 畫圓形線
    CGContextAddArc(ctx, r, r, r, 0, endAngle, 0);

    // 背影顏色
    CGContextSetRGBFillColor(ctx, 0.7, 0.7,0.7, 1);

    // 完成繪制
    CGContextFillPath(ctx);

    /**** 繪制扇形區域 ****/

    // 計算結束角度
    endAngle = M_PI * 2 * _progressValue;

    /** 畫圓
     *  參數1:c           當前上下文
     *  參數2:x           圓的X坐標
     *  參數3:y           圓的Y坐標
     *  參數4:radius      圓的半徑
     *  參數5:startAngle  開始角度
     *  參數6:endAngle    結束角度
     *  參數7:clockwise   是否逆時針
     */
    CGContextAddArc(ctx, r, r, r, 0, endAngle, 0);

    // 連成線,成弧形
    CGContextAddLineToPoint(ctx, r, r);
    // 其實就是在連接的那條線上加一個點,讓線條連接到那一個點,就像拉弓,可加多個點
//    CGContextAddLineToPoint(ctx, r + 20, r + 20);

    // 填充顏色
    CGContextSetRGBFillColor(ctx, 0, 0, 1, 1);

    // 完成繪制
    CGContextFillPath(ctx);

}
3、調用自定義的MyProgress類
#import "MyProgress.h"

@interface ViewController ()
{
    MyProgress* _myProView;
}
@end

@implementation ViewController

- (void)viewDidLoad {
    [super viewDidLoad];

    // 創建自定義控件
    _myProView = [[MyProgress alloc]initWithFrame:CGRectMake(100, 50, 180, 180)];
    // 默認進度
    _myProView.progressValue = 0.2;

    [self.view addSubview:_myProView];
}
- 上一頁:Swift_協議
- 下一頁:微信小程序,超能裝的實例教程

相關文章
+