ios開發之Swift UIPasteboard剪貼板的使用詳解(復制、粘貼文字和圖片)
UITextField、UITextView組件系統原生就支持文字的復制,但有時我們需要讓其他的一些組件也能實現復制功能,比如點擊復制UILabel上的文字、UIImageView中的圖片、UITableView裡單元格的內容、或者點擊按鈕把文字或圖片自動復制到粘貼板中等等。
這些我們借助 UIPasteboard 就可以實現。
一,將內容寫入到剪貼板中
1,復制字符串
UIPasteboard.generalPasteboard().string = "歡迎訪問 hangge.com"
2,復制字符串數組
UIPasteboard.generalPasteboard().strings = ["hellow", "hangge.com"]
3,復制圖片
let image = UIImage(named: "logo.png")
UIPasteboard.generalPasteboard().image = image
4,復制二進制數據(NSData)
let path = NSBundle.mainBundle().pathForResource("logo", ofType: "png")!
let fileData = NSData(contentsOfFile: path)!
UIPasteboard.generalPasteboard().setData(fileData, forPasteboardType: "public.png")
注:從剪貼板獲取二進制數據(NSData)
let myData = UIPasteboard.generalPasteboard().dataForPasteboardType("public.png")
二,常見組件增加復制功能
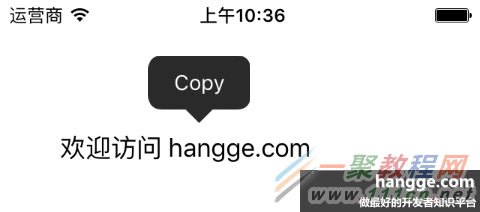
1,讓文本標簽(UILabel)支持復制功能
我們自定義一個可復制的標簽類 UICopyLabel(繼承UILabel),其內部能響應 Touch 事件並顯示復制菜單
import UIKit
class UICopyLabel: UILabel {
override init(frame: CGRect) {
super.init(frame: frame)
sharedInit()
}
required init?(coder aDecoder: NSCoder) {
super.init(coder: aDecoder)
sharedInit()
}
func sharedInit() {
userInteractionEnabled = true
addGestureRecognizer(UILongPressGestureRecognizer(target: self,
action: "showMenu:"))
}
func showMenu(sender: AnyObject?) {
becomeFirstResponder()
let menu = UIMenuController.sharedMenuController()
if !menu.menuVisible {
menu.setTargetRect(bounds, inView: self)
menu.setMenuVisible(true, animated: true)
}
}
//復制
override func copy(sender: AnyObject?) {
let board = UIPasteboard.generalPasteboard()
board.string = text
let menu = UIMenuController.sharedMenuController()
menu.setMenuVisible(false, animated: true)
}
override func canBecomeFirstResponder() -> Bool {
return true
}
override func canPerformAction(action: Selector, withSender sender: AnyObject?)
-> Bool {
if action == "copy:" {
return true
}
return false
}
}
在這個文本標簽上長按後便可以復制其內容:
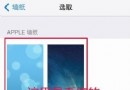
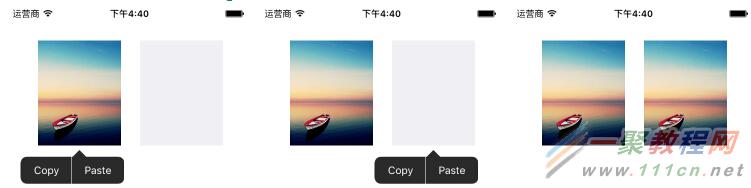
 2,讓圖片控件(UIImageView)支持復制、粘貼功能
我們自定義一個圖片控件類 UICPImageView(繼承UIImageView),內部同樣添加Touch事件響應。該控件不僅支持復制,還支持粘貼。
import UIKit
class UICPImageView: UIImageView {
override init(frame: CGRect) {
super.init(frame: frame)
sharedInit()
}
required init?(coder aDecoder: NSCoder) {
super.init(coder: aDecoder)
sharedInit()
}
func sharedInit() {
userInteractionEnabled = true
addGestureRecognizer(UILongPressGestureRecognizer(target: self,
action: "showMenu:"))
}
func showMenu(sender: AnyObject?) {
becomeFirstResponder()
let menu = UIMenuController.sharedMenuController()
if !menu.menuVisible {
menu.setTargetRect(bounds, inView: self)
menu.setMenuVisible(true, animated: true)
}
}
//復制
override func copy(sender: AnyObject?) {
let board = UIPasteboard.generalPasteboard()
board.image = self.image
let menu = UIMenuController.sharedMenuController()
menu.setMenuVisible(false, animated: true)
}
//粘貼
override func paste(sender: AnyObject?) {
let board = UIPasteboard.generalPasteboard()
self.image = board.image
let menu = UIMenuController.sharedMenuController()
menu.setMenuVisible(false, animated: true)
}
override func canBecomeFirstResponder() -> Bool {
return true
}
override func canPerformAction(action: Selector, withSender sender: AnyObject?)
-> Bool {
if action == "copy:" {
return true
}else if action == "paste:" {
return true
}
return false
}
}
下面我們在界面上添加兩個 UICPImageView,我們可以把左邊控件裡的圖片復制到右邊控件中來,效果圖如下:
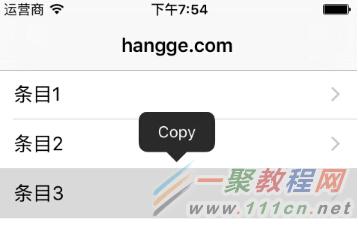
3,讓表格(UITableView)支持復制功能
import UIKit
class ViewController: UIViewController, UITableViewDelegate, UITableViewDataSource {
var tableView:UITableView?
var tableData = ["條目1", "條目2", "條目3", "條目4", "條目5", "條目6", "條目7"]
override func loadView() {
super.loadView()
}
override func viewDidLoad() {
super.viewDidLoad()
//創建表視圖
self.tableView = UITableView(frame: self.view.frame, style:.Plain)
self.tableView!.delegate = self
self.tableView!.dataSource = self
//創建一個重用的單元格
self.tableView!.registerClass(UITableViewCell.self,
forCellReuseIdentifier: "SwiftCell")
self.view.addSubview(self.tableView!)
}
func tableView(tableView: UITableView, performAction action: Selector,
forRowAtIndexPath indexPath: NSIndexPath, withSender sender: AnyObject?) {
let board = UIPasteboard.generalPasteboard()
board.string = tableData[indexPath.row]
}
func tableView(tableView: UITableView, canPerformAction action: Selector,
forRowAtIndexPath indexPath: NSIndexPath, withSender sender: AnyObject?) -> Bool {
if action == "copy:" {
return true
}
return false
}
func tableView(tableView: UITableView,
shouldShowMenuForRowAtIndexPath indexPath: NSIndexPath) -> Bool {
return true
}
//在本例中,只有一個分區
func numberOfSectionsInTableView(tableView: UITableView) -> Int {
return 1;
}
//返回表格行數(也就是返回控件數)
func tableView(tableView: UITableView, numberOfRowsInSection section: Int) -> Int {
return tableData.count
}
//創建各單元顯示內容(創建參數indexPath指定的單元)
func tableView(tableView: UITableView, cellForRowAtIndexPath indexPath: NSIndexPath)
-> UITableViewCell
{
//為了提供表格顯示性能,已創建完成的單元需重復使用
let identify:String = "SwiftCell"
//同一形式的單元格重復使用,在聲明時已注冊
let cell = tableView.dequeueReusableCellWithIdentifier(identify,
forIndexPath: indexPath) as UITableViewCell
cell.accessoryType = UITableViewCellAccessoryType.DisclosureIndicator
cell.textLabel?.text = tableData[indexPath.row]
return cell
}
override func didReceiveMemoryWarning() {
super.didReceiveMemoryWarning()
}
}
長按某個單元格即可復制這個單元格內容: