Swift使用xib制作UITableView的自定義Cell(自定義單元格的復用)
在StoryBoard中,我們可以很方便地設置表格(tableView)內部單元格(cell)樣式。但如果多個頁面的tableView單元格樣式都一樣的話,再一個個單獨設置不僅麻煩,而且會造成代碼冗余。
最好的辦法就是把單元格提取出來做成自定義組件,從而實現cell的復用。
對於自定義單元格組件,我門既可以通過繼承 UITableViewCell,使用純代碼來實現。也可以配合 XIB 來實現。前面一種方法我原來寫過很多樣例了,本文介紹後面一種方法。
1,使用xib制作tableView的cell介紹
同純代碼相比,xib實現自定義樣式會方便很多。不管布局約束,還是樣式的設置,使用xib都很簡單。
下面通過xib實現如下的自定義單元格:白底圓角,左側是標題文本,右側是圖片。

 2,自定義cell組件的步驟
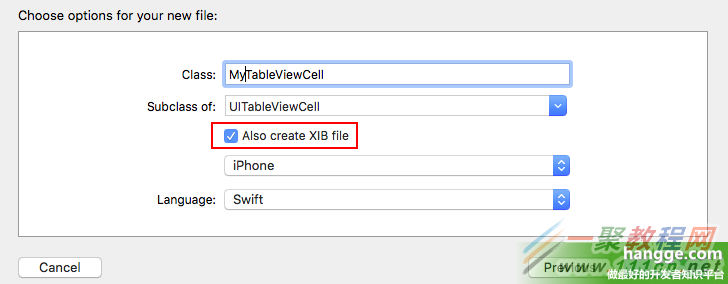
(1)首先,創建自定義cell類(MyTableViewCell)的時候選中“Also create XIB file”
2,自定義cell組件的步驟
(1)首先,創建自定義cell類(MyTableViewCell)的時候選中“Also create XIB file”
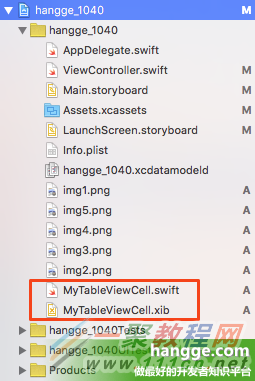
 (2)創建完畢後,我們可以看到除了自動生成了一個 swift 文件,還有個對應的 xib 文件
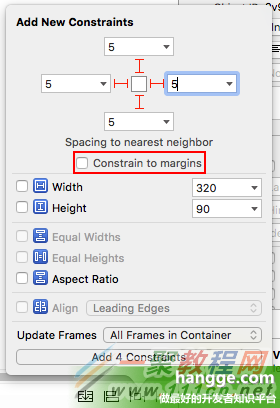
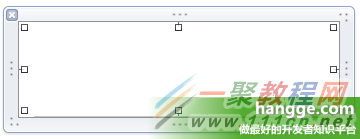
 (3)打開xib文件,將其背景色設為Clear Color。向裡面拖入一個 View 組件,並設置約束。
注意:設置約束時去掉“Constrain to margins”的勾選,這樣做防止自動添加外邊距。
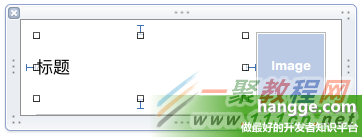
(4)接著往新增的View組件裡面拖入一個 Image View 組件和一個 Lable 組件(lines屬性設為2),並添加相關的約束
 (5)把xib中新增的三個組件在對應的類中做代碼關聯。同時在初始化函數 awakeFromNib() 中設置圓角
代碼如下
復制代碼
(5)把xib中新增的三個組件在對應的類中做代碼關聯。同時在初始化函數 awakeFromNib() 中設置圓角
代碼如下
復制代碼
import UIKit
class MyTableViewCell: UITableViewCell {
@IBOutlet weak var customView: UIView!
@IBOutlet weak var customLabel: UILabel!
@IBOutlet weak var customImage: UIImageView!
override func awakeFromNib() {
super.awakeFromNib()
//設置cell是有圓角邊框顯示
customView.layer.cornerRadius = 8
}
override func setSelected(selected: Bool, animated: Bool) {
super.setSelected(selected, animated: animated)
}
}
3,自定義cell組件的使用
代碼如下 復制代碼
import UIKit
class ViewController: UIViewController, UITableViewDelegate, UITableViewDataSource {
var tableData = [["title":"Swift - 讓標簽欄按鈕UITabBarItem圖片居中","image":"img1.png"],
["title":"Swift - 使用SSZipArchive實現文件的壓縮、解壓縮","image":"img2.png"],
["title":"Swift - 使用LINQ操作數組/集合","image":"img3.png"],
["title":"Swift - 給表格UITableView添加索引功能","image":"img4.png"],
["title":"Swift - 列表項尾部附件點擊響應","image":"img5.png"],
["title":"Swift - 自由調整圖標按鈕中的圖標和文字位置","image":"img6.png"]]
var tableView:UITableView?
override func loadView() {
super.loadView()
}
override func viewDidLoad() {
super.viewDidLoad()
//創建表視圖
self.tableView = UITableView(frame: UIScreen.mainScreen().applicationFrame,
style:.Plain)
self.tableView!.delegate = self
self.tableView!.dataSource = self
//設置表格背景色
self.tableView!.backgroundColor = UIColor(red: 0xf0/255, green: 0xf0/255,
blue: 0xf0/255, alpha: 1)
//去除單元格分隔線
self.tableView!.separatorStyle = .None
//創建一個重用的單元格
self.tableView!.registerNib(UINib(nibName:"MyTableViewCell", bundle:nil),
forCellReuseIdentifier:"myCell")
self.view.addSubview(self.tableView!)
}
//在本例中,只有一個分區
func numberOfSectionsInTableView(tableView: UITableView) -> Int {
return 1;
}
//返回表格行數(也就是返回控件數)
func tableView(tableView: UITableView, numberOfRowsInSection section: Int) -> Int {
return self.tableData.count
}
//單元格高度
func tableView(tableView: UITableView, heightForRowAtIndexPath indexPath: NSIndexPath)
-> CGFloat {
return 100
}
//創建各單元顯示內容(創建參數indexPath指定的單元)
func tableView(tableView: UITableView, cellForRowAtIndexPath indexPath: NSIndexPath)
-> UITableViewCell
{
let cell:MyTableViewCell = tableView.dequeueReusableCellWithIdentifier("myCell")
as! MyTableViewCell
let item = tableData[indexPath.row]
cell.customLabel.text = item["title"]
cell.customImage.image = UIImage(named:item["image"]!)
return cell
}
override func didReceiveMemoryWarning() {
super.didReceiveMemoryWarning()
}
}


- iOS10告訴框架UserNotification懂得與運用
- iOS Webview自順應現實內容高度的4種辦法詳解
- iOS10 App適配權限 Push Notifications 字體Frame 碰到的成績
- iOS獲得以後裝備WiFi信息的辦法
- iPhone/iPad開辟經由過程LocalNotification完成iOS准時當地推送功效
- iOS推送之當地告訴UILocalNotification
- iOS開辟之widget完成詳解
- iOS10添加當地推送(Local Notification)實例
- iOS Remote Notification長途新聞推送處置
- IOS上iframe的轉動條掉效的處理方法
- Swift 同享文件操作小結(iOS 8 +)
- Swift 2.1 為 UIView 添加點擊事宜和點擊後果
- 在Swift中應用JSONModel 實例代碼
- 應用Swift代碼完成iOS手勢解鎖、指紋解鎖實例詳解
- 詳解iOS App中UISwitch開關組件的根本創立及應用辦法