Swift 使用SSZipArchive實現文件的壓縮、解壓縮代碼
通常我們為了節約流量,傳輸多個文件的時候需要將它們打包成Zip文件再傳輸,或者把下載下來的Zip包進行解壓。本文介紹如何使用 ZipArchive 進行文件的壓縮、解壓操作。
1,SSZipArchive介紹
SSZipArchive是一個使用Objective-C編寫的在iOS、Mac下的壓縮、解壓縮工具類。
GitHub地址:https://github.com/ZipArchive/ZipArchive
功能如下:
(1)解壓zip文件
(2)解壓帶密碼保護的zip文件
(3)創建zip文件
(4)添加新文件到zip文件中
(5)壓縮文件
(6)使用一個名字來壓縮NSData對象
2,SSZipArchive的安裝配置
(1)將下載下來的 SSZipArchive 文件夾添加到項目中來
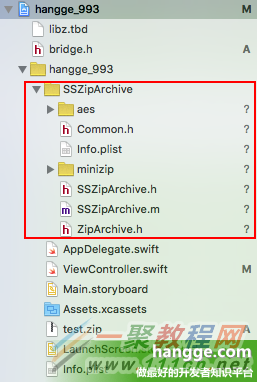
(2)創建橋接頭文件 bridge.h 來包含需要引用的Objective-C頭文件,內容如下:
#import "ZipArchive.h"
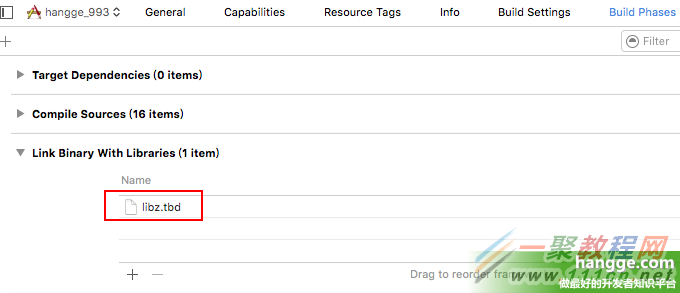
(3)在項目target -> Build Phases -> Link Binary With Libraries中點擊加號,添加 libz.dylib
3,使用樣例
首先為了便於後面測試,我們先在項目中添加兩張圖片,以及兩個壓縮包文件(其中 test_password.zip 是帶密碼的壓縮包,密碼是:hangge.com)

同時定義一個方法返回目標路徑(每次調用都會在程序的 Caches 下創建一個隨機文件夾),為的是讓每次壓縮、解壓縮的目標保存地址都不會沖突:
//在Caches文件夾下隨機創建一個文件夾,並返回路徑
func tempDestPath() -> String? {
var path = NSSearchPathForDirectoriesInDomains(.CachesDirectory,
.UserDomainMask, true)[0]
path += "/\(NSUUID().UUIDString)"
let url = NSURL(fileURLWithPath: path)
do {
try NSFileManager.defaultManager().createDirectoryAtURL(url,
withIntermediateDirectories: true, attributes: nil)
} catch {
return nil
}
if let path = url.path {
print("path:\(path)")
return path
}
return nil
}
(1)解壓普通zip文件
let zipPath = NSBundle.mainBundle().pathForResource("test", ofType: "zip")
SSZipArchive.unzipFileAtPath(zipPath, toDestination: tempDestPath())
(2)解壓帶密碼的zip文件
let zipPath2 = NSBundle.mainBundle().pathForResource("test_password", ofType: "zip")
do {
try SSZipArchive.unzipFileAtPath(zipPath2, toDestination: tempDestPath(),
overwrite: true, password: "hangge.com")
} catch {
}
(3)將文件打成壓縮包
let files = [NSBundle.mainBundle().pathForResource("logo", ofType: "png")!,
NSBundle.mainBundle().pathForResource("icon", ofType: "png")!]
let zipPath3 = tempDestPath()! + "/hangge.zip"
SSZipArchive.createZipFileAtPath(zipPath3, withFilesAtPaths: files)
當然我們也是可以給壓縮包加上密碼的:
SSZipArchive.createZipFileAtPath(zipPath3, withFilesAtPaths: files,
withPassword: "hangge.com")
(4)將整個文件夾下的文件打成壓縮包
//需要壓縮的文件夾啊
let filePath:String = NSHomeDirectory() + "/Documents"
//先在該文件夾下添加一個文件
let image = UIImage(named: "logo.png")
let data:NSData = UIImagePNGRepresentation(image!)!
data.writeToFile(filePath + "/logo.png", atomically: true)
let zipPath5 = tempDestPath()! + "/hangge.zip"
SSZipArchive.createZipFileAtPath(zipPath5, withContentsOfDirectory: filePath)
同樣的,我門也可以添加密碼:
SSZipArchive.createZipFileAtPath(zipPath6, withContentsOfDirectory: filePath,
withPassword: "hangge.com") //帶密碼


- iOS10告訴框架UserNotification懂得與運用
- iOS Webview自順應現實內容高度的4種辦法詳解
- iOS10 App適配權限 Push Notifications 字體Frame 碰到的成績
- iOS獲得以後裝備WiFi信息的辦法
- iPhone/iPad開辟經由過程LocalNotification完成iOS准時當地推送功效
- iOS推送之當地告訴UILocalNotification
- iOS開辟之widget完成詳解
- iOS10添加當地推送(Local Notification)實例
- iOS Remote Notification長途新聞推送處置
- IOS上iframe的轉動條掉效的處理方法
- Swift 同享文件操作小結(iOS 8 +)
- Swift 2.1 為 UIView 添加點擊事宜和點擊後果
- 在Swift中應用JSONModel 實例代碼
- 應用Swift代碼完成iOS手勢解鎖、指紋解鎖實例詳解
- 詳解iOS App中UISwitch開關組件的根本創立及應用辦法