iOS的UI開發中UITabBarControlle的基本使用教程
UITabBarController的基本使用
一、簡單介紹
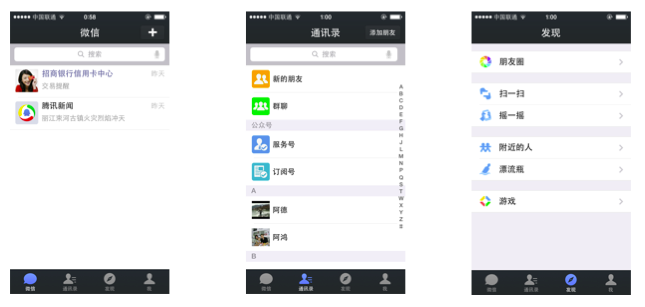
UITabBarController和UINavigationController類似,UITabBarController也可以輕松地管理多個控制器,輕松完成控制器之間的切換,典型的例子就是QQ、微信等應⽤。
二、UITabBarController的使用
1.使用步驟:
(1)初始化UITabBarController
(2)設置UIWindow的rootViewController為UITabBarController
(3)創建相應的子控制器(viewcontroller)
(4)把子控制器添加到UITabBarController
2.代碼示例
新建一個空的文件,在Application的代理中編碼
YYAppDelegate.m文件
代碼如下:
//
// YYAppDelegate.m
// 01-UITabBar控制器基本使用
//
// Created by 孔醫己 on 14-6-7.
// Copyright (c) 2014年 itcast. All rights reserved.
//
#import "YYAppDelegate.h"
@implementation YYAppDelegate
- (BOOL)application:(UIApplication *)application didFinishLaunchingWithOptions:(NSDictionary *)launchOptions
{
//1.創建Window
self.window = [[UIWindow alloc] initWithFrame:[[UIScreen mainScreen] bounds]];
self.window.backgroundColor = [UIColor whiteColor];
//a.初始化一個tabBar控制器
UITabBarController *tb=[[UITabBarController alloc]init];
//設置控制器為Window的根控制器
self.window.rootViewController=tb;
//b.創建子控制器
UIViewController *c1=[[UIViewController alloc]init];
c1.view.backgroundColor=[UIColor grayColor];
c1.view.backgroundColor=[UIColor greenColor];
c1.tabBarItem.title=@"消息";
c1.tabBarItem.image=[UIImage imageNamed:@"tab_recent_nor"];
c1.tabBarItem.badgeValue=@"123";
UIViewController *c2=[[UIViewController alloc]init];
c2.view.backgroundColor=[UIColor brownColor];
c2.tabBarItem.title=@"聯系人";
c2.tabBarItem.image=[UIImage imageNamed:@"tab_buddy_nor"];
UIViewController *c3=[[UIViewController alloc]init];
c3.tabBarItem.title=@"動態";
c3.tabBarItem.image=[UIImage imageNamed:@"tab_qworld_nor"];
UIViewController *c4=[[UIViewController alloc]init];
c4.tabBarItem.title=@"設置";
c4.tabBarItem.image=[UIImage imageNamed:@"tab_me_nor"];
//c.添加子控制器到ITabBarController中
//c.1第一種方式
// [tb addChildViewController:c1];
// [tb addChildViewController:c2];
//c.2第二種方式
tb.viewControllers=@[c1,c2,c3,c4];
//2.設置Window為主窗口並顯示出來
[self.window makeKeyAndVisible];
return YES;
}
@end
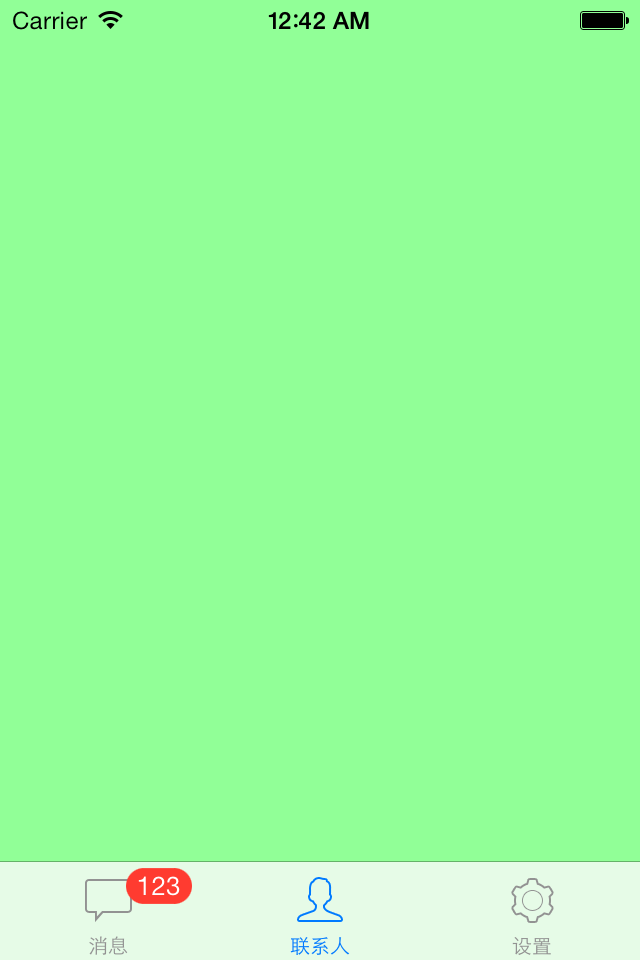
實現效果:

三、重要說明
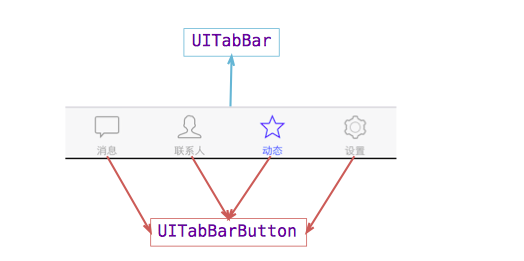
1.UITabBar
下方的工具條稱為UITabBar ,如果UITabBarController有N個子控制器,那麼UITabBar內部就會有N 個UITabBarButton作為子控件與之對應。
注意:UITabBarButton在UITabBar中得位置是均分的,UITabBar的高度為49。
在上面的程序中,UITabBarController有4個子控制器,所以UITabBar中有4個UITabBarButton,UITabBar的結構⼤大致如下圖所示:
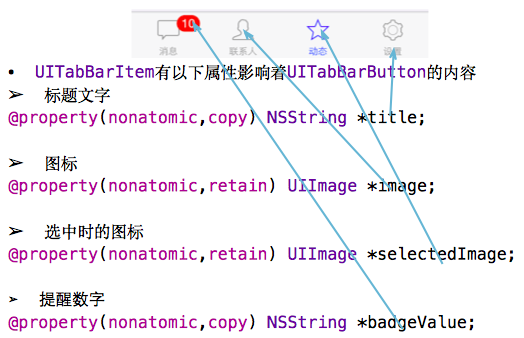
2.UITabBarButton
UITabBarButton⾥面顯⽰什麼內容,由對應子控制器的tabBarItem屬性來決定
c1.tabBarItem.title=@"消息";
c1.tabBarItem.image=[UIImage imageNamed:@"tab_recent_nor"];
3.有兩種方式可以往UITabBarController中添加子控制器
(1)[tb addChildViewController:c1];
(2)tb.viewControllers=@[c1,c2,c3,c4];
注意:展示的順序和添加的順序一致,和導航控制器中不同,展現在眼前的是第一個添加的控制器對應的View。
UITabBarController生命周期(使用storyoard搭建)
一、UITabBarController在storyoard中得搭建
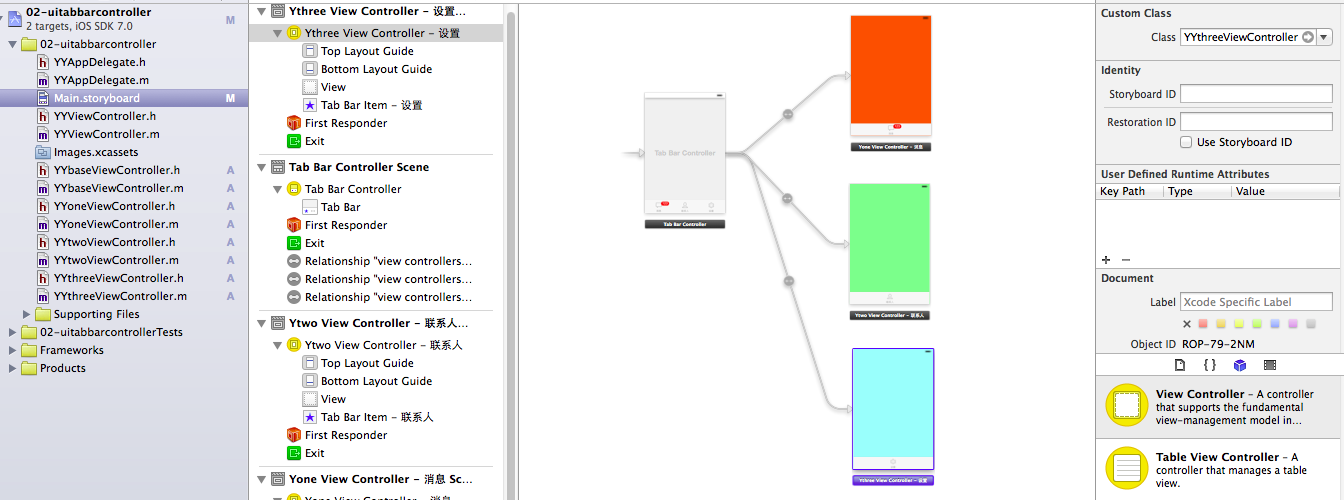
1.新建一個項目,把storyboard中默認的控制器刪除,拖UITab Bar Controller。
2.創建viewcontroller,添加到UITab Bar Controller中去(連線)。
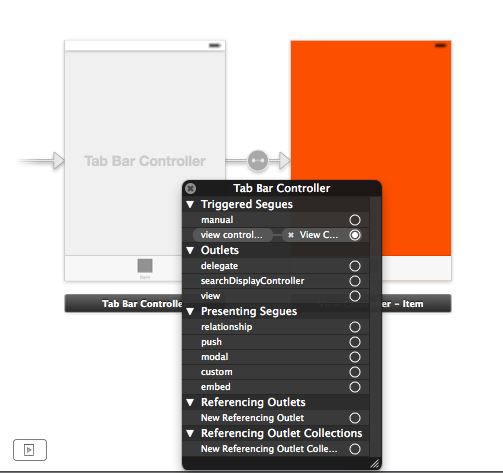
注意點:連線的順序就是將來顯示的順序,顯示在眼前的為第一個連線的view。
提示:控制器的界面對應的tabbarbutton和圖片顯示什麼內容,由它的控制器確定。
3.設置子控制器的UITabBar等信息。
4.運行效果
二、UITabBarController的生命周期演示
思路:新建三個控制器類來對控制器進行分別管理,重寫內部的生命周期方法就可以了解UITabBarController內部管理機制。
分析代碼:
代碼如下:
//
// YYbaseViewController.m
// 02-uitabbarcontroller
//
// Created by 孔醫己 on 14-6-8.
// Copyright (c) 2014年 itcast. All rights reserved.
//
#import "YYbaseViewController.h"
@interface YYbaseViewController ()
@end
代碼如下:
@implementation YYbaseViewController
// 當控制器的view加載完畢就調用
- (void)viewDidLoad
{
[super viewDidLoad];
NSLog(@"%@ - 控制器的view加載完畢", [self class]);
}
// 控制器即將顯示的時候調用
- (void)viewWillAppear:(BOOL)animated
{
[super viewWillAppear:YES];
NSLog(@"%@ - 控制器即將顯示", [self class]);
}
// 控制器完全顯示的時候調用
- (void)viewDidAppear:(BOOL)animated
{
[super viewDidAppear:animated];
NSLog(@"%@ - 控制器完全顯示", [self class]);
}
// 控制器即將消失的時候調用
- (void)viewWillDisappear:(BOOL)animated
{
[super viewWillDisappear:animated];
NSLog(@"%@ - 控制器即將消失", [self class]);
}
// 控制器完全消失的時候調用
- (void)viewDidDisappear:(BOOL)animated
{
[super viewDidDisappear:animated];
NSLog(@"%@ - 控制器完全消失", [self class]);
}
- (void)viewWillUnload
{
[super viewWillUnload];
NSLog(@"%@ - view即將被銷毀", [self class]);
}
- (void)viewDidUnload
{
[super viewDidUnload];
NSLog(@"%@ - view完全被銷毀", [self class]);
}
- (void)dealloc
{
NSLog(@"%@", [self class]);
}
@end
(1)運行程序,打印輸出為:
說明 :當把三個子控制器都添加給UITabBarController來管理後,當程序啟動時它只會加載第一個添加的控制器的view。
(2)點擊聯系人按鈕,切換到第二個界面。打印輸出為:

說明:先把第一個view移開,再把新的view添加上去,但是第一個view並沒有被銷毀。
(3)重新點擊消息界面,打印如下:
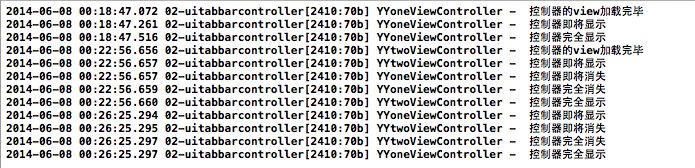
說明:先重新切換到消息界面,one控制器直接即將顯示,沒有進行加載證明了(2)中第一個view移除後並沒有被銷毀(因為它的控制器還存在,有一個強引用引用著它),且two的view移除後也沒有被銷毀。無論怎麼切換,控制器和view都不會被銷毀。
UINavigationController和UITabBarController一個通過棧來管理,一個通過普通的數組來進行管理。
補充說明:UITabBarController中的UITabBar實際高度為49.
在Application的下面方法中打印UITabBar的frame進行查看。
代碼如下:
- (void)applicationDidBecomeActive:(UIApplication *)application
{
// Restart any tasks that were paused (or not yet started) while the application was inactive. If the application was previously in the background, optionally refresh the user interface.
UITabBarController *tb=(UITabBarController*)self.window.rootViewController;
NSLog(@"%@",NSStringFromCGRect(tb.tabBar.frame));
}
打印結果為: