IOS實現點擊滑動抽屜效果
編輯:關於IOS教程
最近,看到好多Android上的抽屜效果,也忍不住想要自己寫一個。在Android裡面可以用SlidingDrawer,很方便的實現。IOS上面就只有自己寫了。其實原理很簡單就是 UIView 的移動,和一些手勢的操作。
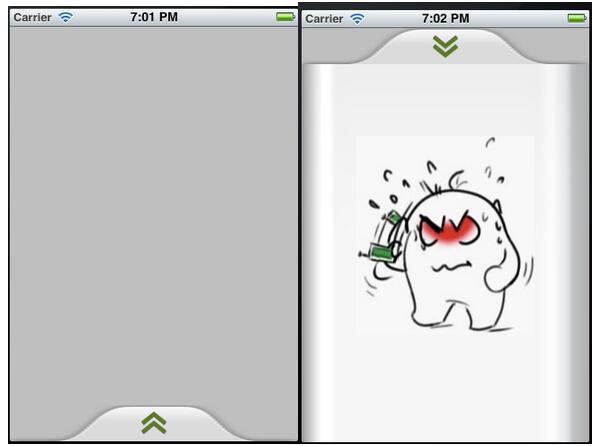
效果圖:
//
// DrawerView.h
// DrawerDemo
//
// Created by Zhouhaifeng on 12-3-27.
// Copyright (c) 2012年 CJLU. All rights reserved.
//

#import <UIKit/UIKit.h>

typedef enum
{
  DrawerViewStateUp = 0,
  DrawerViewStateDown
}DrawerViewState;

@interface DrawerView : UIView<UIGestureRecognizerDelegate>
{
  UIImageView *arrow;     //向上拖拽時顯示的圖片

  CGPoint upPoint;      //抽屜拉出時的中心點
  CGPoint downPoint;     //抽屜收縮時的中心點

  UIView *parentView;     //抽屜所在的view
  UIView *contentView;    //抽屜裡面顯示的內容

  DrawerViewState drawState; //當前抽屜狀態
}

- (id)initWithView:(UIView *) contentview parentView :(UIView *) parentview;
- (void)handlePan:(UIPanGestureRecognizer *)recognizer;
- (void)handleTap:(UITapGestureRecognizer *)recognizer;
- (void)transformArrow:(DrawerViewState) state;

@property (nonatomic,retain) UIView *parentView;
@property (nonatomic,retain) UIView *contentView;
@property (nonatomic,retain) UIImageView *arrow;
@property (nonatomic) DrawerViewState drawState;

@end
//
// DrawerView.m
// DrawerDemo
//
// Created by Zhouhaifeng on 12-3-27.
// Copyright (c) 2012年 CJLU. All rights reserved.
//

#import "DrawerView.h"

@implementation DrawerView
@synthesize contentView,parentView,drawState;
@synthesize arrow;

- (id)initWithView:(UIView *) contentview parentView :(UIView *) parentview;
{
  self = [super initWithFrame:CGRectMake(0,0,contentview.frame.size.width, contentview.frame.size.height+40)];
  if (self) {
    // Initialization code
    contentView = contentview;
    parentView = parentview;

    //一定要開啟
    [parentView setUserInteractionEnabled:YES];

    //嵌入內容區域的背景
    UIImage *drawer_bg = [UIImage imageNamed:@"drawer_content.png"];
    UIImageView *view_bg = [[UIImageView alloc]initWithImage:drawer_bg];
    [view_bg setFrame:CGRectMake(0,40,contentview.frame.size.width, contentview.bounds.size.height+40)];
    [self addSubview:view_bg];

    //頭部拉拽的區域背景
    UIImage *drawer_handle = [UIImage imageNamed:@"drawer_handlepng.png"];
    UIImageView *view_handle = [[UIImageView alloc]initWithImage:drawer_handle];
    [view_handle setFrame:CGRectMake(0,0,contentview.frame.size.width,40)];
    [self addSubview:view_handle];

    //箭頭的圖片
    UIImage *drawer_arrow = [UIImage imageNamed:@"drawer_arrow.png"];
    arrow = [[UIImageView alloc]initWithImage:drawer_arrow];
    [arrow setFrame:CGRectMake(0,0,28,28)];
    arrow.center = CGPointMake(contentview.frame.size.width/2, 20);
    [self addSubview:arrow];

    //嵌入內容的UIView
    [contentView setFrame:CGRectMake(0,40,contentview.frame.size.width, contentview.bounds.size.height+40)];
    [self addSubview:contentview];

    //移動的手勢
    UIPanGestureRecognizer *panRcognize=[[UIPanGestureRecognizer alloc] initWithTarget:self action:@selector(handlePan:)];
    panRcognize.delegate=self;
    [panRcognize setEnabled:YES];
    [panRcognize delaysTouchesEnded];
    [panRcognize cancelsTouchesInView];

    [self addGestureRecognizer:panRcognize];

    //單擊的手勢
    UITapGestureRecognizer *tapRecognize = [[UITapGestureRecognizer alloc]initWithTarget:self action:@selector(handleTap:)];
    tapRecognize.numberOfTapsRequired = 1;
    tapRecognize.delegate = self;
    [tapRecognize setEnabled :YES];
    [tapRecognize delaysTouchesBegan];
    [tapRecognize cancelsTouchesInView];

    [self addGestureRecognizer:tapRecognize];

    //設置兩個位置的坐標
    downPoint = CGPointMake(parentview.frame.size.width/2, parentview.frame.size.height+contentview.frame.size.height/2-40);
    upPoint = CGPointMake(parentview.frame.size.width/2, parentview.frame.size.height-contentview.frame.size.height/2-40);
    self.center = downPoint;

    //設置起始狀態
    drawState = DrawerViewStateDown;
  }
  return self;
}


#pragma UIGestureRecognizer Handles
/*
 * 移動圖片處理的函數
 * @recognizer 移動手勢
 */
- (void)handlePan:(UIPanGestureRecognizer *)recognizer {


  CGPoint translation = [recognizer translationInView:parentView];
  if (self.center.y + translation.y < upPoint.y) {
    self.center = upPoint;
  }else if(self.center.y + translation.y > downPoint.y)
  {
    self.center = downPoint;
  }else{
    self.center = CGPointMake(self.center.x,self.center.y + translation.y);
  }
  [recognizer setTranslation:CGPointMake(0, 0) inView:parentView];

  if (recognizer.state == UIGestureRecognizerStateEnded) {
    [UIView animateWithDuration:0.75 delay:0.15 options:UIViewAnimationOptionCurveEaseOut animations:^{
        if (self.center.y < downPoint.y*4/5) {
          self.center = upPoint;
          [self transformArrow:DrawerViewStateUp];
        }else
        {
          self.center = downPoint;
          [self transformArrow:DrawerViewStateDown];
        }

    } completion:nil];

  }
}

/*
 * handleTap 觸摸函數
 * @recognizer UITapGestureRecognizer 觸摸識別器
 */
-(void) handleTap:(UITapGestureRecognizer *)recognizer
{
    [UIView animateWithDuration:0.75 delay:0.15 options:UIViewAnimationOptionTransitionCurlUp animations:^{
      if (drawState == DrawerViewStateDown) {
        self.center = upPoint;
        [self transformArrow:DrawerViewStateUp];
      }else
      {
        self.center = downPoint;
        [self transformArrow:DrawerViewStateDown];
      }
    } completion:nil];

}

/*
 * transformArrow 改變箭頭方向
 * state DrawerViewState 抽屜當前狀態
 */
-(void)transformArrow:(DrawerViewState) state
{
    //NSLog(@"DRAWERSTATE :%d STATE:%d",drawState,state);
    [UIView animateWithDuration:0.3 delay:0.35 options:UIViewAnimationOptionCurveEaseOut animations:^{
      if (state == DrawerViewStateUp){
          arrow.transform = CGAffineTransformMakeRotation(M_PI);
        }else
        {
           arrow.transform = CGAffineTransformMakeRotation(0);
        }
    } completion:^(BOOL finish){
        drawState = state;
    }];


}

@end
以上就是本文的全部內容,希望對大家的學習有所幫助。

相關文章
+