實例講解iOS中的CATransition轉場動畫使用
一、簡介
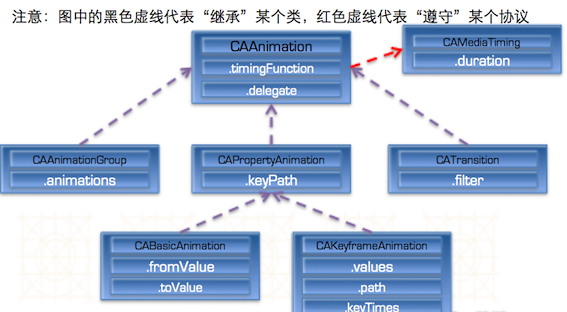
CATransition是CAAnimation的子類,用於做轉場動畫
能夠為圖層提供移出屏幕和移入屏幕的動畫效果。iOS比Mac OS X的轉場動畫效果少一點
如:UINavigationController導航控制器就是通過CATransition轉場動畫實現了將控制器的視圖推入屏幕的動畫效果
CATransition頭文件
動畫屬性:
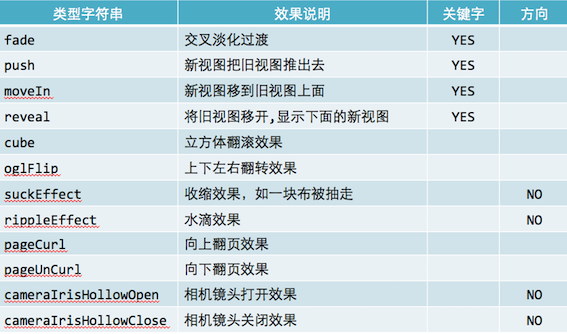
type:動畫過渡類型
subtype:動畫過渡方向
startProgress:動畫起點(在整體動畫的百分比)
endProgress:動畫終點(在整體動畫的百分比)
......
代碼如下:
#import <QuatzCore/CAAnimation.h>
CATransition *myTransition=[CATransition animation];//創建CATransition
myTransition.duration=0.3;//持續時長0.3秒
myTransition.timingFunction=UIViewAnimationCurveEaseInOut;//計時函數,從頭到尾的流暢度
myTransition.type=kCATransionPush;//動畫類型
myTransition.subtype=kCATransitionFromLeft;//子類型
//要令一個轉場生效,組要將動畫添加到將要變為動畫視圖所附著的圖層。例如在兩個視圖控制器之間進行轉場,那就將動畫添加到窗口的圖層中:
[[self.view.superview layer]addAnimation:myTransition forKey:nil ];
//如果是將控制器內的子視圖轉場到另一個子視圖,就將動畫加入到視圖控制器的圖層。還有一種選擇,用視圖控制器內部的視圖作為替代,將你的子視圖作為主視圖的子圖層:
[ self.view.layer addAnimation:myTransition forKey:nil ];
[ self.view addSubView:newView ];
[oldView removeFromSuperview];
//如果你使用的是導航控制器,可以將動畫加到導航控制器的視圖圖層中。
[ navigationController.view.layer addAnimation:myTransition forKey:nil ];
轉場動畫過渡效果
二、view類自帶轉場動畫函數
1、單視圖
+(void)transitionWithView:(UIView*)view duration:(NSTimeInterval)duration options:
(UIViewAnimationOptions)options
animations:(void(^)(void))animations
completion:(void(^)(BOOLfinished))completion;
參數說明:
duration:動畫的持續時間
view:需要進行轉場動畫的視圖
options:轉場動畫的類型
animations:將改變視圖屬性的代碼放在這個block中
completion:動畫結束後,會自動調用這個block
2、雙視圖
+ (void)transitionFromView:(UIView*) fromView
toView:(UIView*) toViewduration:(NSTimeInterval)durationoptions:(UIViewAnimationOptions) options
completion:(void(^)(BOOLfinished))completion;
參數說明:
duration:動畫的持續時間
options:轉場動畫的類型
animations:將改變視圖屬性的代碼放在這個block中
completion:動畫結束後,會自動調用這個block
三、應用
注意:
轉場動畫使用注意點:轉場代碼必須和轉場動畫代碼寫在一起,否則無效
1、圖片浏覽
實例:

代碼實現
代碼如下:
#import "ViewController.h"
@interface ViewController ()
@property (weak, nonatomic) IBOutlet UIImageView *imageV;
@end
@implementation ViewController
// 注意: 轉場動畫使用注意點:轉場代碼必須和轉場動畫代碼寫在一起,否則無效
- (void)touchesBegan:(NSSet *)touches withEvent:(UIEvent *)event
{
// 實現:圖片浏覽
/** 轉場代碼 */
static int index = 2;
NSString *imageName = [NSString stringWithFormat:@"%d",index];
_imageV.image = [UIImage imageNamed:imageName];
index++;
if (index == 4) {
index = 1;
}
/** 轉場動畫代碼 */
// 創建轉場動畫對象
CATransition *anim = [CATransition animation];
// 設置轉場類型
anim.type = @"pageCurl";
// 設置動畫的方向
anim.subtype = kCATransitionFromLeft;
anim.duration = 3;
[_imageV.layer addAnimation:anim forKey:nil];
}
@end
2、圖標3D翻轉:使用UIView自帶的單視圖的轉場動畫函數實現
代碼實現
代碼如下:
#import "ViewController.h"
@interface ViewController ()
@property (weak, nonatomic) UIImageView *iconView;
@end
@implementation ViewController
- (void)viewDidLoad{
[super viewDidLoad];
UIImageView *iconView = [[UIImageView alloc] initWithImage:[UIImage imageNamed:@"1"]];
[self.view addSubview:iconView];
iconView.center = self.view.center;
iconView.backgroundColor = [UIColor greenColor];
self.iconView = iconView;
// 設置為圓角圖片
self.iconView.layer.cornerRadius = self.iconView.frame.size.width * 0.5;
self.iconView.clipsToBounds = YES;
}
- (void)touchesBegan:(NSSet *)touches withEvent:(UIEvent *)event
{
// UIView自帶的轉場動畫
[UIView transitionWithView:self.iconView duration:1.0 options:UIViewAnimationOptionTransitionFlipFromLeft animations:^{ /** 執行左翻轉動畫,*/
// 從左邊翻轉 , 之前設置顯示圖片1,翻轉後顯示圖2 -》圖片1 左翻轉到最後顯示圖片2
self.iconView.image = [UIImage imageNamed:@"2"];
} completion:^(BOOL finished) {
NSLog(@"completion");
/** 左翻轉動畫 結束後, 停 1 秒後,再執行 右翻轉動畫 */
dispatch_after(dispatch_time(DISPATCH_TIME_NOW, (int64_t)(1.0 * NSEC_PER_SEC)), dispatch_get_main_queue(), ^{ // 停 1 秒後,再執行 右翻轉動畫
[UIView transitionWithView:self.iconView duration:1.0 options:UIViewAnimationOptionTransitionFlipFromRight animations:^{ // 然後,從右邊翻轉,翻轉時顯示圖片1 -》圖片2 右翻轉最後顯示圖片1
self.iconView.image = [UIImage imageNamed:@"1"];
} completion:nil];
});
}];
}
@end
3、視圖間轉場動畫:使用UIView自帶雙視圖間的轉場動畫函數實現
代碼如下:
#import "ViewController.h"
@interface ViewController ()
@property (weak, nonatomic) IBOutlet UIScrollView *scrollView;
/**< imageView1 */
@property (nonatomic, strong) UIView *view1;
/**< imageView2 */
@property (nonatomic, strong) UIView *view2;
@end
@implementation ViewController
- (void)viewDidLoad{
[super viewDidLoad];
self.view.backgroundColor = [UIColor blackColor];
// 1. scrollView 添加 view2 子控件
UIView *view2 = [[UIView alloc] init];
view2.backgroundColor = [UIColor greenColor];
[self.scrollView addSubview:view2];
self.view2 = view2;
// 2. scrollView 添加 view1 子控件
UIView *view1 = [[UIView alloc] init];
view1.backgroundColor = [UIColor redColor];
[self.scrollView addSubview:view1];
self.view1 = view1;
// 3. frame
CGFloat scrollViewW = self.scrollView.frame.size.width;
CGFloat scrollViewH = self.scrollView.frame.size.height;
view1.frame = CGRectMake(0, 0, scrollViewW, scrollViewH);
view2.frame = CGRectMake(0, 0, scrollViewW, scrollViewH); // CGRectMake(scrollViewW, 0, scrollViewW, scrollViewH);
// 4. scrollView
self.scrollView.contentSize = CGSizeMake(scrollViewW, scrollViewH);
// 添加手勢
UITapGestureRecognizer *tap = [[UITapGestureRecognizer alloc] initWithTarget:self action:@selector(tapClick:)];
[self.scrollView addGestureRecognizer:tap];
}
int i = 1;
// 監聽到點擊scrollView,進行翻轉動畫
- (void)tapClick:(UITapGestureRecognizer *)tap{
if (i % 2 != 0) {
[UIView transitionFromView:self.view1 toView:self.view2 duration:1.0 options:UIViewAnimationOptionTransitionFlipFromTop completion:nil];
}else{
[UIView transitionFromView:self.view2 toView:self.view1 duration:1.0 options:UIViewAnimationOptionTransitionFlipFromBottom completion:nil];
}
i++;
}


- iOS 完成多署理的辦法及實例代碼
- IOS 陀螺儀開辟(CoreMotion框架)實例詳解
- ajax 三種完成辦法實例代碼
- iOS中 LGLAlertView 提醒框的實例代碼
- IOS 仿時間網選票UI實例代碼
- iOS 雷達後果實例詳解
- IOS 粒子體系 (CAEmitterLayer)實例詳解
- iOS 動畫 —— 禮花後果實例具體
- 在Swift中應用JSONModel 實例代碼
- iOS 9 Core Spotlight搜刮實例代碼
- 實例講授iOS中的UIPageViewController翻頁視圖掌握器
- 實例講授iOS中的CATransition轉場動畫應用
- 應用Swift代碼完成iOS手勢解鎖、指紋解鎖實例詳解
- iOS App開辟中應用設計形式中的單例形式的實例解析
- iOS中應用UIDatePicker制造時光選擇器的實例教程