iOS關於tableView的一些簡單操作
1.刪除:
- (void)tableView:(UITableView *)tableView commitEditingStyle:(UITableViewCellEditingStyle)editingStyle forRowAtIndexPath:(NSIndexPath *)indexPath
{
if (editingStyle == UITableViewCellEditingStyleDelete)
{
NSLog(@"....");
NSUInteger row = indexPath.row;
[self.editArray removeObjectAtIndex:row];
[tableView deleteRowsAtIndexPaths:[NSArray arrayWithObject:indexPath] withRowAnimation:(UITableViewRowAnimationTop)];
}
//收藏數據更新
// [self replaceCurrentViewData:self.editArray];
}
實現以上函數即可
2;移動:
-(void)tableView:(UITableView *)tableView moveRowAtIndexPath:(NSIndexPath *)sourceIndexPath toIndexPath:(NSIndexPath *)destinationIndexPath
{
if (sourceIndexPath != destinationIndexPath)
{
id object = [self.editArray objectAtIndex:sourceIndexPath.row];
[object retain];
[self.editArray removeObjectAtIndex:sourceIndexPath.row];
if (destinationIndexPath.row > [self.editArray count])
{
[self.editArray addObject:object];
}
else {
[self.editArray insertObject:object atIndex:destinationIndexPath.row];
}
[object release];
}
// [self replaceCurrentViewData:self.editArray];
}
3:插入
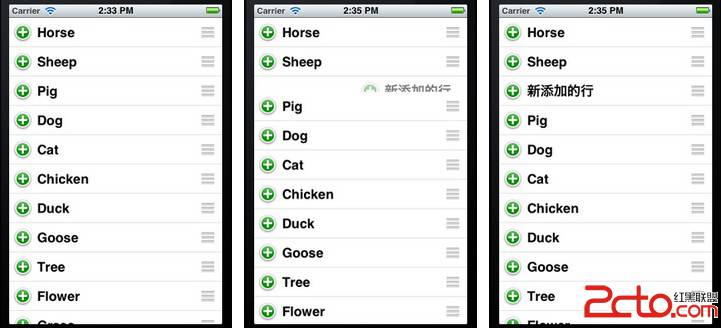
這個與刪除行類似。實現下面,點擊 +號即可。
3.1 首先將editingStyleForRowAtIndexPath方法中的UITableViewCellEditingStyleDelete修改成UITableViewCellEditingStyleInsert
-(void)tableView:(UITableView *)tableView commitEditingStyle:(UITableViewCellEditingStyle)editingStyle forRowAtIndexPath:(NSIndexPath *)indexPath
{
if (editingStyle == UITableViewCellEditingStyleDelete)
{
NSLog(@"....");
NSUInteger row = indexPath.row;
[self.editArray removeObjectAtIndex:row];
[tableView deleteRowsAtIndexPaths:[NSArray arrayWithObject:indexPath] withRowAnimation:(UITableViewRowAnimationTop)];
}
else
{
NSArray *insertIndexPaths = [NSArray arrayWithObjects:indexPath,nil];
//同樣,將數據加到list中,用的row
[self.list insertObject:@"新添加的行" atIndex:row];
[tableView insertRowsAtIndexPaths:insertIndexPaths withRowAnimation:UITableViewRowAnimationRight];
}
//收藏數據更新
// [self replaceCurrentViewData:self.editArray];
}

4:標記:
- (void)tableView:(UITableView *)tableView didSelectRowAtIndexPath:(NSIndexPath *)indexPath
{
UITableViewCell *oneCell = [tableView cellForRowAtIndexPath: indexPath];
if (oneCell.accessoryType == UITableViewCellAccessoryNone) {
oneCell.accessoryType = UITableViewCellAccessoryCheckmark;
} else
oneCell.accessoryType = UITableViewCellAccessoryNone;
[tableView deselectRowAtIndexPath:indexPath animated:YES];
}
else {
//我們實現的是在所選行的位置插入一行,因此直接使用了參數indexPath
NSArray *insertIndexPaths = [NSArray arrayWithObjects:indexPath,nil];
//同樣,將數據加到list中,用的row
[self.list insertObject:@"新添加的行" atIndex:row];
[tableView insertRowsAtIndexPaths:insertIndexPaths withRowAnimation:UITableViewRowAnimationRight];
}
- 上一頁:iOS系統Crash文件分析方法
- 下一頁:iOS開發異步下載


