iOS 實現類似QQ分組樣式的兩種方式
編輯:IOS開發綜合
思路
思路很簡單,對模型數據操作或則控制界面顯示
先看下json部分數據
"chapterDtoList": [{
      "token": null,
      "id": 1295,
      "chapterName": "第一章",
      "parentId": 0,
      "chapterLevel": 0,
      "attachmentUrl": "",
      "description": null,
      "startDateTimestamp": null,
      "endDateTimestamp": null,
      "startDate": 1490889600000,
      "endDate": 1491062400000,
      "browseCount": 0,
      "workId": null,
      "chapterStatus": 3,
      "hadRead": 0,
      "subChapterList": [{
        "token": null,
        "id": 1296,
        "chapterName": "第一節",
        "parentId": 1295,
        "chapterLevel": 1,
        "attachmentUrl": "",
        "description": null,
        "startDateTimestamp": null,
        "endDateTimestamp": null,
        "startDate": null,
        "endDate": null,
        "browseCount": 0,
        "workId": null,
        "chapterStatus": null,
        "hadRead": 0,
        "subChapterList": [],
        "classUserReadInfo": []
      },
這種數據對應的一般都是個tableView, 然後根據章節分開,最終界面如下:
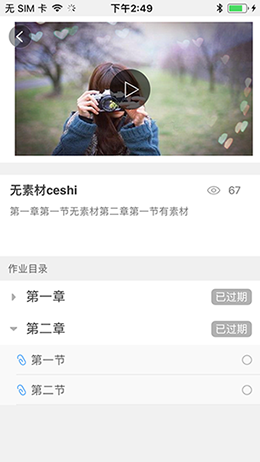
分析
這裡采用UITableViewStylePlain樣式,chapterDtoList對應章,subChapterList對應節。章的話我們使用headerView來做,節的話我們使用cell來做。然後只需要給headerView添加一個點擊手勢,點擊的時候給對應的模型添加標識,從而去控制章節的收合。
方法一:
對模型數組進行操作,我們可以將返回的json數據轉化為兩個模型數組chapterListArray和tempChapterListArray,通過控制subChapterList的count來實現。界面的模型數據統一使用tempChapterListArray,展開與合並就等價於是否將“章數組“中的”節數組“賦值為nil
- (NSInteger)tableView:(UITableView *)tableView numberOfRowsInSection:(NSInteger)section {
  YJTOnlineTaskDetailModel *onlineTaskDetailModel = self.tempChapterListArray[section];
  return onlineTaskDetailModel.subChapterList.count;
}
- (UIView *)tableView:(UITableView *)tableView viewForHeaderInSection:(NSInteger)section {
  YJTOnlineChapeterCell *headerView = [tableView dequeueReusableCellWithIdentifier:onlineChapeterCell];
  YJTOnlineTaskDetailModel *onlineTaskDetailModel = self.chapterListArray[section];
  headerView.backgroundColor = [UIColor whiteColor];
  headerView.onlineTaskDetailModel = onlineTaskDetailModel;
  if (section == 0) {
    headerView.tipsLableHeight.constant = 30;
  }else {
    headerView.tipsLableHeight.constant = 0;
  }
  [headerView whenTapWithBlock:^{
    onlineTaskDetailModel.isSelected = !onlineTaskDetailModel.isSelected;
    YJTOnlineTaskDetailModel *detailModel = self.tempChapterListArray[section];
    if (detailModel.subChapterList == nil) {
      detailModel.subChapterList = onlineTaskDetailModel.subChapterList;
    }else {
      detailModel.subChapterList = nil;
    }
    [self.tableView reloadData];
  }];
  return headerView;
}
方法二:
上面的方法是通過控制模型數組來實現的,我們也可以采用控制界面的顯示,從而達到我們的要求。既然我們在點擊HeadView的時候已經標記過對應的模型數據是否展開,那麼我們完全可以通過控制界面對應分組的個數來實現。當然也可以通過控制rowHeight來到達效果。相比之下,該方法簡單明了些。
- (NSInteger)tableView:(UITableView *)tableView numberOfRowsInSection:(NSInteger)section {
  YJTOnlineTaskDetailModel *onlineTaskDetailModel = self.chapterListArray[section];
  return onlineTaskDetailModel.isSelected ? onlineTaskDetailModel.subChapterList.count : 0;
}
 [headerView whenTapWithBlock:^{
    onlineTaskDetailModel.isSelected = !onlineTaskDetailModel.isSelected;
    [self.tableView reloadData];
  }];
總結
以上所述是小編給大家介紹的iOS 實現類似QQ分組樣式的兩種方式,希望對大家有所幫助,如果大家有任何疑問請給我留言,小編會及時回復大家的。在此也非常感謝大家對本站網站的支持!

相關文章
+