總結iOS完成突變色彩的三種辦法
在IOS開辟進程中有的時刻會須要用到突變的色彩,這篇文章總結了三種辦法來完成,有須要的同伙們上面來一路看看吧。
1、CAGradientLayer完成突變
CAGradientLayer是CALayer的一個特別子類,用於生成色彩突變的圖層,應用較為便利
上面引見下它的相干屬性:
colors 突變的色彩
locations 突變色彩的朋分點
startPoint&endPoint 色彩突變的偏向,規模在(0,0)與(1.0,1.0)之間,如(0,0)(1.0,0)代表程度偏向突變,(0,0)(0,1.0)代表豎直偏向突變
 CAGradientLayer *gradientLayer = [CAGradientLayer layer];
 gradientLayer.colors = @[(__bridge id)[UIColor redColor].CGColor, (__bridge id)[UIColor yellowColor].CGColor, (__bridge id)[UIColor blueColor].CGColor];
 gradientLayer.locations = @[@0.3, @0.5, @1.0];
 gradientLayer.startPoint = CGPointMake(0, 0);
 gradientLayer.endPoint = CGPointMake(1.0, 0);
 gradientLayer.frame = CGRectMake(0, 100, 300, 100);
 [self.view.layer addSublayer:gradientLayer];
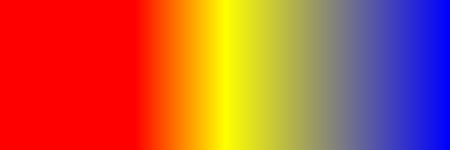
CAGradientLayer完成突變標間簡略直不雅,但存在必定的局限性,好比沒法自界說全部突變區域的外形,如環形、曲線形的突變。
2、Core Graphics相干辦法完成突變
IOS Core Graphics中有兩個辦法用於繪制突變色彩,CGContextDrawLinearGradient可以用於生成線性突變,CGContextDrawRadialGradient用於生成圓半徑偏向色彩突變。函數可以自界說path,不管是甚麼外形都可以,道理都是用來做Clip,所以須要在CGContextClip函數前挪用CGContextAddPath函數把CGPathRef參加到Context中。
別的一個須要留意的處所是突變的偏向,偏向是由兩個點掌握的,點的單元就是坐標。是以須要准確從CGPathRef中找到准確的點,辦法固然有許多種看詳細完成,本例中,我就是簡略得經由過程挪用CGPathGetBoundingBox函數,前往CGPathRef的矩形區域,然後依據這個矩形取兩個點,讀者可以依據自行需求修正詳細代碼。
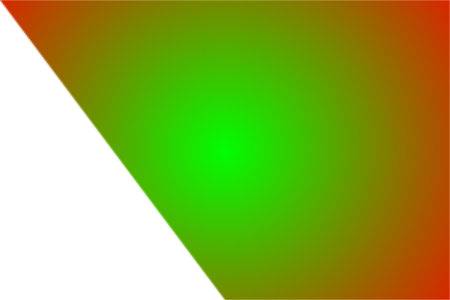
1-> 線性突變
- (void)drawLinearGradient:(CGContextRef)context
  path:(CGPathRef)path
 startColor:(CGColorRef)startColor
  endColor:(CGColorRef)endColor
{
 CGColorSpaceRef colorSpace = CGColorSpaceCreateDeviceRGB();
 CGFloat locations[] = { 0.0, 1.0 };

 NSArray *colors = @[(__bridge id) startColor, (__bridge id) endColor];

 CGGradientRef gradient = CGGradientCreateWithColors(colorSpace, (__bridge CFArrayRef) colors, locations);


 CGRect pathRect = CGPathGetBoundingBox(path);

 //詳細偏向可依據需求修正
 CGPoint startPoint = CGPointMake(CGRectGetMinX(pathRect), CGRectGetMidY(pathRect));
 CGPoint endPoint = CGPointMake(CGRectGetMaxX(pathRect), CGRectGetMidY(pathRect));

 CGContextSaveGState(context);
 CGContextAddPath(context, path);
 CGContextClip(context);
 CGContextDrawLinearGradient(context, gradient, startPoint, endPoint, 0);
 CGContextRestoreGState(context);

 CGGradientRelease(gradient);
 CGColorSpaceRelease(colorSpace);
}

- (void)viewDidLoad
{
 [super viewDidLoad];
 // Do any additional setup after loading the view.

 //創立CGContextRef
 UIGraphicsBeginImageContext(self.view.bounds.size);
 CGContextRef gc = UIGraphicsGetCurrentContext();

 //創立CGMutablePathRef
 CGMutablePathRef path = CGPathCreateMutable();

 //繪制Path
 CGRect rect = CGRectMake(0, 100, 300, 200);
 CGPathMoveToPoint(path, NULL, CGRectGetMinX(rect), CGRectGetMinY(rect));
 CGPathAddL.netoPoint(path, NULL, CGRectGetMidX(rect), CGRectGetMaxY(rect));
 CGPathAddL.netoPoint(path, NULL, CGRectGetWidth(rect), CGRectGetMaxY(rect));
 CGPathCloseSubpath(path);

 //繪制突變
 [self drawLinearGradient:gc path:path startColor:[UIColor greenColor].CGColor endColor:[UIColor redColor].CGColor];

 //留意釋放CGMutablePathRef
 CGPathRelease(path);

 //從Context中獲得圖象,並顯示在界面上
 UIImage *img = UIGraphicsGetImageFromCurrentImageContext();
 UIGraphicsEndImageContext();

 UIImageView *imgView = [[UIImageView alloc] initWithImage:img];
 [self.view addSubview:imgView];
}

2-> 圓半徑偏向突變
- (void)drawRadialGradient:(CGContextRef)context
  path:(CGPathRef)path
 startColor:(CGColorRef)startColor
  endColor:(CGColorRef)endColor
{
 CGColorSpaceRef colorSpace = CGColorSpaceCreateDeviceRGB();
 CGFloat locations[] = { 0.0, 1.0 };

 NSArray *colors = @[(__bridge id) startColor, (__bridge id) endColor];

 CGGradientRef gradient = CGGradientCreateWithColors(colorSpace, (__bridge CFArrayRef) colors, locations);


 CGRect pathRect = CGPathGetBoundingBox(path);
 CGPoint center = CGPointMake(CGRectGetMidX(pathRect), CGRectGetMidY(pathRect));
 CGFloat radius = MAX(pathRect.size.width / 2.0, pathRect.size.height / 2.0) * sqrt(2);

 CGContextSaveGState(context);
 CGContextAddPath(context, path);
 CGContextEOClip(context);

 CGContextDrawRadialGradient(context, gradient, center, 0, center, radius, 0);

 CGContextRestoreGState(context);

 CGGradientRelease(gradient);
 CGColorSpaceRelease(colorSpace);
}

- (void)viewDidLoad
{
 [super viewDidLoad];
 // Do any additional setup after loading the view.

 //創立CGContextRef
 UIGraphicsBeginImageContext(self.view.bounds.size);
 CGContextRef gc = UIGraphicsGetCurrentContext();

 //創立CGMutablePathRef
 CGMutablePathRef path = CGPathCreateMutable();

 //繪制Path
 CGRect rect = CGRectMake(0, 100, 300, 200);
 CGPathMoveToPoint(path, NULL, CGRectGetMinX(rect), CGRectGetMinY(rect));
 CGPathAddLineToPoint(path, NULL, CGRectGetMidX(rect), CGRectGetMaxY(rect));
 CGPathAddLineToPoint(path, NULL, CGRectGetWidth(rect), CGRectGetMaxY(rect));
 CGPathAddLineToPoint(path, NULL, CGRectGetWidth(rect), CGRectGetMinY(rect));
 CGPathCloseSubpath(path);

 //繪制突變
 [self drawRadialGradient:gc path:path startColor:[UIColor greenColor].CGColor endColor:[UIColor redColor].CGColor];

 //留意釋放CGMutablePathRef
 CGPathRelease(path);

 //從Context中獲得圖象,並顯示在界面上
 UIImage *img = UIGraphicsGetImageFromCurrentImageContext();
 UIGraphicsEndImageContext();

 UIImageView *imgView = [[UIImageView alloc] initWithImage:img];
 [self.view addSubview:imgView];
}
3、以CAShapeLayer作為layer的mask屬性
CALayer的mask屬性可以作為遮罩讓layer顯示mask遮住(非通明)的部門;CAShapeLayer為CALayer的子類,經由過程path屬性可以生成分歧的外形,將CAShapeLayer對象用作layer的mask屬性的話,便可以生成分歧外形的圖層。
故生成色彩突變有以下幾個步調:
1、生成一個imageView(也能夠為layer),image的屬性為色彩突變的圖片
2、生成一個CAShapeLayer對象,依據path屬性指定所需的外形
3、將CAShapeLayer對象賦值給imageView的mask屬性
- (void)viewDidLoad
{
 [super viewDidLoad];

 [self.view addSubview:self.firstCircle];
 _firstCircle.frame = CGRectMake(0, 0, 200, 200);
 _firstCircle.center = CGPointMake(CGRectGetWidth(self.view.bounds) / 2.0, CGRectGetHeight(self.view.bounds) / 2.0);
 CGFloat firsCircleWidth = 5;
 self.firstCircleShapeLayer = [self generateShapeLayerWithLineWidth:firsCircleWidth];
 _firstCircleShapeLayer.path = [self generateBezierPathWithCenter:CGPointMake(100, 100) radius:100].CGPath;
 _firstCircle.layer.mask = _firstCircleShapeLayer;
}

- (CAShapeLayer *)generateShapeLayerWithLineWidth:(CGFloat)lineWidth
{
 CAShapeLayer *waveline = [CAShapeLayer layer];
 waveline.lineCap = kCALineCapButt;
 waveline.lineJoin = kCALineJoinRound;
 waveline.strokeColor = [UIColor redColor].CGColor;
 waveline.fillColor = [[UIColor clearColor] CGColor];
 waveline.lineWidth = lineWidth;
 waveline.backgroundColor = [UIColor clearColor].CGColor;

 return waveline;
}

- (UIBezierPath *)generateBezierPathWithCenter:(CGPoint)center radius:(CGFloat)radius
{
 UIBezierPath *circlePath = [UIBezierPath bezierPathWithArcCenter:center radius:radius startAngle:0 endAngle:2*M_PI clockwise:NO];

 return circlePath;
}

- (UIImageView *)firstCircle
{
 if (!_firstCircle) {
 self.firstCircle = [[UIImageView alloc] initWithImage:[UIImage imageNamed:@"circleBackground"]];
 _firstCircle.layer.masksToBounds = YES;
 _firstCircle.alpha = 1.0;
 }

 return _firstCircle;
}

總結
以上就是這篇文章的全體內容了,願望本文的內容對列位IOS開辟者們能有所贊助,假如有疑問年夜家可以留言交換。
【總結iOS完成突變色彩的三種辦法】的相關資料介紹到這裡,希望對您有所幫助! 提示:不會對讀者因本文所帶來的任何損失負責。如果您支持就請把本站添加至收藏夾哦!