
實例講授iOS中的UIPageViewController翻頁視圖掌握器
1、引言
UIPageViewController是IOS中少見的動畫視圖掌握器之一,經由過程它既可以創立相似UIScrollView與UIPageControl聯合的滾屏視圖,也能夠創立相似圖書後果的炫酷翻頁視圖。
UIPageViewController在IOS 5 SDK中初次引入,它使得開辟者可使用這個ViewController創立分頁視圖。在IOS 6中,這個類有了更新,支撐轉動過渡後果。應用Page View,用戶可以便利的經由過程手勢在多個頁面之間導航。UIPageViewController其實不僅僅用於引誘頁,許多游戲,例如:惱怒的小鳥,就是用Page View來展現關卡選擇的頁面,還有有關書本的運用,用這個類來顯示書的頁面。
UIPageViewController是個高度可設置裝備擺設的類,你可以停止以下設置裝備擺設:
- 分頁的偏向——程度或垂直
- 翻頁的款式——書卷翻頁或許滑動翻頁
- 書脊地位——只要書卷翻頁款式有用
- 頁面間距——只要滑動翻頁款式有用,用來界說頁面間距(inter-page spacing)
UIPageViewController相似一個視圖容器,個中每一個詳細的視圖由各自的ViewController停止保護治理,UIPageViewController只停止調和與動畫安排。下圖可以很好的展示出UIPageViewControlelr的應用構造:
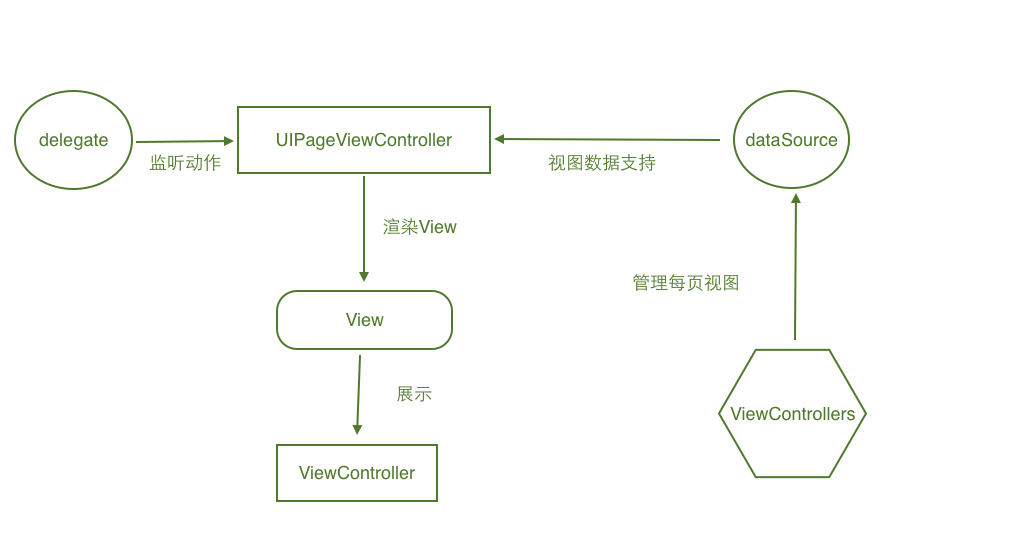
上圖中,UIPageViewControllerDataSource協定為UIPageViewController供給數據支撐,DataSource協定供給的數據來自各個ViewContoller自行保護,UIPageViewControllerDelegate中的回調可以對翻頁舉措,屏幕扭轉舉措等停止監聽。UIPageViewController把從DataSource中獲得到的視圖數據襯著給View用於以後視圖掌握器的展現。
為了演示,我們會一路創立一個簡略的app。固然,我們不會演示一切的UIPageViewController的設置裝備擺設細節,我們會演示到應用滑動翻頁款式來創立一個引誘頁。不外別擔憂,有了對UIPageViewController的根本懂得,我信任你可以或許去摸索其他的特征。
開端吧!
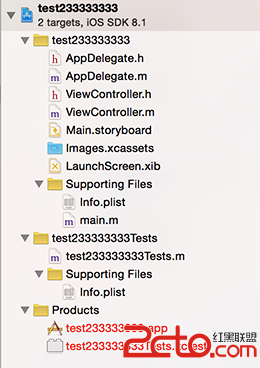
2、創立一個UIPageViewController
起首新建一個類作為翻頁視圖掌握器中詳細每頁視圖的掌握器,使其繼續於UIViewController:
ModelViewController.h
#import <UIKit/UIKit.h>ModelViewController.m
@interface ModelViewController : UIViewController
+(ModelViewController *)creatWithIndex:(int)index;
@property(nonatomic,strong)UILabel * indexLabel;
@end
#import "ModelViewController.h"在工程模板自帶的ViewController.m文件中完成以下代碼:
@interface ModelViewController ()
@end
@implementation ModelViewController
+(ModelViewController *)creatWithIndex:(int)index{
ModelViewController * con = [[ModelViewController alloc]init];
con.indexLabel = [[UILabel alloc]initWithFrame:CGRectMake(110, 200, 100, 30)];
con.indexLabel.text = [NSString stringWithFormat:@"第%d頁",index];
[con.view addSubview:con.indexLabel];
return con;
}
- (void)viewDidLoad {
[super viewDidLoad];
// Do any additional setup after loading the view.
self.view.backgroundColor = [UIColor redColor];
}
@end
#import "ViewController.h"

#import "ModelViewController.h"

//遵照協定

@interface ViewController ()<UIPageViewControllerDataSource,UIPageViewControllerDelegate>

{

    //翻頁視圖掌握器對象

    UIPageViewController * _pageViewControl;

    //數據源數組

    NSMutableArray * _dataArray;

}

@end
@implementation ViewController
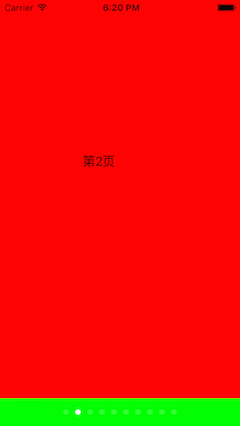
- (void)viewDidLoad {下面創立了最簡略的翻頁視圖掌握器示例,後果以下圖:
[super viewDidLoad];
//停止初始化
_pageViewControl = [[UIPageViewController alloc]initWithTransitionStyle:UIPageViewControllerTransitionStyleScroll navigationOrientation:UIPageViewControllerNavigationOrientationHorizontal options:@{UIPageViewControllerOptionSpineLocationKey:@0,UIPageViewControllerOptionInterPageSpacingKey:@10}];
self.view.backgroundColor = [UIColor greenColor];
//設置翻頁視圖的尺寸
_pageViewControl.view.bounds=self.view.bounds;
//設置數據源與署理
_pageViewControl.dataSource=self;
_pageViewControl.delegate=self;
//創立初始界面
ModelViewController * model = [ModelViewController creatWithIndex:1];
//設置初始界面
[_pageViewControl setViewControllers:@[model] direction:UIPageViewControllerNavigationDirectionReverse animated:YES completion:nil];
//設置能否雙面展現
_pageViewControl.doubleSided = NO;
_dataArray = [[NSMutableArray alloc]init];
[_dataArray addObject:model];
[self.view addSubview:_pageViewControl.view];
}
//翻頁掌握器停止向前翻頁舉措 這個數據源辦法前往的視圖掌握器為要顯示視圖的視圖掌握器
- (nullable UIViewController *)pageViewController:(UIPageViewController *)pageViewController viewControllerBeforeViewController:(UIViewController *)viewController{
int index = (int)[_dataArray indexOfObject:viewController];
if (index==0) {
return nil;
}else{
return _dataArray[index-1];
}
}
//翻頁掌握器停止向後翻頁舉措 這個數據源辦法前往的視圖掌握器為要顯示視圖的視圖掌握器
- (nullable UIViewController *)pageViewController:(UIPageViewController *)pageViewController viewControllerAfterViewController:(UIViewController *)viewController{
int index = (int)[_dataArray indexOfObject:viewController];
if (index==9) {
return nil;
}else{
if (_dataArray.count-1>=(index+1)) {
return _dataArray[index+1];
}else{
ModelViewController * model = [ModelViewController creatWithIndex:index+2];
[_dataArray addObject:model];
return model;
}
}
}
//屏幕扭轉觸發的署理辦法
- (UIPageViewControllerSpineLocation) pageViewController:(UIPageViewController *)pageViewController spineLocationForInterfaceOrientation:(UIInterfaceOrientation)orientation{
return UIPageViewControllerSpineLocationMin;
}
//設置分頁掌握器的分頁數
- (NSInteger)presentationCountForPageViewController:(UIPageViewController *)pageViewController {
return 10;
}
//設置初始的分頁點
- (NSInteger)presentationIndexForPageViewController:(UIPageViewController *)pageViewController{
return 0;
}
@end
3、UIPageViewController中辦法應用解析
//創立翻頁視圖掌握器對象下面辦法用於創立視圖掌握器對象,個中UIPageViewControllerTransitionStyle參數設置翻頁掌握器的作風,列舉以下:
- (instancetype)initWithTransitionStyle:(UIPageViewControllerTransitionStyle)style navigationOrientation:(UIPageViewControllerNavigationOrientation)navigationOrientation options:(nullable NSDictionary<NSString *, id> *)options;
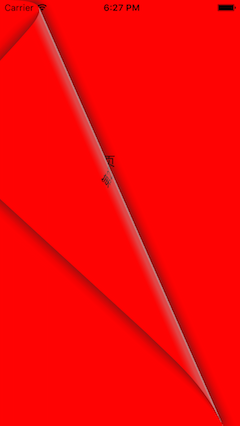
typedef NS_ENUM(NSInteger, UIPageViewControllerTransitionStyle) {假如設置為UIPageViewControllerTransitionStyleCurl,翻頁後果以下圖所示:
UIPageViewControllerTransitionStylePageCurl = 0, //相似於書本翻頁後果
UIPageViewControllerTransitionStyleScroll = 1 // 相似於ScrollView的滑動後果
};
下面初始化辦法中的UIPageViewControllerNavigationOrientation屬性設置翻頁的偏向,列舉以下:
typedef NS_ENUM(NSInteger, UIPageViewControllerNavigationOrientation) {options參數用於設置翻頁視圖掌握器的設置裝備擺設字典,其可以設置的設置裝備擺設鍵值以下:
UIPageViewControllerNavigationOrientationHorizontal = 0,//程度翻頁
UIPageViewControllerNavigationOrientationVertical = 1//豎直翻頁
};
//這個鍵須要設置為UIPageViewControllerOptionSpineLocationKey列舉值對應的NSNumber對象 設置翻頁掌握器的書軸 前面會引見上面是UIPageViewController的一些經常使用屬性與辦法:
NSString * const UIPageViewControllerOptionSpineLocationKey;
//這個鍵須要設置為NSNumber類型 設置每頁視圖的間距 用於轉動視圖作風的
NSString * const UIPageViewControllerOptionInterPageSpacingKey;
//設置數據源下面只要spineLocation屬性有些難於懂得,其列舉以下:
@property (nullable, nonatomic, weak) id <UIPageViewControllerDelegate> delegate;
//設置署理
@property (nullable, nonatomic, weak) id <UIPageViewControllerDataSource> dataSource;
//獲得翻頁作風
@property (nonatomic, readonly) UIPageViewControllerTransitionStyle transitionStyle;
//獲得翻頁偏向
@property (nonatomic, readonly) UIPageViewControllerNavigationOrientation navigationOrientation;
//獲得書軸類型
@property (nonatomic, readonly) UIPageViewControllerSpineLocation spineLocation;
//設置能否雙面顯示
@property (nonatomic, getter=isDoubleSided) BOOL doubleSided;
//設置要顯示的視圖掌握器
- (void)setViewControllers:(nullable NSArray<UIViewController *> *)viewControllers direction:(UIPageViewControllerNavigationDirection)direction animated:(BOOL)animated completion:(void (^ __nullable)(BOOL finished))completion;
typedef NS_ENUM(NSInteger, UIPageViewControllerSpineLocation) {將下面的示例代碼修正幾個處所以下:
//關於SCrollView類型的滑動後果 沒有書軸 會前往上面這個列舉值
UIPageViewControllerSpineLocationNone = 0,
//以右邊或許上邊為軸停止翻轉 界面統一時光只顯示一個View
UIPageViewControllerSpineLocationMin = 1,
//以中央為軸停止翻轉 界面同時可以顯示兩個View
UIPageViewControllerSpineLocationMid = 2,
//以下邊或許左邊為軸停止翻轉 界面統一時光只顯示一個View
UIPageViewControllerSpineLocationMax = 3
};
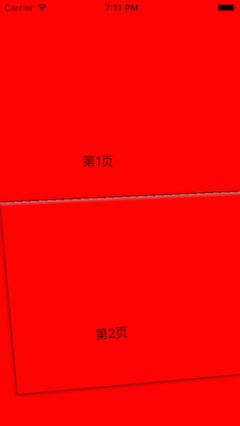
- (void)viewDidLoad {運轉後果以下圖所示:
[super viewDidLoad];
// Do any additional setup after loading the view, typically from a nib.
_pageViewControl = [[UIPageViewController alloc]initWithTransitionStyle:UIPageViewControllerTransitionStylePageCurl navigationOrientation:UIPageViewControllerNavigationOrientationVertical options:@{UIPageViewControllerOptionSpineLocationKey:@2,UIPageViewControllerOptionInterPageSpacingKey:@10}];
self.view.backgroundColor = [UIColor greenColor];
_pageViewControl.view.bounds=self.view.bounds;
_pageViewControl.dataSource=self;
_pageViewControl.delegate=self;
ModelViewController * model = [ModelViewController creatWithIndex:1];
ModelViewController * model2 = [ModelViewController creatWithIndex:2];
[_pageViewControl setViewControllers:@[model,model2] direction:UIPageViewControllerNavigationDirectionReverse animated:YES completion:nil];
_pageViewControl.doubleSided = YES;
_dataArray = [[NSMutableArray alloc]init];
[_dataArray addObject:model];
[self.view addSubview:_pageViewControl.view];
}
- (UIPageViewControllerSpineLocation) pageViewController:(UIPageViewController *)pageViewController spineLocationForInterfaceOrientation:(UIInterfaceOrientation)orientation{
return UIPageViewControllerSpineLocationMid;
}
4、UIPageViewControllerDataSource中辦法解析
//向前翻頁展現的ViewController5、UIPageViewControllerDelegate中辦法解析
- (nullable UIViewController *)pageViewController:(UIPageViewController *)pageViewController viewControllerBeforeViewController:(UIViewController *)viewController;
//向後翻頁展現的ViewController
- (nullable UIViewController *)pageViewController:(UIPageViewController *)pageViewController viewControllerAfterViewController:(UIViewController *)viewController;
//設置分頁掌握器的分頁點數
- (NSInteger)presentationCountForPageViewController:(UIPageViewController *)pageViewController NS_AVAILABLE_IOS(6_0);
//設置以後分頁掌握器所高亮的點
- (NSInteger)presentationIndexForPageViewController:(UIPageViewController *)pageViewController NS_AVAILABLE_IOS(6_0);
//翻頁視圖掌握器將要翻頁時履行的辦法

- (void)pageViewController:(UIPageViewController *)pageViewController willTransitionToViewControllers:(NSArray<UIViewController *> *)pendingViewControllers NS_AVAILABLE_IOS(6_0);

//翻頁動畫履行完成後回調的辦法

- (void)pageViewController:(UIPageViewController *)pageViewController didFinishAnimating:(BOOL)finished previousViewControllers:(NSArray<UIViewController *> *)previousViewControllers transitionCompleted:(BOOL)completed;

//屏幕防地轉變時回到的辦法,可以經由過程前往值重設書軸類型列舉

- (UIPageViewControllerSpineLocation)pageViewController:(UIPageViewController *)pageViewController spineLocationForInterfaceOrientation:(UIInterfaceOrientation)orientation;
【實例講授iOS中的UIPageViewController翻頁視圖掌握器】的相關資料介紹到這裡,希望對您有所幫助! 提示:不會對讀者因本文所帶來的任何損失負責。如果您支持就請把本站添加至收藏夾哦!

- iOS 完成多署理的辦法及實例代碼
- IOS 陀螺儀開辟(CoreMotion框架)實例詳解
- ajax 三種完成辦法實例代碼
- iOS中 LGLAlertView 提醒框的實例代碼
- IOS 仿時間網選票UI實例代碼
- iOS 雷達後果實例詳解
- IOS 粒子體系 (CAEmitterLayer)實例詳解
- iOS 動畫 —— 禮花後果實例具體
- 在Swift中應用JSONModel 實例代碼
- iOS 9 Core Spotlight搜刮實例代碼
- 圖文講授若何處理App的iOS 7頂部狀況欄適配成績
- 實例講授iOS中的CATransition轉場動畫應用
- 應用Swift代碼完成iOS手勢解鎖、指紋解鎖實例詳解
- iOS App開辟中應用設計形式中的單例形式的實例解析
- iOS中應用UIDatePicker制造時光選擇器的實例教程
