NSLayoutConstraint 靜態規劃
在IOS開發中,由於屏幕是變化的,所以有時分 規劃是靜態的,所以本期帶來的就是NSLayoutConstraint靜態規劃。
在用NSLayoutConstraint規劃之前translatesAutoresizingMaskIntoConstraints屬性一定要設為NO。
先引見一下用的一個辦法。
+(instancetype)constraintWithItem:(id)view1 attribute:(NSLayoutAttribute)attr1 relatedBy:(NSLayoutRelation)relation toItem:(nullable id)view2 attribute:(NSLayoutAttribute)attr2 multiplier:(CGFloat)multiplier constant:(CGFloat)c;
參數view1:目的視圖。
參數attr1:目的視圖所要設置的屬性。
參數relation:目的視圖屬性與參照視圖的關系 有三種
NSLayoutRelationLessThanOrEqual = -1,小於等於
NSLayoutRelationEqual = 0,等於
NSLayoutRelationGreaterThanOrEqual = 1,大於等於
參數view2:參照視圖。
參數attr2:參照視圖屬性。
參數multiplier:乘數--目的視圖與參照視圖的屬性的倍數關系。不可為0
參數c:常數--目的視圖與參照視圖的屬性的加減關系。
屬性NSLayoutAttribute:
NSLayoutAttributeLeft 對象右邊距
NSLayoutAttributeRight, 對象左邊距
NSLayoutAttributeTop, 對象上邊距
NSLayoutAttributeBottom, 對象下邊距
NSLayoutAttributeLeading, 對象右邊距
NSLayoutAttributeTrailing, 對象左邊距 這裡特別將強調一下trailing和right代表的意思是一樣的 但是實踐使用的時分 不能混用 一定要一致
NSLayoutAttributeWidth, 對象的寬
NSLayoutAttributeHeight, 對象的高
NSLayoutAttributeCenterX, 對象中心點的x
NSLayoutAttributeCenterY, 對象中心的點y
NSLayoutAttributeLastBaseline,文本下劃線
NSLayoutAttributeBaseline NS_SWIFT_UNAVAILABLE("Use 'lastBaseline' instead") = NSLayoutAttributeLastBaseline,文本下劃線
NSLayoutAttributeFirstBaseline NS_ENUM_AVAILABLE_IOS(8_0),文本上劃線
關於上面的屬性在下面的根底上加了邊緣,也就是說上下左右間隔實踐邊緣有8磅的間隔。
NSLayoutAttributeLeftMargin NS_ENUM_AVAILABLE_IOS(8_0),
NSLayoutAttributeRightMargin NS_ENUM_AVAILABLE_IOS(8_0),
NSLayoutAttributeTopMargin NS_ENUM_AVAILABLE_IOS(8_0),
NSLayoutAttributeBottomMargin NS_ENUM_AVAILABLE_IOS(8_0),
NSLayoutAttributeLeadingMargin NS_ENUM_AVAILABLE_IOS(8_0),
NSLayoutAttributeTrailingMargin NS_ENUM_AVAILABLE_IOS(8_0),
NSLayoutAttributeCenterXWithinMargins NS_ENUM_AVAILABLE_IOS(8_0),
NSLayoutAttributeCenterYWithinMargins NS_ENUM_AVAILABLE_IOS(8_0),
NSLayoutAttributeNotAnAttribute = 0 沒有屬性
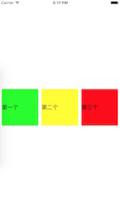
好了說了那麼多廢話,終於要使用了,這樣吧隨意舉個例子:在屏幕地方並列橫排放三個label,一切的寬與一切的高都相反,居左8,居右8,間距10。
上面是完成代碼:
UILabel *label1 = [[UILabel alloc] init];
UILabel *label2 = [[UILabel alloc] init];
UILabel *label3 = [[UILabel alloc] init];
[self.view addSubview:label1];
[self.view addSubview:label2];
[self.view addSubview:label3];
label1.translatesAutoresizingMaskIntoConstraints = NO;
label2.translatesAutoresizingMaskIntoConstraints = NO;
label3.translatesAutoresizingMaskIntoConstraints = NO;
label1.backgroundColor = [UIColor greenColor];
label2.backgroundColor = [UIColor yellowColor];
label3.backgroundColor = [UIColor redColor];
label1.text = @"第一個";
label2.text = @"第二個";
label3.text = @"第三個";
[self.view addConstraint:[NSLayoutConstraint constraintWithItem:label1 attribute:NSLayoutAttributeHeight relatedBy:NSLayoutRelationEqual toItem:label1 attribute:NSLayoutAttributeWidth multiplier:1 constant:0]];//label1 高=寬
[self.view addConstraint:[NSLayoutConstraint constraintWithItem:label1 attribute:NSLayoutAttributeLeftMargin relatedBy:NSLayoutRelationEqual toItem:self.view attribute:NSLayoutAttributeLeftMargin multiplier:1 constant:0]];// label1 距左8
[self.view addConstraint:[NSLayoutConstraint constraintWithItem:label1 attribute:NSLayoutAttributeCenterY relatedBy:NSLayoutRelationEqual toItem:self.view attribute:NSLayoutAttributeCenterY multiplier:1 constant:0]];//label1 距上150
[self.view addConstraint:[NSLayoutConstraint constraintWithItem:label2 attribute:NSLayoutAttributeHeight relatedBy:NSLayoutRelationEqual toItem:label2 attribute:NSLayoutAttributeWidth multiplier:1 constant:0]];//label2 高=寬
[self.view addConstraint:[NSLayoutConstraint constraintWithItem:label2 attribute:NSLayoutAttributeWidth relatedBy:NSLayoutRelationEqual toItem:label1 attribute:NSLayoutAttributeWidth multiplier:1 constant:0]];//label2 寬=label1 的寬
[self.view addConstraint:[NSLayoutConstraint constraintWithItem:label2 attribute:NSLayoutAttributeTop relatedBy:NSLayoutRelationEqual toItem:label1 attribute:NSLayoutAttributeTop multiplier:1 constant:0]];//label2 上 = label1上邊距
[self.view addConstraint:[NSLayoutConstraint constraintWithItem:label2 attribute:NSLayoutAttributeLeading relatedBy:NSLayoutRelationEqual toItem:label1 attribute:NSLayoutAttributeTrailing multiplier:1 constant:10]];//label2 左距laebl1左邊10
[self.view addConstraint:[NSLayoutConstraint constraintWithItem:label3 attribute:NSLayoutAttributeHeight relatedBy:NSLayoutRelationEqual toItem:label3 attribute:NSLayoutAttributeWidth multiplier:1 constant:0]];//label3 高=寬
[self.view addConstraint:[NSLayoutConstraint constraintWithItem:label3 attribute:NSLayoutAttributeWidth relatedBy:NSLayoutRelationEqual toItem:label1 attribute:NSLayoutAttributeWidth multiplier:1 constant:0]];//label3 寬=label1的寬
[self.view addConstraint:[NSLayoutConstraint constraintWithItem:label3 attribute:NSLayoutAttributeTop relatedBy:NSLayoutRelationEqual toItem:label1 attribute:NSLayoutAttributeTop multiplier:1 constant:0]];//label3 上 = label1上邊距
[self.view addConstraint:[NSLayoutConstraint constraintWithItem:label3 attribute:NSLayoutAttributeLeading relatedBy:NSLayoutRelationEqual toItem:label2 attribute:NSLayoutAttributeTrailing multiplier:1 constant:10]];////label3 左距laebl2左邊10
[self.view addConstraint:[NSLayoutConstraint constraintWithItem:label3 attribute:NSLayoutAttributeTrailingMargin relatedBy:NSLayoutRelationEqual toItem:self.view attribute:NSLayoutAttributeTrailingMargin multiplier:1 constant:0]];//label3 距左邊8
上面是效果圖:
【NSLayoutConstraint 靜態規劃】的相關資料介紹到這裡,希望對您有所幫助! 提示:不會對讀者因本文所帶來的任何損失負責。如果您支持就請把本站添加至收藏夾哦!
- 上一頁:wax
- 下一頁:iOS 任務之余小總結

- iOS在固定的label上靜態顯示一切文字
- iOS應用CALayer完成動畫加載的後果
- iOS中 LGLAlertView 提醒框的實例代碼
- iOS長按UIlabel完成可復制功效
- iOS10 App適配權限 Push Notifications 字體Frame 碰到的成績
- iOS開辟之(APNS)長途推送完成代碼 附證書與真機調試
- iOS突變圓環扭轉動畫CAShapeLayer CAGradientLayer
- IOS 粒子體系 (CAEmitterLayer)實例詳解
- iOS法式開辟之應用PlaceholderImageView完成優雅的圖片加載後果
- iOS Runntime 靜態添加類辦法並挪用-class_addMethod
- iOS中NSArray數組經常使用處置方法
- 處理Alamofire庫在iOS7下設置Head有效的成績
- iOS開辟中#import、#include和@class的差別解析
- iOS App開辟中擴大RCLabel組件停止基於HTML的文本結構
- IOS代碼筆記UIView的placeholder的後果