iOS動畫案例(1) 相似於qq賬號信息裡的一個動畫效果
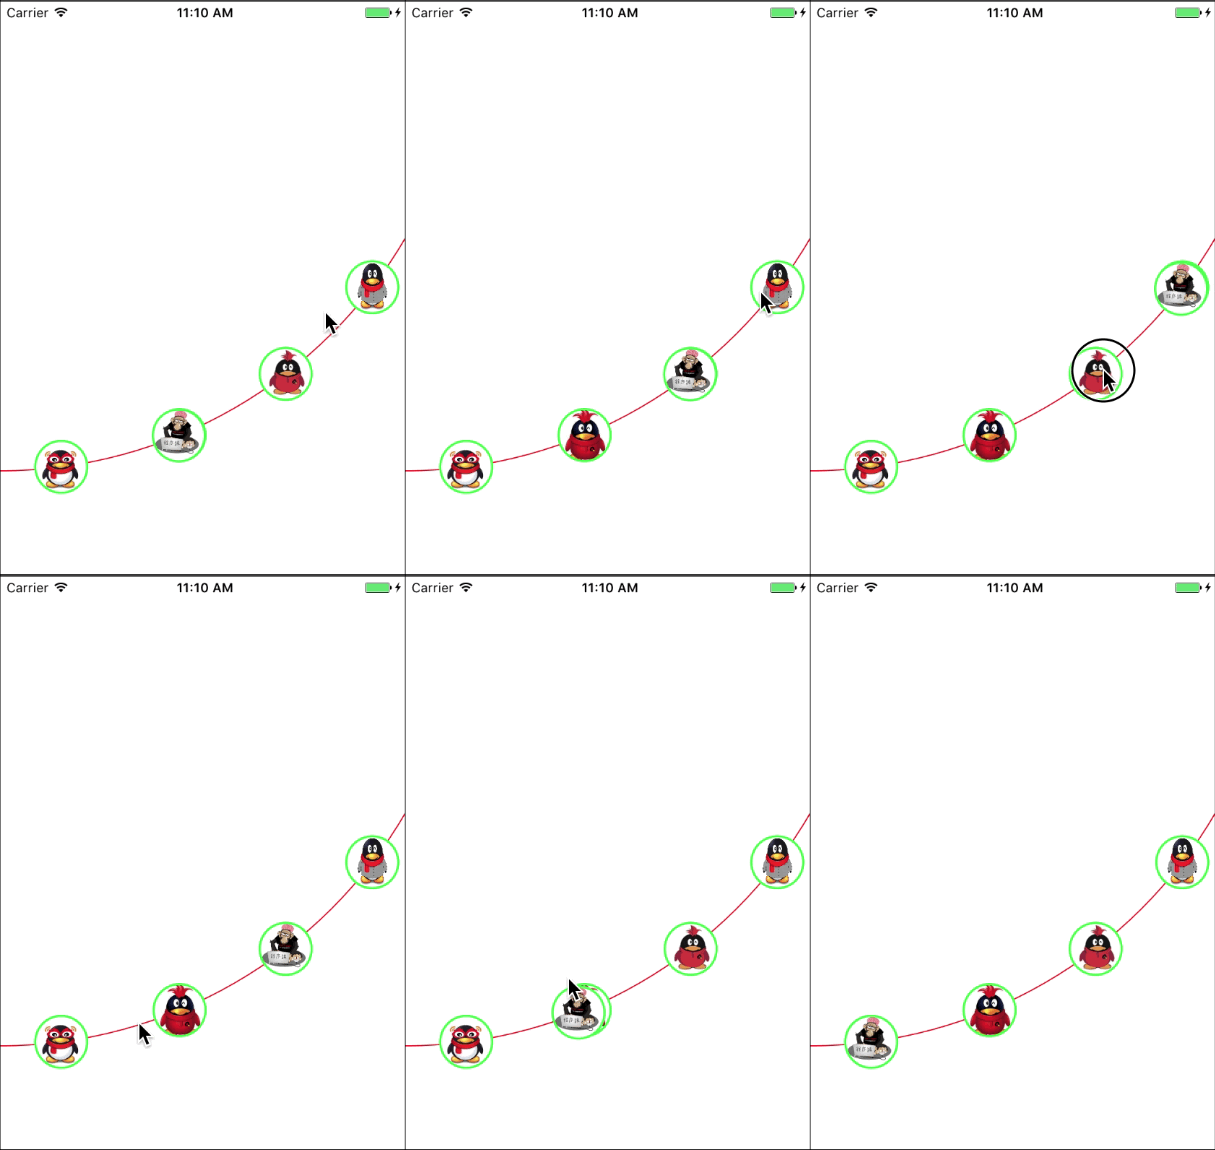
受人所托,做一個相似於qq賬號信息裡的一個動畫,覺得挺有意思,也沒覺得有多難,就開端做了,後果才發現學的數學知識都還給體育教師了,研討了大半天賦做出來。
先看一下動畫效果:

用到的知識點:
(1)三角函數
(2)CALayer
(3)CATransaction
(4)UIBezierPath
(5)CAKeyframeAnimation
(6)CAAnimationGroup

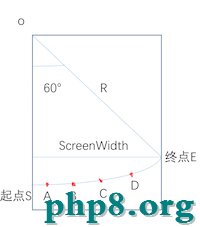
如圖,這分明是一段圓弧,那麼要確定這段一段圓弧的地位,就得確定這段圓弧的圓心和圓心角。我規則圓心在手機屏幕的左頂點,也就是(0,0),圓心角為60°。別問我為什麼這麼確定,我也是一點點嘗試的。我們先設手機屏幕的寬度為 ScreenWidth,圓弧半徑為R;那麼R = ScreenWidth/cos(60°);知道了這些開端畫圓弧。
// 屏幕的寬度
 CGFloat width = [UIScreen mainScreen].bounds.size.width;
 // 圓半徑
 float r = 2 * width / sqrt(3);
 // 畫曲線
 UIColor *color = [UIColor redColor];
 [color set];
 UIBezierPath *path = [UIBezierPath bezierPathWithArcCenter:CGPointMake(0, 0) radius:r startAngle:M_PI / 2 endAngle:M_PI / 6 clockwise:NO];
 path.lineWidth = 1.0;
 path.lineCapStyle = kCGLineCapRound;
 path.lineJoinStyle = kCGLineJoinRound;
 [path stroke];
確定了圓心角和半徑就要確定ABCD四個點的坐標了,辨別作為四張圖片的圓心。圓弧SA和圓弧DE的圓心角一樣,設定為7.5°,那麼弧AB、弧BC、弧CD的圓心角設定為相等,辨別為(60 - 7.5 * 2)/ 3 = 15°。那麼A點的坐標就等於(R * sin7.5,R * cos7.5°);B,C,D點的坐標一樣用三角函數求,辨別為(R * sin22.5,R * cos22.5°),(R * sin37.5,R * cos37.5°),(R * sin52.5,R * cos52.5°)。ABCD其實都是一個按鈕,上面開端放按鈕。
// 放圖片
 for (int i = 0; i < 4; i++) {
  // 一共四個按鈕 從左到右index辨別為0,1,2,3
  UIButton *button = [UIButton buttonWithType:UIButtonTypeCustom];
  button.frame = [self getButtonFrame:i];
  button.tag = i + 1;
  [button addTarget:self action:@selector(buttonClick:) forControlEvents:UIControlEventTouchUpInside];
  [button setImage:[UIImage imageNamed:[NSString stringWithFormat:@"%d",i + 1]] forState:UIControlStateNormal];
  // 設置按鈕為圓
  button.layer.cornerRadius = 25;
  button.layer.borderColor = [UIColor greenColor].CGColor;
  button.layer.masksToBounds = YES;
  button.layer.borderWidth = 2.0f;
  [self addSubview:button];
 }
 // 依據Index確定按鈕的坐標
 - (CGRect)getButtonFrame: (int) index {
 float radians = M_PI * (7.5 + 15 * index) / 180;
 CGFloat width = [UIScreen mainScreen].bounds.size.width;
 float r = 2 * width / sqrt(3);
 CGRect frame = CGRectMake(sin(radians) * r, cos(radians) * r, 50, 50);
 frame.origin.x = frame.origin.x - 25;
 frame.origin.y = frame.origin.y - 25;
 return frame;
 }
頭像默許放第一個。
 self.head = [[UIImageView alloc] initWithFrame:[self getButtonFrame:0]];
 self.head.image = [UIImage imageNamed:@"myHead"];
 self.head.layer.borderColor = [UIColor greenColor].CGColor;
 self.head.layer.masksToBounds = YES;
 self.head.layer.cornerRadius = 25;
 self.head.layer.borderWidth = 2.0f;
 [self addSubview:self.head];
之後按鈕點擊之後,頭像挪動到按鈕點擊的中央。
// 按鈕點擊事情
- (void)buttonClick:(UIButton *)button {
 // 原來圖片所在按鈕的index
 int preIndex = [self getPreviousIndexByFrame:self.head.frame];
 int buttonIndex = (int)button.tag - 1;
 // 點擊圖片所在按鈕 不做任何操作
 if (preIndex == buttonIndex) {
  return;
 }
 CGFloat width = [UIScreen mainScreen].bounds.size.width;
 float r = 2 * width / sqrt(3);
 //參加動畫效果
 CALayer *transitionLayer = [[CALayer alloc] init];
 //顯式事務默許開啟動畫效果,kCFBooleanTrue封閉 保證begin和commit 之間的屬性修正同時停止
 transitionLayer.contents = self.head.layer.contents;
 transitionLayer.borderColor = [UIColor greenColor].CGColor;
 transitionLayer.masksToBounds = YES;
 transitionLayer.cornerRadius = 25;
 transitionLayer.borderWidth = 2.0f;
 transitionLayer.frame = self.head.frame;
 transitionLayer.backgroundColor=[UIColor blueColor].CGColor;
 [self.layer addSublayer:transitionLayer];
 self.head.hidden = YES;
 UIBezierPath *movePath;
 //途徑曲線 貝塞爾曲線
 if (buttonIndex > preIndex) {
  // 向上滑 逆時針
  movePath = [UIBezierPath bezierPathWithArcCenter:CGPointMake(0, 0) radius:r startAngle:[self getAnticlockwiseByIndex:preIndex] endAngle:[self getAnticlockwiseByIndex:buttonIndex] clockwise:NO];
  [movePath moveToPoint:transitionLayer.position];
 }else {
  // 向下滑 順時針
  movePath = [UIBezierPath bezierPathWithArcCenter:CGPointMake(0, 0) radius:r startAngle:[self getClockwiseAngleByIndex:preIndex] endAngle:[self getClockwiseAngleByIndex:buttonIndex] clockwise:YES];
  [movePath moveToPoint:transitionLayer.position];
 }
 //關鍵幀動畫效果
 CAKeyframeAnimation *positionAnimation = [CAKeyframeAnimation animationWithKeyPath:@"position"];
 // 動畫軌跡
 positionAnimation.path = movePath.CGPath;
 // 動畫完成之後能否刪除動畫效果
 positionAnimation.removedOnCompletion = NO;
 // 設置開端的時間
 positionAnimation.beginTime = CACurrentMediaTime();
 CGFloat time = 0.7;
 if (labs(buttonIndex - preIndex) > 1) {
  time = 0.4 * labs(buttonIndex - preIndex);
 }
 //動畫總時間
 positionAnimation.duration = time;
 // 動畫的方式 淡入淡出
 positionAnimation.timingFunction=[CAMediaTimingFunction functionWithName:kCAMediaTimingFunctionEaSEOut];
 // 執行完之後保管最新的形態
 positionAnimation.fillMode = kCAFillModeForwards;
 // 動畫完成之後,能否回到原來的中央
 positionAnimation.autoreverses= NO;
 [transitionLayer addAnimation:positionAnimation forKey:@"opacity"];
 [CATransaction setCompletionBlock:^{
  [NSThread sleepForTimeInterval:time];
  self.head.hidden = NO;
  self.head.frame = button.frame;
  [transitionLayer removeFromSuperlayer];
 }];
}
// 依據Index取得順時針的弧度
- (float)getAnticlockwiseByIndex: (NSInteger)index {
 return M_PI * (0.5 - (7.5 + 15 * index) / 180);
}
// 依據Index取得逆時針的弧度
- (float)getClockwiseAngleByIndex: (NSInteger)index {
 index = 3 - index;
 return M_PI * (30 + 7.5 + 15 * index) / 180;
}
這個動畫的難點其實是確定四個按鈕的坐標以及圓弧的半徑,次要是學的數學都忘的差不多了,還好重新撿起來還算不難。
以上所述是本站給大家引見的IOS動畫案例(1) 相似於qq賬號信息裡的一個動畫效果,希望對大家有所協助,假如大家有任何疑問請給我留言,本站會及時回復大家的。在此也十分感激大家對本站網站的支持!
【iOS動畫案例(1) 相似於qq賬號信息裡的一個動畫效果】的相關資料介紹到這裡,希望對您有所幫助! 提示:不會對讀者因本文所帶來的任何損失負責。如果您支持就請把本站添加至收藏夾哦!
- 上一頁:iOS圖片拉伸的4種辦法
- 下一頁:iOS經過逆向了解Block的內存模型


