詳解iOS開發中UItableview控件的數據刷新功能的實現
實現UItableview控件數據刷新
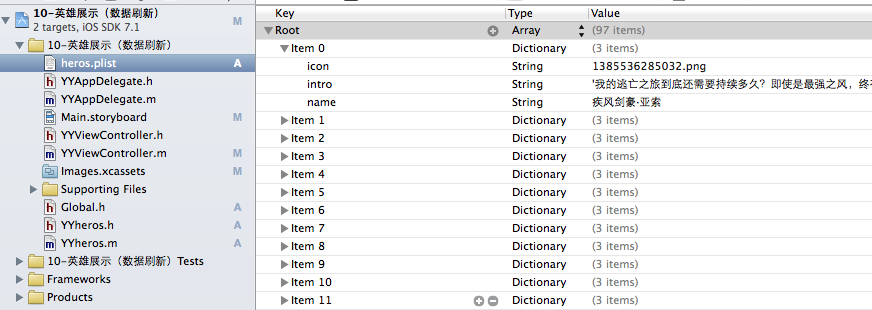
一、項目文件結構和plist文件

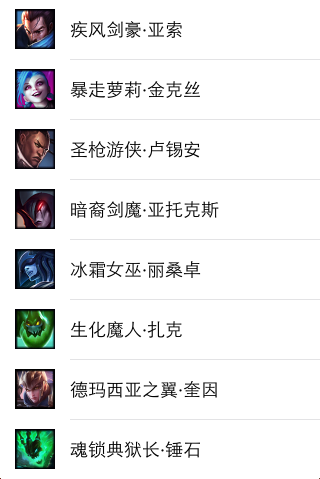
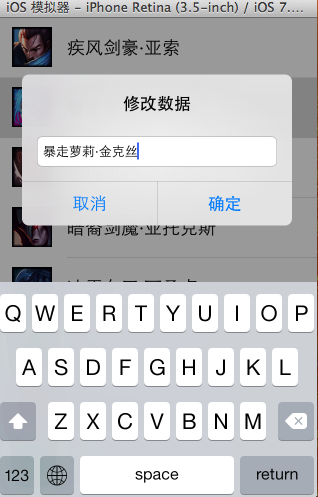
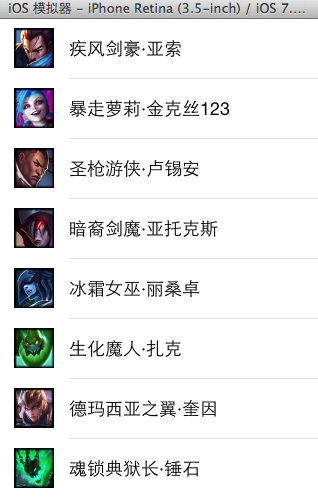
二、實現效果
1.說明:這是一個英雄展示界面,點擊選中行,可以修改改行英雄的名稱(完成數據刷新的操作).
運行界面:
點擊選中行:
修改數據後自動刷新:
三、代碼示例
數據模型部分:
YYheros.h文件
復制代碼 代碼如下:
//
// YYheros.h
// 10-英雄展示(數據刷新)
//
// Created by apple on 14-5-29.
// Copyright (c) 2014年 itcase. All rights reserved.
//
#import <Foundation/Foundation.h>
#import "Global.h"
@interface YYheros : NSObject
@property(nonatomic,copy)NSString *name;
@property(nonatomic,copy)NSString *icon;
@property(nonatomic,copy)NSString *intro;
//-(instancetype)initWithDict:(NSDictionary *)dict;
//+(instancetype)herosWithDict:(NSDictionary *)dict;
YYinitH(hero)
@end
YYheros.m文件
復制代碼 代碼如下:
//
// YYheros.m
// 10-英雄展示(數據刷新)
//
// Created by apple on 14-5-29.
// Copyright (c) 2014年 itcase. All rights reserved.
//
#import "YYheros.h"
@implementation YYheros
//-(instancetype)initWithDict:(NSDictionary *)dict
//{
// if (self=[super init]) {
//// self.name=dict[@"name"];
//// self.icon=dict[@"icon"];
//// self.intro=dict[@"intro"];
//
// //使用KVC
// [self setValuesForKeysWithDictionary:dict];
// }
// return self;
//}
//
//+(instancetype)herosWithDict:(NSDictionary *)dict
//{
// return [[self alloc]initWithDict:dict];
//}
YYinitM(hero)
@end
主控制器 YYViewController.m文件
復制代碼 代碼如下:
//
// YYViewController.m
// 10-英雄展示(數據刷新)
//
// Created by apple on 14-5-29.
// Copyright (c) 2014年 itcase. All rights reserved.
//
#import "YYViewController.h"
#import "YYheros.h"
@interface YYViewController ()<UITableViewDataSource,UIAlertViewDelegate,UITableViewDelegate>
@property (strong, nonatomic) IBOutlet UITableView *tableview;
@property(nonatomic,strong)NSArray *heros;
@end
復制代碼 代碼如下:
@implementation YYViewController
- (void)viewDidLoad
{
[super viewDidLoad];
//設置數據源
self.tableview.dataSource=self;
self.tableview.delegate=self;
self.tableview.rowHeight=60.f;
NSLog(@"%d",self.heros.count);
}
#pragma mark -懶加載
-(NSArray *)heros
{
if (_heros==nil) {
NSString *fullpath=[[NSBundle mainBundle]pathForResource:@"heros.plist" ofType:nil];
NSArray *temparray=[NSArray arrayWithContentsOfFile:fullpath];
NSMutableArray *arrayM=[NSMutableArray array];
for (NSDictionary *dict in temparray) {
YYheros *hero=[YYheros herosWithDict:dict];
[arrayM addObject:hero];
}
_heros=[arrayM mutableCopy];
}
return _heros;
}
#pragma mark- tableview的處理
//多少組
-(NSInteger)numberOfSectionsInTableView:(UITableView *)tableView
{
return 1;
}
//多少行
-(NSInteger)tableView:(UITableView *)tableView numberOfRowsInSection:(NSInteger)section
{
return self.heros.count;
}
//每組每行的數據,設置cell
-(UITableViewCell *)tableView:(UITableView *)tableView cellForRowAtIndexPath:(NSIndexPath *)indexPath
{
//NSLog(@"cellForRowAtIndexPath 修改的了 %d", indexPath.row);
//1.去緩存中取
static NSString *identifier=@"hero";
UITableViewCell *cell=[tableView dequeueReusableCellWithIdentifier:identifier];
//2.如果沒有,那麼就自己創建
if (cell==nil) {
NSLog(@"chuangjiancell");
cell=[[UITableViewCell alloc]initWithStyle:UITableViewCellStyleDefault reuseIdentifier:identifier];
}
//3.設置數據
//3.1拿到該行的模型
YYheros *hero=self.heros[indexPath.row];
cell.textLabel.text=hero.name;
cell.imageView.image=[UIImage imageNamed:hero.icon];
cell.detailTextLabel.text=hero.intro;
//4.返回cell
return cell;
}
#pragma mark-數據刷新
//1.彈出窗口,拿到數據
//當某一行被選中的時候調用該方法
-(void)tableView:(UITableView *)tableView didSelectRowAtIndexPath:(NSIndexPath *)indexPath
{
//拿到改行的數據模型
YYheros *hero=self.heros[indexPath.row];
UIAlertView *alert=[[UIAlertView alloc]initWithTitle:@"修改數據" message:nil delegate:self cancelButtonTitle:@"取消" otherButtonTitles:@"確定", nil];
//密碼框形式的
//alert.alertViewStyle=UIAlertViewStyleSecureTextInput;
alert.alertViewStyle=UIAlertViewStylePlainTextInput;
UITextField *text=[alert textFieldAtIndex:0];
//把當前行的英雄數據顯示到文本框中
text.text=hero.name;
alert.tag=indexPath.row;
[alert show];
}
//2.修改數據,完成刷新操作
-(void)alertView:(UIAlertView *)alertView clickedButtonAtIndex:(NSInteger)buttonIndex
{
//1.修改模型
//如果選中的是取消,那麼就返回,不做任何操作
if (0==buttonIndex) return;
//否則就修改模型,刷新數據
YYheros *hero=self.heros[alertView.tag];
//拿到當前彈窗中的文本數據(已經修改後的數據)
UITextField *text=[alertView textFieldAtIndex:0];
//用修改後的數據去修改模型
hero.name=text.text;
//2.刷新數據
// 只要調用tableview的該方法就會自動重新調用數據源的所有方法
// 會自動調用numberOfSectionsInTableView
// 會自動調用numberOfRowsInSection
// 會自動調用cellForRowAtIndexPath
// [self.tableview reloadData];
// 刷新指定行
NSIndexPath *path = [NSIndexPath indexPathForRow:alertView.tag inSection:0];
[self.tableview reloadRowsAtIndexPaths:@[path] withRowAnimation:UITableViewRowAnimationRight];
//如果不進行刷新會怎麼樣?(修改之後不會即時刷新,要等到重新對cell進行數據填充的時候才會刷新)
}
//隱藏狀態欄
-(BOOL)prefersStatusBarHidden
{
return YES;
}
@end
四、把常用的代碼封裝成一個帶參數的宏
封裝方法和代碼:
復制代碼 代碼如下:
//
// Global.h
// 10-英雄展示(數據刷新)
//
// Created by apple on 14-5-29.
// Copyright (c) 2014年 itcase. All rights reserved.
//
#ifndef _0____________Global_h
#define _0____________Global_h
/**
* 自定義帶參數的宏
*/
#define YYinitH(name) -(instancetype)initWithDict:(NSDictionary *)dict;\
+(instancetype)herosWithDict:(NSDictionary *)dict;
#define YYinitM(name) -(instancetype)initWithDict:(NSDictionary *)dict\
{\
if (self=[super init]) {\
[self setValuesForKeysWithDictionary:dict];\
}\
return self;\
}\
\
+(instancetype)herosWithDict:(NSDictionary *)dict\
{\
return [[self alloc]initWithDict:dict];\
}\
#endif
以後在需要使用的時候,只需要使用宏即可。
如在YYheros.m文件中使用YYinitM(hero)這一句代碼可以代替下面的代碼段:
復制代碼 代碼如下:
-(instancetype)initWithDict:(NSDictionary *)dict
{
if (self=[super init]) {
// self.name=dict[@"name"];
// self.icon=dict[@"icon"];
// self.intro=dict[@"intro"];
//使用KVC
[self setValuesForKeysWithDictionary:dict];
}
return self;
}
+(instancetype)herosWithDict:(NSDictionary *)dict
{
return [[self alloc]initWithDict:dict];
}
五、注意點
1.刷新數據的兩個步驟:
1)修改模型
2)刷新表格數據(可以全部刷新,也可以刷新指定的行)
2.在主控制器文件中,遵守了三個協議
分別是:
UITableViewDataSource,
UIAlertViewDelegate,
UITableViewDelegate
UITableview控件使用小結
一、UITableview的使用步驟
UITableview的使用就只有簡單的三個步驟:
1.告訴一共有多少組數據
方法:復制代碼 代碼如下:- (NSInteger)numberOfSectionsInTableView:(UITableView *)tableView;
2.告訴每組一共有多少行
方法:復制代碼 代碼如下:- (NSInteger)tableView:(UITableView *)tableView numberOfRowsInSection:(NSInteger)section;
3.設置每組每行(cell)
方法:復制代碼 代碼如下:- (UITableViewCell *)tableView:(UITableView *)tableView cellForRowAtIndexPath:(NSIndexPath *)indexPath;
二、使用說明
1.多少組數據和顯示多少行通常是和數據息息相關的,在開發中數據通常存儲在plist文件中,需要以一定的方式加載到項目中(模型)。
2.設置每組每行,說簡單點就是設置tableview中得每個cell.
設置cell的步驟有三步:
(1)創建一個cell(需要考慮性能,對cell進行循環利用,注意緩存處理方式)
(2)為cell設置數據
(3)返回一個cell
設置cell有三種方式:
(1)使用系統提供的tableviewcell進行設置
(2)通過xib自定義tableviewcell,適用於長相一致的,如團購展示界面
(3)通過純代碼自定義tableviewcell,適用於有差距的,如表現為高度不一樣,有的cell擁有某個屬性,而有的cell中沒有,如微博展示界面
三、自定義tableviewcell
1.通過xib文件自定義一個view的步驟
(1)新建一個xib文件,描述一個view的內部
(2)新建一個自定義的類,自定義的類需要繼承自系統自帶的view,繼承自哪個類,取決於xib跟對象的class
(3)新建類的類型最好跟xib的文件名保持一致
(4)將xib的控件和自定義類的.m文件進行連線
(5)提供一個類的方法返回一個創建好的自定iview(屏蔽從xib加載的過程)
(6)提供一個模型屬性讓外界傳遞模型數據
(7)重寫模型屬性的setter方法,在這裡講模型數據展示到對應的子控件上面
2.通過代碼方式自定義cell
(1)新建⼀一個繼承自UITableViewCell的類
(2)重寫initWithStyle:reuseIdentifier:方法
添加所有需要顯示的子控件(不需要設置子控件的數據和frame, 子控件要添加 到contentView中)
對子控件進行一次性的屬性設置(有些屬性只需要設置一次, 比如字體\固定的圖片)
(3)提供2個模型
數據模型: 存放文字數據\圖片數據
frame模型: 存放數據模型\所有子控件的frame\cell的高度
(4)cell擁有一個frame模型(不要直接擁有數據模型)
(5)重寫frame模型屬性的setter方法: 在這個方法中設置子控件的顯示數據和frame
(6)frame模型數據的初始化已經采取懶加載的方式(每一個cell對應的frame模型數據只加載一 次)
四、使用代理的步驟
(1)先搞清楚誰是誰的代理(delegate)
(2)定義代理協議,協議名稱的命名規范:控件類名 + Delegate
(3)定義代理方法
代理方法一般都定義為@optional
代理方法名都以控件名開頭
代理方法至少有1個參數,將控件本身傳遞出去
(4)設置代理(delegate)對象 (⽐比如myView.delegate = xxxx;)
代理對象遵守協議
代理對象實現協議裡面該實現的方法
(5)在恰當的時刻調⽤代理對象(delegate)的代理方法,通知代理發生了什麼事情
(在調⽤之前判斷代理是否實現了該代理⽅方法)