iOS中使用UItableviewcell實現團購和微博界面的示例
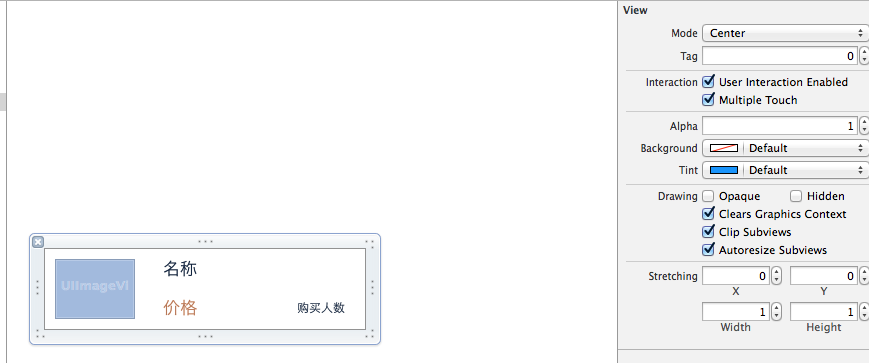
使用xib自定義UItableviewcell實現一個簡單的團購應用界面布局
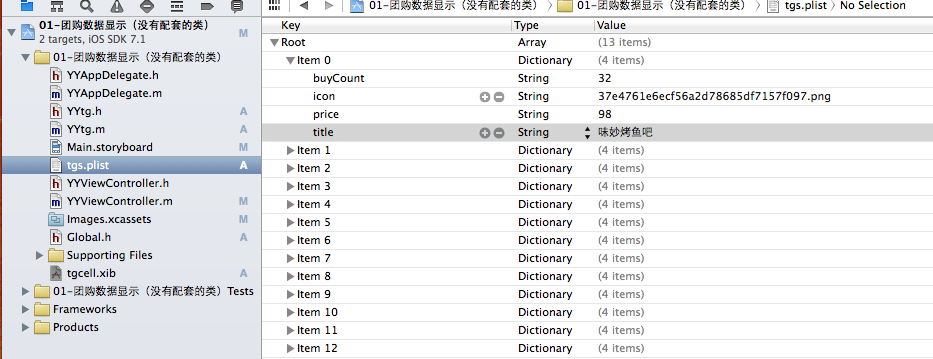
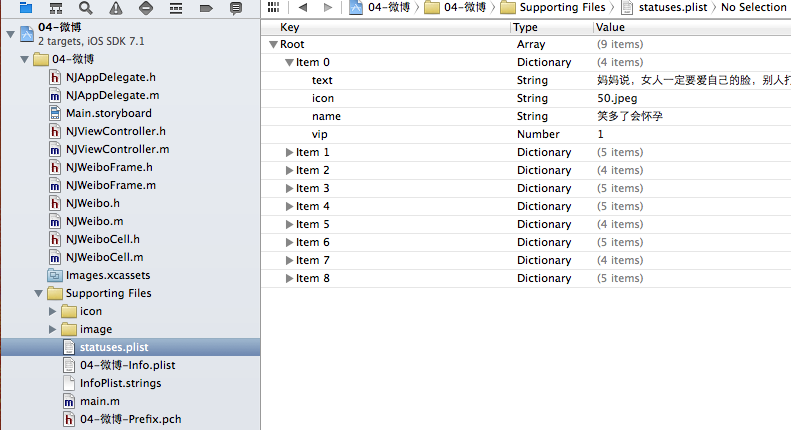
一、項目文件結構和plist文件
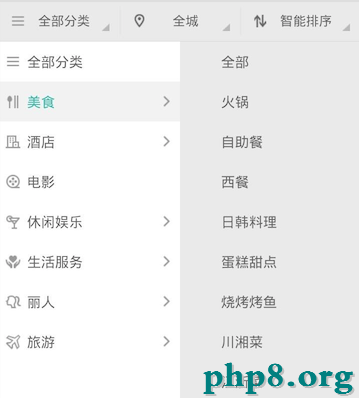
二、實現效果
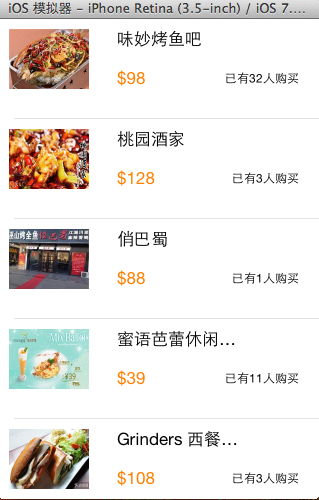
三、代碼示例
1.沒有使用配套的類,而是直接使用xib文件控件tag值操作
數據模型部分:
YYtg.h文件
復制代碼 代碼如下:
//
// YYtg.h
// 01-團購數據顯示(沒有配套的類)
//
// Created by apple on 14-5-29.
// Copyright (c) 2014年 itcase. All rights reserved.
//
#import <Foundation/Foundation.h>
#import "Global.h"
@interface YYtg : NSObject
@property(nonatomic,copy)NSString *buyCount;
@property(nonatomic,copy)NSString *icon;
@property(nonatomic,copy)NSString *price;
@property(nonatomic,copy)NSString *title;
YYinitH(tg)
@end
YYtg.m文件
復制代碼 代碼如下:
//
// YYtg.m
// 01-團購數據顯示(沒有配套的類)
//
// Created by apple on 14-5-29.
// Copyright (c) 2014年 itcase. All rights reserved.
//
#import "YYtg.h"
@implementation YYtg
YYinitM(tg)
@end
主控制器
YYViewController.m文件
復制代碼 代碼如下:
//
// YYViewController.m
// 01-團購數據顯示(沒有配套的類)
//
// Created by apple on 14-5-29.
// Copyright (c) 2014年 itcase. All rights reserved.
//
#import "YYViewController.h"
#import "YYtg.h"
@interface YYViewController ()<UITableViewDataSource>
@property(nonatomic,strong)NSArray *tg;
@property (strong, nonatomic) IBOutlet UITableView *tableview;
@end
復制代碼 代碼如下:
@implementation YYViewController
- (void)viewDidLoad
{
[super viewDidLoad];
self.tableview.rowHeight=100;
}
#pragma mark- 懶加載
-(NSArray *)tg
{
if (_tg==nil) {
NSString *fullpath=[[NSBundle mainBundle]pathForResource:@"tgs.plist" ofType:nil];
NSArray *temparray=[NSArray arrayWithContentsOfFile:fullpath];
NSMutableArray *arrayM=[NSMutableArray arrayWithCapacity:temparray.count];
for (NSDictionary *dict in temparray) {
YYtg *tg=[YYtg tgWithDict:dict];
[arrayM addObject:tg];
}
_tg=[arrayM mutableCopy];
}
return _tg;
}
#pragma mark-數據顯示
-(NSInteger)numberOfSectionsInTableView:(UITableView *)tableView
{
return 1;
}
-(NSInteger)tableView:(UITableView *)tableView numberOfRowsInSection:(NSInteger)section
{
return self.tg.count;
}
-(UITableViewCell *)tableView:(UITableView *)tableView cellForRowAtIndexPath:(NSIndexPath *)indexPath
{
//讀取xib中的數據
// NSArray *arrayM=[[NSBundle mainBundle]loadNibNamed:@"tgcell" owner:nil options:nil];
// UITableViewCell *cell=[arrayM firstObject];
static NSString *identifier=@"tg";
UITableViewCell *cell=[tableView dequeueReusableCellWithIdentifier:identifier];
if (cell==nil) {
// cell=[[UITableViewCell alloc]initWithStyle:UITableViewCellStyleDefault reuseIdentifier:identifier];
cell= [[[NSBundle mainBundle]loadNibNamed:@"tgcell" owner:nil options:nil] firstObject];
}
YYtg *tg=self.tg[indexPath.row];
//設置數據
//使用tag
UIImageView *imgv=(UIImageView *)[cell viewWithTag:1];
imgv.image=[UIImage imageNamed:tg.icon];
UILabel *buyCount=(UILabel *)[cell viewWithTag:4];
buyCount.text=[NSString stringWithFormat:@"已有%@人購買",tg.buyCount];
UILabel *title=(UILabel *)[cell viewWithTag:2];
title.text=tg.title;
UILabel *price=(UILabel *)[cell viewWithTag:3];
price.text=[NSString stringWithFormat:@"$%@",tg.price];
//返回cell
return cell;
}
//隱藏狀態欄
-(BOOL)prefersStatusBarHidden
{
return YES;
}
@end
使用xib自定義的UItableviewcell
代碼分析:
上面的代碼通過使用xib文件中各個控件的tag值,完成對每個部分數據的賦值和刷新。但是,作為主控制器,它應該知道xib文件中各個控件的tag值,它知道的是不是太多了呢?
為了解決上面的問題,我們可以為自定義的cell設置一個配套的類,讓這個類來操作這個xib,對外提供接口,至於內部的數據處理,外界不需要關心,也不用關心。
改造後的代碼如下:
2.使用xib和對應的類完成自定義cell的數據展示
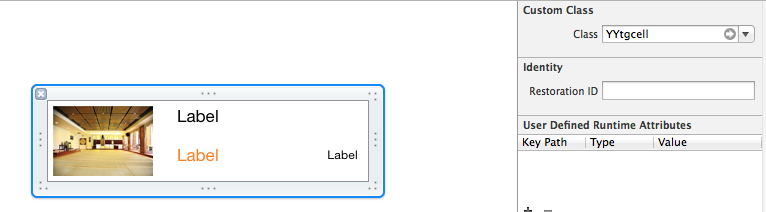
新建一個類,用來管理對應的xib文件
注意類的繼承類,並把該類和xib文件進行關聯
YYtgcell.h文件代碼:
復制代碼 代碼如下:
//
// YYtgcell.h
// 02-團購(使用xib和類完成數據展示)
//
// Created by apple on 14-5-29.
// Copyright (c) 2014年 itcase. All rights reserved.
//
#import <UIKit/UIKit.h>
#import "YYtg.h"
@interface YYtgcell : UITableViewCell
@property(nonatomic,strong)YYtg *yytg;
@end
YYtgcell.m文件
復制代碼 代碼如下:
//
// YYtgcell.m
// 02-團購(使用xib和類完成數據展示)
//
// Created by apple on 14-5-29.
// Copyright (c) 2014年 itcase. All rights reserved.
//
#import "YYtgcell.h"
//私有擴展
@interface YYtgcell()
@property (strong, nonatomic) IBOutlet UIImageView *img;
@property (strong, nonatomic) IBOutlet UILabel *titlelab;
@property (strong, nonatomic) IBOutlet UILabel *pricelab;
@property (strong, nonatomic) IBOutlet UILabel *buycountlab;
@end
復制代碼 代碼如下:
@implementation YYtgcell
#pragma mark 重寫set方法,完成數據的賦值操作
-(void)setYytg:(YYtg *)yytg
{
_yytg=yytg;
self.img.image=[UIImage imageNamed:yytg.icon];
self.titlelab.text=yytg.title;
self.pricelab.text=[NSString stringWithFormat:@"$%@",yytg.price];
self.buycountlab.text=[NSString stringWithFormat:@"已有%@人購買",yytg.buyCount];
}
@end
主控制器
YYViewController.m文件
復制代碼 代碼如下:
//
// YYViewController.m
// 02-團購(使用xib和類完成數據展示)
//
// Created by apple on 14-5-29.
// Copyright (c) 2014年 itcase. All rights reserved.
//
#import "YYViewController.h"
#import "YYtg.h"
#import "YYtgcell.h"
@interface YYViewController ()<UITableViewDataSource,UITableViewDelegate>
@property (strong, nonatomic) IBOutlet UITableView *tableview;
@property(strong,nonatomic)NSArray *tg;
@end
復制代碼 代碼如下:
@implementation YYViewController
- (void)viewDidLoad
{
[super viewDidLoad];
self.tableview.rowHeight=80.f;
}
#pragma mark- 懶加載
-(NSArray *)tg
{
if (_tg==nil) {
NSString *fullpath=[[NSBundle mainBundle]pathForResource:@"tgs.plist" ofType:nil];
NSArray *temparray=[NSArray arrayWithContentsOfFile:fullpath];
NSMutableArray *arrayM=[NSMutableArray arrayWithCapacity:temparray.count];
for (NSDictionary *dict in temparray) {
YYtg *tg=[YYtg tgWithDict:dict];
[arrayM addObject:tg];
}
_tg=[arrayM mutableCopy];
}
return _tg;
}
#pragma mark- xib創建cell數據處理
#pragma mark 多少組
-(NSInteger)numberOfSectionsInTableView:(UITableView *)tableView
{
return 1;
}
#pragma mark多少行
-(NSInteger)tableView:(UITableView *)tableView numberOfRowsInSection:(NSInteger)section
{
return self.tg.count;
}
#pragma mark設置每組每行
-(UITableViewCell *)tableView:(UITableView *)tableView cellForRowAtIndexPath:(NSIndexPath *)indexPath
{
static NSString *identifier= @"tg";
YYtgcell *cell=[tableView dequeueReusableCellWithIdentifier:identifier];
if (cell==nil) {
//如何讓創建的cell加個戳
//對於加載的xib文件,可以到xib視圖的屬性選擇器中進行設置
cell=[[[NSBundle mainBundle]loadNibNamed:@"tgcell" owner:nil options:nil]firstObject];
NSLog(@"創建了一個cell");
}
//設置cell的數據
//獲取當前行的模型
YYtg *tg=self.tg[indexPath.row];
cell.yytg=tg;
return cell;
}
-(BOOL)prefersStatusBarHidden
{
return YES;
}
@end
3.對上述代碼進行進一步的優化和調整(MVC)
優化如下:
(1)把主控制器中創建cell的過程抽取到YYtgcell中完成,並對外提供一個接口。
YYtgcell.h文件(提供接口)
復制代碼 代碼如下:
#import <UIKit/UIKit.h>
#import "YYtgModel.h"
@interface YYtgcell : UITableViewCell
@property(nonatomic,strong)YYtgModel *yytg;
//把加載數據(使用xib創建cell的內部細節進行封裝)
+(instancetype)tgcellWithTableView:(UITableView *)tableView;
@end
YYtgcell.m文件(把創建自定義cell的部分進行封裝)
復制代碼 代碼如下:
//
// YYtgcell.m
// 02-團購(使用xib和類完成數據展示)
//
// Created by apple on 14-5-29.
// Copyright (c) 2014年 itcase. All rights reserved.
//
#import "YYtgcell.h"
//私有擴展
@interface YYtgcell()
@property (strong, nonatomic) IBOutlet UIImageView *img;
@property (strong, nonatomic) IBOutlet UILabel *titlelab;
@property (strong, nonatomic) IBOutlet UILabel *pricelab;
@property (strong, nonatomic) IBOutlet UILabel *buycountlab;
@end
復制代碼 代碼如下:
@implementation YYtgcell
#pragma mark 重寫set方法,完成數據的賦值操作
-(void)setYytg:(YYtgModel *)yytg
{
_yytg=yytg;
self.img.image=[UIImage imageNamed:yytg.icon];
self.titlelab.text=yytg.title;
self.pricelab.text=[NSString stringWithFormat:@"$%@",yytg.price];
self.buycountlab.text=[NSString stringWithFormat:@"已有%@人購買",yytg.buyCount];
}
+(instancetype)tgcellWithTableView:(UITableView *)tableView
{
static NSString *identifier= @"tg";
YYtgcell *cell=[tableView dequeueReusableCellWithIdentifier:identifier];
if (cell==nil) {
//如何讓創建的cell加個戳
//對於加載的xib文件,可以到xib視圖的屬性選擇器中進行設置
cell=[[[NSBundle mainBundle]loadNibNamed:@"tgcell" owner:nil options:nil]firstObject];
NSLog(@"創建了一個cell");
}
return cell;
}
@end
主控器中的業務邏輯更加清晰,YYViewController.m文件代碼如下
復制代碼 代碼如下:
//
// YYViewController.m
// 02-團購(使用xib和類完成數據展示)
//
// Created by apple on 14-5-29.
// Copyright (c) 2014年 itcase. All rights reserved.
//
#import "YYViewController.h"
#import "YYtgModel.h"
#import "YYtgcell.h"
@interface YYViewController ()<UITableViewDataSource,UITableViewDelegate>
@property (strong, nonatomic) IBOutlet UITableView *tableview;
@property(strong,nonatomic)NSArray *tg;
@end
復制代碼 代碼如下:
@implementation YYViewController
- (void)viewDidLoad
{
[super viewDidLoad];
self.tableview.rowHeight=80.f;
}
#pragma mark- 懶加載
-(NSArray *)tg
{
if (_tg==nil) {
NSString *fullpath=[[NSBundle mainBundle]pathForResource:@"tgs.plist" ofType:nil];
NSArray *temparray=[NSArray arrayWithContentsOfFile:fullpath];
NSMutableArray *arrayM=[NSMutableArray arrayWithCapacity:temparray.count];
for (NSDictionary *dict in temparray) {
YYtgModel *tg=[YYtgModel tgWithDict:dict];
[arrayM addObject:tg];
}
_tg=[arrayM mutableCopy];
}
return _tg;
}
#pragma mark- xib創建cell數據處理
#pragma mark 多少組
-(NSInteger)numberOfSectionsInTableView:(UITableView *)tableView
{
return 1;
}
#pragma mark多少行
-(NSInteger)tableView:(UITableView *)tableView numberOfRowsInSection:(NSInteger)section
{
return self.tg.count;
}
#pragma mark設置每組每行
-(UITableViewCell *)tableView:(UITableView *)tableView cellForRowAtIndexPath:(NSIndexPath *)indexPath
{
//1.創建cell
YYtgcell *cell=[YYtgcell tgcellWithTableView:tableView];
//2.獲取當前行的模型,設置cell的數據
YYtgModel *tg=self.tg[indexPath.row];
cell.yytg=tg;
//3.返回cell
return cell;
}
#pragma mark- 隱藏狀態欄
-(BOOL)prefersStatusBarHidden
{
return YES;
}
@end
四、推薦調整的項目文件結構
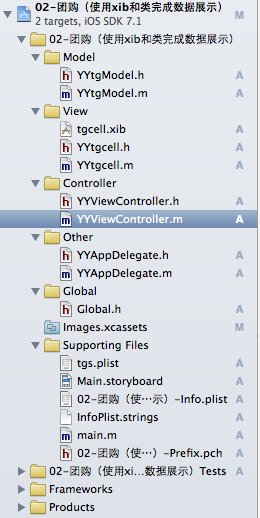
這是調整後的文件結構,完整的MVC架構。
注意:注意文件的命名規范。
提示技巧:批量改名,操作如下:
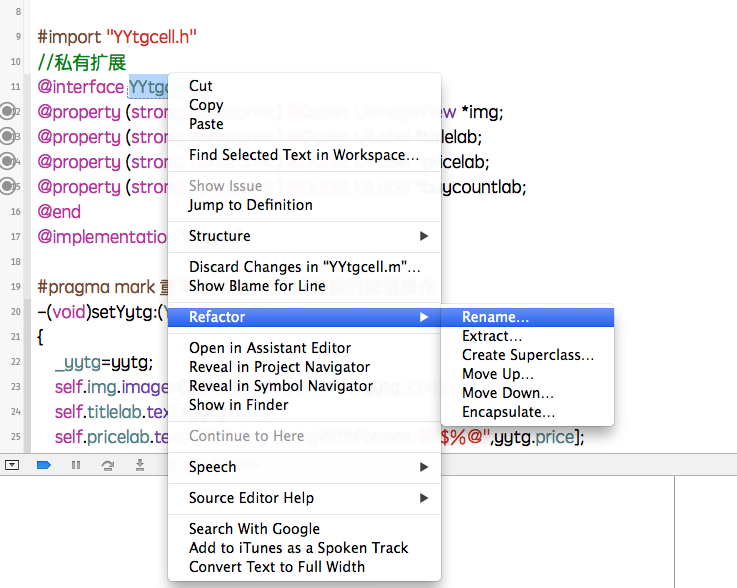
修改為想要的名稱:

實現一個簡單的微博界面布局
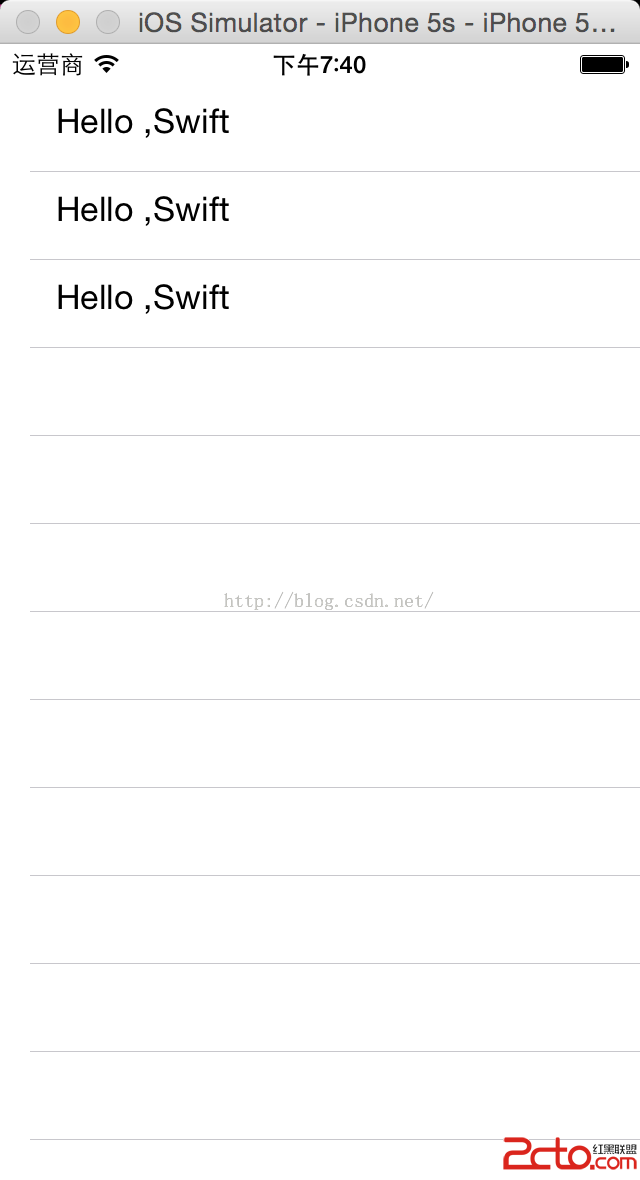
一、實現效果

二、使用純代碼自定義一個tableview的步驟
1.新建一個繼承自UITableViewCell的類
2.重寫initWithStyle:reuseIdentifier:方法
添加所有需要顯示的子控件(不需要設置子控件的數據和frame, 子控件要添加到contentView中)
進行子控件一次性的屬性設置(有些屬性只需要設置一次, 比如字體\固定的圖片)
3.提供2個模型
數據模型: 存放文字數據\圖片數據
frame模型: 存放數據模型\所有子控件的frame\cell的高度
4.cell擁有一個frame模型(不要直接擁有數據模型)
5.重寫frame模型屬性的setter方法: 在這個方法中設置子控件的顯示數據和frame
6.frame模型數據的初始化已經采取懶加載的方式(每一個cell對應的frame模型數據只加載一次)
三、文件結構和實現代碼
1.文件結構
2.實現代碼:
NJWeibo.h文件
復制代碼 代碼如下:
#import <Foundation/Foundation.h>
@interface NJWeibo : NSObject
@property (nonatomic, copy) NSString *text; // 內容
@property (nonatomic, copy) NSString *icon; // 頭像
@property (nonatomic, copy) NSString *name; // 昵稱
@property (nonatomic, copy) NSString *picture; // 配圖
@property (nonatomic, assign) BOOL vip;
- (id)initWithDict:(NSDictionary *)dict;
+ (id)weiboWithDict:(NSDictionary *)dict;
@end
NJWeibo.m文件
復制代碼 代碼如下:
#import "NJWeibo.h"
@implementation NJWeibo
- (id)initWithDict:(NSDictionary *)dict
{
if (self = [super init]) {
[self setValuesForKeysWithDictionary:dict];
}
return self;
}
+ (id)weiboWithDict:(NSDictionary *)dict
{
return [[self alloc] initWithDict:dict];
}
@end
NJWeiboCell.h文件
復制代碼 代碼如下:
#import <UIKit/UIKit.h>
@class NJWeiboFrame;
@interface NJWeiboCell : UITableViewCell
/**
* 接收外界傳入的模型
*/
//@property (nonatomic, strong) NJWeibo *weibo;
@property (nonatomic, strong) NJWeiboFrame *weiboFrame;
+ (instancetype)cellWithTableView:(UITableView *)tableView;
@end
NJWeiboCell.m文件
復制代碼 代碼如下:
#import "NJWeiboCell.h"
#import "NJWeibo.h"
#import "NJWeiboFrame.h"
#define NJNameFont [UIFont systemFontOfSize:15]
#define NJTextFont [UIFont systemFontOfSize:16]
@interface NJWeiboCell ()
/**
* 頭像
*/
@property (nonatomic, weak) UIImageView *iconView;
/**
* vip
*/
@property (nonatomic, weak) UIImageView *vipView;
/**
* 配圖
*/
@property (nonatomic, weak) UIImageView *pictureView;
/**
* 昵稱
*/
@property (nonatomic, weak) UILabel *nameLabel;
/**
* 正文
*/
@property (nonatomic, weak) UILabel *introLabel;
@end
復制代碼 代碼如下:
@implementation NJWeiboCell
+ (instancetype)cellWithTableView:(UITableView *)tableView
{
// NSLog(@"cellForRowAtIndexPath");
static NSString *identifier = @"status";
// 1.緩存中取
NJWeiboCell *cell = [tableView dequeueReusableCellWithIdentifier:identifier];
// 2.創建
if (cell == nil) {
cell = [[NJWeiboCell alloc]initWithStyle:UITableViewCellStyleDefault reuseIdentifier:identifier];
}
return cell;
}
/**
* 構造方法(在初始化對象的時候會調用)
* 一般在這個方法中添加需要顯示的子控件
*/
- (id)initWithStyle:(UITableViewCellStyle)style reuseIdentifier:(NSString *)reuseIdentifier
{
self = [super initWithStyle:style reuseIdentifier:reuseIdentifier];
if (self) {
// 讓自定義Cell和系統的cell一樣, 一創建出來就擁有一些子控件提供給我們使用
// 1.創建頭像
UIImageView *iconView = [[UIImageView alloc] init];
[self.contentView addSubview:iconView];
self.iconView = iconView;
// 2.創建昵稱
UILabel *nameLabel = [[UILabel alloc] init];
nameLabel.font = NJNameFont;
// nameLabel.backgroundColor = [UIColor redColor];
[self.contentView addSubview:nameLabel];
self.nameLabel = nameLabel;
// 3.創建vip
UIImageView *vipView = [[UIImageView alloc] init];
vipView.image = [UIImage imageNamed:@"vip"];
[self.contentView addSubview:vipView];
self.vipView = vipView;
// 4.創建正文
UILabel *introLabel = [[UILabel alloc] init];
introLabel.font = NJTextFont;
introLabel.numberOfLines = 0;
// introLabel.backgroundColor = [UIColor greenColor];
[self.contentView addSubview:introLabel];
self.introLabel = introLabel;
// 5.創建配圖
UIImageView *pictureView = [[UIImageView alloc] init];
[self.contentView addSubview:pictureView];
self.pictureView = pictureView;
}
return self;
}
- (void)setWeiboFrame:(NJWeiboFrame *)weiboFrame
{
_weiboFrame = weiboFrame;
// 1.給子控件賦值數據
[self settingData];
// 2.設置frame
[self settingFrame];
}
/**
* 設置子控件的數據
*/
- (void)settingData
{
NJWeibo *weibo = self.weiboFrame.weibo;
// 設置頭像
self.iconView.image = [UIImage imageNamed:weibo.icon];
// 設置昵稱
self.nameLabel.text = weibo.name;
// 設置vip
if (weibo.vip) {
self.vipView.hidden = NO;
self.nameLabel.textColor = [UIColor redColor];
}else
{
self.vipView.hidden = YES;
self.nameLabel.textColor = [UIColor blackColor];
}
// 設置內容
self.introLabel.text = weibo.text;
// 設置配圖
if (weibo.picture) {// 有配圖
self.pictureView.image = [UIImage imageNamed:weibo.picture];
self.pictureView.hidden = NO;
}else
{
self.pictureView.hidden = YES;
}
}
/**
* 設置子控件的frame
*/
- (void)settingFrame
{
// 設置頭像的frame
self.iconView.frame = self.weiboFrame.iconF;
// 設置昵稱的frame
self.nameLabel.frame = self.weiboFrame.nameF;
// 設置vip的frame
self.vipView.frame = self.weiboFrame.vipF;
// 設置正文的frame
self.introLabel.frame = self.weiboFrame.introF;
// 設置配圖的frame
if (self.weiboFrame.weibo.picture) {// 有配圖
self.pictureView.frame = self.weiboFrame.pictrueF;
}
}
/**
* 計算文本的寬高
*
* @param str 需要計算的文本
* @param font 文本顯示的字體
* @param maxSize 文本顯示的范圍
*
* @return 文本占用的真實寬高
*/
- (CGSize)sizeWithString:(NSString *)str font:(UIFont *)font maxSize:(CGSize)maxSize
{
NSDictionary *dict = @{NSFontAttributeName : font};
// 如果將來計算的文字的范圍超出了指定的范圍,返回的就是指定的范圍
// 如果將來計算的文字的范圍小於指定的范圍, 返回的就是真實的范圍
CGSize size = [str boundingRectWithSize:maxSize options:NSStringDrawingUsesLineFragmentOrigin attributes:dict context:nil].size;
return size;
}
@end
NJWeiboFrame.h文件
復制代碼 代碼如下:
// 專門用來保存每一行數據的frame, 計算frame
#import <Foundation/Foundation.h>
@class NJWeibo;
@interface NJWeiboFrame : NSObject
/**
* 頭像的frame
*/
@property (nonatomic, assign) CGRect iconF;
/**
* 昵稱的frame
*/
@property (nonatomic, assign) CGRect nameF;
/**
* vip的frame
*/
@property (nonatomic, assign) CGRect vipF;
/**
* 正文的frame
*/
@property (nonatomic, assign) CGRect introF;
/**
* 配圖的frame
*/
@property (nonatomic, assign) CGRect pictrueF;
/**
* 行高
*/
@property (nonatomic, assign) CGFloat cellHeight;
/**
* 模型數據
*/
@property (nonatomic, strong) NJWeibo *weibo;
@end
NJWeiboFrame.m文件
復制代碼 代碼如下:
#import "NJWeiboFrame.h"
#import "NJWeibo.h"
#define NJNameFont [UIFont systemFontOfSize:15]
#define NJTextFont [UIFont systemFontOfSize:16]
@implementation NJWeiboFrame
- (void)setWeibo:(NJWeibo *)weibo
{
_weibo = weibo;
// 間隙
CGFloat padding = 10;
// 設置頭像的frame
CGFloat iconViewX = padding;
CGFloat iconViewY = padding;
CGFloat iconViewW = 30;
CGFloat iconViewH = 30;
self.iconF = CGRectMake(iconViewX, iconViewY, iconViewW, iconViewH);
// 設置昵稱的frame
// 昵稱的x = 頭像最大的x + 間隙
CGFloat nameLabelX = CGRectGetMaxX(self.iconF) + padding;
// 計算文字的寬高
CGSize nameSize = [self sizeWithString:_weibo.name font:NJNameFont maxSize:CGSizeMake(MAXFLOAT, MAXFLOAT)];
CGFloat nameLabelH = nameSize.height;
CGFloat nameLabelW = nameSize.width;
CGFloat nameLabelY = iconViewY + (iconViewH - nameLabelH) * 0.5;
self.nameF = CGRectMake(nameLabelX, nameLabelY, nameLabelW, nameLabelH);
// 設置vip的frame
CGFloat vipViewX = CGRectGetMaxX(self.nameF) + padding;
CGFloat vipViewY = nameLabelY;
CGFloat vipViewW = 14;
CGFloat vipViewH = 14;
self.vipF = CGRectMake(vipViewX, vipViewY, vipViewW, vipViewH);
// 設置正文的frame
CGFloat introLabelX = iconViewX;
CGFloat introLabelY = CGRectGetMaxY(self.iconF) + padding;
CGSize textSize = [self sizeWithString:_weibo.text font:NJTextFont maxSize:CGSizeMake(300, MAXFLOAT)];
CGFloat introLabelW = textSize.width;
CGFloat introLabelH = textSize.height;
self.introF = CGRectMake(introLabelX, introLabelY, introLabelW, introLabelH);
// 設置配圖的frame
CGFloat cellHeight = 0;
if (_weibo.picture) {// 有配圖
CGFloat pictureViewX = iconViewX;
CGFloat pictureViewY = CGRectGetMaxY(self.introF) + padding;
CGFloat pictureViewW = 100;
CGFloat pictureViewH = 100;
self.pictrueF = CGRectMake(pictureViewX, pictureViewY, pictureViewW, pictureViewH);
// 計算行高
self.cellHeight = CGRectGetMaxY(self.pictrueF) + padding;
}else
{
// 沒有配圖情況下的行高
self.cellHeight = CGRectGetMaxY(self.introF) + padding;
}
}
/**
* 計算文本的寬高
*
* @param str 需要計算的文本
* @param font 文本顯示的字體
* @param maxSize 文本顯示的范圍
*
* @return 文本占用的真實寬高
*/
- (CGSize)sizeWithString:(NSString *)str font:(UIFont *)font maxSize:(CGSize)maxSize
{
NSDictionary *dict = @{NSFontAttributeName : font};
// 如果將來計算的文字的范圍超出了指定的范圍,返回的就是指定的范圍
// 如果將來計算的文字的范圍小於指定的范圍, 返回的就是真實的范圍
CGSize size = [str boundingRectWithSize:maxSize options:NSStringDrawingUsesLineFragmentOrigin attributes:dict context:nil].size;
return size;
}
@end
主控制器
NJViewController.m文件
復制代碼 代碼如下:
#import "NJViewController.h"
#import "NJWeibo.h"
#import "NJWeiboCell.h"
#import "NJWeiboFrame.h"
@interface NJViewController ()
@property (nonatomic, strong) NSArray *statusFrames;
@end
復制代碼 代碼如下:
@implementation NJViewController
#pragma mark - 數據源方法
- (NSInteger)tableView:(UITableView *)tableView numberOfRowsInSection:(NSInteger)section
{
return self.statusFrames.count;
}
- (UITableViewCell *)tableView:(UITableView *)tableView cellForRowAtIndexPath:(NSIndexPath *)indexPath
{
NJWeiboCell *cell = [NJWeiboCell cellWithTableView:tableView];
// 3.設置數據
cell.weiboFrame = self.statusFrames[indexPath.row];
// 4.返回
return cell;
}
#pragma mark - 懶加載
- (NSArray *)statusFrames
{
if (_statusFrames == nil) {
NSString *fullPath = [[NSBundle mainBundle] pathForResource:@"statuses.plist" ofType:nil];
NSArray *dictArray = [NSArray arrayWithContentsOfFile:fullPath];
NSMutableArray *models = [NSMutableArray arrayWithCapacity:dictArray.count];
for (NSDictionary *dict in dictArray) {
// 創建模型
NJWeibo *weibo = [NJWeibo weiboWithDict:dict];
// 根據模型數據創建frame模型
NJWeiboFrame *wbF = [[NJWeiboFrame alloc] init];
wbF.weibo = weibo;
[models addObject:wbF];
}
self.statusFrames = [models copy];
}
return _statusFrames;
}
#pragma mark - 代理方法
- (CGFloat)tableView:(UITableView *)tableView heightForRowAtIndexPath:(NSIndexPath *)indexPath
{
// NSLog(@"heightForRowAtIndexPath");
// 取出對應航的frame模型
NJWeiboFrame *wbF = self.statusFrames[indexPath.row];
NSLog(@"height = %f", wbF.cellHeight);
return wbF.cellHeight;
}
- (BOOL) prefersStatusBarHidden
{
return YES;
}
@end
四、補充說明
由於系統提供的tableview可能並不能滿足我們的開發需求,所以經常要求我們能夠自定義tableview。
自定義tableview有兩種方式,一種是使用xib創建,一種是使用純代碼的方式創建。
對於樣式一樣的tableview,通常使用xib進行創建,對於高度不一樣,內容也不完全一致的通常使用純代碼進行自定義。