
全面解析iOS應用中自定義UITableViewCell的方法
有時候我們需要自己定義UITableViewCell的風格,其實就是向行中添加子視圖。添加子視圖的方法主要有兩種:使用代碼以及從.xib文件加載。當然後一種方法比較直觀。
一、基本用法
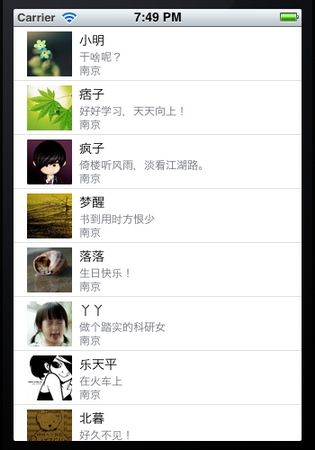
我們這次要自定義一個Cell,使得它像QQ好友列表的一行一樣:左邊是一張圖片,圖片的右邊是三行標簽:

當然,我們不會搞得這麼復雜,只是有點意思就行。
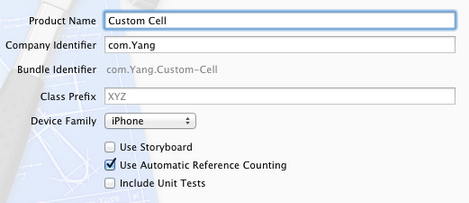
1、運行Xcode 4.2,新建一個Single View Application,名稱為Custom Cell:
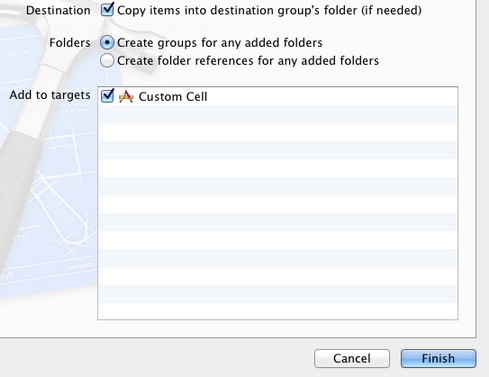
2、將圖片資源導入到工程。為此,我找了14張50×50的.png圖片,名稱依次是1、2、……、14,放在一個名為Images的文件夾中。將此文件夾拖到工程中,在彈出的窗口中選中Copy items into…
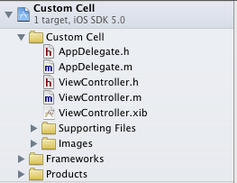
添加完成後,工程目錄如下:
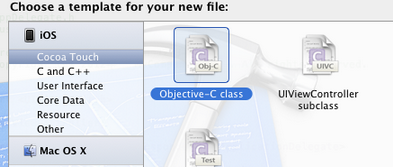
3、創建一個UITableViewCell的子類:選中Custom Cell目錄,依次選擇File — New — New File,在彈出的窗口,左邊選擇Cocoa Touch,右邊選擇Objective-C class:
單擊Next,輸入類名CustomCell,Subclass of選擇UITableViewCell:

之後選擇Next和Create,就建立了兩個文件:CustomCell.h和CustomCell.m。
4、創建CustomCell.xib:依次選擇File — New — New File,在彈出的窗口,左邊選擇User Interface,右邊選擇Empty:
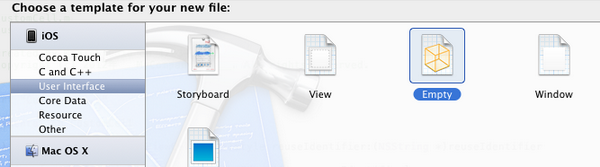
單擊Next,選擇iPhone,再單擊Next,輸入名稱為CustomCell,選擇好位置:

單擊Create,這樣就創建了CustomCell.xib。
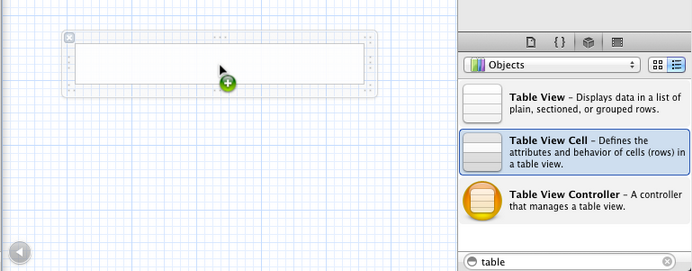
5、打開CustomCell.xib,拖一個Table View Cell控件到面板上:
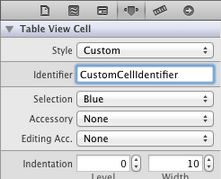
選中新加的控件,打開Identity Inspector,選擇Class為CustomCell;然後打開Size Inspector,調整高度為60。
6、向新加的Table View Cell添加控件:拖放一個ImageView控件到左邊,並設置大小為50×50。然後在ImageView右邊添加三個Label,設置標簽字號,最上邊的是14,其余兩個是12:
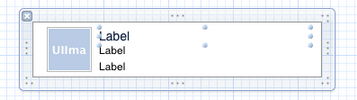
接下來向CustomCell.h添加Outlet映射,將ImageView與三個Label建立映射,名稱分別為imageView、nameLabel、decLabel以及locLable,分別表示頭像、昵稱、個性簽名,地點。
選中Table View Cell,打開Attribute Inspector,將Identifier設置為CustomCellIdentifier:
為了充分使用這些標簽,還要自己創建一些數據,存在plist文件中,後邊會做。
7、打開CustomCell.h,添加屬性:
復制代碼 代碼如下:
@property (copy, nonatomic) UIImage *image;
@property (copy, nonatomic) NSString *name;
@property (copy, nonatomic) NSString *dec;
@property (copy, nonatomic) NSString *loc;
8、打開CustomCell.m,向其中添加代碼:
8.1 在@implementation下面添加代碼:
復制代碼 代碼如下:
@synthesize image;
@synthesize name;
@synthesize dec;
@synthesize loc;
8.2 在@end之前添加代碼:
復制代碼 代碼如下:
- (void)setImage:(UIImage *)img {
if (![img isEqual:image]) {
image = [img copy];
self.imageView.image = image;
}
}
-(void)setName:(NSString *)n {
if (![n isEqualToString:name]) {
name = [n copy];
self.nameLabel.text = name;
}
}
-(void)setDec:(NSString *)d {
if (![d isEqualToString:dec]) {
dec = [d copy];
self.decLabel.text = dec;
}
}
-(void)setLoc:(NSString *)l {
if (![l isEqualToString:loc]) {
loc = [l copy];
self.locLabel.text = loc;
}
}
這相當於重寫了各個set函數,從而當執行賦值操作時,會執行我們自己寫的函數。
好了,現在自己定義的Cell已經可以使用了。
不過在此之前,我們先新建一個plist,用於存儲想要顯示的數據。建立plist文件的方法前面的文章有提到。我們建好一個friendsInfo.plist,往其中添加數據如下:
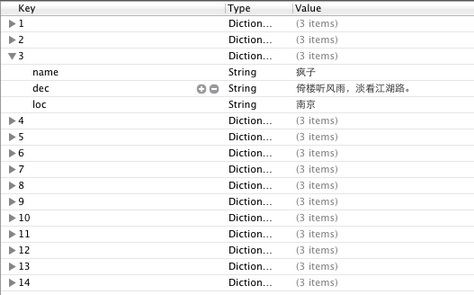
注意每個節點類型選擇。
9、打開ViewController.xib,拖一個Table View到視圖上,並將Delegate和DataSource都指向File' Owner,就像上一篇文章介紹的一樣。
10、打開ViewController.h,向其中添加代碼:
復制代碼 代碼如下:
#import <UIKit/UIKit.h>
@interface ViewController : UIViewController<UITableViewDelegate, UITableViewDataSource>
@property (strong, nonatomic) NSArray *dataList;
@property (strong, nonatomic) NSArray *imageList;
@end
11、打開ViewController.m,添加代碼:
11.1 在首部添加:
復制代碼 代碼如下:
#import "CustomCell.h"
11.2 在@implementation後面添加代碼:
復制代碼 代碼如下:
@synthesize dataList;
@synthesize imageList;
11.3 在viewDidLoad方法中添加代碼:
復制代碼 代碼如下:
- (void)viewDidLoad
{
[super viewDidLoad];
// Do any additional setup after loading the view, typically from a nib.
//加載plist文件的數據和圖片
NSBundle *bundle = [NSBundle mainBundle];
NSURL *plistURL = [bundle URLForResource:@"friendsInfo" withExtension:@"plist"];
NSDictionary *dictionary = [NSDictionary dictionaryWithContentsOfURL:plistURL];
NSMutableArray *tmpDataArray = [[NSMutableArray alloc] init];
NSMutableArray *tmpImageArray = [[NSMutableArray alloc] init];
for (int i=0; i<[dictionary count]; i++) {
NSString *key = [[NSString alloc] initWithFormat:@"%i", i+1];
NSDictionary *tmpDic = [dictionary objectForKey:key];
[tmpDataArray addObject:tmpDic];
NSString *imageUrl = [[NSString alloc] initWithFormat:@"%i.png", i+1];
UIImage *image = [UIImage imageNamed:imageUrl];
[tmpImageArray addObject:image];
}
self.dataList = [tmpDataArray copy];
self.imageList = [tmpImageArray copy];
}
11.4 在ViewDidUnload方法中添加代碼:
復制代碼 代碼如下:
self.dataList = nil;
self.imageList = nil;
11.5 在@end之前添加代碼:
復制代碼 代碼如下:
#pragma mark -
#pragma mark Table Data Source Methods
- (NSInteger)tableView:(UITableView *)tableView numberOfRowsInSection:(NSInteger)section {
return [self.dataList count];
}
- (UITableViewCell *)tableView:(UITableView *)tableView cellForRowAtIndexPath:(NSIndexPath *)indexPath {
static NSString *CustomCellIdentifier = @"CustomCellIdentifier";
static BOOL nibsRegistered = NO;
if (!nibsRegistered) {
UINib *nib = [UINib nibWithNibName:@"CustomCell" bundle:nil];
[tableView registerNib:nib forCellReuseIdentifier:CustomCellIdentifier];
nibsRegistered = YES;
}
CustomCell *cell = [tableView dequeueReusableCellWithIdentifier:CustomCellIdentifier];
NSUInteger row = [indexPath row];
NSDictionary *rowData = [self.dataList objectAtIndex:row];
cell.name = [rowData objectForKey:@"name"];
cell.dec = [rowData objectForKey:@"dec"];
cell.loc = [rowData objectForKey:@"loc"];
cell.image = [imageList objectAtIndex:row];
return cell;
}
#pragma mark Table Delegate Methods
- (CGFloat)tableView:(UITableView *)tableView heightForRowAtIndexPath:(NSIndexPath *)indexPath {
return 60.0;
}
- (NSIndexPath *)tableView:(UITableView *)tableView
willSelectRowAtIndexPath:(NSIndexPath *)indexPath {
return nil;
}
12、運行:
二、如何重用UITableviewCell
重用的目的是為了減少內存消耗,假如有1千個cell,如果不重用,那麼每一次滑動都得重新
alloc 很多很多的cell,耗費內存,同時屏幕會出現不連續的現象,晃眼睛。
重用cell很簡單,在創建cell的時候,使用
alloc initwithtableviewCellStyle:reuseIdentifer這個接口創建cell實例,而非使用alloc initwithFrame
使用前者表示該cell可重用,identifer使用一個固定的NSString即可
代碼如下:
復制代碼 代碼如下:
-(UITableViewCell*)tableView:(UITableView *)tableView cellForRowAtIndexPath:(NSIndexPath *)indexPath
{
static NSString *CellIdentifier = @"Cell";
UITableViewCell *cell = [tableView dequeueReusableCellWithIdentifier:CellIdentifier];//首先從可重用隊列裡面彈出一個cell
if (cell == nil) {//說明可重用隊列裡面並cell,此時需要重新創建cell實例,采用下面方法
cell = [[UITableViewCell alloc] initWithStyle:UITableViewCellStyleDefault reuseIdentifier:CellIdentifier] ;
}else{//此時表示有可重用cell,直接返回即可
NSLog(@"cell 重用啦");
}
return cell;
}
三、如何如何動態調整cell的高度?
這個問題還是比較頭疼的,下面這個函數肯定要用到
復制代碼 代碼如下:
-(CGFloat)tableView:(UITableView *)tableView heightForRowAtIndexPath:(NSIndexPath *)indexPath
經過實踐之後發現,可以在創建cell或者重用cell的時候,設置其frame
比如cell.frame=CGRectMake(0,0,320,450);
這個代碼會有效,同時在下面這個函數裡面
使用:
復制代碼 代碼如下:
-(CGFloat)tableView:(UITableView *)tableView heightForRowAtIndexPath:(NSIndexPath *)indexPath
{
NSLog(@"當前是第%ld行",(long)indexPath.row);
UITableViewCell *myCell=[self tableView:tableView cellForRowAtIndexPath:indexPath];//獲取當前indexPath中的cell實例
if( myCell == nil ){
return 0;
}else{
NSLog(@"%f",myCell.frame.size.height);
return myCell.frame.size.height;
}
return 0;
}
上面獲取當前indexPath的cell實例會重新申請建立一個實例(意思是個cell實際要創建兩個實例)
這樣的目的是為了獲取cell的frame,如果不這樣做也可以在第一部分創建cell的時候,將cell的frame保存在一個私有
變量中,在heightForRowAtIndexPath中訪問這個私有變量
通過上述方式可以動態改變UITableViewCell的高度
四、對於一個UILabel,根據其內容計算CGRect
首先要設置UILable的font,比如
tmLabel.font=[UIFont systemFontOfSize:14.0f];
然後使用boundingRectOfSize計算出該尺寸對應的矩形大小,代碼如下:
復制代碼 代碼如下:
NSDictionary *attrDic=@{NSFontAttributeName:[UIFont systemFontOfSize:12.0f]};
CGSize labelSize=[text boundingRectWithSize:CGSizeMake(320, 990)
options:NSStringDrawingUsesLineFragmentOrigin|NSStringDrawingUsesFontLeading
attributes:attrDic context:nil].size;
CGRect labelRect=CGRectMake(0, 0, labelSize.width, labelSize.height);
現在UILable的rect都可以被計算出來了,那麼如果自定義一個UITableViewCell,並且其內部的UILabel高度可變的話
也是可以實現的
五、內部含有可變高度的UILabel的UITableViewCell
如果還有其他控件,比如UIButton等等,也是一樣的。
這些控件在實例化的時候,設置frame為CGRectZero, 然後分別計算各自的高度和尺寸
使用cell.contentview addSubview 的方式,將這些子空間添加到cell中。重新計算cell的frame時
也需要把這些控件的frame累加上。上代碼:
復制代碼 代碼如下:
-(UITableViewCell*)tableView:(UITableView *)tableView cellForRowAtIndexPath:(NSIndexPath *)indexPath
{
static NSString *CellIdentifier = @"Cell";
UITableViewCell *cell = [tableView dequeueReusableCellWithIdentifier:CellIdentifier];
if (cell == nil) {
cell = [[UITableViewCell alloc] initWithStyle:UITableViewCellStyleDefault reuseIdentifier:CellIdentifier] ;
UILabel *label = [[UILabel alloc] initWithFrame:CGRectZero];
label.tag = 1;
label.lineBreakMode = NSLineBreakByCharWrapping;
label.highlightedTextColor = [UIColor whiteColor];
label.numberOfLines = 0;
label.opaque = NO; // 選中Opaque表示視圖後面的任何內容都不應該繪制
label.font=[UIFont systemFontOfSize:12.0f];
label.backgroundColor = [UIColor grayColor];
[cell.contentView addSubview:label];
UIButton *tmpButton=[[UIButton alloc]initWithFrame:CGRectZero];
tmpButton.tag=2;
tmpButton.backgroundColor=[UIColor cyanColor];
[cell.contentView addSubview:tmpButton];
tmpButton.opaque=NO;
[tmpButton setTitle:@"nihao" forState:UIControlStateNormal];
[tmpButton setTitleColor:[UIColor whiteColor ]forState:UIControlStateHighlighted];
[tmpButton addTarget:self action:@selector(tmpButtonHandler:) forControlEvents:UIControlEventTouchUpInside];
}else{
NSLog(@"cell 重用啦");
}
UILabel *tmpLabel=(UILabel *)[cell viewWithTag:1];
NSString *text=[tmpArray objectAtIndex:indexPath.row];
tmpLabel.text=text;
UIButton *tmpButton=(UIButton *)[cell viewWithTag:2];
NSDictionary *attrDic=@{NSFontAttributeName:[UIFont systemFontOfSize:12.0f]};
CGSize labelSize=[text boundingRectWithSize:CGSizeMake(320, 990)
options:NSStringDrawingUsesLineFragmentOrigin|NSStringDrawingUsesFontLeading
attributes:attrDic context:nil].size;
CGRect labelRect=CGRectMake(0, 0, labelSize.width, labelSize.height);//計算UILabel的rect
[tmpLabel setFrame:labelRect];
[tmpButton setFrame:CGRectMake(0, labelSize.height+1, 100, 50)];//計算UIButton 子控件的rect
[cell setFrame:CGRectMake(0, 0, labelSize.width, labelSize.height+50+1)];//cell的frame是以上兩個子控件之和
return cell;
}
為何不再創建時設置frame,而是在if和else邏輯後面?
重用cell的時候,從重用cell隊列裡面取出的cell,其內容(UILabel)是之前的cell內容,需要重新填充UILabel並且重新計算
整個cell的frame並設置其frame。而創建cell的時候也需要設置frame,所以這兩個邏輯重復,直接放在if else邏輯外面做。


- 解析iOS10中的極光推送新聞的適配
- 周全解析iOS中同步要求、異步要求、GET要求、POST要求
- 周全解析iOS運用中自界說UITableViewCell的辦法
- 解析iOS運用開辟中對設計形式中的籠統工場形式的完成
- 深刻解析設計形式中的裝潢器形式在iOS運用開辟中的完成
- 實例解析設計形式中的外不雅形式在iOS App開辟中的應用
- 深刻解析iOS運用開辟中對設計形式中的橋接形式的應用
- 深刻解析iOS運用開辟中九宮格視圖結構的相干盤算辦法
- 實例解析iOS運用多線程開辟中NSthread類的用法
- iOS開辟應用GDataXML框架解析收集數據
- iOS開辟應用XML解析收集數據
- iOS開辟應用JSON解析收集數據
- 實例解析iOS app開辟中音頻文件播下班具類的封裝
- iOS中json解析湧現的null,nil,NSNumber的處理方法
- 簡介Objective-C解析XML與JSON數據格局的辦法
