詳解iOS獲取通訊錄的4種方式
本文實例為大家分享了iOS獲取通訊錄的4種方式,供大家參考,具體內容如下
使用場景
一些App通過手機號碼來推薦好友,如 微博、支付寶
首先客戶端會獲取通訊錄中的所有手機號然後將這些手機號提交到App服務器中,服務器會查找每個手機號對應的App賬號如QQ號碼返回到客戶端,然後客戶端根據服務器返回的賬號列表來推薦好友。
獲取聯系人方式
方案一:AddressBookUI.framework框架
提供了聯系人列表界面、聯系人詳情界面、添加聯系人界面等
一般用於選擇聯系人
方案二:AddressBook.framework框架:
沒有提供UI界面,需要自己搭建聯系人界面
純C語言的API, 僅僅是獲得聯系人數據
大部分數據類型是Core Foundation
從iOS6 開始,需要得到用戶的授權才能訪問通訊錄
方案三:第三方框架:RHAddressBook
對 AddressBook.framework 進行封裝
方案四:iOS9.0最新通訊錄框架
ContactsUI.framework : 方案1的替代品,特點: 面向對象,使用簡單,有界面
Contacts.framework: 方案2的替代品, 特點:面向對象,使用簡單,五界面
方案一:AddressBookUI.framework
實現步驟:
1.創建選擇聯系人的控制器
2.設置代理:用來接收用戶選擇的聯系人信息
3.彈出聯系人控制器
4.實現代理方法
5.在對應的代理方法中獲取聯系人信息
AddressBook.frame實現步驟:
1.請求授權
2.判斷授權狀態如果已授權則繼續,如果未授權則提示用戶
3.創建通訊錄對象
4.從通訊錄中獲取所有的聯系人
5.遍歷所有的聯系人
6.釋放不再使用的對象
AddreesBook.framework具體實現:
1. AppDelegate 應用啟動時請求授權
#import "AppDelegate.h"
#import <AddressBook/AddressBook.h>

@interface AppDelegate ()

@end

@implementation AppDelegate

- (BOOL)application:(UIApplication *)application didFinishLaunchingWithOptions:(NSDictionary *)launchOptions {
 // Override point for customization after application launch.

 [self requestAuthorizationAddressBook];
 return YES;
}


- (void)requestAuthorizationAddressBook {
 // 判斷是否授權
 ABAuthorizationStatus authorizationStatus = ABAddressBookGetAuthorizationStatus();
 if (authorizationStatus == kABAuthorizationStatusNotDetermined) {
  // 請求授權
  ABAddressBookRef addressBookRef = ABAddressBookCreate();
  ABAddressBookRequestAccessWithCompletion(addressBookRef, ^(bool granted, CFErrorRef error) {
   if (granted) { // 授權成功

   } else {  // 授權失敗
    NSLog(@"授權失敗!");
   }
  });
 }
}
@end
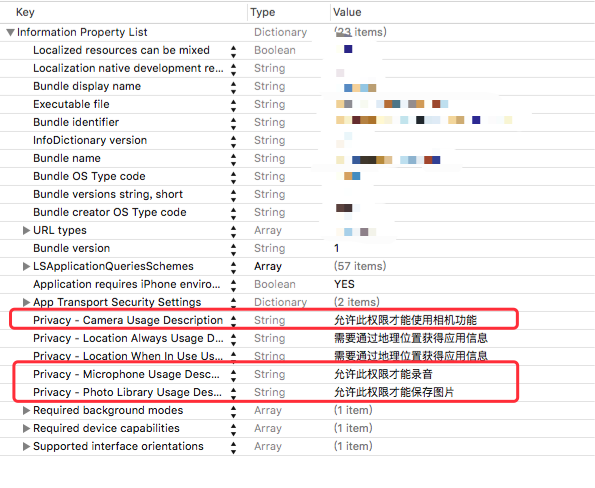
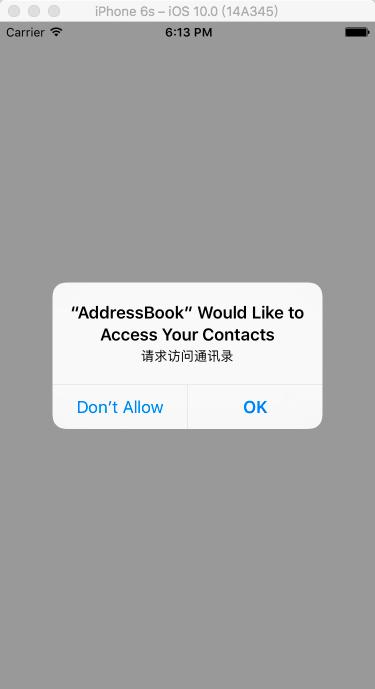
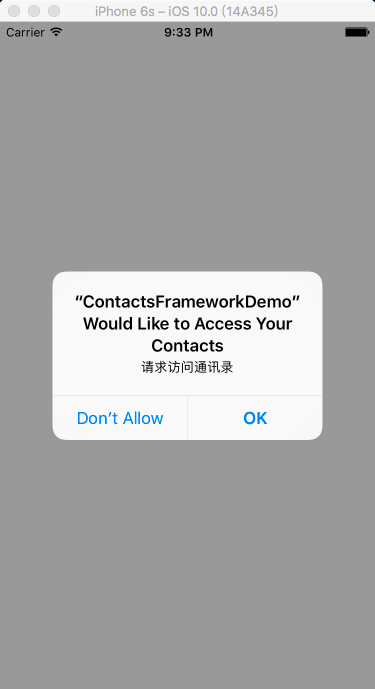
2. iOS10 需要在Info.plist配置NSContactsUsageDescription
<key>NSContactsUsageDescription</key>
<string>請求訪問通訊錄</string>
3. ViewController
#import "ViewController.h"
#import <AddressBook/AddressBook.h>

@interface ViewController ()

@end

@implementation ViewController

- (void)viewDidLoad {
 [super viewDidLoad];
}

- (void)touchesBegan:(NSSet<UITouch *> *)touches withEvent:(UIEvent *)event {
 // 1. 判讀授權
 ABAuthorizationStatus authorizationStatus = ABAddressBookGetAuthorizationStatus();
 if (authorizationStatus != kABAuthorizationStatusAuthorized) {

  NSLog(@"沒有授權");
  return;
 }

 // 2. 獲取所有聯系人
 ABAddressBookRef addressBookRef = ABAddressBookCreate();
 CFArrayRef arrayRef = ABAddressBookCopyArrayOfAllPeople(addressBookRef);
 long count = CFArrayGetCount(arrayRef);
 for (int i = 0; i < count; i++) {
  //獲取聯系人對象的引用
  ABRecordRef people = CFArrayGetValueAtIndex(arrayRef, i);

  //獲取當前聯系人名字
  NSString *firstName=(__bridge NSString *)(ABRecordCopyValue(people, kABPersonFirstNameProperty));

  //獲取當前聯系人姓氏
  NSString *lastName=(__bridge NSString *)(ABRecordCopyValue(people, kABPersonLastNameProperty));
  NSLog(@"--------------------------------------------------");
  NSLog(@"firstName=%@, lastName=%@", firstName, lastName);

  //獲取當前聯系人的電話 數組
  NSMutaleArray *phoneArray = [[NSMutableArray alloc]init];
  ABMultiValueRef phones = ABRecordCopyValue(people, kABPersonPhoneProperty);
  for (NSInteger j=0; j<ABMultiValueGetCount(phones); j++) {
   NSString *phone = (__bridge NSString *)(ABMultiValueCopyValueAtIndex(phones, j));
   NSLog(@"phone=%@", phone);
   [phoneArray addObject:phone];
  }

  //獲取當前聯系人的郵箱 注意是數組
  NSMutableArray *emailArray = [[NSMutableArray alloc]init];
  ABMultiValueRef emails= ABRecordCopyValue(people, kABPersonEmailProperty);
  for (NSInteger j=0; j<ABMultiValueGetCount(emails); j++) {
   NSString *email = (__bridge NSString *)(ABMultiValueCopyValueAtIndex(emails, j));
   NSLog(@"email=%@", email);
   [emailArray addObject:email];
  }
//獲取當前聯系人中間名
  NSString *middleName=(__bridge NSString*)(ABRecordCopyValue(people, kABPersonMiddleNameProperty));
  //獲取當前聯系人的名字前綴
  NSString *prefix=(__bridge NSString*)(ABRecordCopyValue(people, kABPersonPrefixProperty));

  //獲取當前聯系人的名字後綴
  NSString *suffix=(__bridge NSString*)(ABRecordCopyValue(people, kABPersonSuffixProperty));

  //獲取當前聯系人的昵稱
  NSString *nickName=(__bridge NSString*)(ABRecordCopyValue(people, kABPersonNicknameProperty));

  //獲取當前聯系人的名字拼音
  NSString *firstNamePhoneic=(__bridge NSString*)(ABRecordCopyValue(people, kABPersonFirstNamePhoneticProperty));

  //獲取當前聯系人的姓氏拼音
  NSString *lastNamePhoneic=(__bridge NSString*)(ABRecordCopyValue(people, kABPersonLastNamePhoneticProperty));

  //獲取當前聯系人的中間名拼音
  NSString *middleNamePhoneic=(__bridge NSString*)(ABRecordCopyValue(people, kABPersonMiddleNamePhoneticProperty));

  //獲取當前聯系人的公司
  NSString *organization=(__bridge NSString*)(ABRecordCopyValue(people, kABPersonOrganizationProperty));

  //獲取當前聯系人的職位
  NSString *job=(__bridge NSString*)(ABRecordCopyValue(people, kABPersonJobTitleProperty));

  //獲取當前聯系人的部門
  NSString *department=(__bridge NSString*)(ABRecordCopyValue(people, kABPersonDepartmentProperty));

  //獲取當前聯系人的生日
  NSString *birthday=(__bridge NSDate*)(ABRecordCopyValue(people, kABPersonBirthdayProperty));

  //獲取當前聯系人的備注
  NSString *notes=(__bridge NSString*)(ABRecordCopyValue(people, kABPersonNoteProperty));

  //獲取創建當前聯系人的時間 注意是NSDate
  NSDate *creatTime=(__bridge NSDate*)(ABRecordCopyValue(people, kABPersonCreationDateProperty));

  //獲取最近修改當前聯系人的時間
  NSDate *alterTime=(__bridge NSDate*)(ABRecordCopyValue(people, kABPersonModificationDateProperty));

  //獲取地址
  ABMultiValueRef address = ABRecordCopyValue(people, kABPersonAddressProperty);
  for (int j=0; j<ABMultiValueGetCount(address); j++) {
   //地址類型
   NSString *type = (__bridge NSString *)(ABMultiValueCopyLabelAtIndex(address, j));
   NSDictionary * tempDic = (__bridge NSDictionary *)(ABMultiValueCopyValueAtIndex(address, j));
   //地址字符串,可以按需求格式化
   NSString *adress = [NSString stringWithFormat:@"國家:%@\n省:%@\n市:%@\n街道:%@\n郵編:%@",[temDic valueForKey:(NSString*)kABPersonAddressCountryKey],[tempDic valueForKey:(NSString*)kABPersonAddressStateKey],[tempDic valueForKey:(NSString*)kABPersonAddressCityKey],[tempDic valueForKey:(NSString*)kABPersonAddressStreetKey],[tempDic valueForKey:(NSString*)kABPersonAddressZIPKey]];
  }

  //獲取當前聯系人頭像圖片
  NSData *userImage=(__bridge NSData*)(ABPersonCopyImageData(people));

  //獲取當前聯系人紀念日
  NSMutableArray *dateArr = [[NSMutableArray alloc]init];
  ABMultiValueRef dates= ABRecordCopyValue(people, kABPersonDateProperty);
  for (NSInteger j=0; j<ABMultiValueGetCount(dates); j++) {
   //獲取紀念日日期
   NSDate *data =(__bridge NSDate*)(ABMultiValueCopyValueAtIndex(dates, j));
   //獲取紀念日名稱
   NSString *str =(__bridge NSString*)(ABMultiValueCopyLabelAtIndex(dates, j));
   NSDictionary *tempDic = [NSDictionary dictionaryWithObject:data forKey:str];
   [dateArr addObject:tempDic];
  }
 }
}

@end
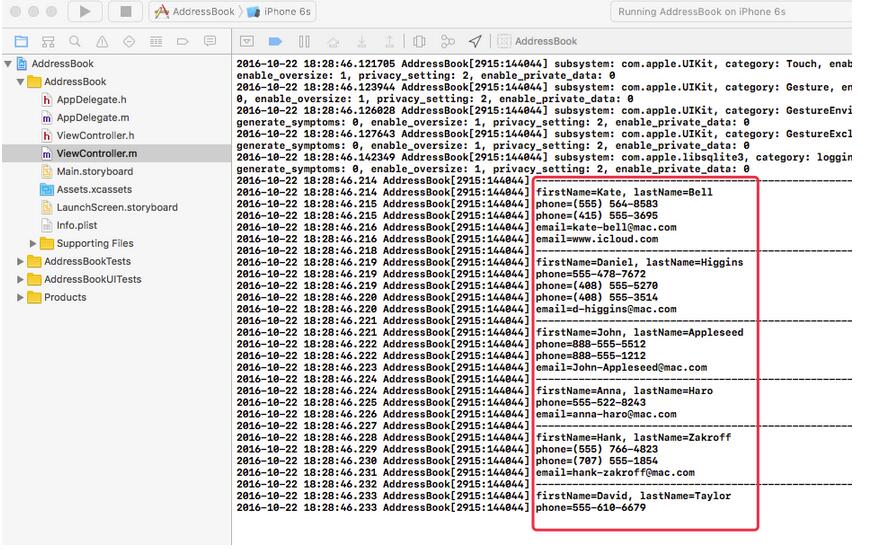
4. 運行結果
第三方框架:RHAddressBook
https://github.com/heardrwt/RHAddressBook
該框架使用的MRC來管理內存的,如果直接將源代碼拖入進去需要為每個文件設置編譯標記:-fno-objc-arc, 設置完還會報錯,該項目使用的一些方法過於古老,很多都不支持了,所以這種方式不采用; 可以將該項目打成靜態庫的方式;也可以直接將項目拖入到自己的工程中作為一個依賴
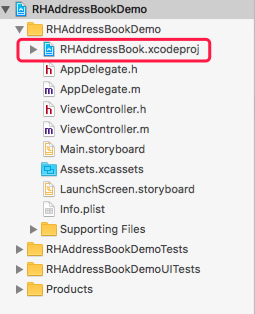
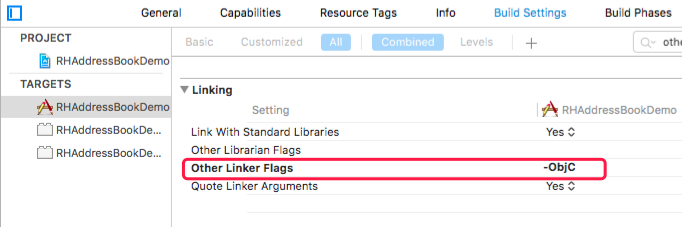
1.直接將RHAddressBook.xcodeproj拖入到工程中
2.添加Target Dependencies和Link Binary With Libraries
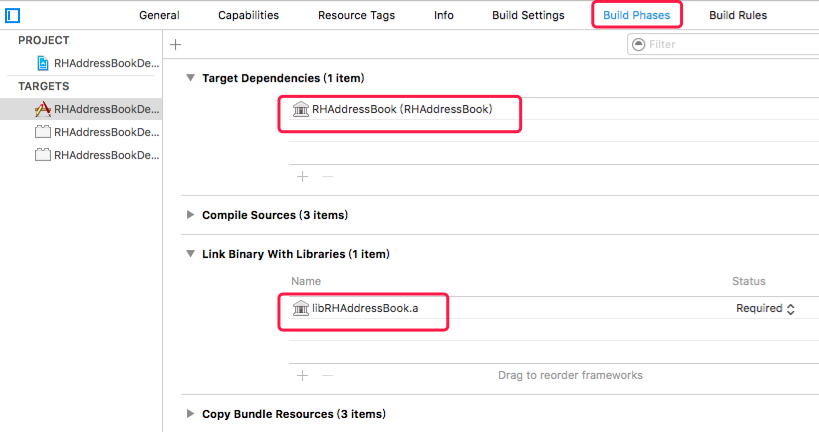
3.Build Settings—> Other Linker Flags : -ObjC
用於解決系統分類找不到方法的錯誤
4.iOS10 需要在Info.plist配置NSContactsUsageDescription
<key>NSContactsUsageDescription</key>
<string>請求訪問通訊錄</string>
App啟動時請求授權訪問通訊錄
#import "AppDelegate.h"
#import <RHAddressBook/RHAddressBook.h>

@interface AppDelegate ()

@end

@implementation AppDelegate

- (BOOL)application:(UIApplication *)application didFinishLaunchingWithOptions:(NSDictionary *)launchOptions {
  // Override point for customization after application launch.

  [self requestAuthorizationForAddressBook];
  return YES;
}

- (void)requestAuthorizationForAddressBook {
  RHAddressBook *ab = [[RHAddressBook alloc] init];
  if ([RHAddressBook authorizationStatus] == RHAuthorizationStatusNotDetermined){

    [ab requestAuthorizationWithCompletion:^(bool granted, NSError *error) {
      if (granted) {

      } else {
        NSLog(@"請求授權拒絕");
      }
    }];
  }
}
@end
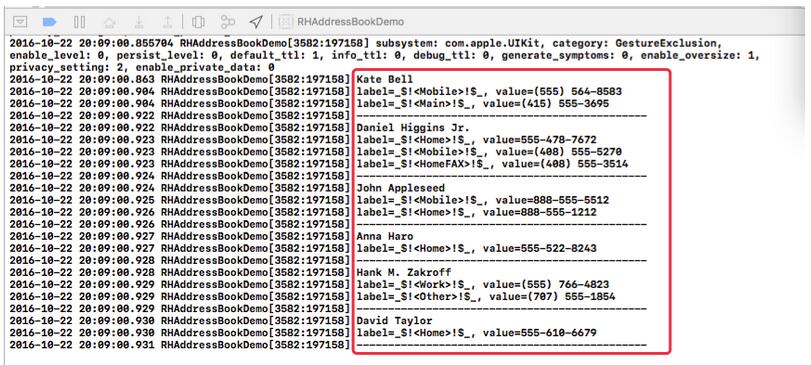
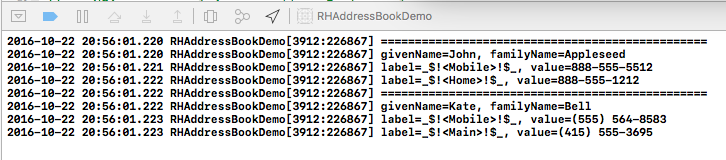
獲取所有聯系人的信息:姓名、手機號等
#import "ViewController.h"
#import <RHAddressBook/RHAddressBook.h>
#import <RHAddressBook/AddressBook.h>

@interface ViewController ()

@end

@implementation ViewController
- (void)viewDidLoad {
  [super viewDidLoad];
}

- (void)touchesBegan:(NSSet<UITouch *> *)touches withEvent:(UIEvent *)event {
  RHAddressBook *addressBook = [[RHAddressBook alloc] init];
  if ([RHAddressBook authorizationStatus] != RHAuthorizationStatusAuthorized){
    NSLog(@"沒有授權");
    return;
  }

  NSArray *peopleArray= addressBook.people;
  for (int i = 0; i < peopleArray.count; i++) {
    RHPerson *people = (RHPerson *)peopleArray[i];
    NSLog(@"%@", people.name);

    RHMultiStringValue *phoneNumbers = people.phoneNumbers;
    for (int i = 0; i < phoneNumbers.count; i++) {
      NSString* label= [phoneNumbers labelAtIndex:i];
      NSString* value= [phoneNumbers valueAtIndex:i];

      NSLog(@"label=%@, value=%@", label, value);
    }

    NSLog(@"----------------------------------------------");
  }
}
@end
運行結果:
ContactsUI.framework
#import "ViewController.h"
#import <ContactsUI/ContactsUI.h>

@interface ViewController () <CNContactPickerDelegate>

@end

@implementation ViewController

- (void)viewDidLoad {
  [super viewDidLoad];

  CNContactPickerViewController *contactPickerViewController = [[CNContactPickerViewController alloc] init];
  contactPickerViewController.delegate = self;

  [self presentViewController:contactPickerViewController animated:YES completion:nil];
}


// 如果實現該方法當選中聯系人時就不會再出現聯系人詳情界面, 如果需要看到聯系人詳情界面只能不實現這個方法,
- (void)contactPicker:(CNContactPickerViewController *)picker didSelectContact:(CNContact *)contact {
  NSLog(@"選中某一個聯系人時調用---------------------------------");

  [self printContactInfo:contact];
}

// 同時選中多個聯系人
- (void)contactPicker:(CNContactPickerViewController *)picker didSelectContacts:(NSArray<CNContact *> *)contacts {
  for (CNContact *contact in contacts) {
    NSLog(@"================================================");
    [self printContactInfo:contact];
  }
}

- (void)printContactInfo:(CNContact *)contact {
  NSString *givenName = contact.givenName;
  NSString *familyName = contact.familyName;
  NSLog(@"givenName=%@, familyName=%@", givenName, familyName);
  NSArray * phoneNumbers = contact.phoneNumbers;
  for (CNLabeledValue<CNPhoneNumber*>*phone in phoneNumbers) {
    NSString *label = phone.label;
    CNPhoneNumber *phonNumber = (CNPhoneNumber *)phone.value;
    NSLog(@"label=%@, value=%@", label, phonNumber.stringValue);
  }
}
// 注意:如果實現該方法,上面那個方法就不能實現了,這兩個方法只能實現一個
//- (void)contactPicker:(CNContactPickerViewController *)picker didSelectContactProperty:(CNContactProperty *)contactProperty {
//  NSLog(@"選中某個聯系人的某個屬性時調用");
//}

@end
選擇單個聯系人時運行效果:

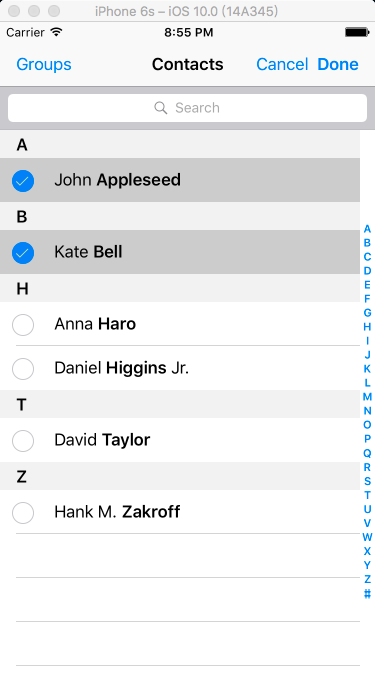
選擇多個聯系人的界面:
Contact.framework
iOS10 需要在Info.plist配置NSContactsUsageDescription
<key>NSContactsUsageDescription</key>
<string>請求訪問通訊錄</string>
應用啟動時請求授權:
#import "AppDelegate.h"
#import <Contacts/Contacts.h>

@interface AppDelegate ()

@end

@implementation AppDelegate


- (BOOL)application:(UIApplication *)application didFinishLaunchingWithOptions:(NSDictionary *)launchOptions {
  // Override point for customization after application launch.

  [self requestAuthorizationForAddressBook];
  return YES;
}

- (void)requestAuthorizationForAddressBook {
  CNAuthorizationStatus authorizationStatus = [CNContactStore authorizationStatusForEntityType:CNEntityTypeContacts];
  if (authorizationStatus == CNAuthorizationStatusNotDetermined) {
    CNContactStore *contactStore = [[CNContactStore alloc] init];
    [contactStore requestAccessForEntityType:CNEntityTypeContacts completionHandler:^(BOOL granted, NSError * _Nullable error) {
      if (granted) {

      } else {
        NSLog(@"授權失敗, error=%@", error);
      }
    }];
  }
}

@end
獲取通訊錄信息
#import "ViewController.h"
#import <Contacts/Contacts.h>

@interface ViewController ()

@end

@implementation ViewController

- (void)viewDidLoad {
  [super viewDidLoad];

}

- (void)touchesBegan:(NSSet<UITouch *> *)touches withEvent:(UIEvent *)event {
  CNAuthorizationStatus authorizationStatus = [CNContactStore authorizationStatusForEntityType:CNEntityTypeContacts];
  if (authorizationStatus == CNAuthorizationStatusAuthorized) {
    NSLog(@"沒有授權...");
  }

  // 獲取指定的字段,並不是要獲取所有字段,需要指定具體的字段
  NSArray *keysToFetch = @[CNContactGivenNameKey, CNContactFamilyNameKey, CNContactPhoneNumbersKey];
  CNContactFetchRequest *fetchRequest = [[CNContactFetchRequest alloc] initWithKeysToFetch:keysToFetch];
  CNContactStore *contactStore = [[CNContactStore alloc] init];
  [contactStore enumerateContactsWithFetchRequest:fetchRequest error:nil usingBlock:^(CNContact * _Nonnull contact, BOOL * _Nonnull stop) {
    NSLog(@"-------------------------------------------------------");
    NSString *givenName = contact.givenName;
    NSString *familyName = contact.familyName;
    NSLog(@"givenName=%@, familyName=%@", givenName, familyName);


    NSArray *phoneNumbers = contact.phoneNumbers;
    for (CNLabeledValue *labelValue in phoneNumbers) {
      NSString *label = labelValue.label;
      CNPhoneNumber *phoneNumber = labelValue.value;

      NSLog(@"label=%@, phone=%@", label, phoneNumber.stringValue);
    }

//    *stop = YES; // 停止循環,相當於break;
  }];

}
@end
運行效果:

以上就是本文的全部內容,希望對大家的學習有所幫助,也希望大家多多支持本站。