iOS 仿百度外賣-首頁重力感應的實例
編輯:IOS開發綜合
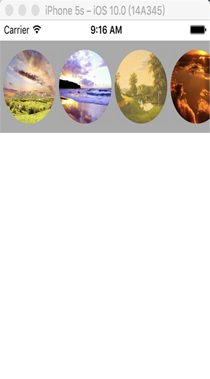
今天帶來的是仿百度外賣首頁的重力感應..(由於只能真機測試,手裡測試機只有5s,所以有些地方並沒有適配其他機型,需要的還需要根據真機自行適配)
來簡單說下實現吧,之前重力感應都是用UIAccelerometer實現的,但是,好像是從iOS 4 以後,這個方法就廢棄了,它被直接封裝到了CoreMotion框架中,所以現在有關重力感應,加速計什麼的都需要通過CoreMotion框架實現,這也算是蘋果對於重力感應的整合吧.本文對CoreMotion框架只是進行了簡單的使用,想要更深的使用,還是請自行 google(百度上的文檔非常少).
好了.下面就是實現代碼
(注意這裡需要導入系統框架CoreMotion.framework)
//
// ViewController.m
// 仿百度外賣首頁-重力感應
//
// Created by Amydom on 16/12/5.
// Copyright © 2016年 Amydom. All rights reserved.
//

#import "ViewController.h"
#import <CoreMotion/CoreMotion.h>

@interface ViewController ()<UIScrollViewDelegate>{

  NSTimeInterval updateInterval;
  CGFloat setx;//scroll的動態偏移量

}
@property (nonatomic,strong) CMMotionManager *mManager;

@property (nonatomic , strong)UIScrollView *myScrollView;

@property (nonatomic , assign)CGFloat offsetX;//初始偏移量

@property (nonatomic , assign)NSInteger offset;


@end

@implementation ViewController

- (void)viewDidAppear:(BOOL)animated_{

  [super viewDidAppear:animated_];
  //在界面已經顯示後在調用方法(優化)
  [self startUpdateAccelerometerResult:0];

}

- (void)viewDidLoad {
  [super viewDidLoad];
  self.view.backgroundColor = [UIColor whiteColor];
  [self createView];

}

- (void)createView{

  //collectionView
  UICollectionViewFlowLayout *flowLayout = [[UICollectionViewFlowLayout alloc]init];
  UICollectionView *myCollection = [[UICollectionView alloc]initWithFrame:[UIScreen mainScreen].bounds collectionViewLayout:flowLayout];
  myCollection.backgroundColor = [UIColor whiteColor];
  [self.view addSubview:myCollection];


  _myScrollView = [[UIScrollView alloc]initWithFrame:CGRectMake(0, 22, self.view.frame.size.width, 100)];
  _myScrollView.backgroundColor = [UIColor lightGrayColor];
  _myScrollView.delegate = self;
  [self.view addSubview:_myScrollView];


  for (int i = 0; i < 8; i ++) {

    NSString *name = [NSString stringWithFormat:@"%d.jpg",i + 1];
    UIImageView *image = [[UIImageView alloc]initWithFrame:CGRectMake(5 + 885 * i, 10, 80, 80)];
    image.image = [UIImage imageNamed:name];
    image.backgroundColor = [UIColor orangeColor];
    image.layer.masksToBounds = YES;
    image.layer.cornerRadius = 40;
    [_myScrollView addSubview:image];
    //偏移量為最後 image 的 frame + origin
    _myScrollView.contentSize = CGSizeMake (image.frame.size.width + image.frame.origin.x, 10);


  }


}

//手指觸碰時
- (void)scrollViewWillBeginDragging:(UIScrollView *)scrollView{

   _offsetX = scrollView.contentOffset.x;
  [self stopUpdate];

}

- (void)scrollViewDidScroll:(UIScrollView *)scrollView{

  //優化處理
  setx = scrollView.contentOffset.x;

  _offset = scrollView.contentOffset.x - _offsetX;

    if (_offset > 0) {

      //left

    }else{

      //right

    }


}
//手指離開時
- (void)scrollViewDidEndDragging:(UIScrollView *)scrollView willDecelerate:(BOOL)decelerate{

  [self startUpdateAccelerometerResult:0];

}

#pragma mark - 重力感應
- (CMMotionManager *)mManager
{
  if (!_mManager) {
    updateInterval = 1.0/15.0;
    _mManager = [[CMMotionManager alloc] init];
  }
  return _mManager;
}
//開始
- (void)startUpdateAccelerometerResult:(void (^)(NSInteger))result
{

  if ([self.mManager isAccelerometerAvailable] == YES) {
    //回調會一直調用,建議獲取到就調用下面的停止方法,需要再重新開始,當然如果需求是實時不間斷的話可以等離開頁面之後再stop
    [self.mManager setAccelerometerUpdateInterval:updateInterval];
    [self.mManager startAccelerometerUpdatesToQueue:[NSOperationQueue currentQueue] withHandler:^(CMAccelerometerData *accelerometerData, NSError *error)
     {
       double x = accelerometerData.acceleration.x;
       double y = accelerometerData.acceleration.y;
       if (fabs(y) >= fabs(x))
       {//前後
         if (y >= 0){
           //Down
         }
         else{
           //Portrait
         }

       } else { //左右

         if (x >= 0){

           setx += 10;

           if (setx <= 360) {
             //由於以10為單位改變 contentOffset, 會出現頓的現象,加上動畫就可解決這個問題
             [UIView animateWithDuration:0.1 animations:^{

               _myScrollView.contentOffset = CGPointMake(setx, 0);
             }];
             //模仿 scroll 的回彈效果
             if (setx == 360) {

               [UIView animateWithDuration:0.5 animations:^{

                 _myScrollView.contentOffset = CGPointMake(setx + 50, 0);

               } completion:^(BOOL finished) {

                 [UIView animateWithDuration:0.5 animations:^{

                   _myScrollView.contentOffset = CGPointMake(setx , 0);

                 }];

               }];

             }

           }else{

             setx = 360;
           }


         }else{

           setx -= 10;

           if (setx >= 0) {

             [UIView animateWithDuration:0.1 animations:^{

               _myScrollView.contentOffset = CGPointMake(setx, 0);

             }];

             //模仿 scroll 的回彈效果
             if (setx == 0) {

               [UIView animateWithDuration:0.5 animations:^{

                 _myScrollView.contentOffset = CGPointMake(setx - 50, 0);

               } completion:^(BOOL finished) {

                 [UIView animateWithDuration:0.5 animations:^{

                   _myScrollView.contentOffset = CGPointMake(setx, 0);

                 }];

               }];

             }

           }else{

             setx = 0;

           }
         }
       }
     }];
  }
}

//停止感應方法
- (void)stopUpdate
{
  if ([self.mManager isAccelerometerActive] == YES)
  {
    [self.mManager stopAccelerometerUpdates];
  }
}
//離開頁面後停止(移除 mManager)
- (void)dealloc
{
  //制空,防止野指針
  _mManager = nil;
}


- (void)didReceiveMemoryWarning {
  [super didReceiveMemoryWarning];
  // Dispose of any resources that can be recreated.
}


@end
到這裡,就可以進行真機測試了..
以上就是本文的全部內容,希望對大家的學習有所幫助,也希望大家多多支持本站。


相關文章
+