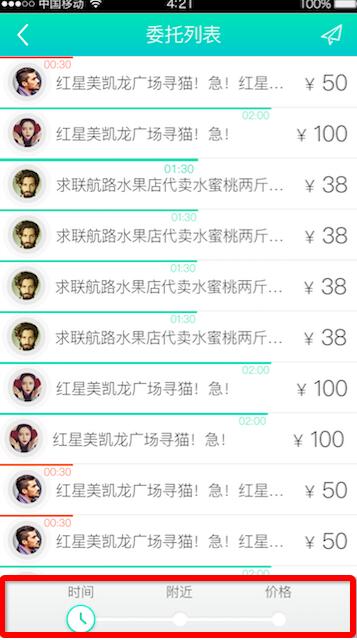
iOS仿Uber篩選欄效果
編輯:IOS開發綜合
這個是之前項目中用的仿Uber篩選欄,現在要改了,改之前把這個記錄下來,萬一有人用到了,就可以直接拿來用了,這個是在大神的基礎上改的,還行吧,但是覺得有點丑!有需要的可以看一下,方法有點笨,大神勿噴。
1.加載數據
* 加載數據
*/
- (void)loadData{
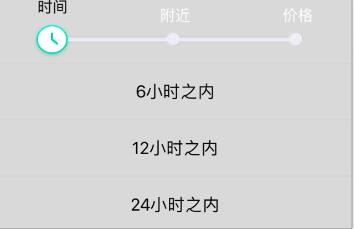
timeArray = @[@"6小時之內",@"12小時之內",@"24小時之內"];
locationArray = @[@"全城",@"附近1km",@"附近3千米",@"附近5千米",@"附近10千米"];
piceArray = @[@"價格不限",@"0-5元",@"5-20元",@"20-50元",@"50-100元"];
}
2.加載視圖
 * 加載UI視圖
 */
-(void)shuaxin{

 dicengbackeView = [[UIView alloc]initWithFrame:CGRectMake(0, kScreenHeight-140, kScreenWidth, 420)];

 dicengbackeView.backgroundColor = [UIColor colorWithWhite:0.850 alpha:1.000];

 [self.view addSubview:dicengbackeView];

 filter = [[SEFilterControlList alloc]initWithFrame:CGRectMake((kScreenWidth-300)/2, -5, 300, 30) Titles:[NSArray arrayWithObjects:@"時間", @"附近", @"價格",nil]];

 filter.userInteractionEnabled = YES;

 [filter addTarget:self action:@selector(filterValueChanged:) forControlEvents:UIControlEventTouchUpInside];

 [filter setProgressColor:[UIColor groupTableViewBackgroundColor]];//設置滑桿的顏色

 [filter setTitlesFont:[UIFont fontWithName:@"Didot" size:16]];

 [filter setTopTitlesColor:[UIColor blackColor]];//設置滑塊上方字體顏色

 [filter setSelectedIndex:0];//設置當前選中

 [dicengbackeView addSubview:filter];


 Button_UIView = [[UIView alloc]initWithFrame:CGRectMake(0, 70,kScreenWidth,240)];

 Button_UIView.backgroundColor = [UIColor colorWithWhite:0.730 alpha:1.000];

 [dicengbackeView addSubview:Button_UIView];

 _backsrollView = [[UIScrollView alloc]initWithFrame:CGRectMake(0, 0,kScreenWidth , 240)];

 _backsrollView.pagingEnabled = YES;

 _backsrollView.userInteractionEnabled = YES;

 _backsrollView.contentSize =CGSizeMake(kScreenWidth*3, 0);
 //設置是否滾動
 _backsrollView.scrollEnabled = NO;

 [Button_UIView addSubview:_backsrollView];

 imageView1 = [[UIImageView alloc]initWithFrame:CGRectMake(0, 0, kScreenWidth, _backsrollView.frame.size.height)];

 imageView2 = [[UIImageView alloc]initWithFrame:CGRectMake(kScreenWidth, 0, kScreenWidth, _backsrollView.frame.size.height)];

 imageView3 = [[UIImageView alloc]initWithFrame:CGRectMake(kScreenWidth*2, 0, kScreenWidth, _backsrollView.frame.size.height)];
#pragma mark ==========Loading===================
 imageView1.userInteractionEnabled = YES;

 imageView2.userInteractionEnabled = YES;

 imageView3.userInteractionEnabled = YES;

#pragma mark ==========Loading===================
 for (int g =0; g<3; g++) {

  UIButton *button1 = [UIButton buttonWithType:UIButtonTypeCustom];

  button1.frame = CGRectMake(0, (180/3)*g, kScreenWidth, 180/3);
  button1.backgroundColor = [UIColor colorWithWhite:0.850 alpha:1.000];

  [button1 setTitle:timeArray[g] forState:UIControlStateNormal];

  [button1 setTitleColor:[UIColor blackColor] forState:UIControlStateNormal];

  button1.tag = 100+g;

  button1.titleLabel.textAlignment = NSTextAlignmentCenter;

  button1.layer.borderColor = [[UIColor colorWithWhite:0.837 alpha:1.000] CGColor];

  button1.layer.borderWidth = 1.0f;

  [button1 addTarget:self action:@selector(timebtn:) forControlEvents:UIControlEventTouchUpInside];

  [imageView1 addSubview:button1];

 }

 for (int k =0; k<5; k++) {

  UIButton *button2 = [UIButton buttonWithType:UIButtonTypeCustom];

  button2.frame = CGRectMake(0, (180/5)*k, kScreenWidth, 180/5);
  button2.backgroundColor = [UIColor colorWithWhite:0.850 alpha:1.000];

  [button2 setTitle:locationArray[k] forState:UIControlStateNormal];

  [button2 setTitleColor:[UIColor blackColor] forState:UIControlStateNormal];

  button2.tag = 200+k;

  button2.titleLabel.textAlignment = NSTextAlignmentCenter;

  button2.layer.borderColor = [[UIColor colorWithWhite:0.837 alpha:1.000] CGColor];

  button2.layer.borderWidth = 1.0f;

  [imageView2 addSubview:button2];

  [button2 addTarget:self action:@selector(timebtn:) forControlEvents:UIControlEventTouchUpInside];

 }

 for (int y =0; y<5; y++) {

  UIButton *button3 = [UIButton buttonWithType:UIButtonTypeCustom];

  button3.frame = CGRectMake(0, (180/5)*y, kScreenWidth, 180/5);

  button3.backgroundColor = [UIColor colorWithWhite:0.850 alpha:1.000];

  [button3 setTitle:piceArray[y] forState:UIControlStateNormal];

  [button3 setTitleColor:[UIColor blackColor] forState:UIControlStateNormal];

  button3.tag = 300+y;

  button3.titleLabel.textAlignment = NSTextAlignmentCenter;

  button3.layer.borderColor = [[UIColor colorWithWhite:0.837 alpha:1.000] CGColor];

  button3.layer.borderWidth = 1.0f;

  [imageView3 addSubview:button3];

  [button3 addTarget:self action:@selector(timebtn:) forControlEvents:UIControlEventTouchUpInside];
 }

 [_backsrollView addSubview:imageView1];

 [_backsrollView addSubview:imageView2];

 [_backsrollView addSubview:imageView3];

}

- (void)filterValueChanged:(SEFilterControlList *)sender{

 NSLog(@"%d",sender.SelectedIndex);
 switch (sender.SelectedIndex) {
  case 0:{

   break;
  }
  case 1:{

   break;
  }
  case 2:{

   break;
  }
  default:
   break;
 }

 _backsrollView.contentOffset = CGPointMake([sender SelectedIndex]*kScreenWidth, 0);

// self.table.contentInset = UIEdgeInsetsMake(0, 0, 230, 0);

 [UIView animateWithDuration:0.2 animations:^{


  [UIView animateWithDuration:0.2 animations:^{

   dicengbackeView.frame = CGRectMake(0,kScreenHeight-310 , kScreenWidth,310);
  }];


 } completion:^(BOOL finished) {

 }];

}


- (void)timebtn:(UIButton *)sender{

 switch (sender.tag) {
  case 100:{

   [shaixuan setObject:@"6" forKey:@"times"];

   [self dianji];
   [self chuanzhi];

   break;
  }
  case 101:{


   [shaixuan setObject:@"12" forKey:@"times"];


   [self dianji];
   //   [self pianyi];
   [self chuanzhi];
   break;
  }
  case 102:{

   [shaixuan setObject:@"24" forKey:@"times"];


   [self dianji];
   //   [self pianyi];
   [self chuanzhi];
   break;
  }

  case 200:{


   [shaixuan setObject:@"0" forKey:@"nearby"];


   [self dianji];
   //   [self pianyi];
   [self chuanzhi];

   break;
  }

  case 201:{


   [shaixuan setObject:@"1" forKey:@"nearby"];


   [self dianji];
   //   [self pianyi];
   [self chuanzhi];

   break;
  }

  case 202:{


   [shaixuan setObject:@"3" forKey:@"nearby"];


   [self dianji];
   //   [self pianyi];
   [self chuanzhi];

   break;
  }


  case 203:{


   [shaixuan setObject:@"5" forKey:@"nearby"];

   [self dianji];
   //   [self pianyi];
   [self chuanzhi];

   break;
  }


  case 204:{


   [shaixuan setObject:@"10" forKey:@"nearby"];


   [self dianji];
   //   [self pianyi];
   [self chuanzhi];

   break;
  }

  case 300:{


   [shaixuan setObject:@"0" forKey:@"pricenumber"];


   [self dianji];
   //   [self pianyi];
   [self chuanzhi];

   break;
  }
  case 301:{


   [shaixuan setObject:@"1" forKey:@"pricenumber"];


   [self dianji];
   //   [self pianyi];
   [self chuanzhi];
   break;
  }
  case 302:{


   [shaixuan setObject:@"2" forKey:@"pricenumber"];


   [self dianji];
   //   [self pianyi];
   [self chuanzhi];

   break;
  }
  case 303:{

   [shaixuan setObject:@"3" forKey:@"pricenumber"];

   [self dianji];
   //   [self pianyi];
   [self chuanzhi];

   break;
  }
  case 304:{

   [shaixuan setObject:@"4" forKey:@"pricenumber"];


   [self dianji];
   //   [self pianyi];
   [self chuanzhi];

   break;
  }
  default:
   break;
 }
#pragma mark ===================

}


-(void)dianji{


 [UIView animateWithDuration:0.2 animations:^{

  dicengbackeView.frame = CGRectMake(0, kScreenHeight-135, kScreenWidth, 370);
 }];
}
//將參數傳給後台,請求數據
-(void)chuanzhi{


}
以上就是本文的全部內容,希望對大家的學習有所幫助,也希望大家多多支持本站。

相關文章
+