iOS學習筆記—— MapKit
在iOS應用程序中,我們可以使用Map Kit API開發地圖應用,其核心是MKMapView類。本次主要實現的功能是顯示地圖,添加標注,跟蹤用戶位置變化。
(本日志的所有內容基於已成功獲取坐標位置,獲取方法見上篇日志)
1、顯示地圖
首先需要引用
初始化MapView
mapView = [[MKMapView alloc] initWithFrame:CGRectMake(5, 120, self.view.frame.size.width - 10, 430)];
    mapView.mapType = MKMapTypeStandard;
    mapView.delegate = self;
地圖類型(mapType)有以下3種:
MKMapTypeStandard 標注地圖類型
MKMapSatellite 衛星地圖類型
MKMapTypeHybrid 混合地圖類型
在獲取到位置的placemark後,我自定義了一個函數,實現地圖的顯示
- (void) showInMapView: (CLPlacemark *) placemark
{
    CLLocationCoordinate2D coordinate = placemark.location.coordinate;

    // 添加MapView
    MKCoordinateSpan span = MKCoordinateSpanMake(0.01, 0.01);			// 跨度(比例)
    MKCoordinateRegion region = MKCoordinateRegionMake(coordinate, span);       // 范圍、區域
    [mapView setRegion:region];
    [self.view addSubview: mapView];
}
此處只需設置mapView的顯示區域,使用如下結構體:
typedef struct{
CLLocationCoordinate2D center; // 中心點
MKCoordinateSpan Span; // 跨度
}MKCoodinateRegion;
結構體初始化使用 MKCoodinateRegionMake函數,其第一個參數指定了目標區域中心點,第二個設置目標區域的跨度
而顯示跨度的結構體MKCoordinateSpan的定義為:
typedef struct{
CLLocationDegress latitudeDelta; // 區域的南北跨度
CLLocationDegress longtitudeDelta; // 區域的東西跨度
}MKCoordinateSpan;
南北跨度1度大約是111公裡,東西跨度在赤道上1度大約是111公裡,越靠近兩極,這個距離在逐漸減小,在極點是變為0公裡。
最後使用setRegion函數,為mapView設置顯示區域。
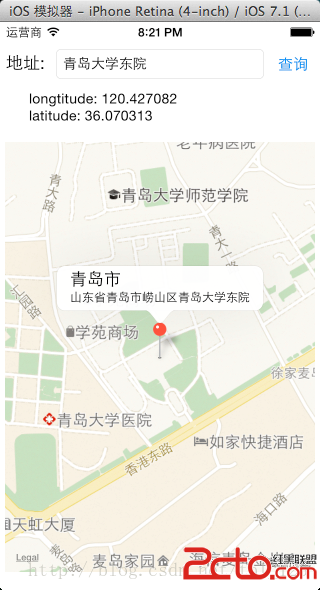
2、添加標注
首先要引用它的頭文件
首先設置標注點,需使用MKPointAnnotation類,它主要有以下三個屬性
- (NSString *) titile; 標注點的主標題
- (NSString *)subtitle; 標注點的副標題
- (CLLocationCoordinate2D) coordinate; // 標注點的位置信息
在設置好以上三個屬性後,直接使用addAnnotation函數將標注點添加進mapView。
這部分代碼還是在上面的showInMapView: 函數中,代碼如下
- (void) showInMapView: (CLPlacemark *) placemark
{
    CLLocationCoordinate2D coordinate = placemark.location.coordinate;

    // 添加MapView
    MKCoordinateSpan span = MKCoordinateSpanMake(0.01, 0.01);
    MKCoordinateRegion region = MKCoordinateRegionMake(coordinate, span);
    [mapView setRegion:region animated:YES];
    [self.view addSubview: mapView];


    // 添加Annotation
    MKPointAnnotation *annotaion = [[MKPointAnnotation alloc] init];
    annotaion.coordinate = coordinate;
    annotaion.title = placemark.locality;
    annotaion.subtitle = placemark.name;

    [mapView addAnnotation: annotaion];
}
要實現標注的顯示,我們還應實現地圖視圖委托協議中的 mapView: viewForAnnotation:方法,在該方法中,我們實例化一個標注點視圖(MKPointAnnotationView),並完成它的初始化工作,實現代碼如下:
- (MKAnnotationView *)mapView:(MKMapView *)mapView viewForAnnotation:(id其中 (MBAnnotationView *) - dequeueReusableAnnotationViewWithIdentifier: 通過標識符返回可復用的標注視圖)annotation { MKPinAnnotationView *annotaionView = (MKPinAnnotationView *)[mapView dequeueReusableAnnotationViewWithIdentifier:@"PIN_ANNOTATION"]; if (annotaionView == nil) { annotaionView = [[MKPinAnnotationView alloc] initWithAnnotation: annotation reuseIdentifier:@"PIN_ANNOTATION"]; } annotaionView.pinColor = MKPinAnnotationColorRed; // 標注點顏色 annotaionView.animatesDrop = YES; // 動畫 annotaionView.canShowCallout = YES; // 插圖編號 return annotaionView; }
3、跟蹤用戶位置變化
開啟地圖的showsUserLocation屬性,並設置方法setUserTrackMode:即可實現跟蹤用戶的位置和方向變化。
    mapView.showsUserLocation = YES;
    [mapView setUserTrackingMode:MKUserTrackingModeFollowWithHeading animated:YES];
其中用戶跟蹤模式有以下三種:
MKUserTrackingModeNone 沒有用戶跟蹤模式
MKUsetTrackingModeFollow 跟蹤用戶的位置變化
MKUserTrackingModeFollowWithHeading 跟蹤用戶位置和方向變化
同時還需實現地圖視圖的委托方法mapView:didUpdataUserLocation:
- (void) mapView:(MKMapView *) mapView didUpdateUserLocation:(MKUserLocation *)userLocation
{
    mapView.centerCoordinate = userLocation.location.coordinate;
}
- 上一頁:iOS下的dao層實現代碼
- 下一頁:iOS:制作左右側滑(抽屜式)菜單