iOS開發之窺探UICollectionViewController(三) --使用UICollectionView自定義瀑布流
UICollectionView之所以強大,是因為其具有自定義功能,這一自定義就不得了啦,自由度非常大,定制的高,所以功能也是灰常強大的。本篇博客就不使用自帶的流式布局了,我們要自定義一個瀑布流。自定義的瀑布流可以配置其參數: 每個Cell的邊距,共有多少列,Cell的最大以及最小高度是多少等。
一.先入為主
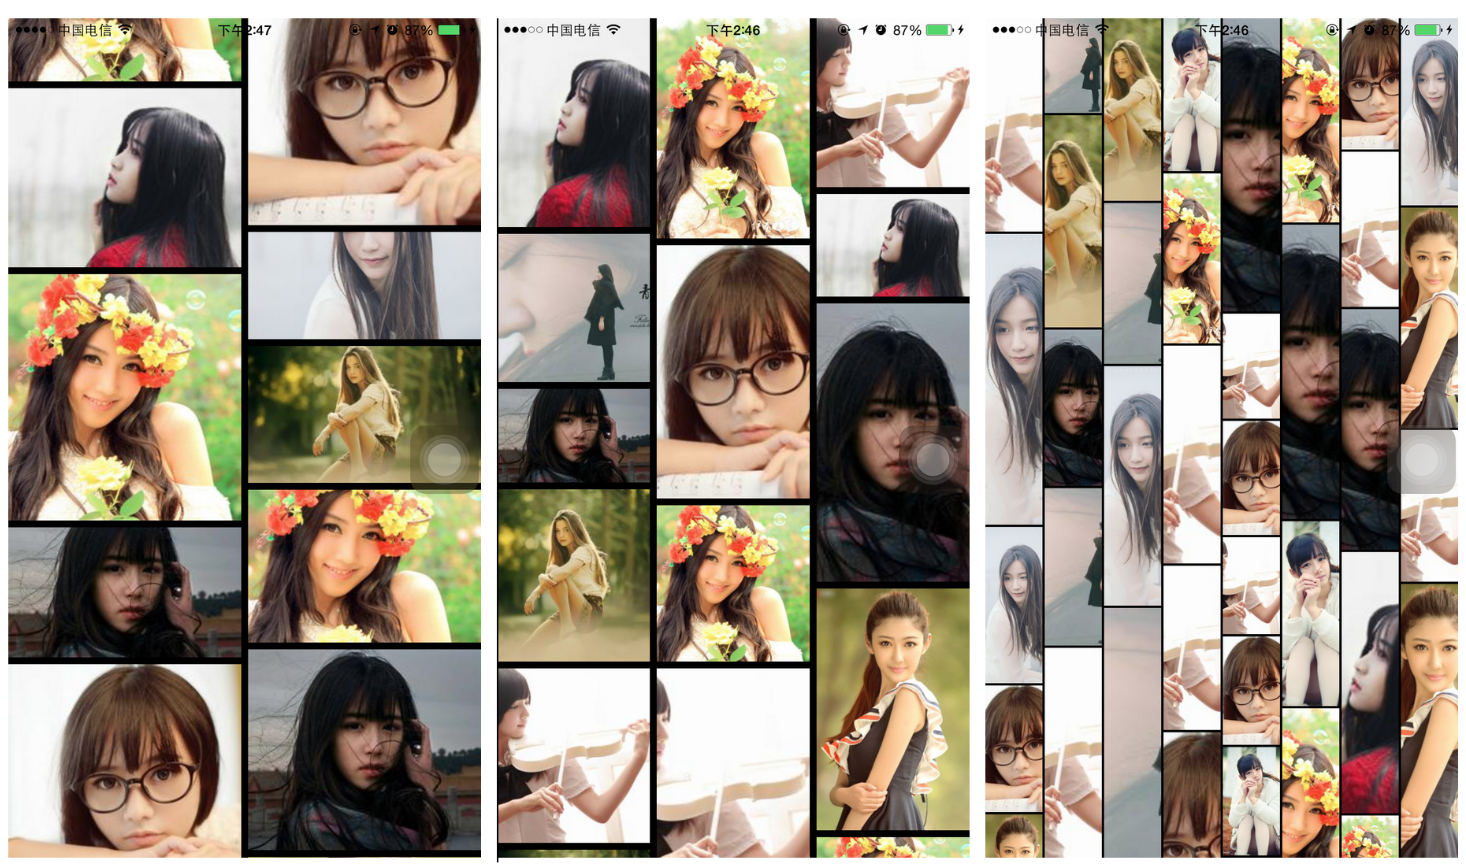
先來看一下不同配置參數下運行後的效果吧,每張截圖的列數和Cell之間的邊距都有所不同,瀑布流的列數依次為2,3,8。有密集恐懼證的童鞋就不要看這些運行效果圖了,真的會看暈的。下面這些運行效果就是修改不同的配置參數來進行布局的。看圖吧,關於瀑布流的效果就不啰嗦了。以下的效果就是使用自定義布局做的,接下來將會介紹一下其實現原理。
二.UICollectionViewLayout
在介紹上述效果實現原理之前,需要介紹一下UICollectionViewLayout。UICollectionView的自定義功能就是自己去實現UICollectionViewLayout的子類,然後重寫相應的方法來實現Cell的布局,先介紹一下需要重寫的方法,然後再此方法上進行應用實現上述瀑布流。好,廢話少說,干活走起。
1.布局預加載函數
當布局首次被加載時會調用prepareLayout函數,見名知意,就是預先加載布局,在該方法中可以去初始化布局相關的數據。該方法類似於視圖控制器的ViewDidLoad方法,稍後回用到該方法。
// The collection view calls -prepareLayout once at its first layout as the first message to the layout instance.
// The collection view calls -prepareLayout again after layout is invalidated and before requerying the layout information.
// Subclasses should always call super if they override.
 - (void)prepareLayout;
2.內容滾動范圍
下方是定義ContentSize的方法。該方法會返回CollectionView的大小,這個方法也是自定義布局中必須實現的方法。說白了,就是設置ScrollView的ContentSize,即滾動區域。
 // Subclasses must override this method and use it to return the width and height of the collection view’s content. These values represent the width and height of all the content, not just the content that is currently visible. The collection view uses this information to configure its own content size to facilitate scrolling.
 - (CGSize)collectionViewContentSize;
3. 下方四個方法是確定布局屬性的,下方第一個方法返回一個數組,該數組中存放的是為每個Cell綁定的UICollectionViewLayoutAttributes屬性,便於在下面第二個方法中去定制每個Cell的屬性。第三個方法就是根據indexPath來獲取Cell所綁定的layoutAtrributes, 然後去更改UICollectionViewLayoutAttributes對象的一些屬性並返回,第四個是為Header View或者FooterView來定制其對應的UICollectionViewLayoutAttributes,然後返回。
 // UICollectionView calls these four methods to determine the layout information.
 // Implement -layoutAttributesForElementsInRect: to return layout attributes for for supplementary or decoration views, or to perform layout in an as-needed-on-screen fashion.
 // Additionally, all layout subclasses should implement -layoutAttributesForItemAtIndexPath: to return layout attributes instances on demand for specific index paths.
 // If the layout supports any supplementary or decoration view types, it should also implement the respective atIndexPath: methods for those types.
 - (NSArray *)layoutAttributesForElementsInRect:(CGRect)rect; // return an array layout attributes instances for all the views in the given rect
 - (UICollectionViewLayoutAttributes *)layoutAttributesForItemAtIndexPath:(NSIndexPath *)indexPath;
 - (UICollectionViewLayoutAttributes *)layoutAttributesForSupplementaryViewOfKind:(NSString *)elementKind atIndexPath:(NSIndexPath *)indexPath;
 - (UICollectionViewLayoutAttributes *)layoutAttributesForDecorationViewOfKind:(NSString*)elementKind atIndexPath:(NSIndexPath *)indexPath;
4.UICollectionViewLayoutAttributes
下方是UICollectionViewLayoutAttributes常用的屬性,你可以在上面第二個方法中去為下方這些屬性賦值,為Cell定制屬於自己的Attributes。由下方的屬性就對自定義布局的的強大,在本篇博客中只用到了下方的一個屬性,那就是frame。
 @property (nonatomic) CGRect frame;
 @property (nonatomic) CGPoint center;
 @property (nonatomic) CGSize size;
 @property (nonatomic) CATransform3D transform3D;
 @property (nonatomic) CGRect bounds NS_AVAILABLE_IOS(7_0);
 @property (nonatomic) CGAffineTransform transform NS_AVAILABLE_IOS(7_0);
 @property (nonatomic) CGFloat alpha;
 @property (nonatomic) NSInteger zIndex; // default is 0
 @property (nonatomic, getter=isHidden) BOOL hidden; // As an optimization, UICollectionView might not create a view for items whose hidden attribute is YES
三.UICollectionViewLayout的應用
經過上面的簡單介紹,想必對UICollectionViewLayout有一定的了解吧,UICollectionViewLayout中還有好多方法,以後用到的時候在給大家介紹。接下來要使用自定義布局來實現瀑布流。我們需要在UICollectionViewLayout的子類中實現相應的布局方法,因為UICollectionViewLayout是虛基類,是不能直接被實例化的,所以我們需要新建一個布局類,這個布局類繼承自UICollectionViewLayout。然後去實現上述方法,給每個Cell定制不同的UICollectionViewLayoutAttributes。好了還是拿代碼說話吧。
1.重寫prepareLayout方法去初始化一些數據,該方法在CollectionView重新加載時只會調用一次,所以把一些參數的配置,計算每個Cell的寬度,每個Cell的高度等代碼放在預處理函數中。在該函數中具體調用的函數如下所示:
#pragma mark --虛基類中重寫的方法 /** * 該方法是預加載layout, 只會被執行一次 */ - (void)prepareLayout{ [super prepareLayout]; [self initData]; [self initCellWidth]; [self initCellHeight]; }
2.返回內容的范圍,即為CollectionView設定ContentSize。ContentSize的Width就是屏幕的寬度,而ContentSize的高度是一列中最後一個Cell的Y坐標加上其自身高度的最大值。在此函數中會調用求CellY數組中的最大值。具體實現代碼如下:
 /**
  * 該方法返回CollectionView的ContentSize的大小
  */
 - (CGSize)collectionViewContentSize{

     CGFloat height = [self maxCellYArrayWithArray:_cellYArray];

     return CGSizeMake(SCREEN_WIDTH,  height);
 }
3.下面的方法是為每個Cell去綁定一個UICollectionViewLayoutAttributes對象,並且以數組的形式返回,在我們的自定義瀑布流中,我們只自定義了Cell的frame,就可以實現我們的瀑布流,UICollectionViewLayoutAttributes的其他屬性我們沒有用到,由此可以看出自定義Cell布局功能的強大。
  /**
  * 該方法為每個Cell綁定一個Layout屬性~
  */
 - (NSArray *)layoutAttributesForElementsInRect:(CGRect)rect
 {

     [self initCellYArray];

     NSMutableArray *array = [NSMutableArray array];

     //add cells
     for (int i=0; i < _numberOfCellsInSections; i++)
     {
         NSIndexPath *indexPath = [NSIndexPath indexPathForItem:i inSection:0];

         UICollectionViewLayoutAttributes *attributes = [self layoutAttributesForItemAtIndexPath:indexPath];

        [array addObject:attributes];
     }

     return array;

 }
4. 通過下述方法設定每個Cell的UICollectionViewLayoutAttributes對象的參數,為了實現瀑布流所以我們只需要設置每個Cell的frame即可。每個cell的frame的確定是以列來定的,有所在列的上個Cell的Y坐標來確定下個cell的位置。瀑布流實現關鍵點如下:
(1)Cell寬度計算:如果瀑布流的列數和Cell的Padding確定了,那麼每個Cell的寬度再通過屏幕的寬度就可以計算出來了。
(2)Cell高度計算:通過隨機數生成的高度
(3)Cell的X軸坐標計算:通過列數,和Padding,以及每個Cell的寬度很容易就可以計算出每個Cell的X坐標。
(4)Cell的Y軸坐標計算:通過Cell所在列的上一個Cell的Y軸坐標,Padding, 和 上一個Cell的高度就可以計算下一個Cell的Y坐標,並記錄在Y坐標的數組中了。
/**
 * 該方法為每個Cell綁定一個Layout屬性~
 */
- (UICollectionViewLayoutAttributes *)layoutAttributesForItemAtIndexPath:(NSIndexPath *)indexPath{

    UICollectionViewLayoutAttributes *attributes = [UICollectionViewLayoutAttributes layoutAttributesForCellWithIndexPath:indexPath];

    CGRect frame = CGRectZero;

    CGFloat cellHeight = [_cellHeightArray[indexPath.row] floatValue];

    NSInteger minYIndex = [self minCellYArrayWithArray:_cellYArray];

    CGFloat tempX = [_cellXArray[minYIndex] floatValue];

    CGFloat tempY = [_cellYArray[minYIndex] floatValue];

    frame = CGRectMake(tempX, tempY, _cellWidth, cellHeight);

    //更新相應的Y坐標
    _cellYArray[minYIndex] = @(tempY + cellHeight + _padding);

    //計算每個Cell的位置
    attributes.frame = frame;

    return attributes;
}
5. initData方法主要是對數據進行初始化,在本篇博客中為了先實現效果,我們暫且把數據給寫死。下篇博客會在本篇博客中的基礎上進行優化和改進,這些配置參數都會在Delegate中提供,便於靈活的去定制屬於你自己的瀑布流。本篇博客中Demo的配置項先寫死就OK了,還是那句話,下篇博客中會給出一些相應的代理,來定制我們的瀑布流。
/**
 * 初始化相關數據
 */
- (void) initData{
    _numberOfSections = [self.collectionView numberOfSections];
    _numberOfCellsInSections = [self.collectionView numberOfItemsInSection:0];

    //通過回調獲取列數
    _columnCount = 5;
    _padding = 5;
    _cellMinHeight = 50;
    _cellMaxHeight = 150;
}
6.下方的方法是根據Cell的列數來求出Cell的寬度。因為Cell的寬度都是一樣的,每個Cell的間隔也是一定的。例如有5列Cell, 那麼Cell中間的間隔就有4(5-1)個,那麼每個Cell的寬度就是屏幕的寬度減去所有間隔的寬度,再除以列數就是Cell的寬度。如果沒聽我啰嗦明白的話,直接看代碼吧,並不復雜。每個Cell的寬度和間隔確定了,那麼每個Cell的X軸坐標也就確定了。代碼如下:
 /**
  * 根據Cell的列數求出Cell的寬度
  */
 - (void) initCellWidth{
     //計算每個Cell的寬度
     _cellWidth = (SCREEN_WIDTH - (_columnCount -1) * _padding) / _columnCount;

     //為每個Cell計算X坐標
     _cellXArray = [[NSMutableArray alloc] initWithCapacity:_columnCount];
     for (int i = 0; i < _columnCount; i ++) {

         CGFloat tempX = i * (_cellWidth + _padding);

         [_cellXArray addObject:@(tempX)];
     }

 }
6. 根據Cell的最小高度和最大高度來利用隨機數計算每個Cell的高度,把每個Cell的高度記錄在數組中,便於Cell加載時使用。具體代碼如下:
 /**
  * 隨機生成Cell的高度
  */
 - (void) initCellHeight{
     //隨機生成Cell的高度
     _cellHeightArray = [[NSMutableArray alloc] initWithCapacity:_numberOfCellsInSections];
     for (int i = 0; i < _numberOfCellsInSections; i ++) {

         CGFloat cellHeight = arc4random() % (_cellMaxHeight - _cellMinHeight) + _cellMinHeight;

         [_cellHeightArray addObject:@(cellHeight)];
     }

 }
7.初始化Cell的Y軸坐標數組,因為是瀑布流,瀑布流的特點是每列中Cell的X軸坐標是相同的,我們只需要根據本列上一個Cell的Y軸坐標來確定本列中將要插入Cell的Y軸坐標,所有我們需要維護一個每列當前Cell的Y軸坐標數組。其初始化方法如下:
/**
 * 初始化每列Cell的Y軸坐標
 */
- (void) initCellYArray{
    _cellYArray = [[NSMutableArray alloc] initWithCapacity:_columnCount];

    for (int i = 0; i < _columnCount; i ++) {
        [_cellYArray addObject:@(0)];
    }
}
8.下面的方法是求Cell的Y軸坐標數組的最大值,因為在Cell都加載完畢後,Cell數組中最大值就是CollectionView的ContentSize的Height的值。
  /**
  * 求CellY數組中的最大值並返回
  */
 - (CGFloat) maxCellYArrayWithArray: (NSMutableArray *) array{
     if (array.count == 0) {
         return 0.0f;
     }

     CGFloat max = [array[0] floatValue];
     for (NSNumber *number in array) {

         CGFloat temp = [number floatValue];

        if (max < temp) {
             max = temp;
         }
     }

     return max;
 }
9.下方代碼是求CellY數組中的第一個最小值的索引,因為求出這個CellY數組中的第一個Cell最新值得索引就是Cell應該插入的列。
 /**
  * 求CellY數組中的最小值的索引
  */
 - (CGFloat) minCellYArrayWithArray: (NSMutableArray *) array{

     if (array.count == 0) {
         return 0.0f;
     }

     NSInteger minIndex = 0;
     CGFloat min = [array[0] floatValue];

     for (int i = 0; i < array.count; i ++) {
         CGFloat temp = [array[i] floatValue];

         if (min > temp) {
             min = temp;
             minIndex = i;
         }
     }

     return minIndex;
 }
自定義集合視圖控制器布局第一階段就先到這,下篇博客會在此基礎上進一步開發。把上述寫死的配置參數,通過Delegate提供,使其在UICollectionView可進行配置,其配置方式類似於UICollectionViewDelegateFlowLayout的代理方法。
上述代碼gitHub分享地址:https://github.com/lizelu/CustomCollectionViewLayout