iOS UITableView(一)
UITableview系列內容包括:
1.純代碼創建UITableview;
2.cell的樣式、點擊事件,cell的重用等;
3.頁面的下拉刷新、上拉加載;
4.自定義cell。
由於內容過多,分成多篇來介紹。
本文主要介紹創建UITableview、cell的樣式、cell的重用、cell的點擊事件、cell左滑按鈕等內容。
1.創建UITableview
首先在ViewController的類名後面添加UITableViewDelegate和UITableViewDataSource。
如圖所致
Swift:

Objective-C:

UITableView的樣式有兩種:Grouped 和 Plain
Grouped:

Plain:

根據自己的需要,選擇創建對應的樣式。
下面會對兩種樣式都做說明。
1).創建一個UITableview並添加到View:
Swift版
// 創建UItableView,style選擇Grouped或Plain,這裡我們以Grouped為例
let tableView = UITableView(frame: CGRectMake(0, 20, self.view.frame.size.width, self.view.frame.size.height-20), style: .Plain)
// 聲明 tableView 的代理和數據源
tableView.delegate = self
tableView.dataSource = self
// 添加到 view 上
self.view.addSubview(tableView)
Objective-C版
// 創建UItableView,style選擇Grouped或Plain,這裡我們以Grouped為例
UITableView *tableView = [[UITableView alloc] initWithFrame:CGRectMake(0, 20, self.view.frame.size.width, self.view.frame.size.height-20) style:UITableViewStyleGrouped];
// 聲明 tableView 的代理和數據源
tableView.delegate = self;
tableView.dataSource = self;
// 添加到 view 上
[self.view addSubview:tableView];
2).設置tableview的數據源:
tableview的style為Grouped的要實現下面的方法。
Swift版
// tableView 中 Section 的個數
func numberOfSectionsInTableView(tableView: UITableView) -> Int {
    return 6
}
Objective-C版
// tableView 中 Section 的個數
-(NSInteger)numberOfSectionsInTableView:(UITableView *)tableView {
    return 6;
}
下面的方法Grouped和Plain兩種類型都要實現,用來設置行數和每一行的內容。
Swift版
// 每個 Section 中的 Cell 個數
func tableView(tableView: UITableView, numberOfRowsInSection section: Int) -> Int {
return 3
}
// 設置每個 Cell
func tableView(tableView: UITableView, cellForRowAtIndexPath indexPath: NSIndexPath) -> UITableViewCell {
// 創建一個cellID,用於cell的重用
let cellID = "cellID"
// 從tableview的重用池裡通過cellID取一個cell
var cell = tableView.dequeueReusableCellWithIdentifier(cellID)
if (cell == nil) {
// 如果tableview的重用池中沒有取到,就創建一個新的cell,style為Value2,並用cellID對其進行標記。
cell = UITableViewCell(style: .Value2, reuseIdentifier: cellID)
}
// 設置 cell 的標題
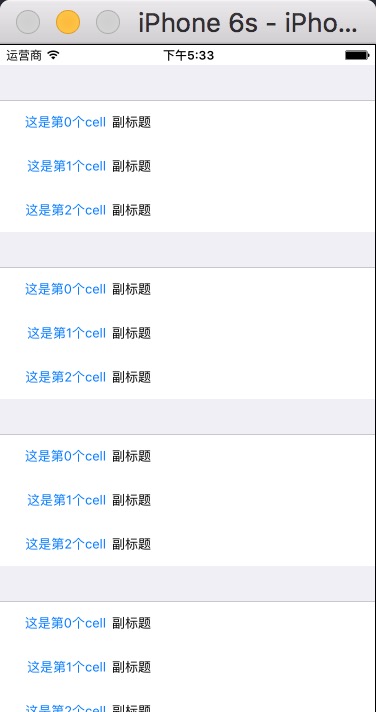
cell?.textLabel?.text = "這是第\(indexPath.row)個cell"
// 設置 cell 的副標題
cell?.detailTextLabel?.text = "副標題"
return cell!
}
Objective-C版
// 每個 Section 中的 Cell 個數
-(NSInteger)tableView:(UITableView *)tableView numberOfRowsInSection:(NSInteger)section {
    return 3;
}
// 設置每個 Cell
-(UITableViewCell *)tableView:(UITableView *)tableView cellForRowAtIndexPath:(NSIndexPath *)indexPath {
    // 創建一個cellID,用於cell的重用
    NSString *cellID = @"cellID";
    // 從tableview的重用池裡通過cellID取一個cell
    UITableViewCell *cell = [tableView dequeueReusableCellWithIdentifier:cellID];
    if (cell == nil) {
         // 如果tableview的重用池中沒有取到,就創建一個新的cell,style為Value2,並用cellID對其進行標記。
        cell = [[UITableViewCell alloc] initWithStyle:UITableViewCellStyleValue2 reuseIdentifier:cellID];
    }
    // 設置 cell 的標題
    cell.textLabel.text = [NSString stringWithFormat:@"這是第%li個cell", (long)indexPath.row];
    // 設置 cell 的副標題
    cell.detailTextLabel.text = @"副標題";
    return cell;
}
現在運行一下,會看到一個基本的UITableview已顯示到界面上:
 vcrHVmFsdWUyo6xjZWxs09DLxNbWu/mxvrXE0fnKvaO6RGVmYXVsdKOsU3VidGl0bGWjrFZhbHVlMaOsVmFsdWUyoaPPws28ysfLxNbW0fnKvbXEx/ix8KO6PGJyIC8+DQo8aW1nIGFsdD0="cell四種類型" src="/uploadfile/Collfiles/20160701/20160701093125665.png" title="\" />
—————————————— 分割線 ——————————————
上面是UITableview的基本實現,接下來是UITableview的一些代理方法實現,包括設置cell的高度,點擊cell的觸發方法等內容
2.代理方法的介紹
1)樣式相關方法
a.設置每個section的header和footer文字內容
Swift版
// 設置 section 的 header 文字
func tableView(tableView: UITableView, titleForHeaderInSection section: Int) -> String? {
    return "header-\(section)"
}
// 設置 section 的 footer 文字
func tableView(tableView: UITableView, titleForFooterInSection section: Int) -> String? {
    return "footer-\(section)"
}
Objective-C版
// 設置 section 的 header 文字
-(NSString *)tableView:(UITableView *)tableView titleForHeaderInSection:(NSInteger)section {
    return [NSString stringWithFormat:@"header-%li", (long)section];
}
// 設置 section 的 footer 文字
-(NSString *)tableView:(UITableView *)tableView titleForFooterInSection:(NSInteger)section {
    return [NSString stringWithFormat:@"footer-%li", (long)section];
}

b.設置header,footer,cell的高度
Swift版
// 設置 section 的 header 高度
func tableView(tableView: UITableView, heightForHeaderInSection section: Int) -> CGFloat {
    return 10
}
// 設置 section 的 footer 高度
func tableView(tableView: UITableView, heightForFooterInSection section: Int) -> CGFloat {
    return 10
}
// 設置 cell 的高度
func tableView(tableView: UITableView, heightForRowAtIndexPath indexPath: NSIndexPath) -> CGFloat {
    return 80
}
Objective-C版
// 設置 section 的 header 高度
-(CGFloat)tableView:(UITableView *)tableView heightForHeaderInSection:(NSInteger)section {
    return 10;
}
// 設置 section 的 footer 高度
-(CGFloat)tableView:(UITableView *)tableView heightForFooterInSection:(NSInteger)section {
    return 10;
}
// 設置 cell 的高度
-(CGFloat)tableView:(UITableView *)tableView heightForRowAtIndexPath:(NSIndexPath *)indexPath {
    return 80;
}
c.設置cell文字的縮進,cell中的文字會向右縮進相應的數值
Swift版
// cell 的文字縮進
func tableView(tableView: UITableView, indentationLevelForRowAtIndexPath indexPath: NSIndexPath) -> Int {
    return 10
}
Objective-C版
// cell 的文字縮進
-(NSInteger)tableView:(UITableView *)tableView indentationLevelForRowAtIndexPath:(NSIndexPath *)indexPath {
    return 10;
}
d.自定義header和footer,將header和footer設置為自定義的view。
注:當使用自定義的header和footer時,上面設置header和footer文字內容的方法就無效,要顯示文字需要在自定義的view上創建。
Swift版
// 自定義 section 的 header
func tableView(tableView: UITableView, viewForHeaderInSection section: Int) -> UIView? {
    let headerView = UIView(frame: CGRectMake(0, 0, 100, 10))
    headerView.backgroundColor = UIColor.redColor()
    return headerView
}
// 自定義 section 的 header
func tableView(tableView: UITableView, viewForFooterInSection section: Int) -> UIView? {
    let footerView = UIView(frame: CGRectMake(0, 0, 100, 10))
    footerView.backgroundColor = UIColor.orangeColor()
    return footerView
}
Objective-C版
// 自定義 section 的 header
-(UIView *)tableView:(UITableView *)tableView viewForHeaderInSection:(NSInteger)section {
    UIView *headerView = [[UIView alloc] initWithFrame:CGRectMake(0, 0, 100, 10)];
    headerView.backgroundColor = [UIColor redColor];
    return headerView;
}
// 自定義 section 的 footer
-(UIView *)tableView:(UITableView *)tableView viewForFooterInSection:(NSInteger)section {
    UIView *footerView = [[UIView alloc] initWithFrame:CGRectMake(0, 0, 100, 10)];
    footerView.backgroundColor = [UIColor orangeColor];
    return footerView;
}
自定義header和footer的效果圖:

2)操作相關方法
a.選中 cell 時觸發的方法
Swift版
// 選中了 cell 時觸發
func tableView(tableView: UITableView, didSelectRowAtIndexPath indexPath: NSIndexPath) {
    print("選中了第\(indexPath.row)個cell")
}
Objective-C版
// 選中了 cell 時觸發
-(void)tableView:(UITableView *)tableView didSelectRowAtIndexPath:(NSIndexPath *)indexPath {
    NSLog(@"選中了第%li個cell", (long)indexPath.row);
}
b.設置cell左滑刪除
使用系統默認的左滑刪除按鈕
Swift版
// 設置 cell 是否允許左滑
func tableView(tableView: UITableView, canEditRowAtIndexPath indexPath: NSIndexPath) -> Bool {
    return true
}
// 設置默認的左滑按鈕的title
func tableView(tableView: UITableView, titleForDeleteConfirmationButtonForRowAtIndexPath indexPath: NSIndexPath) -> String? {
    return "按鈕鈕鈕"
}
// 點擊左滑出現的按鈕時觸發
func tableView(tableView: UITableView, commitEditingStyle editingStyle: UITableViewCellEditingStyle, forRowAtIndexPath indexPath: NSIndexPath) {
    print("點擊左滑出現的按鈕時觸發")
}
// 左滑結束時調用(只對默認的左滑按鈕有效,自定義按鈕時這個方法無效)
func tableView(tableView: UITableView, didEndEditingRowAtIndexPath indexPath: NSIndexPath) {
    print("左滑結束")
}
Objective-C版
// 設置 cell 是否允許左滑
-(BOOL)tableView:(UITableView *)tableView canEditRowAtIndexPath:(NSIndexPath *)indexPath {
    return true;
}
// 設置默認的左滑按鈕的title
-(NSString *)tableView:(UITableView *)tableView titleForDeleteConfirmationButtonForRowAtIndexPath:(NSIndexPath *)indexPath {
    return @"按鈕鈕鈕";
}
// 點擊左滑出現的按鈕時觸發
-(void)tableView:(UITableView *)tableView commitEditingStyle:(UITableViewCellEditingStyle)editingStyle forRowAtIndexPath:(NSIndexPath *)indexPath {
    NSLog(@"點擊左滑出現的按鈕時觸發");
}
// 左滑結束時調用(只對默認的左滑按鈕有效,自定義按鈕時這個方法無效)
-(void)tableView:(UITableView *)tableView didEndEditingRowAtIndexPath:(NSIndexPath *)indexPath {
    NSLog(@"左滑結束");
}
效果圖:

自定義左滑時顯示的按鈕和觸發事件
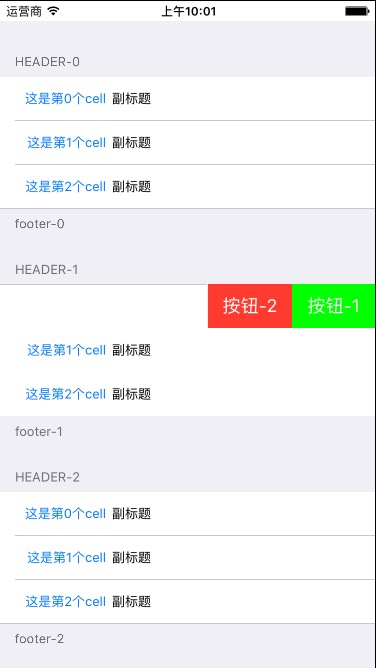
Swift版
// 自定義左滑cell時的按鈕和觸發方法
func tableView(tableView: UITableView, editActionsForRowAtIndexPath indexPath: NSIndexPath) -> [UITableViewRowAction]? {

    // 創建第一個按鈕和觸發事件
    let cellActionA = UITableViewRowAction(style: .Default, title: "按鈕-1", handler: {_,_ in
        // 在此寫點擊按鈕時的觸發事件
        // ......
    })
    // 定義按鈕的顏色
    cellActionA.backgroundColor = UIColor.greenColor()

    // 創建第二個按鈕和觸發事件
    let cellActionB = UITableViewRowAction(style: .Default, title: "按鈕-2", handler: {_,_ in
        // 在此寫點擊按鈕時的觸發事件
        // ......
    })
    // 注意這裡返回的是一個按鈕組,即使只定義了一個按鈕也要返回一個組
    return [cellActionA, cellActionB]
}
Objective-C版
// 自定義左滑cell時的按鈕和觸發方法
- (nullable NSArray *)tableView:(UITableView *)tableView editActionsForRowAtIndexPath:(NSIndexPath *)indexPath {
    // 創建第一個按鈕和觸發事件
    UITableViewRowAction *cellActionA = [UITableViewRowAction rowActionWithStyle:UITableViewRowActionStyleDefault title:@"按鈕-1" handler:^(UITableViewRowAction *action, NSIndexPath *indexPath){
        // 在此寫點擊按鈕時的觸發事件
        // ......
        NSLog(@"點擊了 按鈕-1");
    }];
    // 定義按鈕的顏色
    cellActionA.backgroundColor = [UIColor greenColor];

    // 創建第二個按鈕和觸發事件
    UITableViewRowAction *cellActionB = [UITableViewRowAction rowActionWithStyle:UITableViewRowActionStyleDefault title:@"按鈕-2" handler:^(UITableViewRowAction *action, NSIndexPath *indexPath){
        // 在此寫點擊按鈕時的觸發事件
        // ......
    }];
    // 注意這裡返回的是一個按鈕組,即使只定義了一個按鈕也要返回一個組
    return @[cellActionA, cellActionB];
}
效果圖:
以上內容,是UITableview的基本操作。下一篇會介紹UITableview的下拉刷新、上拉加載、自定義cell等內容。
- 上一頁:iOS 藍牙
- 下一頁:iOS-視頻格式轉換(MOV-)MP4)