iOS開發 適配iOS10&Xcode8
作為開發者,如何適配iOS10呢?
1.Notification(通知)
自從Notification被引入之後,蘋果就不斷的更新優化,但這些更新優化只是小打小鬧,直至現在iOS 10開始真正的進行大改重構,這讓開發者也體會到UserNotifications的易用,功能也變得非常強大。
iOS 9 以前的通知
1.在調用方法時,有些方法讓人很難區分,容易寫錯方法,這讓開發者有時候很苦惱。
2.應用在運行時和非運行時捕獲通知的路徑還不一致。
3.應用在前台時,是無法直接顯示遠程通知,還需要進一步處理。
4.已經發出的通知是不能更新的,內容發出時是不能改變的,並且只有簡單文本展示方式,擴展性根本不是很好。
iOS 10 開始的通知
1.所有相關通知被統一到了UserNotifications.framework框架中。
2.增加了撤銷、更新、中途還可以修改通知的內容。
3.通知不在是簡單的文本了,可以加入視頻、圖片,自定義通知的展示等等。
4.iOS 10相對之前的通知來說更加好用易於管理,並且進行了大規模優化,對於開發者來說是一件好事。
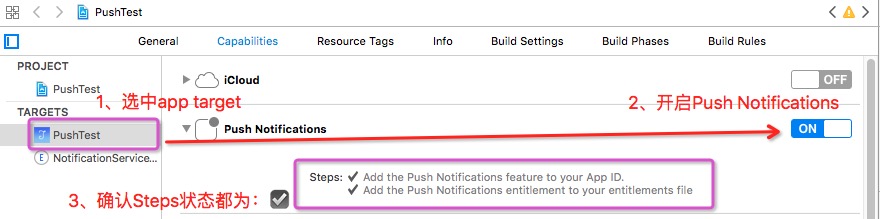
5.iOS 10開始對於權限問題進行了優化,申請權限就比較簡單了(本地與遠程通知集成在一個方法中)。
如果使用了推送,修改如圖:
2.ATS的問題
iOS 9中默認非HTTS的網絡是被禁止的,當然我們也可以把NSAllowsArbitraryLoads設置為YES禁用ATS。不過iOS 10從2017年1月1日起蘋果不允許我們通過這個方法跳過ATS,也就是說強制我們用HTTPS,如果不這樣的話提交App可能會被拒絕。但是我們可以通過NSExceptionDomains來針對特定的域名開放HTTP可以容易通過審核。
NSExceptionDomains方式設置域。可以簡單理解成,把不支持https協議的接口設置成http的接口。
具體方法:
1)、在項目的info.plist中添加一個Key:App Transport Security Settings,類型為字典類型。
2)、然後給它添加一個Exception Domains,類型為字典類型;
3)、把需要的支持的域添加給Exception Domains。其中域作為Key,類型為字典類型。
4)、每個域下面需要設置3個屬性:NSIncludesSubdomains、NSExceptionRequiresForwardSecrecy、NSExceptionAllowsInsecureHTTPLoads。
如圖:
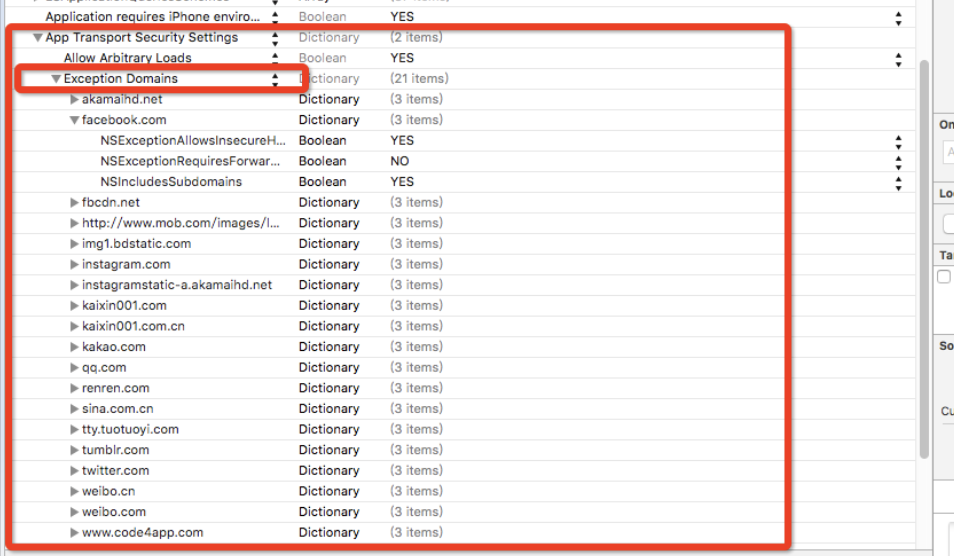
細節提示:在iOS9以後的系統中如果使用到網絡圖片,也要注意網絡圖片是否是HTTP的哦,如果是,也要把圖片的域設置哦!
3.iOS 10 隱私權限設置
iOS 10 開始對隱私權限更加嚴格,如果你不設置就會直接崩潰,現在很多遇到崩潰問題了,一般解決辦法都是在info.plist文件添加對應的Key-Value就可以了。
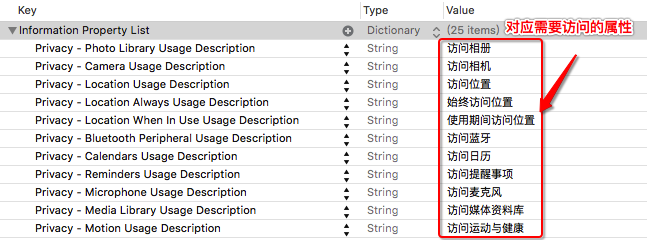
以上Value值,圈出的紅線部分的文字是展示給用戶看的,必須添加。
4.Xcode 8 運行一堆沒用的logs解決辦法
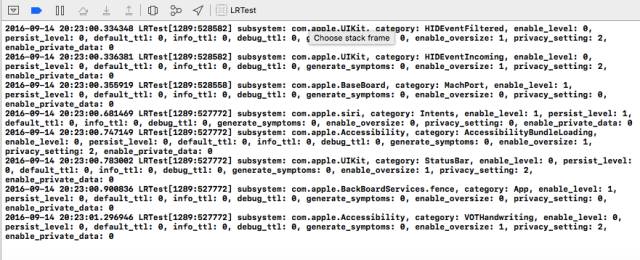
上圖我們看到,自己新建的一個工程啥也沒干就打印一堆爛七八糟的東西,我覺得這個應該是Xcode 8的問題,
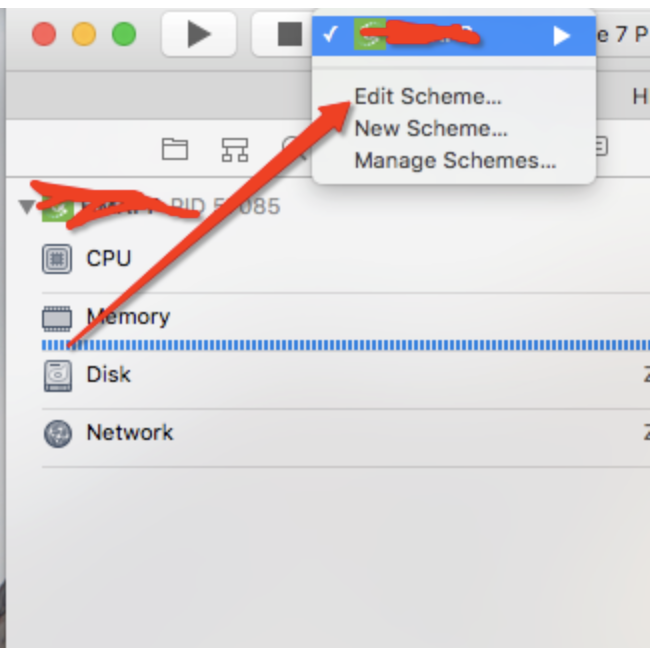
具體也沒細研究,解決辦法是設置OS_ACTIVITY_MODE : disable如下圖:
第一步:
第二步:
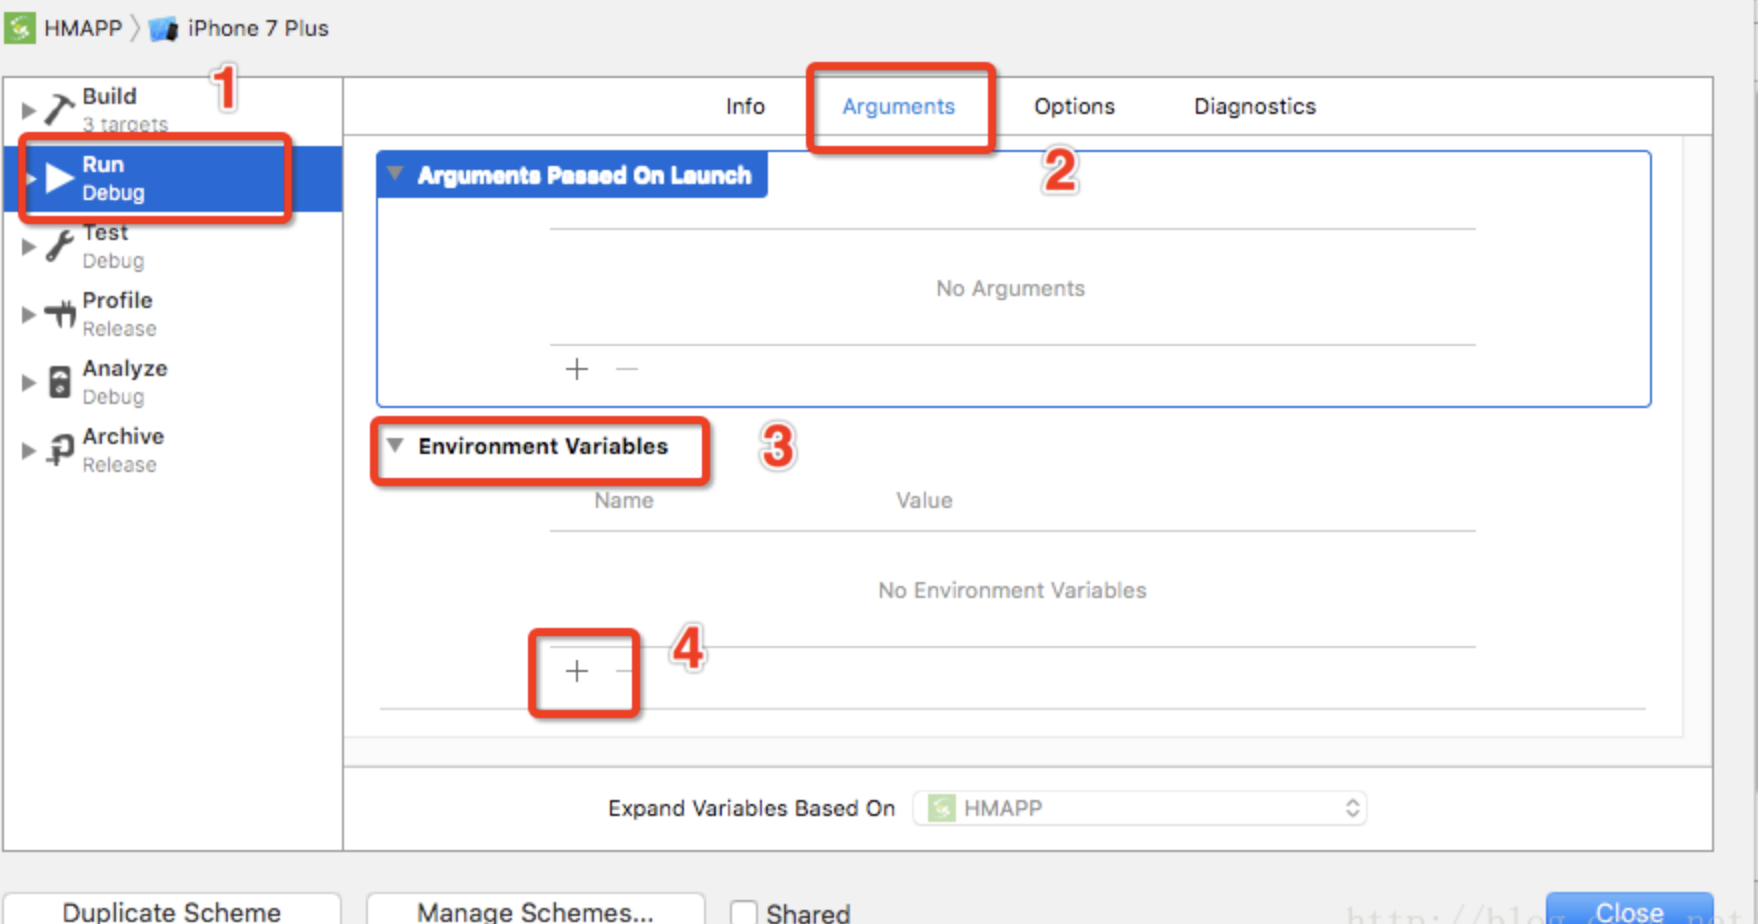
第三步:
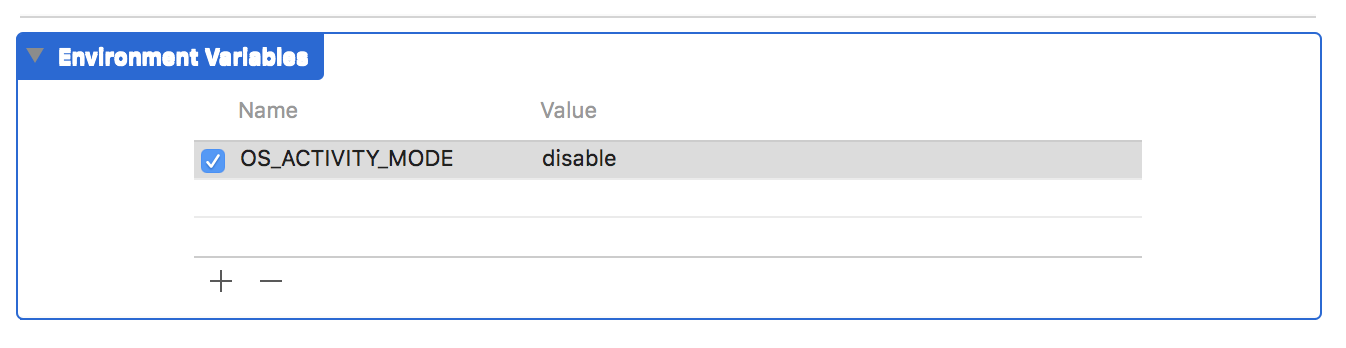
添加參數:
Name :OS_ACTIVITY_MODE
Value : disable
5.iOS 10 UIStatusBar方法過期:
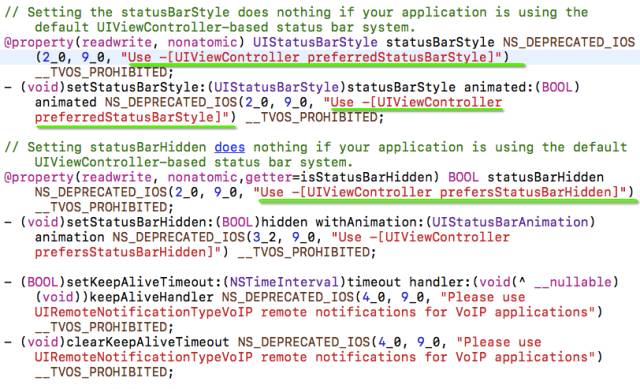
在我們開發中有可能用到UIStatusBar一些屬性,在iOS 10 中這些方法已經過期了,如果你的項目中有用的話就得需要適配。
上面的圖片也能發現,如果在iOS 10中你需要使用preferredStatusBar比如這樣:
//iOS 10 - (UIStatusBarStyle)preferredStatusBarStyle {  return UIStatusBarStyleDefault;
}
6.iOS 10 UICollectionView 性能優化
隨著開發者對UICollectionView的信賴,項目中用的地方也比較多,但是還是存在一些問題,比如有時會卡頓、加載慢等。所以iOS 10 對UICollectionView進一步的優化。
- UICollectionView cell pre-fetching預加載機制
- UICollectionView and UITableView prefetchDataSource 新增的API
- 針對self-sizing cells 的改進
- Interactive reordering
在iOS 10 之前,UICollectionView上面如果有大量cell,當用戶活動很快的時候,整個UICollectionView的卡頓會很明顯,為什麼會造成這樣的問題,這裡涉及到了iOS 系統的重用機制,當cell准備加載進屏幕的時候,整個cell都已經加載完成,等待在屏幕外面了,也就是整整一行cell都已經加載完畢,這就是造成卡頓的主要原因,專業術語叫做:掉幀.
要想讓用戶感覺不到卡頓,我們的app必須幀率達到60幀/秒,也就是說每幀16毫秒要刷新一次.
iOS 10 之前UICollectionViewCell的生命周期是這樣的:
1.用戶滑動屏幕,屏幕外有一個cell准備加載進來,把cell從reusr隊列拿出來,然後調用prepareForReuse方法,在這個方法裡面,可以重置cell的狀態,加載新的數據;2.繼續滑動,就會調用cellForItemAtIndexPath方法,在這個方法裡面給cell賦值模型,然後返回給系統;
3.當cell馬上進去屏幕的時候,就會調用willDisplayCell方法,在這個方法裡面我們還可以修改cell,為進入屏幕做最後的准備工作;
4.執行完willDisplayCell方法後,cell就進去屏幕了.當cell完全離開屏幕以後,會調用didEndDisplayingCell方法.
iOS 10 UICollectionViewCell的生命周期是這樣的:
1.用戶滑動屏幕,屏幕外有一個cell准備加載進來,把cell從reusr隊列拿出來,然後調用prepareForReuse方法,在這裡當cell還沒有進去屏幕的時候,就已經提前調用這個方法了,對比之前的區別是之前是cell的上邊緣馬上進去屏幕的時候就會調用該方法,而iOS 10 提前到cell還在屏幕外面的時候就調用;2.在cellForItemAtIndexPath中創建cell,填充數據,刷新狀態等操作,相比於之前也提前了;
3.用戶繼續滑動的話,當cell馬上就需要顯示的時候我們再調用willDisplayCell方法,原則就是:何時需要顯示,何時再去調用willDisplayCell方法;
4.當cell完全離開屏幕以後,會調用didEndDisplayingCell方法,跟之前一樣,cell會進入重用隊列.
在iOS 10 之前,cell只能從重用隊列裡面取出,再走一遍生命周期,並調用cellForItemAtIndexPath創建或者生成一個cell.
在iOS 10 中,系統會cell保存一段時間,也就是說當用戶把cell滑出屏幕以後,如果又滑動回來,cell不用再走一遍生命周期了,只需要調用willDisplayCell方法就可以重新出現在屏幕中了.
iOS 10 中,系統是一個一個加載cell的,二以前是一行一行加載的,這樣就可以提升很多性能;
iOS 10 新增加的Pre-Fetching預加載
這個是為了降低UICollectionViewCell在加載的時候所花費的時間,在 iOS 10 中,除了數據源協議和代理協議外,新增加了一個UICollectionViewDataSourcePrefetching協議,這個協議裡面定義了兩個方法:- (void)collectionView:(UICollectionView *)collectionView prefetchItemsAtIndexPaths:(NSArray*)indexPaths NS_AVAILABLE_IOS(10_0); - (void)collectionView:(UICollectionView *)collectionView cancelPrefetchingForItemsAtIndexPaths:(NSArray *)indexPaths NS_AVAILABLE_IOS(10_0);
在ColletionView prefetchItemsAt indexPaths這個方法是異步預加載數據的,當中的indexPaths數組是有序的,就是item接收數據的順序;
CollectionView cancelPrefetcingForItemsAt indexPaths這個方法是可選的,可以用來處理在滑動中取消或者降低提前加載數據的優先級.
注意:這個協議並不能代替之前讀取數據的方法,僅僅是輔助加載數據.
Pre-Fetching預加載對UITableViewCell同樣適用.
7.iOS 10 UIColor 新增方法
以下是官方文檔的說明:
Most graphics frameworks throughout the system, including Core Graphics, Core Image, Metal, and AVFoundation, have substantially improved support for extended-range pixel formats and wide-gamut color spaces. By extending this behavior throughout the entire graphics stack, it is easier than ever to support devices with a wide color display. In addition, UIKit standardizes on working in a new extended sRGB color space, making it easy to mix sRGB colors with colors in other, wider color gamuts without a significant performance penalty.
Here are some best practices to adopt as you start working with Wide Color.
-
In iOS 10, the UIColor class uses the extended sRGB color space and its initializers no longer clamp raw component values to between 0.0 and 1.0. If your app relies on UIKit to clamp component values (whether you’re creating a color or asking a color for its component values), you need to change your app’s behavior when you link against iOS 10.
-
When performing custom drawing in a UIView on an iPad Pro (9.7 inch), the underlying drawing environment is configured with an extended sRGB color space.
-
If your app renders custom image objects, use the new UIGraphicsImageRenderer class to control whether the destination bitmap is created using an extended-range or standard-range format.
-
If you are performing your own image processing on wide-gamut devices using a lower level API, such as Core Graphics or Metal, you should use an extended range color space and a pixel format that supports 16-bit floating-point component values. When clamping of color values is necessary, you should do so explicitly.
- Core Graphics, Core Image, and Metal Performance Shaders provide new options for easily converting colors and images between color spaces.
因為之前我們都是用RGB來設置顏色,反正用起來也不是特別多樣化,這次新增的方法應該就是一個彌補吧。所以在iOS 10 蘋果官方建議我們使用sRGB,因為它性能更好,色彩更豐富。如果你自己為UIColor寫了一套分類的話也可嘗試替換為sRGB,UIColor類中新增了兩個Api如下:
+ (UIColor *)colorWithDisplayP3Red:(CGFloat)displayP3Red green:(CGFloat)green blue:(CGFloat)blue alpha:(CGFloat)alpha NS_AVAILABLE_IOS(10_0);

- (UIColor *)initWithDisplayP3Red:(CGFloat)displayP3Red green:(CGFloat)green blue:(CGFloat)blue alpha:(CGFloat)alpha NS_AVAILABLE_IOS(10_0);
8.iOS 10 UITextContentType
// The textContentType property is to provide the keyboard with extra information about the semantic intent of the text document.@property(nonatomic,copy) UITextContentType textContentType NS_AVAILABLE_IOS(10_0); // default is nil
在iOS 10UITextField添加了textContentType枚舉,指示文本輸入區域所期望的語義意義。
使用此屬性可以給鍵盤和系統信息,關於用戶輸入的內容的預期的語義意義。例如,您可以指定一個文本字段,用戶填寫收到一封電子郵件確認uitextcontenttypeemailaddress。當您提供有關您期望用戶在文本輸入區域中輸入的內容的信息時,系統可以在某些情況下自動選擇適當的鍵盤,並提高鍵盤修正和主動與其他文本輸入機會的整合。
9.iOS 10 字體隨著手機系統字體而改變
當我們手機系統字體改變了之後,那我們App的label也會跟著一起變化,這需要我們寫很多代碼來進一步處理才能實現,但是iOS 10 提供了這樣的屬性adjustsFontForContentSizeCategory來設置。因為沒有真機,具體實際操作還沒去實現,如果理解錯誤幫忙指正。
 UILabel *myLabel = [UILabel new];  /*
  UIFont 的preferredFontForTextStyle: 意思是指定一個樣式,並讓字體大小符合用戶設定的字體大小。
  */
  myLabel.font =[UIFont preferredFontForTextStyle: UIFontTextStyleHeadline]; /*
 Indicates whether the corresponding element should automatically update its font when the device’s UIContentSizeCategory is changed.
 For this property to take effect, the element’s font must be a font vended using +preferredFontForTextStyle: or +preferredFontForTextStyle:compatibleWithTraitCollection: with a valid UIFontTextStyle.
 */
   //是否更新字體的變化
  myLabel.adjustsFontForContentSizeCategory = YES;
10.iOS 10 UIScrollView新增refreshControl
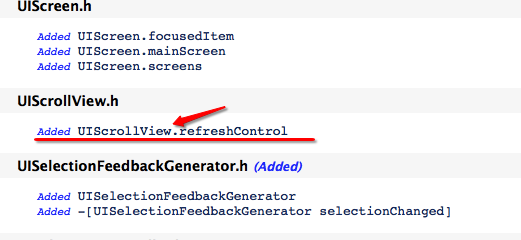
iOS 10 以後只要是繼承UIScrollView那麼就支持刷新功能:
@property (nonatomic, strong, nullable) UIRefreshControl *refreshControl NS_AVAILABLE_IOS(10_0) __TVOS_PROHIBITED;
11.iOS 10 判斷系統版本正確姿勢
判斷系統版本是我們經常用到的,尤其是現在大家都有可能需要適配iOS 10,那麼問題就出現了,如下圖:
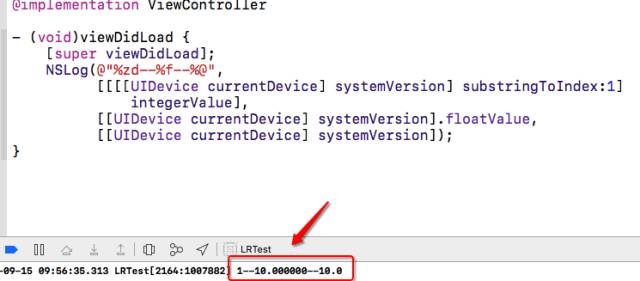
我們得到了答案是:
//值為 1 [[[[UIDevice currentDevice] systemVersion] substringToIndex:1] integerValue]

//值為10.000000 [[UIDevice currentDevice] systemVersion].floatValue,

//值為10.0 [[UIDevice currentDevice] systemVersion]
所以說判斷系統方法最好還是用後面的兩種方法,哦~我忘記說了[[UIDevice currentDevice] systemVersion].floatValue這個方法也是不靠譜的,好像在8.3版本輸出的值是8.2,記不清楚了反正是不靠譜的,所以建議大家用[[UIDevice currentDevice] systemVersion]這個方法!
Swift判斷如下:
 if #available(iOS 10.0, *) {
      // iOS 10.0
      print("iOS 10.0");
    } else { }
12.Xcode 8 插件不能用的問題
大家都升級了Xcode 8,但是對於插件依賴的開發者們,一邊哭著一邊去網上尋找解決辦法。那麼下面是解決辦法:
讓你的 Xcode8 繼續使用插件(http://vongloo.me/2016/09/10/Make-Your-Xcode8-Great-Again/?utm_source=tuicool&utm_medium=referral )
但是看到文章最後的解釋,我們知道如果用插件的話,可能安全上會有問題、並且提交審核會被拒絕,所以建議大家還是不要用了,解決辦法總是有的,比如在Xcode中添加注釋的代碼塊也是很方便的。
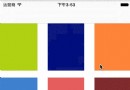
13.iOS 10開始項目中有的文字顯示不全問題
我用Xcode 8和Xcode 7.3分別測試了下,如下圖:
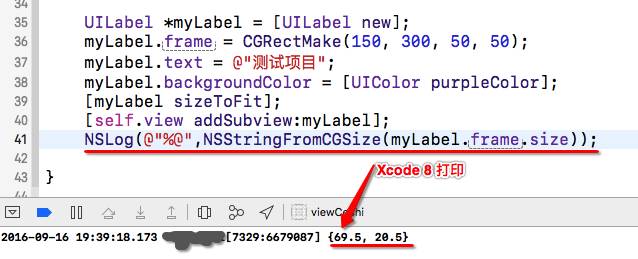
Xcode 8
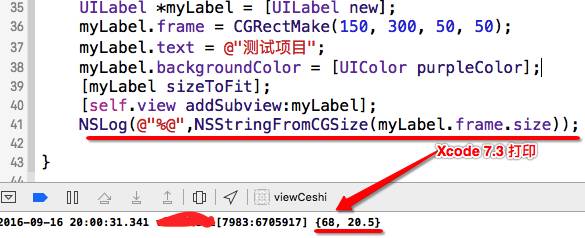
Xcode7
創建一個Label然後讓它自適應大小,字體大小都是17最後輸出的寬度是不一樣的,我們再看一下,
下面的數據就知道為什麼升級iOS 10 之後App中有的文字顯示不全了:
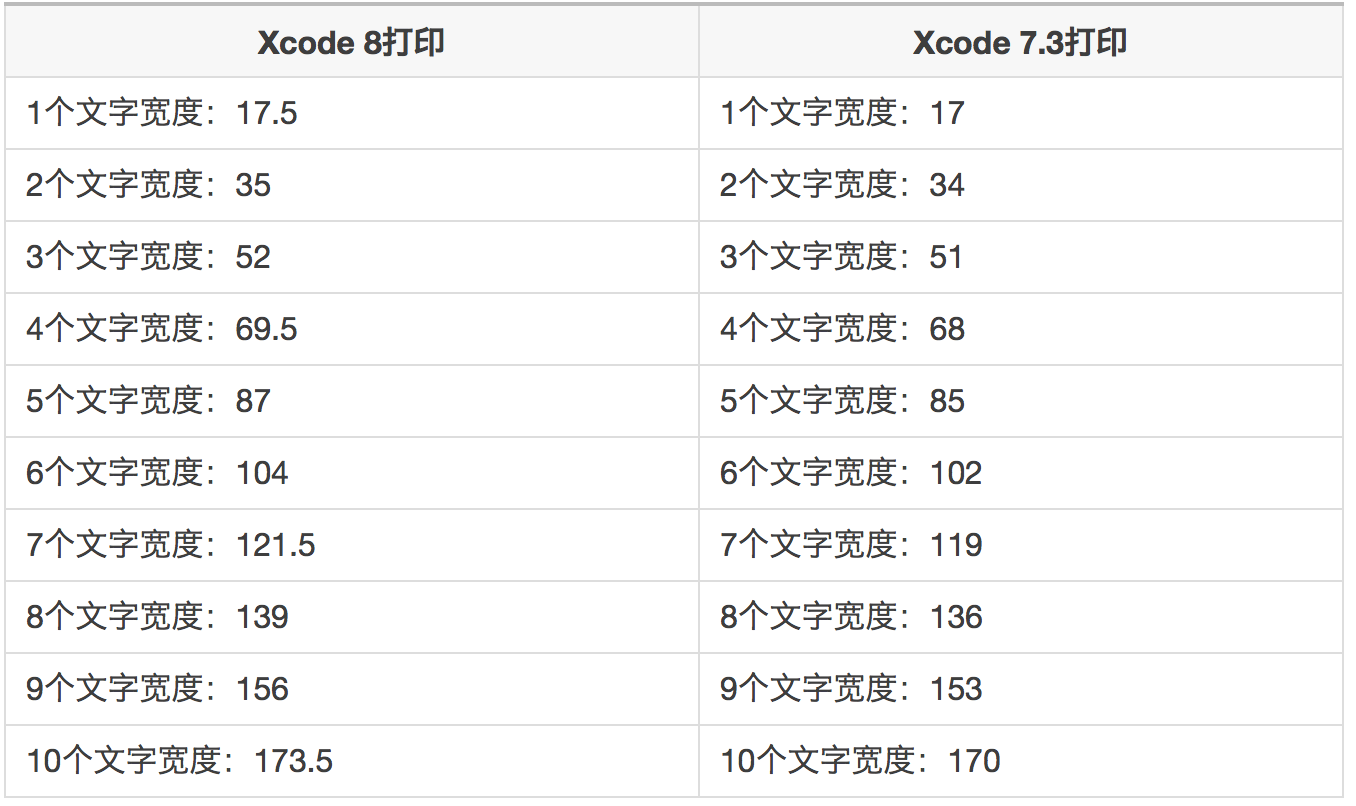
英文字母會不會也有這種問題,我又通過測試,後來發現英文字母沒有問題,只有漢字有問題。
目前只有一個一個修改控件解決這個問題,暫時沒有其他好辦法來解決。
14.Xcode 8使用Xib awakeFromNib的警告問題
在Xcode 8之前我們使用Xib初始化- (void)awakeFromNib {}都是這麼寫也沒什麼問題,但是在Xcode 8會有如下警告:

官方解釋:
You must call the super implementation of awakeFromNib to give parent classes the opportunity to perform any additional initialization they require.
Although the default implementation of this method does nothing, many UIKit classes provide non-empty implementations.
You may call the super implementation at any point during your own awakeFromNib method.


你必須調用父類實現awakeFromNib來給父類來執行它們需要的任何額外的初始化的機會。
雖然這種方法的默認實現不做任何事情,許多UIKit類提供非空的實現。
你可以調用自己的awakeFromNib方法中的任何時候超級實現。
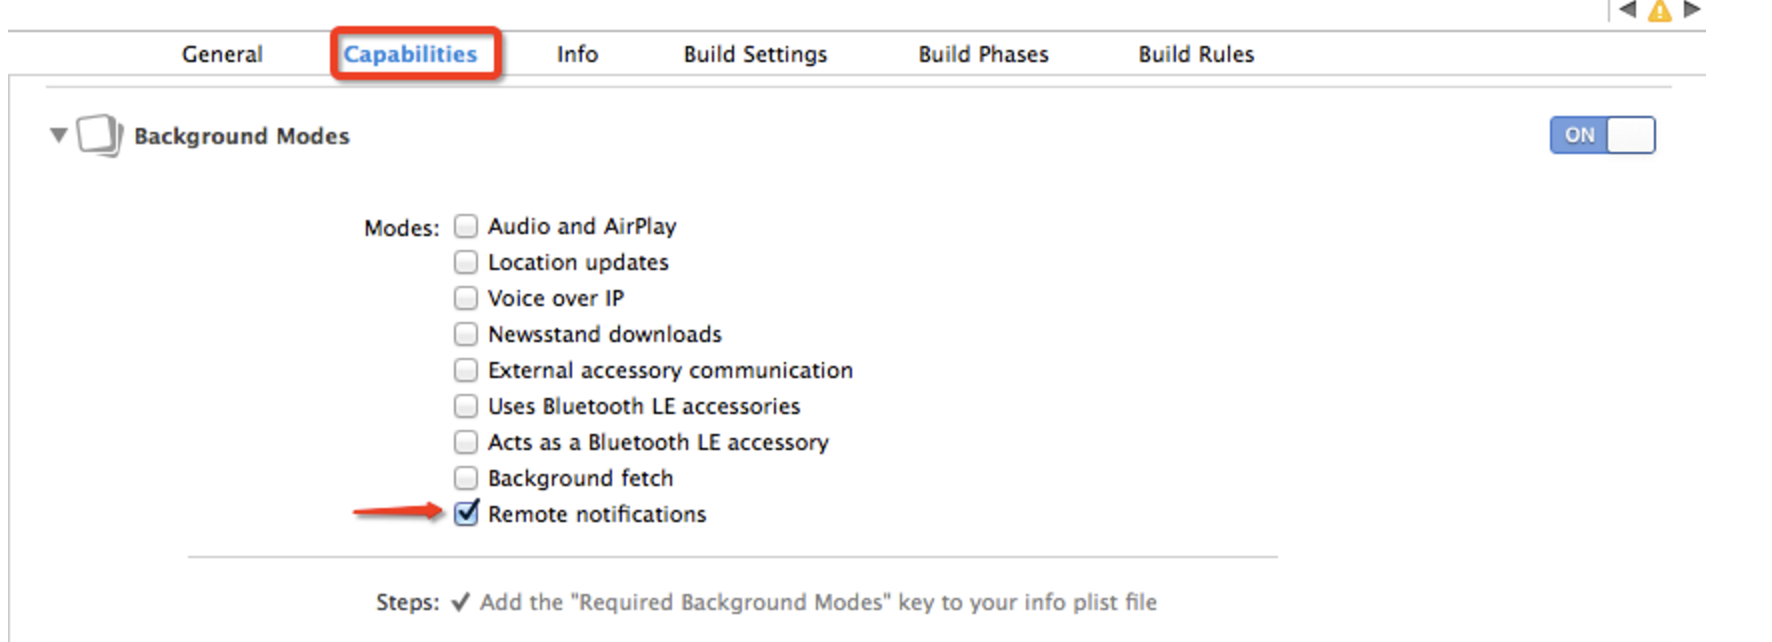
15、推送的時候,開啟Remote notifications
You've implemented -[application:didReceiveRemoteNotification:fetchCompletionHandler:], but you still need to add "remote-notification" to the list of your supported UIBackgroundModes in your Info.plist.
解決方案:需要在Xcode 中修改應用的 Capabilities 開啟Remote notifications,請參考下圖:
16、One of the two will be used. Which one is undefined.”
objc[5114]: Class PLBuildVersion is implemented in both /Applications/Xcode.app/Contents/Developer/Platforms/iPhoneSimulator.platform/Developer/SDKs/iPhoneSimulator.sdk/System/Library/PrivateFrameworks/AssetsLibraryServices.framework/AssetsLibraryServices (0x1109a5910) and /Applications/Xcode.app/Contents/Developer/Platforms/iPhoneSimulator.platform/Developer/SDKs/iPhoneSimulator.sdk/System/Library/PrivateFrameworks/PhotoLibraryServices.framework/PhotoLibraryServices (0x110738210). One of the two will be used. Which one is undefined.
在模擬器中、發現“One of the two will be used. Which one is undefined.”日志
查找資料發現原因:objc runtime 對所用app使用同一個命名空間(flat namespace),運行機制如下:- 首先二進制映像被加載,檢查程序依賴關系
- 每一個二進制映像被加載的同時,程序的objc classes在objc runtime命名空間中注冊
- 如果具有相同名稱的類被再次加載,objc runtime的行為是不可預知的。一種可能的情況是任意一個程序的該類會被加載(這應該也是默認動作)
17、Invalid Bundle - The asset catalog at 'Payload/XXXXX/Assets.car'
can't contain 16-bit or P3 assets if the app supports iOS 9.3 or earlier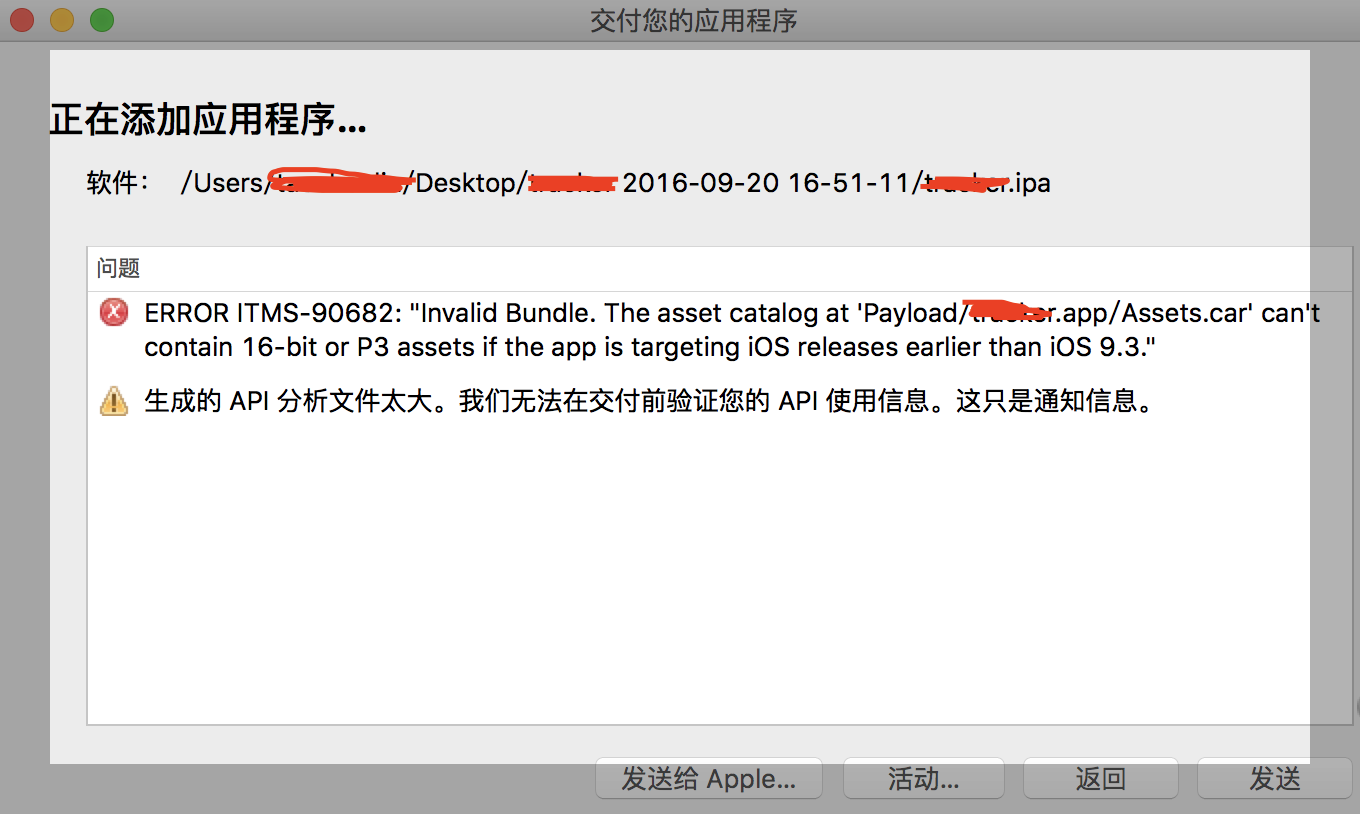
在 Xcode 8 中,當你資源文件中[含有16位圖]或者[圖片顯示模式γ值為'P3']且iOS targets設定為iOS 9.3以下就會出現這個問題. 如果你的app需要支持廣色域顯示的話,那你必須得把target設置成iOS 9.3+,相反,如果你的app不需要支持廣色域且你想兼容 iOS 9.3 之前的項目,你就得把所有的16位的或者顯示模式為'P3'圖片全都替換成8位模式的SRGB顏色的圖片。
你可以通過運行“assetutil”在iTunes Connect的錯誤信息中找到16-bit 或 P3 資源文件。離線的解決方案如下:
1.導出項目的 ipa 文件
2.定位到該ipa文件修改後綴名.ipa 為 .zip.
3. 解壓該 .zip 文件. 解壓後的目錄裡面會有一個包含著你的 app bundle 文件的 Payload 文件夾.
4. 打開終端病切換到你的app的Payload文件夾下的.app bundle文件夾內,形式如下:
cd path/to/Payload/your.app
5. 用 find 命令定位到 Assets.car 文件 .app bundle , 形式如下:
find . -name 'Assets.car'
6. 使用 assetutil 命令找到任何包含著 16-bit or P3 的資源文件, 對每個 Assets.car 之行以下命令 :
sudo xcrun --sdk iphoneos assetutil --info /path/to/a/Assets.car > /tmp/Assets.json
7. 打開上一步生成的 /tmp/Assets.json 文件並查找包含有 “DisplayGamut": “P3” 或者相關的內容. 這段json的"Name"字段對應的值就是16位或顯示的γ值為P3的資源文件名.
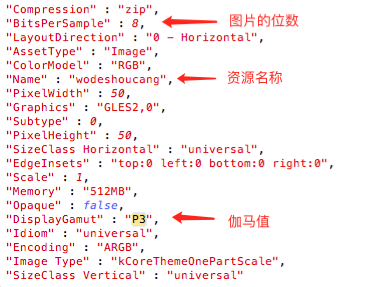
8. 找到這個資源文件修改為 8位的sRGB形式,重新編譯上傳你的app即可.
18、This version does not support documents saved in the Xcode 8 format. Open this document with Xcode 8 or later
編輯項目時默認使用Xcode8打開,導致我用Xcode7打開Xib是報錯:
This version does not support documents saved in the Xcode 8 format. Open this document with Xcode 8.0 or later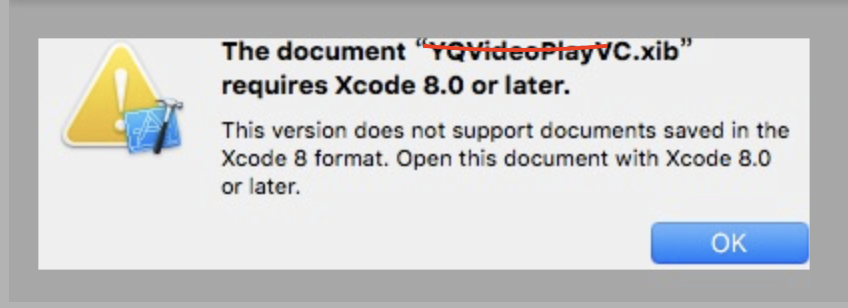
導致用Xcode8打開的Xib全部打不開,只能用編輯器將Xib裡面的下面一句話刪除掉才能打開:
<capability name="documents saved in the Xcode 8 format" minToolsVersion="8.0"/>