
iOS開發之多圖片無縫滾動組件封裝與使用
經常有園友會問"博主,有沒有圖片無限滾動的Demo呀?", 正兒八經的圖片滾動的Demo我這兒還真沒有,今天呢就封裝一個可以在項目中直接使用的圖片輪播。沒看過其他iOS圖片無限輪播的代碼,也不了解他們的原理,我今天封裝這個圖片無限輪播是借鑒Web前端中的做法,因為之前寫Web前端的時候,實現幻燈片就是這麼做的,今天就在iPhone上搞搞。下面的東西是自己寫的了,關於輪播的東西這個開源項目也是相當不錯的https://github.com/nicklockwood/iCarousel,感興趣的可以看一下。那是相當的強大,雖然沒必要重復造輪子但是原理還是有必要理解的。今天的博客就介紹圖片輪播的一種解決方案,下篇博客中在介紹另一種圖片輪播的解決方案。
一、Demo運行效果、原理及調用方式
1.運行效果
下面的GIF呢就是Demo的運行效果,一定間隔後,圖片會自動切換,當然也支持手指滑動。切換到相應圖片時,點擊圖片,會通過Block回調的方式給出該圖片的Index, 在Demo中使用提示框給出Index, 當然在項目中拿到Index你可以做很多事情的,Index就是圖片的Tag值,也就是標記著你點擊的是那張圖片。下圖中是三張圖片進行輪播。

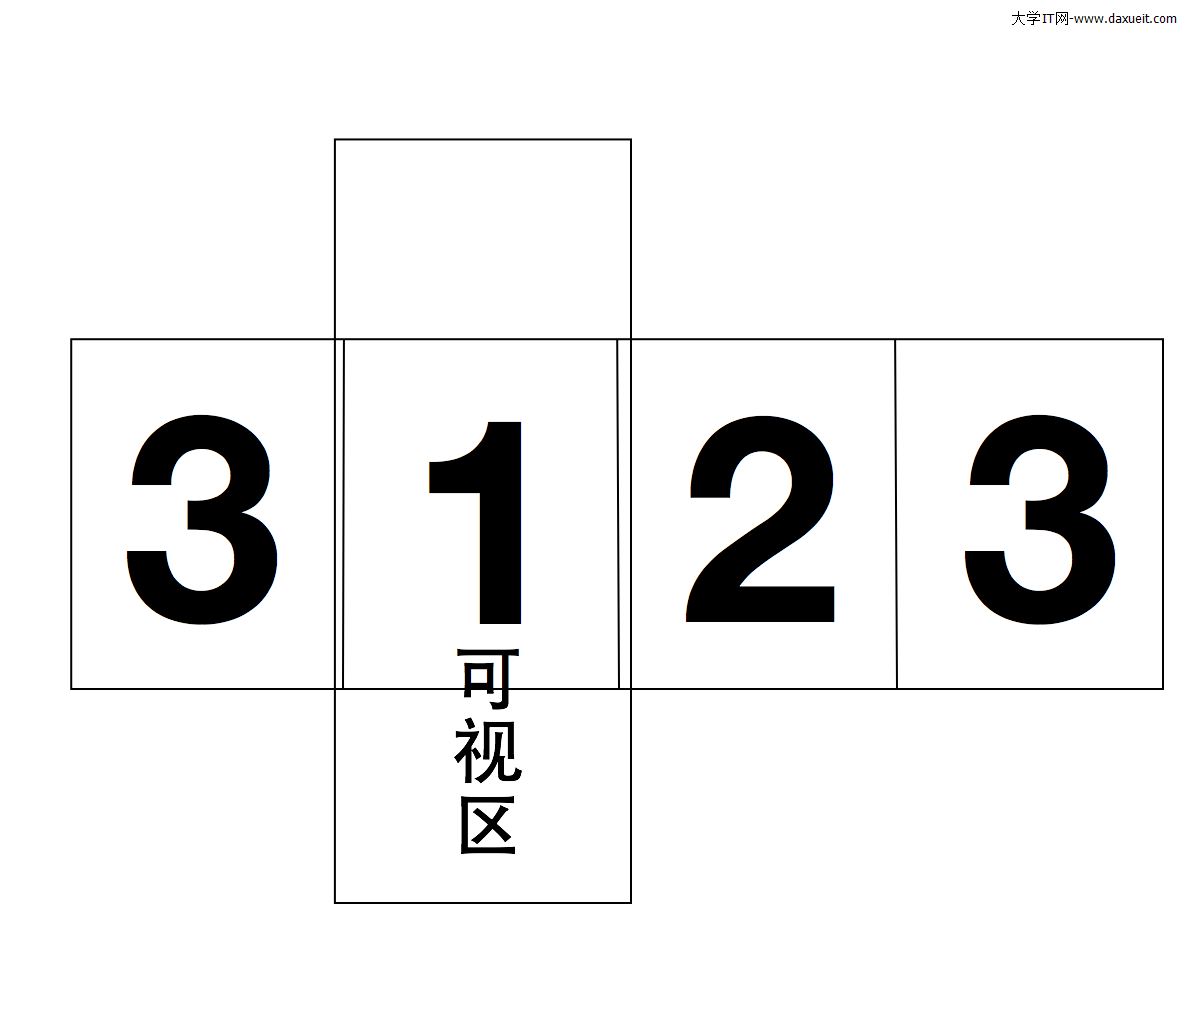
2.原理
下面是實現圖片無限輪播的原理圖(借鑒Web前端幻燈片的寫法,歡迎大家提出好的解決方案),原理用一句話概括:如果顯示3張圖片的話,就往ScrollView上貼4張圖順序是3-1-2-3。首次顯示1的位置,然後滑動,等滑動到最後一個3時,無動畫切換到第一個3的位置,然後在滾動。原理圖如下,就可以按著下面的原理圖來布局和實例化控件了。
3.組件調用方式
下面這段代碼是組件的初始化和屬性的設置,分為如下幾部:
(1):確定組件的位置
(2):生成圖片名字數組
(3):通過便利構造器初始化控件,並傳入imageName數組
(4):設置屬性(可選), scrollInterval-圖片切換間隔,animationInterVale-圖片運動時間
(5):addTapEventForImageWithBlock:圖片點擊後的回調
 -(void) addZLImageViewDisPlayView{

     //獲取要顯示的位置
     CGRect screenFrame = [[UIScreen mainScreen] bounds];

     CGRect frame = CGRectMake(10, 60, screenFrame.size.width - 20, 200);

     NSArray *imageArray = @[@"01.jpg", @"02.jpg", @"03.jpg"];

     //初始化控件
     ZLImageViewDisplayView *imageViewDisplay = [ZLImageViewDisplayView zlImageViewDisplayViewWithFrame:frame WithImages:imageArray];

     //設定輪播時間
     imageViewDisplay.scrollInterval = 2;

     //圖片滾動的時間
     imageViewDisplay.animationInterVale = 0.6;

     //把該視圖添加到相應的父視圖上
     [self.view addSubview:imageViewDisplay];

     [imageViewDisplay addTapEventForImageWithBlock:^(NSInteger imageIndex) {
         NSString *str = [NSString stringWithFormat:@"我是第%ld張圖片", imageIndex];
         UIAlertView *alter = [[UIAlertView alloc] initWithTitle:@"提示" message:str delegate:nil cancelButtonTitle:@"OK" otherButtonTitles:nil, nil];
         [alter show];
     }];

 }
二、核心代碼介紹
1.組件的便利初始化方法如下,傳入的參數是組件的frame, 和要顯示的圖片名字數組。在便利初始化方法中初始化一些屬性和調用相關初始化方法。初始化內容如下:
 #pragma -- mark 遍歷初始化方法
 - (instancetype)initWithFrame: (CGRect)frame
                WithImages: (NSArray *) images
 {
     self = [super initWithFrame:frame];
     if (self) {
         //獲取滾動視圖的寬度
         _widthOfView = frame.size.width;

         //獲取滾動視圖的高度
         _heightView = frame.size.height;

         _scrollInterval = 3;

         _animationInterVale = 0.7;

         //當前顯示頁面
         _currentPage = 1;

         _imageViewcontentModel = UIViewContentModeScaleAspectFill;

         self.clipsToBounds = YES;

         //初始化滾動視圖
         [self initMainScrollView];

         //添加ImageView
         [self addImageviewsForMainScrollWithImages:images];

         //添加timer
         [self addTimerLoop];

         [self addPageControl];

     }
     return self;
 }
2.便利構造器
為我們的組件添加上便利構造器,便利構造器當然是類方法了,傳的參數和便利初始化方法一樣,該方法主要就是類的初始化,然後調用便利初始化方法, 並返回類的對象。代碼如下:
#pragma -- 便利構造器
+ (instancetype) zlImageViewDisplayViewWithFrame: (CGRect) frame
                                      WithImages: (NSArray *) images{
    ZLImageViewDisplayView *instance = [[ZLImageViewDisplayView alloc] initWithFrame:frame WithImages:images];
    return instance;
}
3.初始化ScrollView
往我們自定義組件視圖上添加ScrollView, ScrollView的的大小和我們自定義組件的大小一樣,並且設置相關屬性,設置代理方法,代碼如下:
 #pragma -- mark 初始化ScrollView
 - (void) initMainScrollView{

     _mainScrollView = [[UIScrollView alloc] initWithFrame:CGRectMake(0, 0, _widthOfView, _heightView)];

     _mainScrollView.contentSize = CGSizeMake(_widthOfView, _heightView);

     _mainScrollView.pagingEnabled = YES;

     _mainScrollView.showsHorizontalScrollIndicator = NO;

     _mainScrollView.showsVerticalScrollIndicator = NO;

     _mainScrollView.delegate = self;

     [self addSubview:_mainScrollView];
 }
4.添加PageControl
初始化PageControl, 配置相關屬性,並添加到我們的自定義組件上,代碼如下:
 #pragma 添加PageControl
 - (void) addPageControl{
     _imageViewPageControl = [[UIPageControl alloc] initWithFrame:CGRectMake(0, _heightView - 20, _widthOfView, 20)];

     _imageViewPageControl.numberOfPages = _imageViewArray.count;

     _imageViewPageControl.currentPage = _currentPage - 1;

     _imageViewPageControl.tintColor = [UIColor blackColor];

     [self addSubview:_imageViewPageControl];
 }
5.添加ImageView和Image
往ScrollView上添加ImageView和Image, 下面這個方法也是核心代碼,我們根據是第幾張圖片來計算圖片的Frame進行布局,每張圖片的大小就是我們組件的大小,根據上面原理的介紹,ScrollView上的第一張圖片和最後一張圖片一樣,你想顯示的第一張圖片放到ScrollView上的第二張,並改變Scollview的Contentoffset顯示ScrollView上的第二張圖片,代碼如下:
 #pragma -- mark 給ScrollView添加ImageView
 -(void) addImageviewsForMainScrollWithImages: (NSArray *) images{
     //設置ContentSize
     _mainScrollView.contentSize = CGSizeMake(_widthOfView * (images.count+1), _heightView);

     _imageViewArray = images;

     for ( int i = 0; i < _imageViewArray.count + 1; i ++) {

         CGRect currentFrame = CGRectMake(_widthOfView * i, 0, _widthOfView, _heightView);

         UIImageView *tempImageView = [[UIImageView alloc] initWithFrame:currentFrame];

         tempImageView.contentMode = _imageViewcontentModel;

         tempImageView.clipsToBounds = YES;

         NSString *imageName;

         if (i == 0) {
             imageName = [_imageViewArray lastObject];
         } else {
             imageName = _imageViewArray[i - 1];
         }

         UIImage *imageTemp = [UIImage imageNamed:imageName];
         [tempImageView setImage:imageTemp];

         [_mainScrollView addSubview:tempImageView];
     }

     _mainScrollView.contentOffset = CGPointMake(_widthOfView, 0);

 }
6.添加定時器
想讓圖片自己動起來,是少不了定時器的,為我們的組件添加定時器,下面的方法就是初始化定時器方法:
 - (void) addTimerLoop{

     if (_timer == nil) {
         _timer = [NSTimer scheduledTimerWithTimeInterval:_scrollInterval target:self selector:@selector(changeOffset) userInfo:nil repeats:YES];
     }
 }
7.定時器執行的方法
下面的方法就是定時器執行的方法,當時間到時,自動改變ScrollView的ContentOffset.x的值,有動畫的切換到下一張圖片。如果目前是最後一張圖片則無動畫的切換到ScrollView的第一張圖片,因為第一張圖片和最後一張圖片是一樣的,所以用戶看不到這個無動畫的切換,切換後,圖片有開始從第一個開始滾動,所以就可以無限循環的滾動了,下面也是核心代碼:
 -(void) changeOffset{

     _currentPage ++;

     if (_currentPage == _imageViewArray.count + 1) {
         _currentPage = 1;
     }

     [UIView animateWithDuration:_animationInterVale animations:^{
         _mainScrollView.contentOffset = CGPointMake(_widthOfView * _currentPage, 0);
     } completion:^(BOOL finished) {
         if (_currentPage == _imageViewArray.count) {
             _mainScrollView.contentOffset = CGPointMake(0, 0);
         }
     }];

      _imageViewPageControl.currentPage = _currentPage - 1;

 }
8.手動切換
上面介紹的是使用NSTimer來實現自動切換,那麼如何讓組件支持手動切換呢? 要支持手動切換就得在我們ScrollView的回調中進行處理了。在用戶手動滑動後的方法中去做我們要做的事情,也就是判斷是不是最後一張圖片,然後在暫停一下定時器即可,對應的回調方法如下:
 - (void)scrollViewDidEndDecelerating:(UIScrollView *)scrollView{
     NSInteger currentPage = scrollView.contentOffset.x / _widthOfView;

     if(currentPage == 0){
         _mainScrollView.contentOffset = CGPointMake(_widthOfView * _imageViewArray.count, 0);
         _imageViewPageControl.currentPage = _imageViewArray.count;
         _currentPage = _imageViewArray.count;
     }

     if (_currentPage + 1 == currentPage || currentPage == 1) {
         _currentPage = currentPage;

         if (_currentPage == _imageViewArray.count + 1) {
             _currentPage = 1;
         }

         if (_currentPage == _imageViewArray.count) {
             _mainScrollView.contentOffset = CGPointMake(0, 0);
         }

         _imageViewPageControl.currentPage = _currentPage - 1;
         [self resumeTimer];
         return;
     }


 }
9.暫停定時器
手動滑動後要暫停定時器一段時間,因為不暫停的話,你手動切換完,有時會立刻切換到下一張圖片,下面是暫停定時器的方法,然後在過一段時間後自動激活定時器。方法如下
 #pragma 暫停定時器
 -(void)resumeTimer{

     if (![_timer isValid]) {
         return ;
     }

     [_timer setFireDate:[NSDate dateWithTimeIntervalSinceNow:_scrollInterval-_animationInterVale]];

 }
經過上面的這些代碼組件就可以被調用了,你的圖片就可以使用了,最後在給出該組件留出的對外接口:
 //
 //  ZLImageViewDisplayView.h
 //  ZLImageViewDisplay
 //
 //  Created by Mr.LuDashi on 15/8/14.
 //  Copyright (c) 2015年 ludashi. All rights reserved.
 //

 #import <UIKit/UIKit.h>

 //點擊圖片的Block回調,參數當前圖片的索引,也就是當前頁數
 typedef void(^TapImageViewButtonBlock)(NSInteger imageIndex);

 @interface ZLImageViewDisplayView : UIView


 //切換圖片的時間間隔,可選,默認為3s
 @property (nonatomic, assign) CGFloat scrollInterval;

 //切換圖片時,運動時間間隔,可選,默認為0.7s
 @property (nonatomic, assign) CGFloat animationInterVale;

 /**********************************
  *功能:便利構造器
  *參數:滾動視圖的Frame, 要顯示圖片的數組
  *返回值:該類的對象
  **********************************/
 + (instancetype) zlImageViewDisplayViewWithFrame: (CGRect) frame
                                       WithImages: (NSArray *) images;

 /**********************************
  *功能:便利初始化函數
  *參數:滾動視圖的Frame, 要顯示圖片的數組
  *返回值:該類的對象
  **********************************/
 - (instancetype)initWithFrame: (CGRect)frame
                    WithImages: (NSArray *) images;


 /**********************************
  *功能:為每個圖片添加點擊時間
  *參數:點擊按鈕要執行的Block
  *返回值:無
  **********************************/
 - (void) addTapEventForImageWithBlock: (TapImageViewButtonBlock) block;

 @end
三.組件和Demo分享
下面給出了Demo和組件在GitHub上的分享地址:
https://github.com/lizelu/ZLImageViewDisplay
上面的Demo是圖片輪播的解決方案之一,下篇博客會使用兩個ImageView復用的形式來實現圖片的無限輪播的解決方案。Demo寫的比較著急,難免會有纰漏的地方,望大家批評指正。
- 上一頁:iOS程序啟動過程
- 下一頁:iOS UITextField的全解


- iOS8如何編輯通知顯示?iphone6今日通知顯示欄目編輯教程
- iOS神級手勢插件QuickDo更新 操作方法詳解
- iOS 9.3正式版怎麼升級 iOS 9.3正式版升級方法圖文全教程
- Safari怎麼清除緩存?iPhone清理Safari浏覽器緩存教程
- iOS8.4 GPS不能用怎麼辦 iOS8.4GPS定位不准解決辦法
- iPhone如何調整Home鍵?重新調整Home鍵技巧
- Apple Pay免密支付怎麼設置 Apple Pay取消支付密碼教程
- iphone拍全景拍出2個人即分身術照片的方法
- iOS中倒計時
- iOS9.0.2 App Store打不開怎麼辦?iOS9.0.2 App Store打不開問題的解決方法