iOS App開發中擴展RCLabel組件進行基於HTML的文本布局
iOS系統是一個十分注重用戶體驗的系統,在iOS系統中,用戶交互的方案也十分多,然而要在label中的某部分字體中添加交互行為確實不容易的,如果使用其他類似Button的控件來模擬,文字的排版又將是一個解決十分困難的問題。這個問題的由來是項目中的一個界面中有一些廣告位標簽,而這些廣告位的標簽卻是嵌在文本中的,當用戶點擊文字標簽的位置時,會跳轉到響應的廣告頁。
CoreText框架和一些第三方庫可以解決這個問題,但直接使用CoreText十分復雜,第三方庫多注重於富文本的排版,對類似文字超鏈接的支持亦不是特別簡潔,我們可以借助一些第三方的東西進行針對性更強,更易用的封裝。
RCLabel是一個第三方的將html字符串進行文本布局的工具,代碼十分輕巧,並且其是基於CoreText框架的,其原生性和擴展性十分強。
一、擴展於RCLabel的支持異步加載網絡圖片的富文本引擎的設計
在iOS開發中,圖文混排一直都是UI編程的一個核心點,也有許多優秀的第三方引擎,其中很有名的一套圖文混排的框架叫做DTCoreText。但是在前些日的做的一個項目中,我並沒有采用這套框架,原因有二,一是這套框架體積非常大,而項目的需求其實並不太高;二是要在這套框架中修改一些東西,難度也非常大,我最終采用的是一個叫做RCLabel的第三方控件,經過一些簡單的優化和完善,達到了項目的要求。
先來介紹一下我項目中的圖文混排的需求:首先我從服務器中取到的數據是字符串,但是其中穿插圖片的位置是一個HTML的圖片標簽,標簽裡的資源路徑就是圖片的請求地址。需要達到的要求是這些數據顯示出來後,圖片的位置要空出來,然後通過異步的網絡請求獲取圖片的數據,再將圖片插入文字中。
要自己實現一套這樣的引擎確實會比較麻煩,幸運的是RCLabel可以完美的幫我們解析帶有HTML標簽的數據,進行圖文混排,我們先來看一下這個東西怎麼用,下面是我封裝的一個展示html數據的view:RCLabel的用法很簡單,總結來說只有三步:
@interface YHBaseHtmlView()<YHRTLabelImageDelegate>
{
//RCLabel對象
RCLabel * _rcLabel;
//保存屬性 用於異步加載完成後刷新
RTLabelComponentsStructure * _origenComponent;
//含html標簽的數據字符串
NSString * _srt;
}
@end
@implementation YHBaseHtmlView
/*
// Only override drawRect: if you perform custom drawing.
// An empty implementation adversely affects performance during animation.
- (void)drawRect:(CGRect)rect {
// Drawing code
}
*/
- (instancetype)initWithCoder:(NSCoder *)coder
{
self = [super initWithCoder:coder];
if (self) {
//將rclabel初始化
_rcLabel = [[RCLabel alloc]init];
[self addSubview:_rcLabel];
}
return self;
}
- (instancetype)initWithFrame:(CGRect)frame
{
self = [super initWithFrame:frame];
if (self) {
_rcLabel = [[RCLabel alloc]initWithFrame:frame];
[self addSubview:_rcLabel];
}
return self;
}
-(void)reSetHtmlStr:(NSString *)htmlStr{
_srt = htmlStr;
//這個代理是我額外添加的 後面解釋
_rcLabel.imageDelegate=self;
//設置frame
_rcLabel.frame=CGRectMake(0, 0, self.frame.size.width, 0);
//設置屬性
_origenComponent = [RCLabel extractTextStyle:htmlStr IsLocation:NO withRCLabel:_rcLabel];
_rcLabel.componentsAndPlainText = _origenComponent;
//獲取排版後的size
CGSize size = [_rcLabel optimumSize];
//重新設置frame
_rcLabel.frame=CGRectMake(0, 0, _rcLabel.frame.size.width, size.height);
self.frame=CGRectMake(self.frame.origin.x, self.frame.origin.y, _rcLabel.frame.size.width, size.height);
}
//這是我額外添加的代理方法的實現
-(void)YHRTLabelImageSuccess:(RCLabel *)label{
_origenComponent = [RCLabel extractTextStyle:_srt IsLocation:NO withRCLabel:_rcLabel];
_rcLabel.componentsAndPlainText = _origenComponent;
CGSize size = [_rcLabel optimumSize];
_rcLabel.frame=CGRectMake(0, 0, _rcLabel.frame.size.width, size.height);
self.frame=_rcLabel.frame;
if ([self.delegate respondsToSelector:@selector(YHBaseHtmlView:SizeChanged:)]) {
[self.delegate YHBaseHtmlView:self SizeChanged:self.frame.size];
}
}
1.初始化並設置frame
2.通過帶html標簽的數據進行屬性的初始化
3.將屬性進行set設置並重設視圖frame
RCLabel是很強大,並且代碼很簡練,但是其中處理圖片的部分必須是本地的圖片,即圖片html標簽中的路徑必須是本地圖片的名字,其內部是通過[UIImage ImageNamed:]這個方法進行圖片的渲染的,所以要達到我們的需要,我們需要對其進行一些簡單的擴展:
1、在屬性設置方法中添加一個參數,來區分本地圖片與網絡圖片:
//我在這個方法中添加了location這個bool值,實際上rclabel這個參數也是我添加的,是為了後面代理使用的2、在實現方法中添加如下代碼,因為原文件有1900多行,在其中弄清楚邏輯關系也確實費了我不小的力氣,我這裡只將我添加的代碼貼過來
+ (RTLabelComponentsStructure*)extractTextStyle:(NSString*)dataimage IsLocation:(BOOL)location withRCLabel:(RCLabel *)rcLabel;
#warning 這裡進行了兼容性處理

                if (location) {

                //本地圖片的渲染

                    if (tempURL) {

                        UIImage  *tempImg = [UIImage imageNamed:tempURL];

                        component.img = tempImg;


                    }

                }else{//這裡做遠程圖片數據的處理

                //這裡我進行了緩存的操作,這個緩存中心是我封裝的框架中的另一套東西,這裡可以不用在意

                    //先讀緩存

                    NSData * ceche = [[YHBaseCecheCenter sharedTheSingletion] readCecheFile:tempURL fromPath:YHBaseCecheImage];

                    if (ceche) {

                        UIImage * tempImg = [UIImage imageWithData:ceche];

                        component.img=tempImg;

                    }else{

                    //在分線程中進行圖片數據的獲取

                        dispatch_async(dispatch_get_global_queue(DISPATCH_QUEUE_PRIORITY_HIGH, 0), ^{

                            if (tempURL) {

                                NSData * data = [YHBaseData getDataWithUrl:tempURL];

                                if (data) {

                                //獲取完成後村緩存

                                    //做緩存

                                    [[YHBaseCecheCenter sharedTheSingletion]writeCecheFile:data withFileID:tempURL toPath:YHBaseCecheImage];

                                    //賦值 回調代理

                                    UIImage * tempImg = [UIImage imageWithData:data];

                                    component.img=tempImg;

                                    //這裡代理是我添加的,當圖片下載完成後 通知視圖重新排版

                                    if ([[rcLabel imageDelegate]respondsToSelector:@selector(YHRTLabelImageSuccess:)]) {

                                        //在主線程中執行回調

                                        //這個地方要在主線程中執行,否則刷新會有延時

                                        dispatch_async(dispatch_get_main_queue(), ^{

                                             [[rcLabel imageDelegate] YHRTLabelImageSuccess:rcLabel];

                                        });


                                    }


                                }


                            };


                        });

                    }


                }
二、視圖類與模型類的設計
RCLabel的核心之處在於將HTML文本轉換為富文本布局視圖,因此我們可以將要顯示的文本編程html字符串,將其可以進行用戶交互的部分進行html超鏈接關聯,RCLabel就檢測到我們點擊的區域進行響應邏輯的回調。設計類如下:
.h文件
//文本與超鏈接地址關聯的model類 後面會說上面我們有用到一個YHBaseLinkingLabelModel類,這個類進行了鏈接與字符的映射,設計如下:
@class YHBaseLinkingLabelModel;
@protocol YHBaseLinkingLabelProtocol <NSObject>
@optional
/**
*點擊超鏈接後出發的代理方法 model中有鏈接地址和文字
*/
-(void)YHBaseLinkingLabelClickLinking:(YHBaseLinkingLabelModel *)model;
/**
*尺寸改變後出發的方法
*/
-(void)YHBaseLinkingLabelSizeChange:(CGSize)size;
@end
@interface YHBaseLinkingLabel : YHBaseView
/**
*文字數組 裡面存放這文字對應的超鏈接對象
*/
@property(nonatomic,strong)NSArray<YHBaseLinkingLabelModel *> * textArray;
@property(nonatomic,weak)id<YHBaseLinkingLabelProtocol>delegate;
/**
*設置文字顏色
*/
@property(nonatomic,strong)UIColor * textColor;
/**
*設置超鏈接文字顏色
*/
@property(nonatomic,strong)UIColor * linkColor;
/**
*設置字體大小
*/
@property(nonatomic,assign)NSUInteger fontSize;
/**
*設置超鏈接字體大小
*/
@property(nonatomic,assign)int linkingFontSize;
/**
*設置是否顯示下劃線
*/
@property(nonatomic,assign)BOOL isShowUnderLine;
@end
.m文件
@interface YHBaseLinkingLabel()<YHBaseHtmlViewProcotop>
@end
@implementation YHBaseLinkingLabel
{
//以前博客中 封裝的顯示HTML字符串富文本的視圖
YHBaseHtmlView * _label;
}
/*
// 重載一些初始化方法
- (instancetype)init
{
self = [super init];
if (self) {
_label = [[YHBaseHtmlView alloc]init];
[self addSubview:_label];
[_label mas_makeConstraints:^(MASConstraintMaker *make) {
make.leading.equalTo(@0);
make.trailing.equalTo(@0);
make.top.equalTo(@0);
make.bottom.equalTo(@0);
}];
_label.delegate=self;
}
return self;
}
- (instancetype)initWithCoder:(NSCoder *)coder
{
self = [super initWithCoder:coder];
if (self) {
_label = [[YHBaseHtmlView alloc]init];
[self addSubview:_label];
[_label mas_makeConstraints:^(MASConstraintMaker *make) {
make.leading.equalTo(@0);
make.trailing.equalTo(@0);
make.top.equalTo(@0);
make.bottom.equalTo(@0);
}];
_label.delegate=self;
}
return self;
}
- (instancetype)initWithFrame:(CGRect)frame
{
self = [super initWithFrame:frame];
if (self) {
_label = [[YHBaseHtmlView alloc]init];
[self addSubview:_label];
[_label mas_makeConstraints:^(MASConstraintMaker *make) {
make.leading.equalTo(@0);
make.trailing.equalTo(@0);
make.top.equalTo(@0);
make.bottom.equalTo(@0);
}];
_label.delegate=self;
}
return self;
}
//設置文本數組
-(void)setTextArray:(NSArray<YHBaseLinkingLabelModel *> *)textArray{
_textArray = textArray;
//進行html轉換
NSString * htmlString = [self transLinkingDataToHtmlStr:textArray];
//進行布局
[_label reSetHtmlStr:htmlString];
}
-(void)setTextColor:(UIColor *)textColor{
_textColor = textColor;
_label.fontColor = textColor;
}
-(void)setLinkColor:(UIColor *)linkColor{
_linkColor = linkColor;
_label.linkingColor = linkColor;
}
-(void)setFontSize:(NSUInteger)fontSize{
_fontSize = fontSize;
[_label setFontSize:(int)fontSize];
}
-(void)setLinkingFontSize:(int)linkingFontSize{
_linkingFontSize = linkingFontSize;
[_label setLinkingSize:linkingFontSize];
}
-(void)setIsShowUnderLine:(BOOL)isShowUnderLine{
_isShowUnderLine = isShowUnderLine;
[_label setShowUnderLine:isShowUnderLine];
}
-(NSString *)transLinkingDataToHtmlStr:(NSArray<YHBaseLinkingLabelModel *> *)data{
NSMutableString * mutStr = [[NSMutableString alloc]init];
for (int i=0; i<data.count; i++) {
//這個model中存放的是超鏈接部分的文字和對應的url
YHBaseLinkingLabelModel * model = data[i];
if (!model.linking) {
[mutStr appendString:model.text];
}else {
[mutStr appendString:@"<a href="];
[mutStr appendString:model.linking];
[mutStr appendString:@">"];
[mutStr appendString:model.text];
[mutStr appendString:@"</a>"];
}
}
return mutStr;
}
#pragma mark delegate
//點擊的回調
-(void)YHBaseHtmlView:(YHBaseHtmlView *)htmlView ClickLink:(NSString *)url{
for (YHBaseLinkingLabelModel * model in _textArray) {
if ([model.linking isEqualToString:url]) {
if ([self.delegate respondsToSelector:@selector(YHBaseLinkingLabelClickLinking:)]) {
[self.delegate YHBaseLinkingLabelClickLinking:model];
return;
}
}
}
}
//布局尺寸改變的回調
-(void)YHBaseHtmlView:(YHBaseHtmlView *)htmlView SizeChanged:(CGSize)size{
if ([self.delegate respondsToSelector:@selector(YHBaseLinkingLabelSizeChange:)]) {
[self.delegate YHBaseLinkingLabelSizeChange:size];
}
}
@end
@interface YHBaseLinkingLabelModel : YHBaseModelYHBaseHtmlView類是對RCLabel的一層封裝,其中也對RCLabel進行了一些優化和改動,代碼較多且在上篇博客中有介紹,這裡不再多做解釋了。
/**
*文字內容
*/
@property(nonatomic,strong)NSString * text;
/**
*超鏈接地址 nil則為無
*/
@property(nonatomic,strong)NSString * linking;
@end
在ViewController中寫如下代碼進行使用:
- (void)viewDidLoad {運行效果如下:
[super viewDidLoad];
// Do any additional setup after loading the view, typically from a nib.
YHBaseLinkingLabel * label = [[YHBaseLinkingLabel alloc]initWithFrame:CGRectMake(100, 100, 200, 100)];
NSMutableArray * array = [[NSMutableArray alloc]init];
for (int i=0; i<6; i++) {
YHBaseLinkingLabelModel * model = [[YHBaseLinkingLabelModel alloc]init];
if (!(i%2)) {
model.text =[NSString stringWithFormat:@"第%d個標簽",i];
model.linking = [NSString stringWithFormat:@"第%d個標簽",i];
}else{
model.text = @",不能點得文字,";
}
[array addObject:model];
}
label.textColor = [UIColor blackColor];
label.linkColor = [UIColor purpleColor];
label.fontSize = 15;
label.linkingFontSize = 17;
label.isShowUnderLine=YES;
label.delegate=self;
label.textArray = array;
[self.view addSubview:label];
}
-(void)YHBaseLinkingLabelClickLinking:(YHBaseLinkingLabelModel *)model{
NSLog(@"%@",model.linking);
}
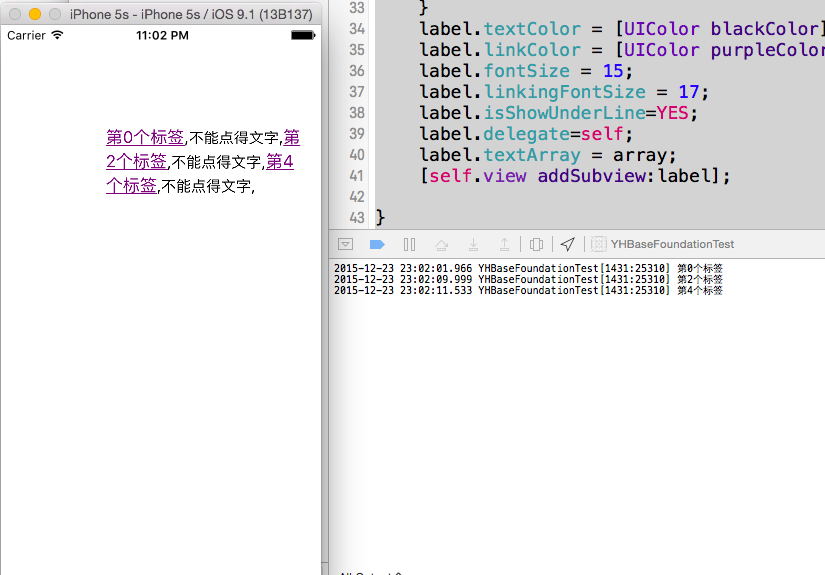
效果不錯,並且十分簡單易用,對吧。