iOS開發系列--IOS程序開發概覽ios基礎
概覽
終於到了真正接觸IOS應用程序的時刻了,之前我們花了很多時間去討論C語言、ObjC等知識,對於很多朋友而言開發IOS第一天就想直接看到成果,看到可以運行的IOS程序。但是這裡我想強調一下,前面的知識是你日後開發IOS的基礎,沒有那些知識你開發IOS會很痛苦,現在很多開發人員做開發都是一知半解,程序質量確實令人擔憂,所以還是希望大家能夠熟練掌握前面的內容,開發過程中多思考,徹底理解程序運行的原理、機制。好了言歸正傳,不管怎麼樣正式進入IOS開發還是令人興奮的,今天的內容雖然說是開發預覽,其實還是有大量內容要說的:
第一個iOS程序iOS程序運行過程
文件結構
Storyboard
純代碼實現iOS開發
補充知識點
第一個iOS程序
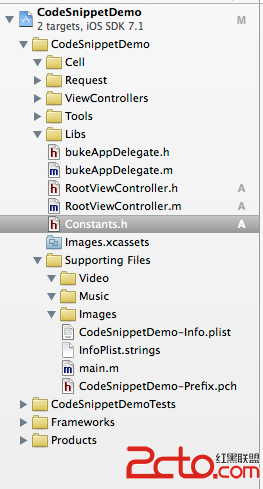
首先打開Xcode—Create a new Xcode project—Single View Application--輸入項目名稱,同時選擇使用Objective-C語言,設備選擇iPhone--接下來系統默認生成一個IOS項目模板。項目目錄結構如下:

此時什麼也不用做,直接運行看一下(注意這裡已經切換模擬器為iPhone5),沒錯我們看到了一個iOS應用程序:

程序的運行過程
在幾乎所有的程序開發中程序一般都是從main函數開始運行的,那麼IOS程序也不例外,在上圖中我們可以看到Xcode為我們生成了一個main.m文件:
// // main.m // FirstIOS // // Created by Kenshin Cui on 14-2-23. // Copyright (c) 2014年 Kenshin Cui. All rights reserved. // #import#import "AppDelegate.h" int main(int argc, char * argv[]) { @autoreleasepool { return UIApplicationMain(argc, argv, nil, NSStringFromClass([AppDelegate class])); } }
這個默認的iOS程序就是從main函數開始執行的,但是在main函數中我們其實只能看到一個方法,這個方法內部是一個消息循環(相當於一個死循環),因此運行到這個方法UIApplicationMain之後程序不會自動退出,而只有當用戶手動關閉程序這個循環才結束。這個方法有四個參數:
- 第一個參數和第二個參數其實就是main函數的參數,分別代表:參數個數、參數內容;
- 第三個參數代表UIApplication類(或子類)字符串,這個參數默認為nil則代表默認為UIApplication類,用戶可以自定義一個類繼承於這個類;如果為nil則等價於NSStringFromClass([UIApplication class]),大家可以自己試驗,效果完全一樣;UIApplication是單例模式,一個應用程序只有一個UIApplication對象或子對象;
- 第四個參數是UIApplication的代理類字符串,默認生成的是AppDelegate類,這個類主要用於監聽整個應用程序生命周期的各個事件(其實類似於之前我們文章中提到的事件監聽代理),當UIApplication運行過程中引發了某個事件之後會調用代理中對應的方法;
小技巧:
其實在Xcode中如果要看一些系統方法的解釋或者參數說明,可以直接鼠標放到這個方法上,在Xcode右側面板中就會給出幫助提示,如下圖當我們放到UIApplicationMain上之後:
也就是說當執行UIApplicationMain方法後這個方法會根據第三個參數創建對應的UIApplication對象,這個對象會根據第四個參數AppDelegate創建並指定此對象為UIApplication的代理;同時UIApplication會開啟一個消息循環不斷監聽應用程序的各個活動,當應用程序生命周期發生改變UIApplication就會調用代理對應的方法。
既然應用程序UIApplication是通過代理和外部交互的,那麼我們就有必要清楚AppDelegate的操作細節,下面是UIApplication詳細的代碼:
AppDelegate.h
// // AppDelegate.h // // // Created by Kenshin Cui on 14-2-23. // Copyright (c) 2014年 Kenshin Cui. All rights reserved. // #import@interface AppDelegate : UIResponder @property (strong, nonatomic) UIWindow *window; @end
AppDelegate.m
//
//  AppDelegate.m
//
//
//  Created by Kenshin Cui on 14-2-23.
//  Copyright (c) 2014年 Kenshin Cui. All rights reserved.
//

#import "AppDelegate.h"

@implementation AppDelegate

- (BOOL)application:(UIApplication *)application didFinishLaunchingWithOptions:(NSDictionary *)launchOptions
{
    return YES;
}

- (void)applicationWillResignActive:(UIApplication *)application
{
    // Sent when the application is about to move from active to inactive state. This can occur for certain types of temporary interruptions (such as an incoming phone call or SMS message) or when the user quits the application and it begins the transition to the background state.
    // Use this method to pause ongoing tasks, disable timers, and throttle down OpenGL ES frame rates. Games should use this method to pause the game.
}

- (void)applicationDidEnterBackground:(UIApplication *)application
{
    // Use this method to release shared resources, save user data, invalidate timers, and store enough application state information to restore your application to its current state in case it is terminated later.
    // If your application supports background execution, this method is called instead of applicationWillTerminate: when the user quits.
}

- (void)applicationWillEnterForeground:(UIApplication *)application
{
    // Called as part of the transition from the background to the inactive state; here you can undo many of the changes made on entering the background.
}

- (void)applicationDidBecomeActive:(UIApplication *)application
{
    // Restart any tasks that were paused (or not yet started) while the application was inactive. If the application was previously in the background, optionally refresh the user interface.
}

- (void)applicationWillTerminate:(UIApplication *)application
{
    // Called when the application is about to terminate. Save data if appropriate. See also applicationDidEnterBackground:.
}

@end
這個類中定義了應用程序生命周期中各個事件的執行方法:
- (BOOL)application:(UIApplication *)application didFinishLaunchingWithOptions:(NSDictionary *)launchOptions;程序啟動之後執行,只有在第一次程序啟動後才執行,以後不再執行;
- (void)applicationWillResignActive:(UIApplication *)application;程序將要被激活時(獲得焦點)執行,程序激活用戶才能操作;
- (void)applicationDidEnterBackground:(UIApplication *)application;程序進入後台後執行,注意進入後台時會先失去焦點再進入後台;
- (void)applicationWillEnterForeground:(UIApplication *)application;程序將要進入前台時執行;
- (void)applicationDidBecomeActive:(UIApplication *)application;程序被激活(獲得焦點)後執行,注意程序被激活時會先進入前台再被激活;
- (void)applicationWillTerminate:(UIApplication *)application;程序在終止時執行,包括正常終止或異常終止,例如說一個應用程序在後太運行(例如音樂播放軟件、社交軟件等)占用太多內存這時會意外終止調用此方法;
為了演示程序的生命周期,不妨在每個事件中都輸出一段內容,簡單調整上面的代碼:
AppDelegate.m
//
//  AppDelegate.m
//  FirstIOS
//
//  Created by Kenshin Cui on 14-2-23.
//  Copyright (c) 2014年 Kenshin Cui. All rights reserved.
//

#import "AppDelegate.h"

@interface AppDelegate ()

@end

@implementation AppDelegate


- (BOOL)application:(UIApplication *)application didFinishLaunchingWithOptions:(NSDictionary *)launchOptions {
    NSLog(@"程序已經啟動...");
    return YES;
}

- (void)applicationWillResignActive:(UIApplication *)application {
    NSLog(@"程序將要失去焦點...");
    // Sent when the application is about to move from active to inactive state. This can occur for certain types of temporary interruptions (such as an incoming phone call or SMS message) or when the user quits the application and it begins the transition to the background state.
    // Use this method to pause ongoing tasks, disable timers, and throttle down OpenGL ES frame rates. Games should use this method to pause the game.
}

- (void)applicationDidEnterBackground:(UIApplication *)application {
    NSLog(@"程序已經進入後台...");
    // Use this method to release shared resources, save user data, invalidate timers, and store enough application state information to restore your application to its current state in case it is terminated later.
    // If your application supports background execution, this method is called instead of applicationWillTerminate: when the user quits.
}

- (void)applicationWillEnterForeground:(UIApplication *)application {
    NSLog(@"程序將要進入前台...");
    // Called as part of the transition from the background to the inactive state; here you can undo many of the changes made on entering the background.
}

- (void)applicationDidBecomeActive:(UIApplication *)application {
    NSLog(@"程序已經獲得焦點...");
    // Restart any tasks that were paused (or not yet started) while the application was inactive. If the application was previously in the background, optionally refresh the user interface.
}

- (void)applicationWillTerminate:(UIApplication *)application {
    NSLog(@"程序將要終止...");
    // Called when the application is about to terminate. Save data if appropriate. See also applicationDidEnterBackground:.
}

-(void)applicationDidReceiveMemoryWarning:(UIApplication *)application{

}

@end
下面是各個不同操作的運行結果:

相信通過上面運行過程大家會對整個運行周期有個大概了解。比較容易混淆的地方就是應用程序進入前台、激活、失去焦點、進入後台,這幾個方法大家要清楚。如果一個應用程序失去焦點那麼意味著用戶當前無法進行交互操作,因此一般會先失去焦點再進入後台防止進入後台過程中用戶誤操作;如果一個應用程序進入前台也是類似的,會先進入前台再獲得焦點,這樣進入前台過程中未完全准備好的情況下用戶無法操作。另外一般如果應用程序要保存用戶數據會在注銷激活中進行(而不是在進入後台方法中進行),因為如果用戶雙擊Home不會進入後台只會注銷激活;如果用戶恢復應用狀態一般在進入激活狀態時處理(而不是在進入前台方法中進行),因為用戶可能是從任務欄直接返回應用,此時不會執行進入前台操作。
當然,上面的事件並不是所有AppDelegate事件,而是最常用的一些事件,其他事件大家可以查閱官方文檔,例如-(void)applicationDidReceiveMemoryWarning:(UIApplication *)application;用於在內存占用過多發出內存警告時調用並通知對應的ViewController調用其內存回收方法。這裡簡單以圖形方式描述一下應用程序的調用過程:

文件結構
這裡對於Xcode默認為我們生產的項目結果文件做一下簡單介紹:
- AppDelegate(.h/.m):應用程序代理,主要用於監聽整個應用程序生命周期中各個階段的事件;
- ViewController(.h/.m):視圖控制器,主要負責管理UIView的生命周期、負責UIView之間的切換、對UIView事件進行監聽等;
- Main.storyboard:界面布局文件,承載對應UIView的視圖控件;
- Images.xcassets:應用程序圖像資源文件;
- Info.plist:應用程序配置文件;
- main.m:應用程序入口函數文件;
- xxx-prefix.pch:項目公共頭文件,此文件中的導入語句在編譯時會應用到所有的類文件中,相當於公共引入文件(注意在Xcode6中沒有提供此文件)
Images.xcassets
關於AppDelegate、main.m前面已經介紹過了,ViewController和Main.storyboard在後面介紹,這裡先說一下Image.xcassets文件。在Xcode中打開這個文件會發現裡面有兩個設置項:AppIcon和LaunchImage

AppIcon
在AppIcon中可以看到三個圖標設置,當我們勾選了右側ios6.1 and Prior Sizes或者其他選項這個圖標會自動增多,也就是說可以設計的圖標跟應用程序准備支持的設備系統有關,這裡我們就以默認的ios7為例(現在基本上設備都升級到ios7了):
a.iPhone Spotlight-iOS5,6 Settings-iOS 5-7 29pt:用於設置iOS5或者iOS6的搜索圖標以及iOS5、iOS6、iOS7的設置圖標,大小是58*58。
iOS搜索圖標:
![]()
iOS設置圖標:

b.iPhone Spootlight iOS 7 40pt:設置iOS7的搜索圖標,大小是80*80。具體參見上圖。
c.iPhone App iOS7 60pt:設置iOS7的應用圖標,大小是120*120。
iOS應用圖標:

LaunchImage
在LaunchImage中兩個圖標設計主要用於豎屏啟動圖
a.iPhone Portraint iOS7 2x:大小為640*1136的啟動圖片;
b.iPhone Portraint iOS7 R4:大小為640*960的啟動圖片;
其實上面的圖片並不是所有圖片都必須設置,具體要求可以直接查看蘋果官方要求,例如這裡我們設置應用圖標和R4啟動圖片後具體效果如下(這裡使用的圖標取材來自微信):


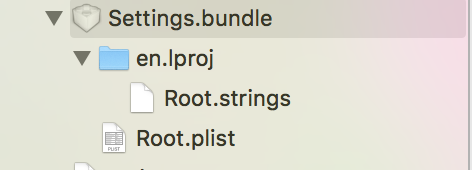
上面我們添加了一個應用圖標和一個啟動圖片,在Images.xcassets上右鍵在Fiddler中查看文件內容並進入Images.xcassets文件夾,可以看到兩個子文件夾:AppIcon.appiconset和LaunchImage.launchimage,如下圖:

兩個文件夾中分別存放了我們前面設置的圖片資源,除此之外還各有一個Contents.json文件,在這個文件中記錄的資源信息,例如AppIcon.appiconset文件夾中的Contents.json內容如下,這裡記錄了每個圖標的大小名稱等信息:

Info.plist
Info.plist文件記錄了應用程序的配置信息,如下圖:

其實這些信息我們可以在項目屬性中進行配置,效果和編輯這個文檔是一樣的,大家可以對照查看:

Storyboard
到目前為止我們還沒有解釋我們的程序是如何顯示默認視圖界面的。做過WinForm程序的朋友都知道每個Window窗口界面都有一個設計器(對應一個設計文件),其實在IOS中也可以通過設計工具設計界面不用編寫代碼,這個工具就是Interface Builder。用Interface Builder編輯的文件在iOS5之前是一個“.xib”文件,從IOS5開始進行了改進,使用“.storyboard”文件進行設計。其實在上面我們已經看到這個文件,這裡重點說明一下Storyboard文件的使用。
首先我們打開Main.storyboard,此時可以看到一個Interface Builder界面設計器出現在我們眼前:
vcnlib2FyZA==" border="0" src="/uploadfile/Collfiles/20160427/20160427092754623.png" title="storyboard" />
在這個界面中整個核心就是右側視圖控制器ViewController,在ViewController中有一個視圖UIView,這個視圖用來放置其他用戶操作控件。視圖控制器左側的箭頭表示這個視圖控制器是個主視圖控制器,程序啟動之後默認就會直接顯示這個視圖控制器的視圖。我們可以在項目屬性中通過修改“Main Interface”屬性來修改主視圖控制器。
這裡我們不妨從Xcode右側工具欄Object Library中拖放一些組件在上面簡單完成一個登錄布局。

要實現這個登錄,那麼接下來就是事件和屬性綁定的問題,大家應該可以猜到登錄的邏輯代碼肯定在ViewController.m中編寫,那麼storyboard文件是如何關聯到這個類的呢?如果我們在storyboard界面選中ViewController在Xcode右側切換到Identity Inspector視圖就會發現裡面當前設置的是ViewController類,通過這個設置Main.storyboard和ViewController關聯在一起。
那麼如何在代碼中讀取兩個TextField的值並通過點擊按鈕觸發相關事件驗證登錄合法性呢?要想在代碼中使用UITextField,並且添加按鈕點擊事件,則必須在ViewController.h中定義兩個UITextField屬性和一個登錄方法。

上面代碼我們需要解釋一下IBOutlet、IBAction,其余代碼和我們之前寫的ObjC沒有任何區別。
- IBOutlet:IBOutlet沒有做任何操作,它的唯一作用就是告訴Interface Builder這個屬性可以被關聯到其中某個控件(在代碼中可以看到代碼前面多了空心圓點)。
- IBAction:其實就是void,只是當你定義為IBAction在Interface Builder中可以關聯到某個控件的事件方法(後面的關聯操作將會看到,而且我們在代碼中也可以看到代碼前面多了空心圓點);
下面看一下storyboard中的控件和代碼中定義的屬性和事件如何關聯。Xcode為我們提供了幾種方式來實現代碼和storyboard控件的關聯:
1.拖拽控件到代碼中(首先點擊Xcode右上方“Show the Assistant editor”切換對應視圖,然後在代碼中打開.h文件,同時打開Interface Builder,按住ctrl鍵拖拽控件到代碼中相應的位置進行關聯),關聯後屬性或方法前的空心圓變成實心表示已經關聯到具體控件(注意:事實上,從控件拖拽到代碼時如果代碼中沒有定義對應的屬性和方法Interface Builder會自動生成代碼)。

2.從控件場景中拖拽控件到代碼,關聯後屬性或方法前的空心圓變成實心表示已經關聯到具體控件。(在Interface Builder中點擊左下角“Show Document outline”顯示控件結構樹,選中相應的控件按住Ctrl鍵拖拽到代碼中的屬性或方法上)

3. 在控件上右鍵找到對應的屬性或方法關聯到代碼中對應的屬性或方法即可,關聯後屬性或方法前的空心圓變成實心表示已經關聯到具體控件。

4.與方法3類似,不再截圖,只是通過View Control Scene中的控件右鍵來關聯,關聯後屬性或方法前的空心圓變成實心表示已經關聯到具體控件。(在Interface Builder中點擊左下角Show Document outline顯示控件結構樹,選中相應的控件右鍵拖拽到代碼中的屬性或方法上)
5.對於前面幾種方法其實我們還可以直接從代碼拖拽到控件上面,這裡簡單演示一種,其他情況大家可以自己試驗。

如果要刪除關聯,可以采用第三、第四種方式在控件上右鍵,在關聯菜單中找到對應的關聯刪除即可。此外需要注意對於一個控件而言可能有多個事件,當我們使用第三種或第四種方式直接選擇具體某個事件關聯到login:方法自然沒有問題,但是第一、第二、第五種方式沒有提示我們關聯到哪個事件而是使用一個控件的默認事件(對於UIButton就是Touch Up Inside事件)。
既然控件和代碼屬性或方法已經做了關聯,這裡我們看一下具體效果,這裡簡單修改一下ViewController.m
//
//  ViewController.m
//  FirstIOS
//
//  Created by Kenshin Cui on 14-2-23.
//  Copyright (c) 2014年 Kenshin Cui. All rights reserved.
//

#import "ViewController.h"

@interface ViewController ()

@end

@implementation ViewController

- (void)viewDidLoad {
    [super viewDidLoad];
    // Do any additional setup after loading the view, typically from a nib.
}

- (void)didReceiveMemoryWarning {
    [super didReceiveMemoryWarning];
    // Dispose of any resources that can be recreated.
}

-(void)login:(UIButton *)btn{
    if ([_phoneNumber.text isEqual:@"123"]&&[_password.text isEqual:@"456"]) {
        NSLog(@"登錄成功!");
    }
}

@end
這裡實現了login:方法模擬登錄的過程,可以發現當在手機號碼中輸入“123”,在密碼中輸入“456”點擊登錄會輸出”登錄成功!“。
純代碼實現iOS開發
storyboard進行界面設計固然不錯,特別是對於初學者經常會使用設計器進行界面設計,但是實際開發過程中我們很多情況下會直接使用代碼進行界面布局,特別是對於復雜的界面布局更是如此。下面我們就從一個空項目建立一個類似於前面的登錄界面。
直接在Xcode中創建“Empty Application”(注意在Xcode6中這個選項已經沒有了,這裡采用Xcode5.1),此時會發現已經沒有ViewController和storyboard文件,我們需要手動創建一個視圖控制器(在項目中右鍵選擇Objective-c class,默認繼承自UIViewController,輸入類名:KCMainViewController即可)。
新建的視圖控制器默認情況下是無法加載到程序運行界面上的,此時需要在應用程序代理的程序加載完畢事件中手動加載並顯示我們的視圖。修改之前KCAppDelegate.m代碼如下:
//  KCAppDelegate.m
//  IOSByCode
//
//  Created by Kenshin Cui on 14-2-23.
//  Copyright (c) 2014年 Kenshin Cui. All rights reserved.
//

#import "KCAppDelegate.h"

@implementation KCAppDelegate

- (BOOL)application:(UIApplication *)application didFinishLaunchingWithOptions:(NSDictionary *)launchOptions
{
    self.window = [[UIWindow alloc] initWithFrame:[[UIScreen mainScreen] bounds]];
    // Override point for customization after application launch.
    self.window.backgroundColor = [UIColor whiteColor];
    [self.window makeKeyAndVisible];
    return YES;
}

- (void)applicationWillResignActive:(UIApplication *)application
{
    // Sent when the application is about to move from active to inactive state. This can occur for certain types of temporary interruptions (such as an incoming phone call or SMS message) or when the user quits the application and it begins the transition to the background state.
    // Use this method to pause ongoing tasks, disable timers, and throttle down OpenGL ES frame rates. Games should use this method to pause the game.
}

- (void)applicationDidEnterBackground:(UIApplication *)application
{
    // Use this method to release shared resources, save user data, invalidate timers, and store enough application state information to restore your application to its current state in case it is terminated later.
    // If your application supports background execution, this method is called instead of applicationWillTerminate: when the user quits.
}

- (void)applicationWillEnterForeground:(UIApplication *)application
{
    // Called as part of the transition from the background to the inactive state; here you can undo many of the changes made on entering the background.
}

- (void)applicationDidBecomeActive:(UIApplication *)application
{
    // Restart any tasks that were paused (or not yet started) while the application was inactive. If the application was previously in the background, optionally refresh the user interface.
}

- (void)applicationWillTerminate:(UIApplication *)application
{
    // Called when the application is about to terminate. Save data if appropriate. See also applicationDidEnterBackground:.
}

@end
我們修改上面- (BOOL)application:(UIApplication *)application didFinishLaunchingWithOptions:(NSDictionary *)launchOptions的代碼如下:
- (BOOL)application:(UIApplication *)application didFinishLaunchingWithOptions:(NSDictionary *)launchOptions
{
    //設置window屬性(在KCAppDelegate中定義的window屬性),初始化windows的大小和位置
    self.window = [[UIWindow alloc] initWithFrame:[[UIScreen mainScreen] bounds]];
    // Override point for customization after application launch.
    //設置window的背景
    self.window.backgroundColor = [UIColor whiteColor];

    //初始化KCMainViewController
    KCMainViewController *mainController=[[KCMainViewController alloc]init];
    //設置自定義控制器的大小和window相同,位置為(0,0)
    mainController.view.frame=self.window.bounds;
    //設置此控制器為window的根控制器
    self.window.rootViewController=mainController;

    //設置window為應用程序主窗口並設為可見
    [self.window makeKeyAndVisible];
    return YES;
}
然後在我們自定義的KCMainViewController.m中添加一個UIImageView、兩個控件UITextField和一個UIButton控件,並且實現具體的登錄方法。
KCMainViewController.h
// // KCMainViewController.h // IOSByCode // // Created by Kenshin Cui on 14-2-23. // Copyright (c) 2014年 Kenshin Cui. All rights reserved. // #import@interface KCMainViewController : UIViewController #pragma mark logo @property (nonatomic,strong) UIImageView *logo; #pragma mark 手機號碼 @property (nonatomic,strong) UITextField *phoneNumber; #pragma mark 密碼 @property (nonatomic,strong) UITextField *password; #pragma mark 登錄按鈕 @property (nonatomic,strong) UIButton *loginButton; #pragma mark 點擊事件 -(void)login:(UIButton *)btn; @end
KCMainViewController.m
//
// KCMainViewController.m
// IOSByCode
//
// Created by Kenshin Cui on 14-2-23.
// Copyright (c) 2014年 Kenshin Cui. All rights reserved.
//
#import "KCMainViewController.h"
@interface KCMainViewController ()
@end
@implementation KCMainViewController
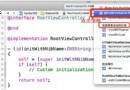
- (id)initWithNibName:(NSString *)nibNameOrNil bundle:(NSBundle *)nibBundleOrNil
{
self = [super initWithNibName:nibNameOrNil bundle:nibBundleOrNil];
if (self) {
// Custom initialization
}
return self;
}
- (void)viewDidLoad
{
[super viewDidLoad];
// Do any additional setup after loading the view.
//self.view.backgroundColor=[UIColor redColor];
//添加圖片
CGRect logoRect=CGRectMake(100, 50, 100, 200);
_logo=[[UIImageView alloc]initWithImage:[UIImage imageNamed:@"LoginBackground.png"]];//設置圖片
_logo.contentMode=UIViewContentModeScaleAspectFit;//設置內容填充模式
_logo.frame=logoRect;//設置控件大小和位置(相對於父控件的位置)
[self.view addSubview:_logo];//添加到KCMainViewController的View中
//添加手機號碼輸入框
CGRect phoneNumberRect=CGRectMake(20, 320, 280, 30);
_phoneNumber=[[UITextField alloc]initWithFrame:phoneNumberRect];
_phoneNumber.borderStyle=UITextBorderStyleRoundedRect;//設置文本框的邊框樣式
[self.view addSubview:_phoneNumber];
//添加密碼輸入框
CGRect passwordRect=CGRectMake(20, 380, 280, 30);
_password=[[UITextField alloc]initWithFrame:passwordRect];
_password.borderStyle=UITextBorderStyleRoundedRect;
[self.view addSubview:_password];
//添加登錄按鈕
CGRect loginButtonRect=CGRectMake(10, 440, 300, 25);
_loginButton=[[UIButton alloc]initWithFrame:loginButtonRect];
[_loginButton setTitleColor:[UIColor blueColor] forState:UIControlStateNormal];//設置標題內容顏色
[_loginButton setTitle:@"登錄" forState:UIControlStateNormal];//設置按鈕標題
[_loginButton addTarget:self action:@selector(login:) forControlEvents:UIControlEventTouchUpInside];//添加點擊事件
[self.view addSubview:_loginButton];
}
- (void)didReceiveMemoryWarning
{
[super didReceiveMemoryWarning];
// Dispose of any resources that can be recreated.
}
-(void)login:(UIButton *)btn{
if ([_phoneNumber.text isEqual:@"123"]&&[_password.text isEqual:@"456"]) {
NSLog(@"登錄成功!");
}else{
NSLog(@"登錄失敗!");
}
}
@end
運行效果如下,與之前使用storyboard創建的界面類似,同時也能點擊登錄:

UIView
在這裡我們需要對上面的代碼一樣解釋,在弄清上面的代碼之前我們不得不熟悉一個UIKit中最重要的類UIView。
- UIView就是指界面可見的控件元素,所有的控件最終都繼承自UIView,UIView中還可以添加其他UIView(通過addSubView方法);
- 在一個iOS應用中必須有一個主窗口UIWindow(理論上也可以有多個UIWindow但是只有一個是主Window,而且只有主Window可以和用戶交互),UIWindow也是繼承自UIView,它擁有UIView的所有屬性、方法;
- 在UIWindow中必須有一個根控制器,這個控制器距離UIWindow是最近的;設置一個控制器為根控制器和直接通過addSubView添加控制器的視圖(view屬性)到window並不完全一樣(例如如果僅僅添加控制器視圖那麼應用雖然可以顯示但是不支持旋轉);
- UIViewController是視圖控制器,主要用來控制UIView,在UIViewController內部有一個UIView(view屬性);
在上面的代碼中我們首先在應用程序加載完畢之後加載一個UIWindow對象,同時把我們的視圖控制器KCMainController設置為UIWindow的根視圖控制器,然後設置這個UIWindow為主窗口並可見。當主窗口設置為可見過程中會調用視圖控制器的loadView方法來加載視圖(注意視圖控制器的loadView方法是延遲加載的,第一次調用視圖控制器的view屬性才會調用此方法;由於makeKeyAndVisible方法中會使用視圖控制器的view屬性所以此時會調用視圖控制器的loadView方法),視圖加載完之後調用viewDidLoad方法,在這個方法中我們添加登錄相關控件並將這些控件加載到視圖控制器KCMainViewController的視圖view中。
下面我們看一下應用程序最終的布局,相信通過這張圖大家對於iOS的布局會有一個大致了解:

補充知識點
1.iOS尺寸設置--在iOS中尺寸的單位是點不是像素,在retina屏幕中一個點有兩個像素。此外在retina屏幕中圖片一般采用”[email protected]”命名,在代碼中使用時只需要寫成“xxx.png”程序會自動根據屏幕類型在retain屏幕下使用”[email protected]”圖片,在非retain屏幕下采用”xxx.png”圖片。

2.應用程序圖像資源尺寸--其實關於圖片尺寸規定我們可以直接查看Xcode自帶幫助文檔,例如可以查看“Icon and Image Sizes”一節獲得圖片大小說明:

關於iOS圖標命名這裡不再贅述,蘋果官方也給出了具體的代碼示例:Application Icons and Launch Images for iOS
3.模擬器文件存儲的位置--模擬器中為什麼可以運行我們的程序,程序到底在什麼位置?
這些文件其實在Mac中 OS X中是隱藏的,首先通過“defaults write com.apple.finder AppleShowAllFiles -bool true”命令顯示隱藏文件(關閉隱藏文件顯示通過“defaults write com.apple.finder AppleShowAllFiles -bool false”命令),然後到“/Users/kenshincui/Library/Application Support/iPhone Simulator/7.1/Applications”文件夾中會看到很多GUID命名的文件夾,只要一個一個查看就可以找到我們的程序。模擬器運行時會加載這個文件夾中的應用程序包顯示到模擬器中。

可以看到在上圖中有一個IOSByCode的應用程序包,我們可以通過“顯示包內容”查看具體程序資源:
4.UIApplication--前面一直提到UIApplication對象,這個對象在iOS中是一個單例,我們通過[UIApplication sharedApplication]獲得(注意在iOS開發中一般以shared開頭的對象都是單例)。這裡列舉一些UIApplication的常用方法:

例如調用applicationIconBadgeNumber方法之後效果如下:

5.組織標示--前面我們在新建項目中有一個“Organization Identifier”是做什麼的呢?它是組織唯一標示,一般我們會使用公司的域名形式(這個域名一般會倒序書寫,例如公司域名為:www.cmjstudio.com,我們這裡就寫成com.cmjstudio),和項目名稱共同組成一個程序的唯一標示“Bundle Identifier”,這個標示在整個App Store中是唯一的,如果兩個應用程序標示完全一樣,那麼安裝時會先卸載前面的程序再安裝新程序。
- 上一頁:iOS基礎學習總結(OC基礎總結)
- 下一頁:iOS基礎筆記